Set up Mercury payments
Decide how Mercury payments work for your team before anyone pays a supplier: which account pays, who approves, and which methods are allowed. All of it is on the Mercury page's Settings tab, except the permissions, which are in Settings → Roles.
Before you begin
- Connect Mercury.
- You need the Integrations → Edit permission to change these settings, and permission to edit roles to change who can pay and approve.
Open the payment settings
- Go to Apps & Integrations → All Integrations, choose Mercury under Bill Payments, and open your connection.
- Click the Settings tab. The Payment Settings card is below the Connection card.
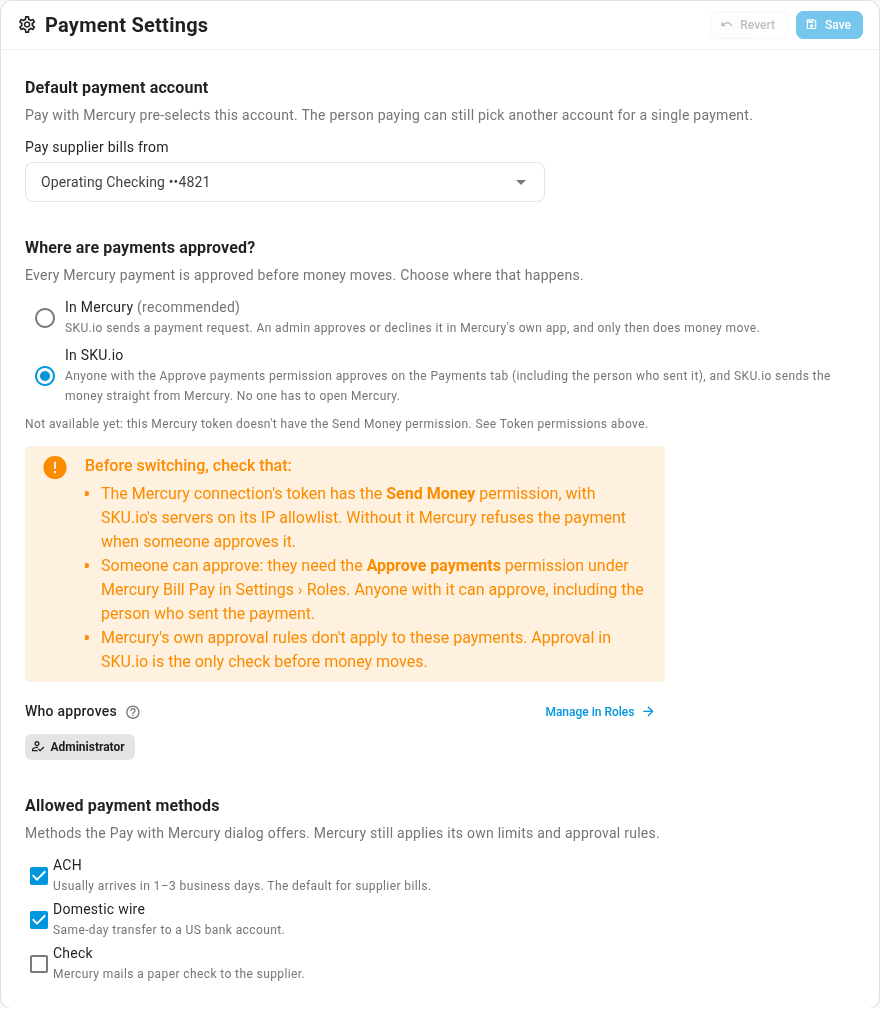
Change what you need, then click Save. Revert puts back the last saved settings. Unsaved changes shows beside the buttons until you save.
Choose the default payment account
- In Pay supplier bills from, choose the account. You can search by name, type or the last four digits.
The Pay with Mercury dialog starts on this account, and the person paying can still pick another one for a single payment. If you choose an account that isn't a checking account, SKU.io warns you: supplier bills are usually paid from operating checking.
Choose where payments are approved
- Under Where are payments approved?, choose In Mercury or In SKU.io.
| Option | What happens |
|---|---|
| In Mercury (recommended) | SKU.io sends a payment request. An admin approves or declines it in Mercury's own app, and only then does money move |
| In SKU.io | Anyone with the Approve payments permission approves on the Payments tab, including the person who sent it, and SKU.io sends the money straight from Mercury. No one has to open Mercury |
In SKU.io needs more from your Mercury token. Before you switch, check that:
- The connection's token has Mercury's Send Money permission, with SKU.io's servers on its IP allowlist. Without it, Mercury refuses the payment when someone approves it. If the token doesn't have it, the option is unavailable and the page says why. See Check the token's permissions.
- Someone can approve: they need Approve payments (below).
- You're comfortable that Mercury's own approval rules don't apply to these payments. Approval in SKU.io is the only check before money moves.
With In SKU.io selected, Who approves lists everyone who can approve. Manage in Roles takes you to Settings → Roles to change it.
Choose the allowed payment methods
- Under Allowed payment methods, tick each method the Pay with Mercury dialog should offer.
| Method | Timing |
|---|---|
| ACH | Usually arrives in 1–2 business days. The default for supplier bills |
| Domestic wire | Same-day transfer to a US bank account |
| Check | Mercury mails a paper check to the supplier |
Keep at least one method ticked. Mercury still applies its own limits and approval rules.
Give people permission to pay and approve
- Go to Settings → Users & Permissions → Roles and edit a role.
- Under Mercury Bill Pay, tick what the role can do:
- Send payments: pay bills and deposits with Mercury, record bank transactions, and add Mercury recipients. It doesn't include approving.
- Approve payments: approve Mercury payments that wait for approval in SKU.io, which sends the money. This includes payments the person sent themselves.
- Save the role.
Administrators can always send and approve.
Open bills on Pay with Mercury by default
When you pay a bill, the Pay dialog opens on the tab your team uses most. To make that Pay with Mercury:
- Go to Settings → Purchasing → Payment Approvals.
- In the Supplier Bills card, under Paying bills, set Default payment method to Pay with Mercury.
- Click Save.
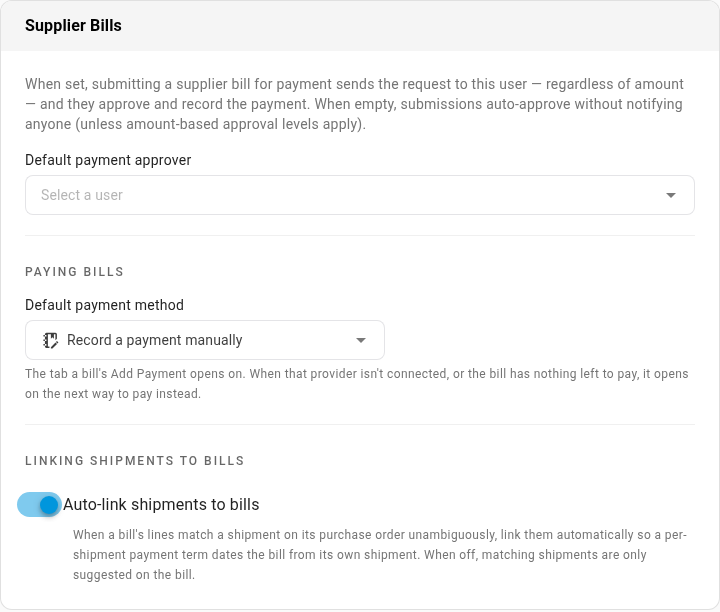
If Mercury isn't connected, or the bill has nothing left to pay, the dialog opens on the next way to pay instead.