Send stock to AWD from the inbound wizard
Video chapters
- 0:00 Open AWD Inbound Orders
- 0:38 Choose the source
- 0:57 Import a purchase order
- 1:10 Review the cases
- 1:21 Verify the stock
- 1:51 Confirm on Amazon
- 2:15 Send labels to the supplier
- 2:26 Add the carrier
- 2:39 Finish in Seller Central if you need to
- 2:50 Start from a purchase order
The inbound wizard builds an Amazon Warehousing and Distribution (AWD) inbound order inside SKU.io. You choose where the stock ships from and what to send, Amazon checks each case group, and you confirm the order, print labels and add the carrier without leaving SKU.io. AWD takes whole cases, and Amazon picks the warehouse.
Before you begin
- Your Amazon connection is enrolled in AWD and has an AWD warehouse in SKU.io. See Track AWD inventory.
- You have the Integrations → Edit permission.
- Each product is listed on Amazon US with a merchant SKU (MSKU), and has a case pack, case dimensions and case weight. You can add case details from the wizard.
- The warehouse the stock ships from has a complete address.
Start from the Inbound Orders tab
-
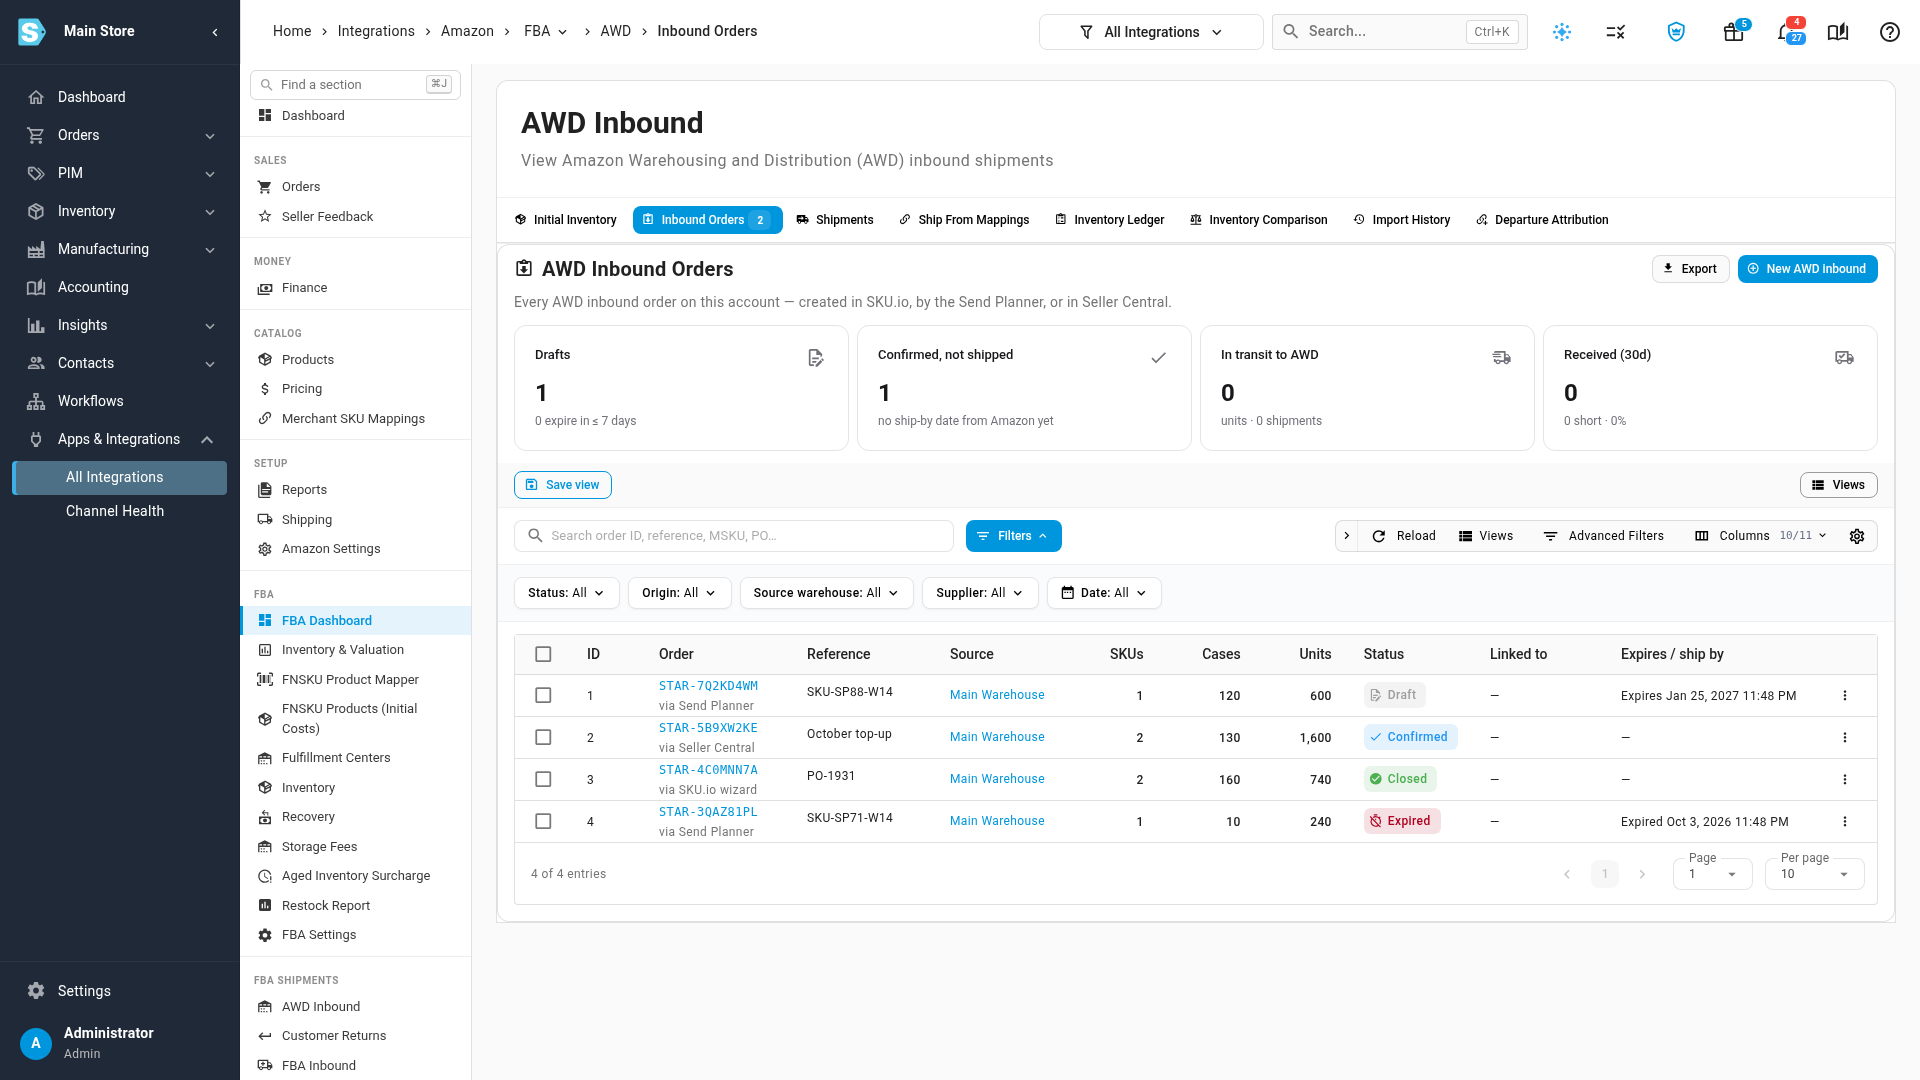
Go to Apps & Integrations, open your Amazon connection, and click AWD Inbound.
-
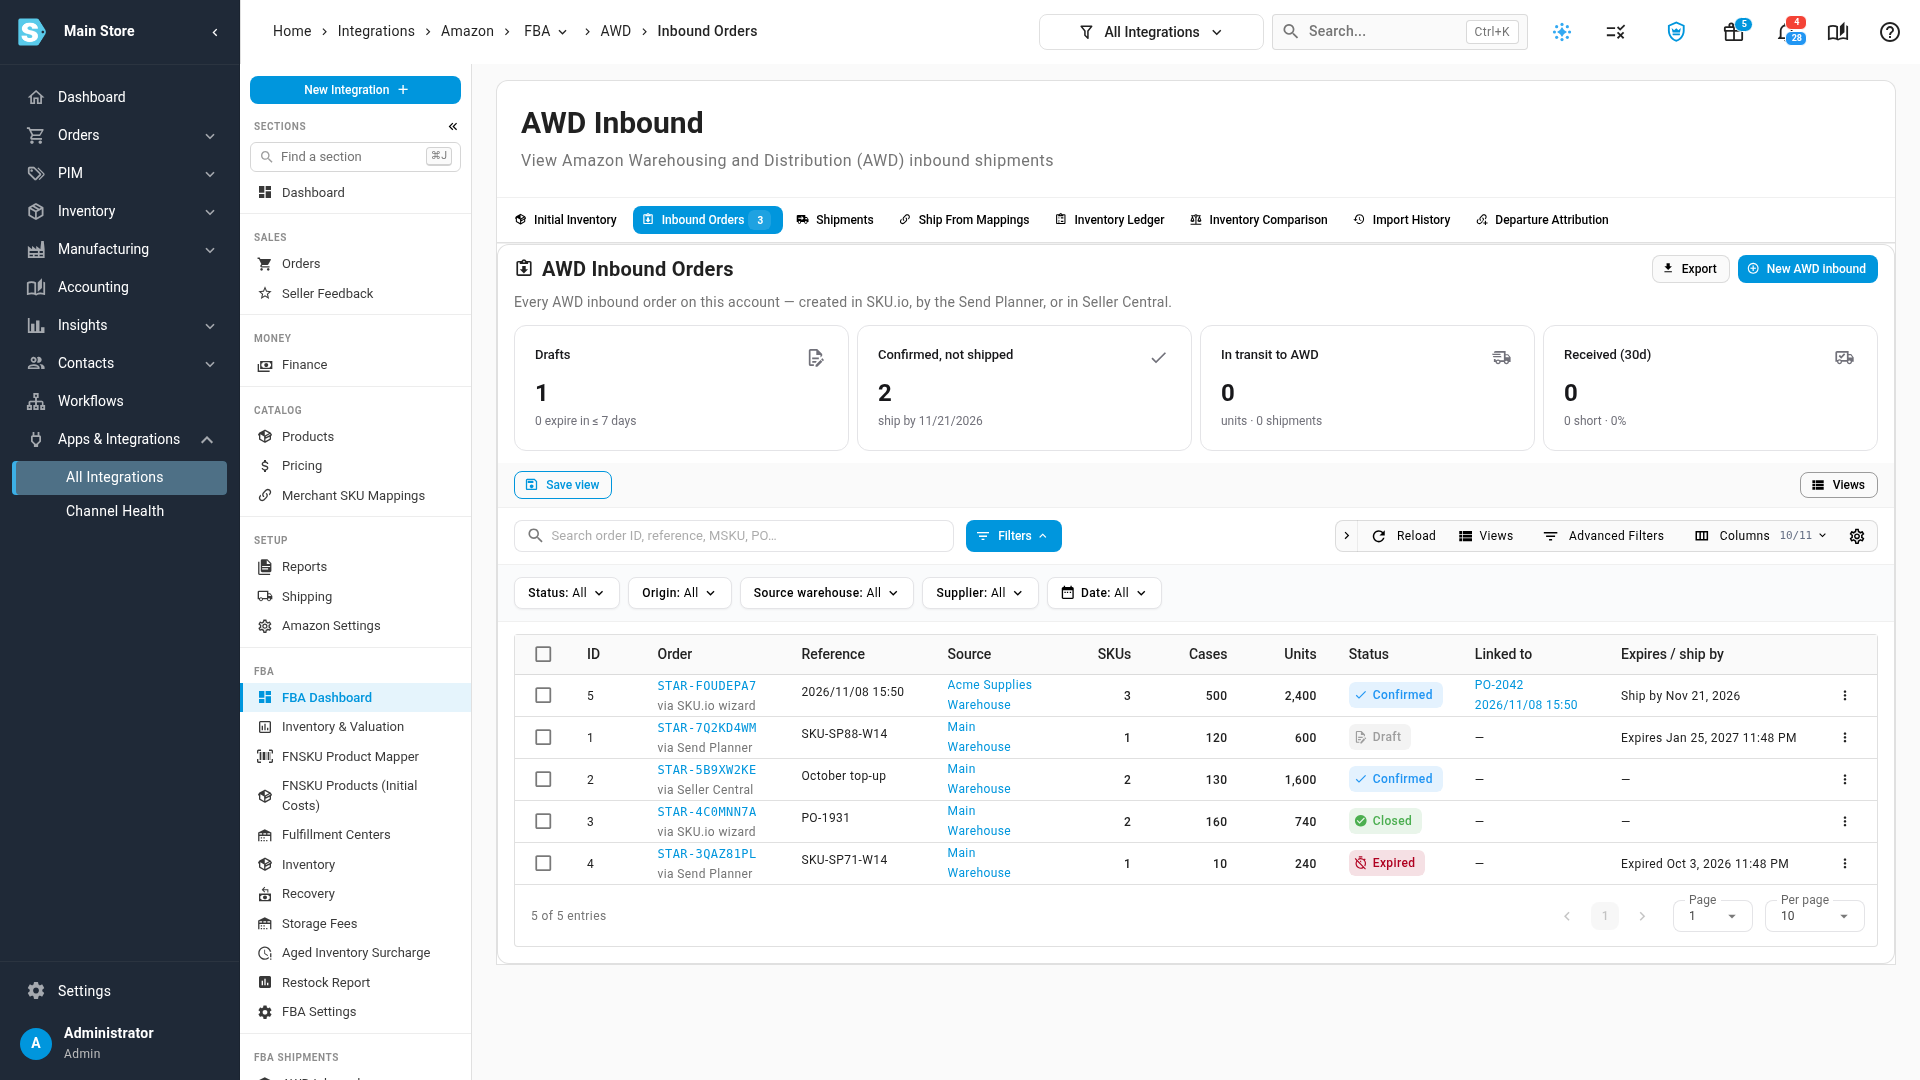
Click the Inbound Orders tab. It lists every AWD inbound order on the account. Under the order number, each row says where the order came from: via SKU.io wizard, via Send Planner or via Seller Central.
-
Click New AWD inbound. The Create New Inbound Plan page opens with AWD already chosen.
Choose the destination and the source
-
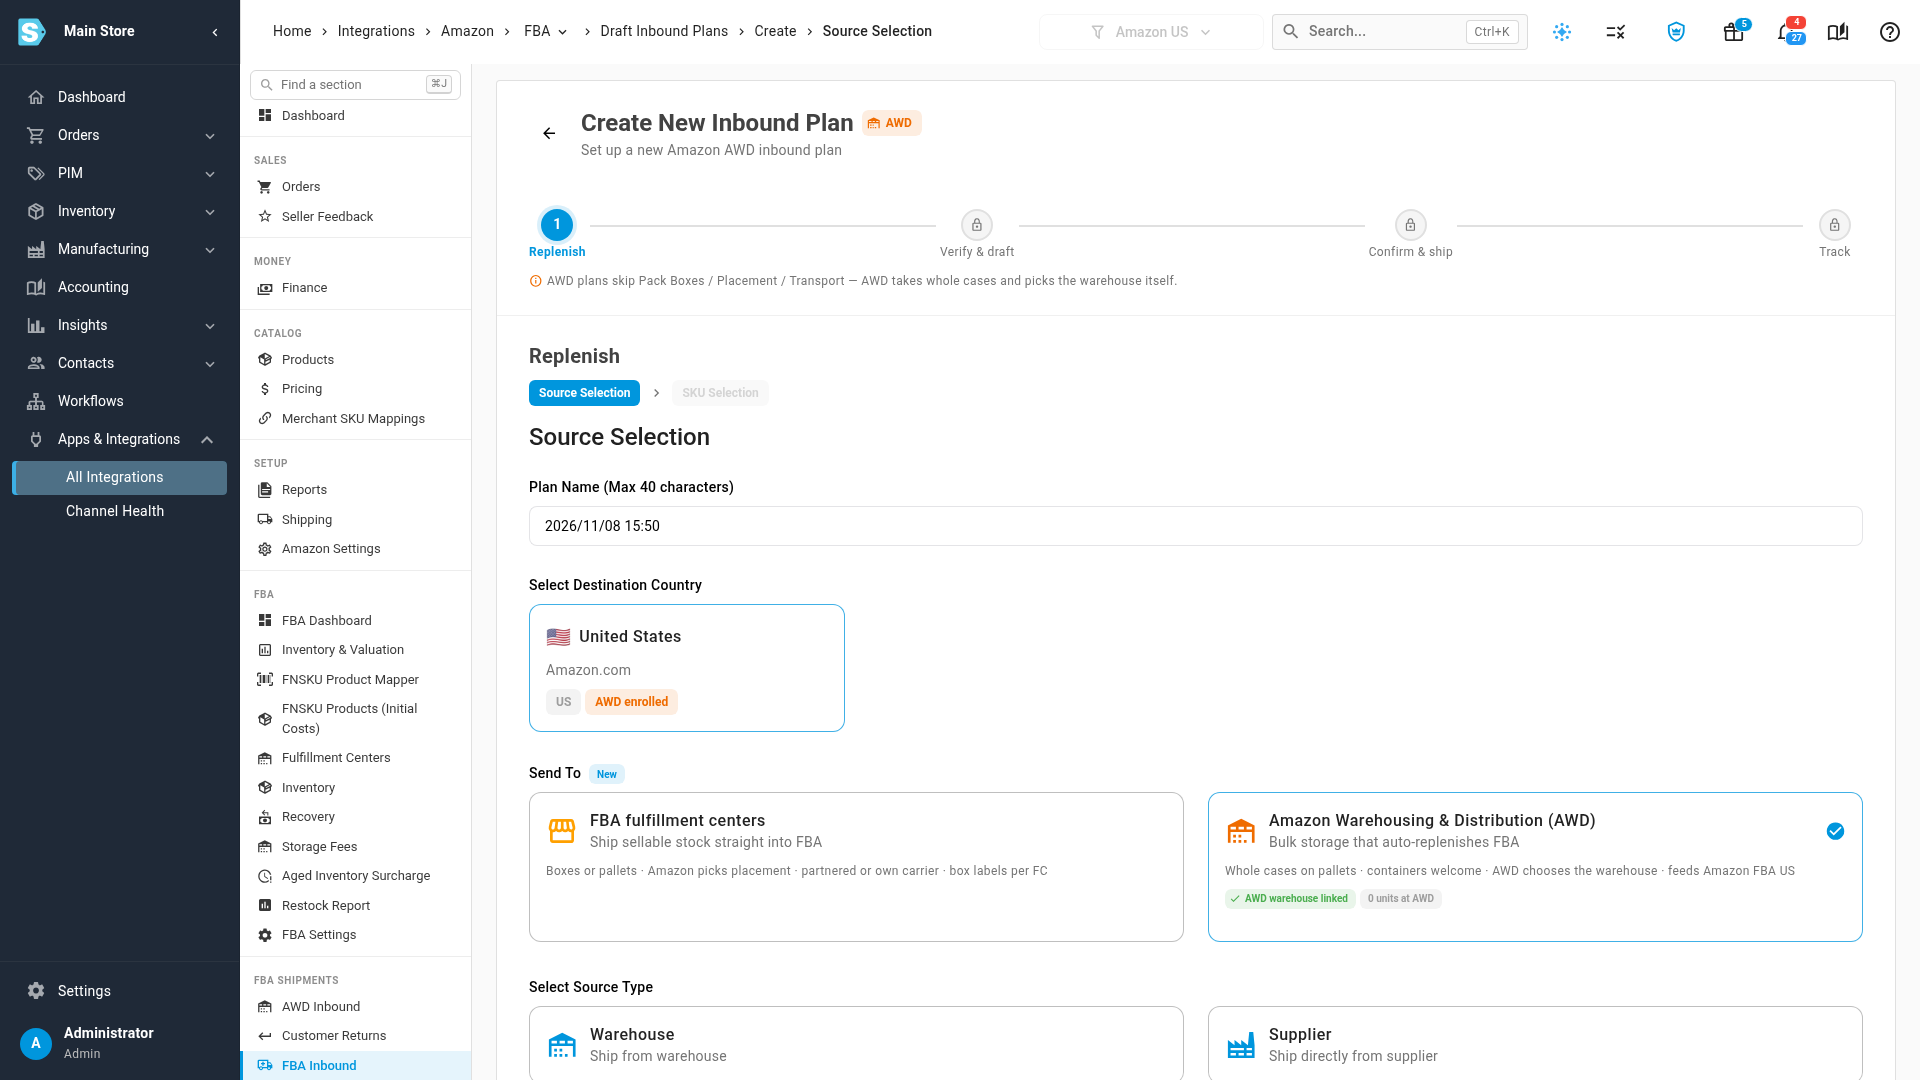
Keep the name in Plan Name (Max 40 characters), or type your own.
-
Under Select Destination Country, click United States. AWD isn't available for every marketplace. When it isn't, the AWD card is greyed out, a note below the cards says why (for example, "AWD isn't available for Amazon CA."), and the plan becomes an FBA plan.
-
Under Send To, check that Amazon Warehousing & Distribution (AWD) is selected and shows AWD warehouse linked.
-
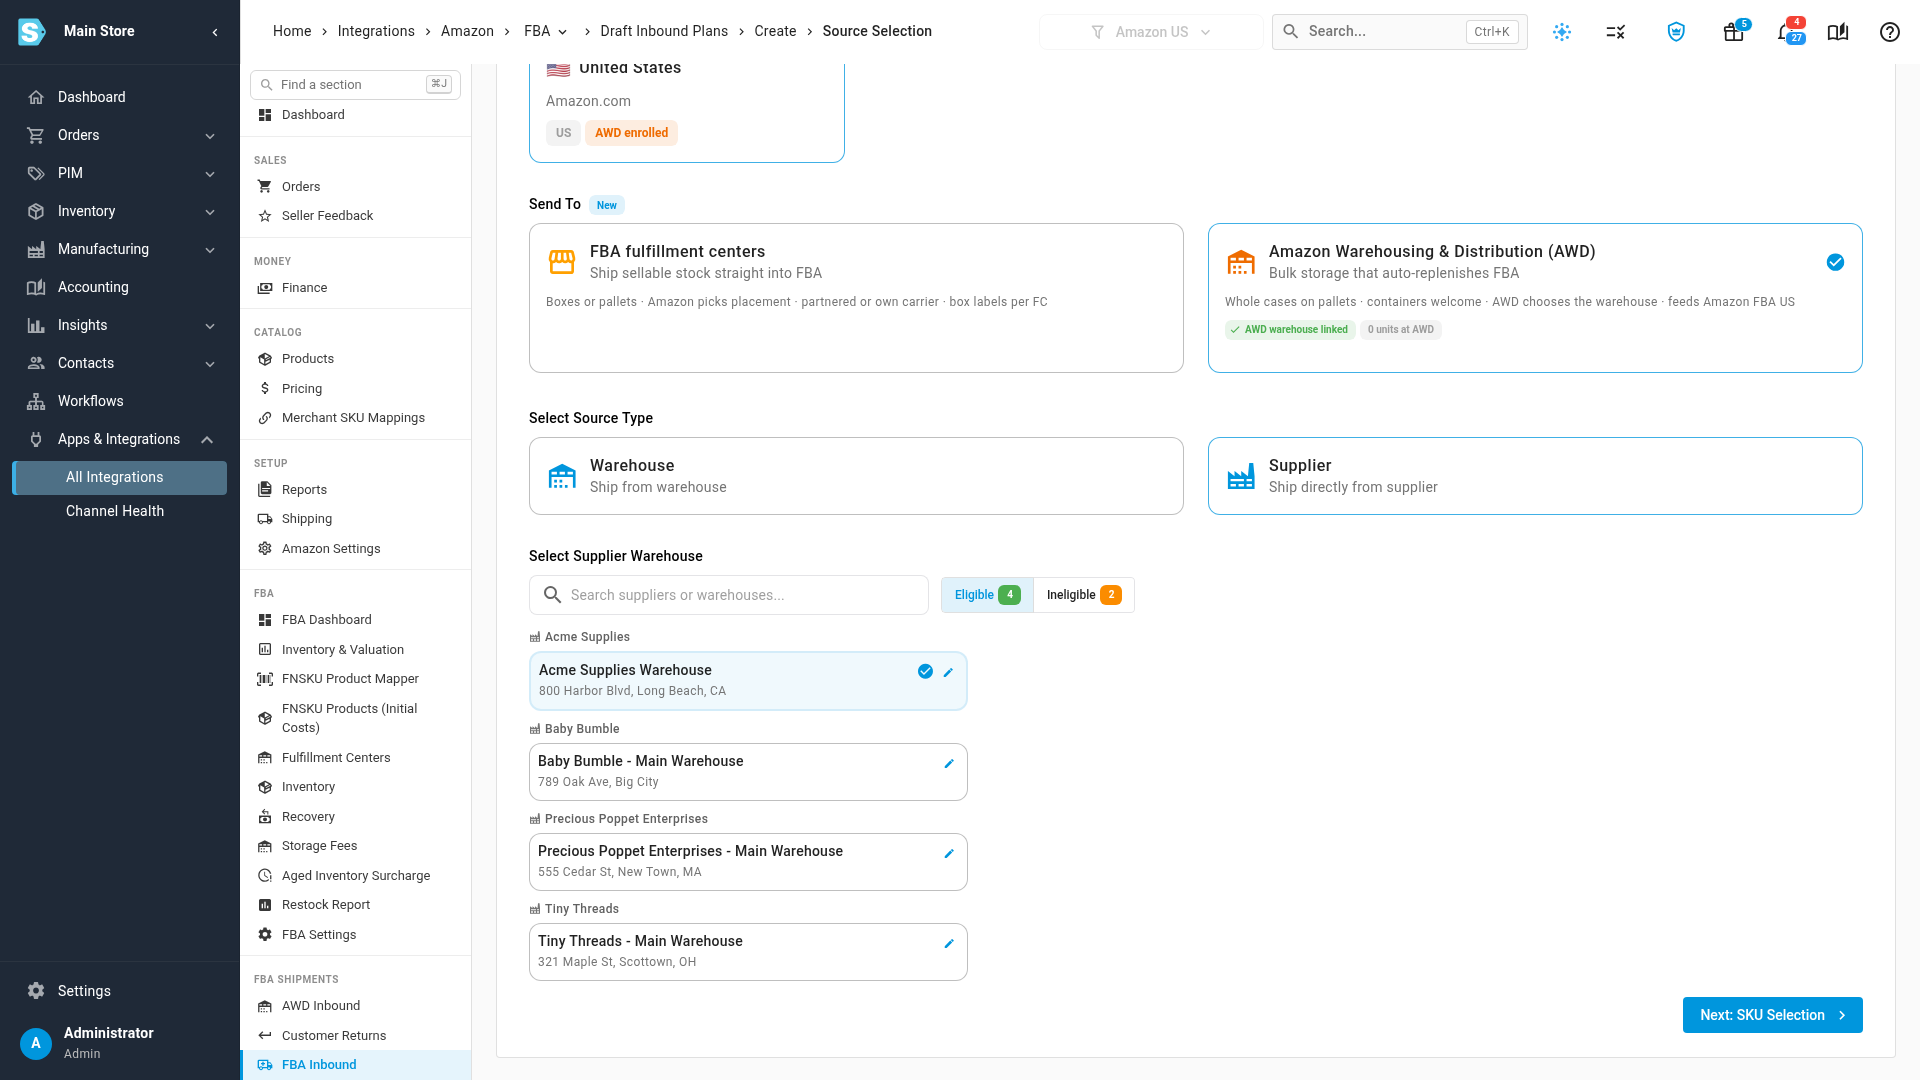
Under Select Source Type, choose where the stock ships from:
- Supplier: stock that ships straight from a factory or vendor. Pick the supplier's warehouse.
- Warehouse: your own stock. Click Direct Warehouse or 3PL Warehouse, then pick the warehouse.
-
Click Next: SKU Selection. SKU.io creates the plan.
Add what you're sending
Add the SKUs one of two ways:
-
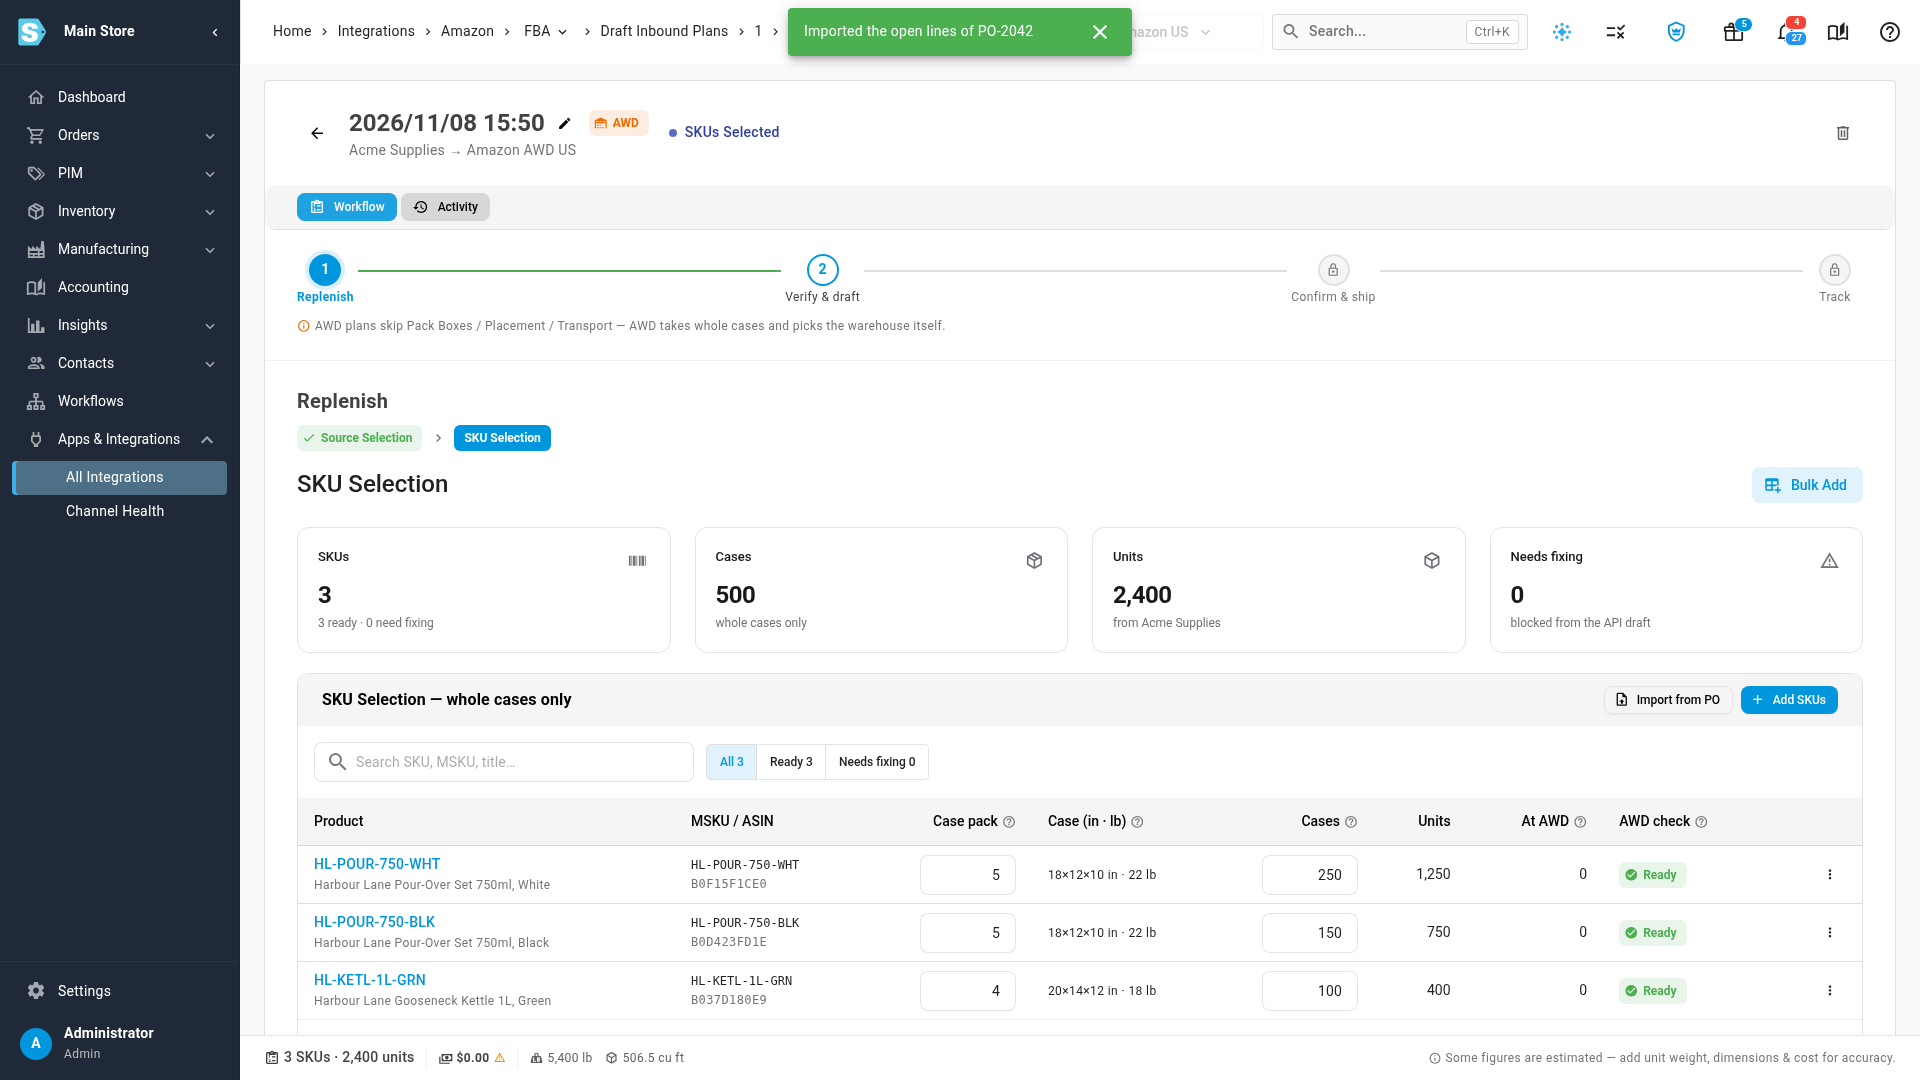
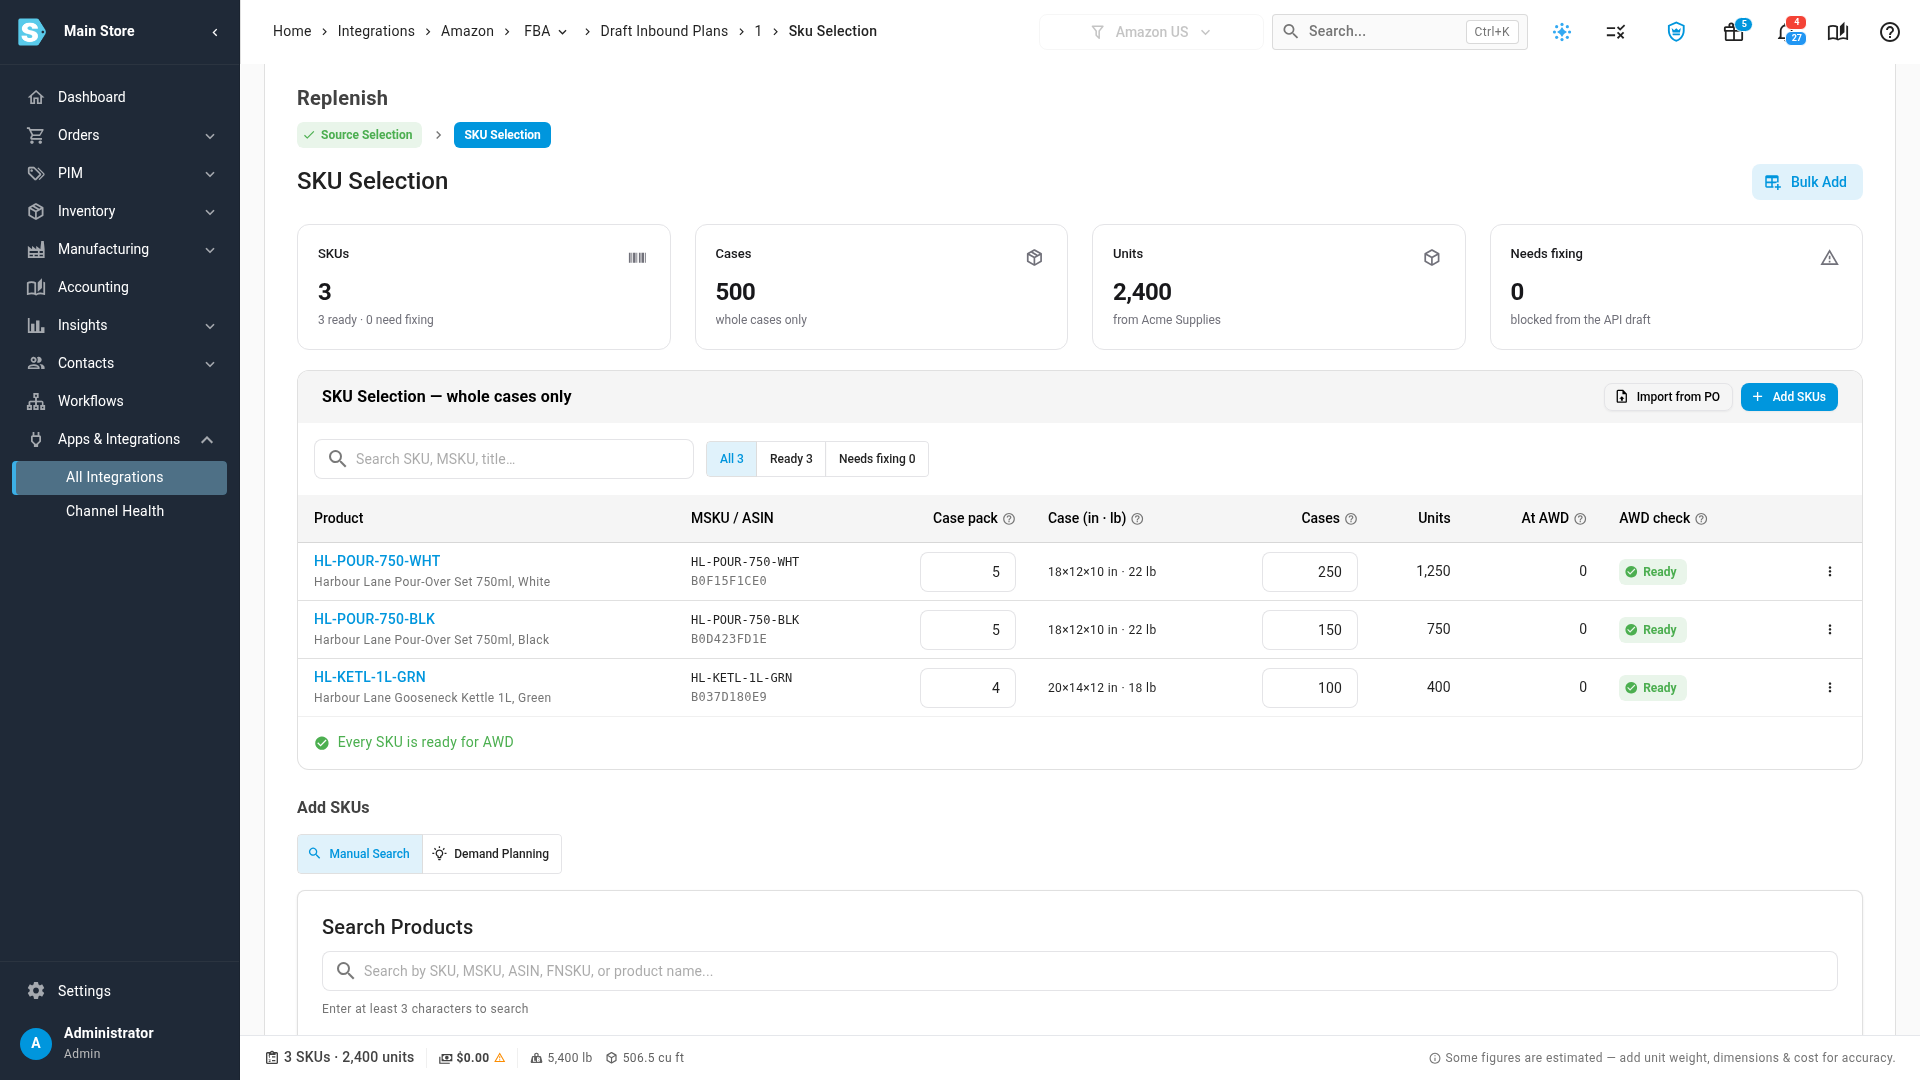
From a purchase order (supplier source only): click Import from PO, choose the order, and click Import lines. Its open lines arrive as cases.
-
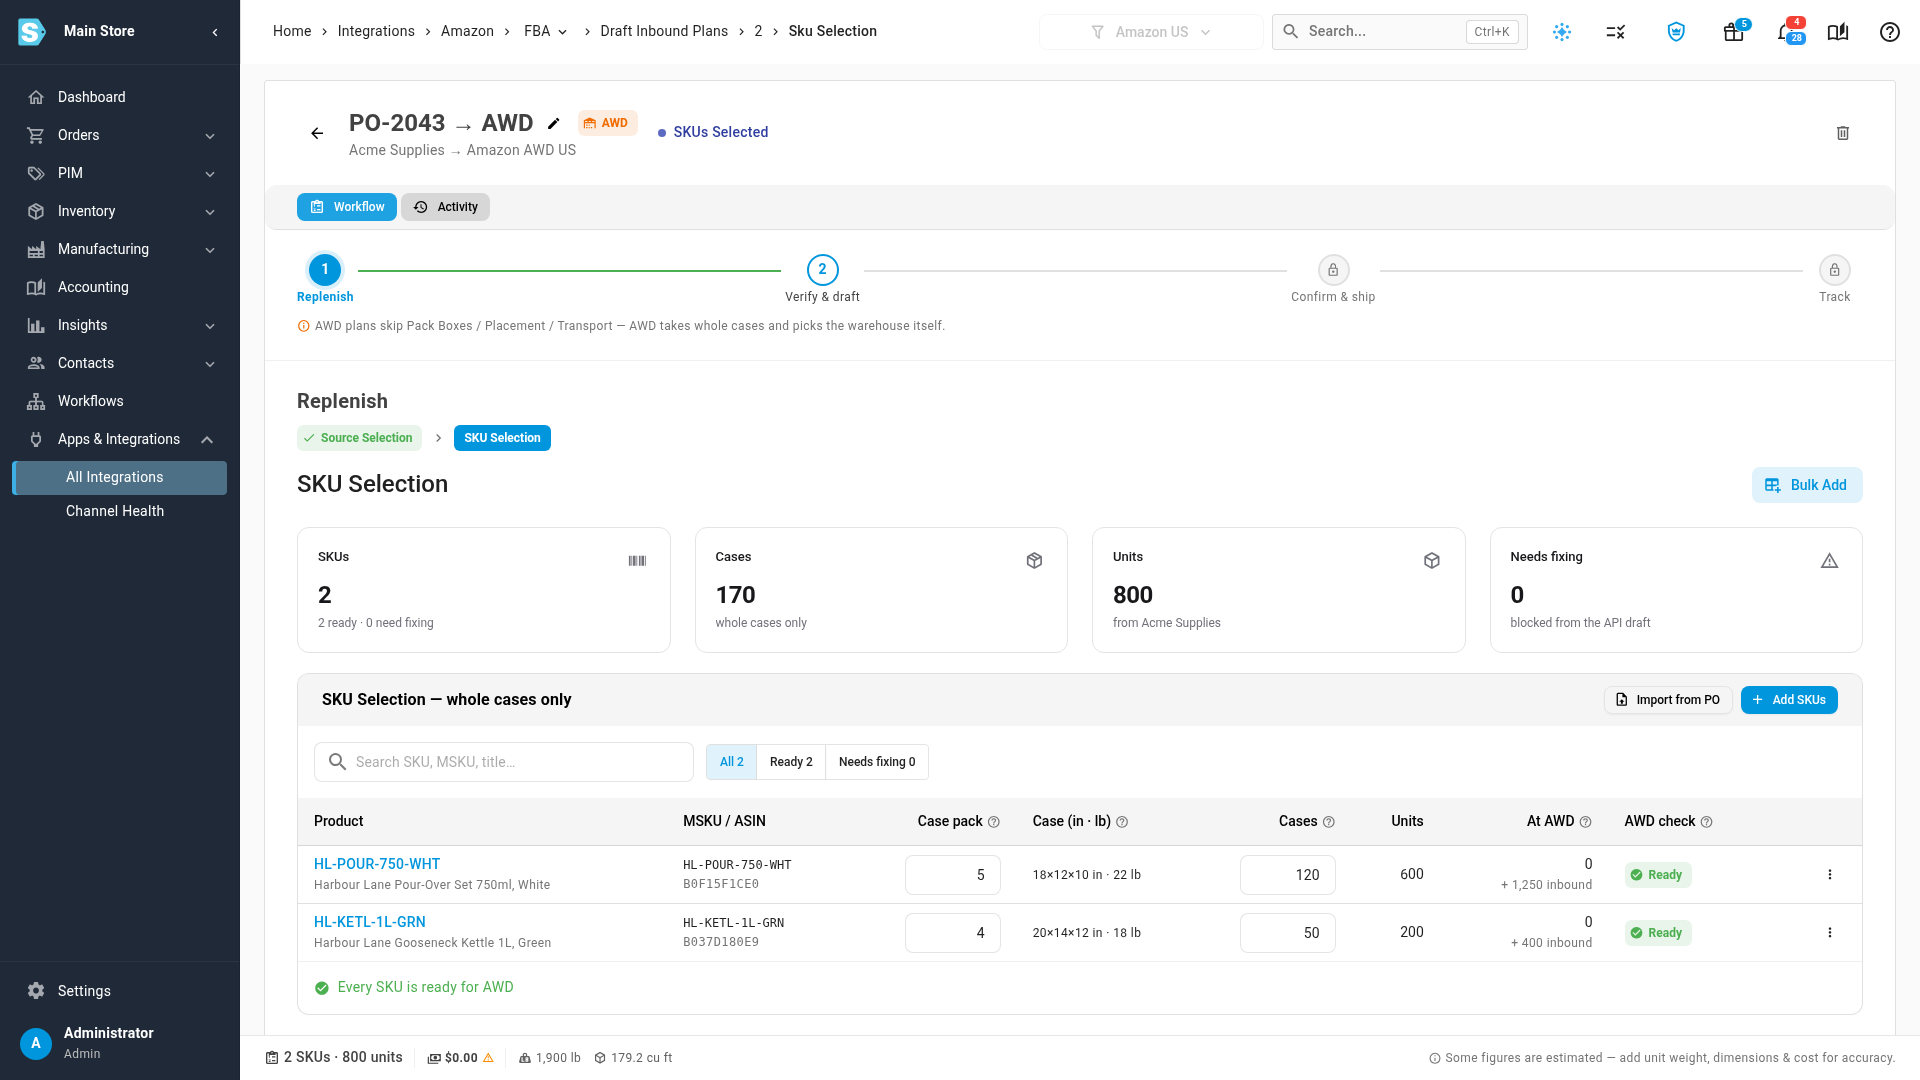
One by one: click Add SKUs, search by SKU, MSKU, ASIN, FNSKU or product name, and click the add button on a result. A line starts at all the stock available at the source, rounded down to whole cases.
Then check each row:
-
Set Cases for each line. Units follows from the case pack.
-
Read AWD check. Ready means AWD has what it needs for that SKU.
-
If a row shows No case pack, click Add case pack, dims & weight and fill in the case details. To drop a row instead, open its menu and click Remove from plan.
-
Click Next: Verification.
If you edit a row's case pack, SKU.io works the line out again from the new pack. Check Cases and Units after you change it.
Verify the stock
- Your own warehouse: click Verify Inventory. SKU.io checks the quantities and allocates the stock to the plan.
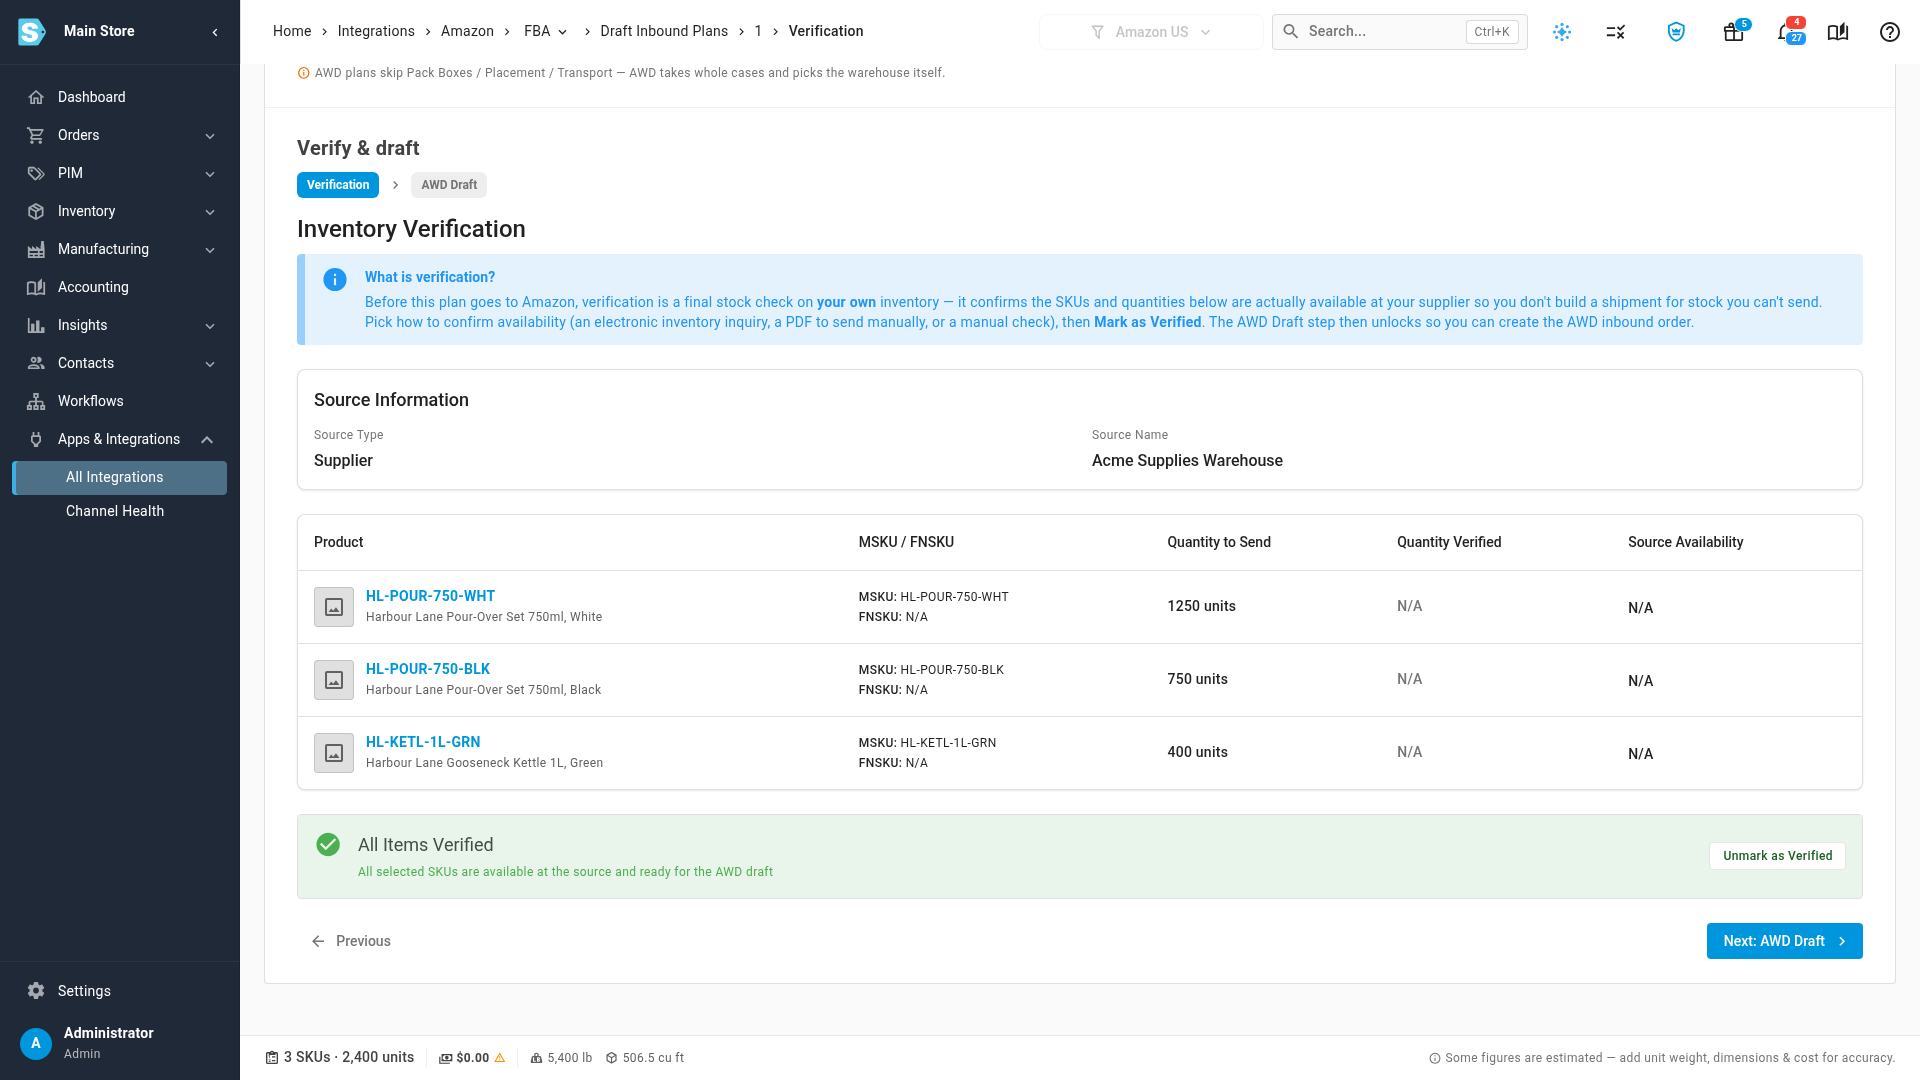
- A supplier: choose how to confirm the stock is there: Send Inventory Inquiry (EDI 840), Download Inventory Inquiry PDF or Verify Manually. Then click Mark As Verified.
Click Next: AWD Draft.
Create the draft order
-
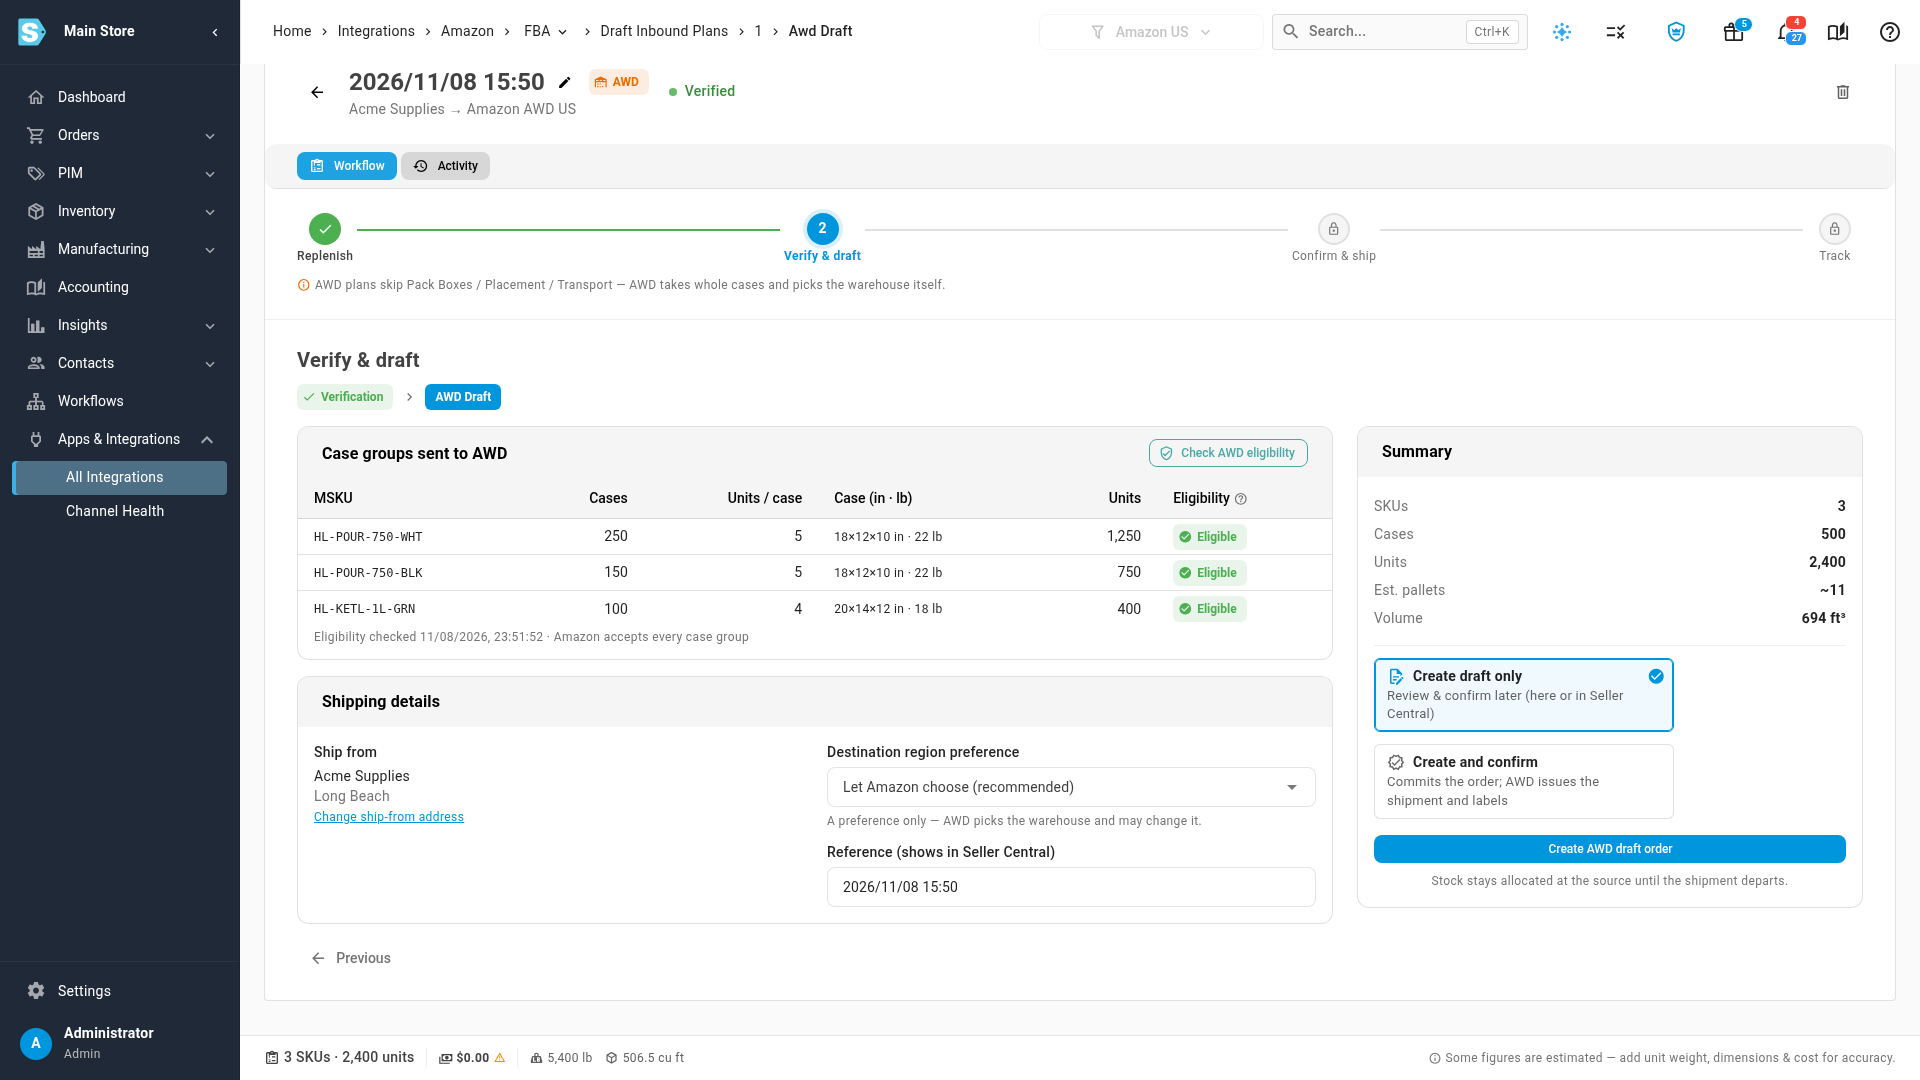
Click Check AWD eligibility. Each case group shows Eligible or Rejected.
-
Under Shipping details, check Ship from. Optionally choose a Destination region preference (Amazon treats it as a preference only) and change the Reference (shows in Seller Central).
-
Choose how far to go:
- Create draft only: review it first, and confirm later here or in Seller Central.
- Create and confirm: commits the order straight away, and AWD issues the shipment and labels.
-
Click Create AWD draft order. The stock stays allocated at the source until the shipment departs.
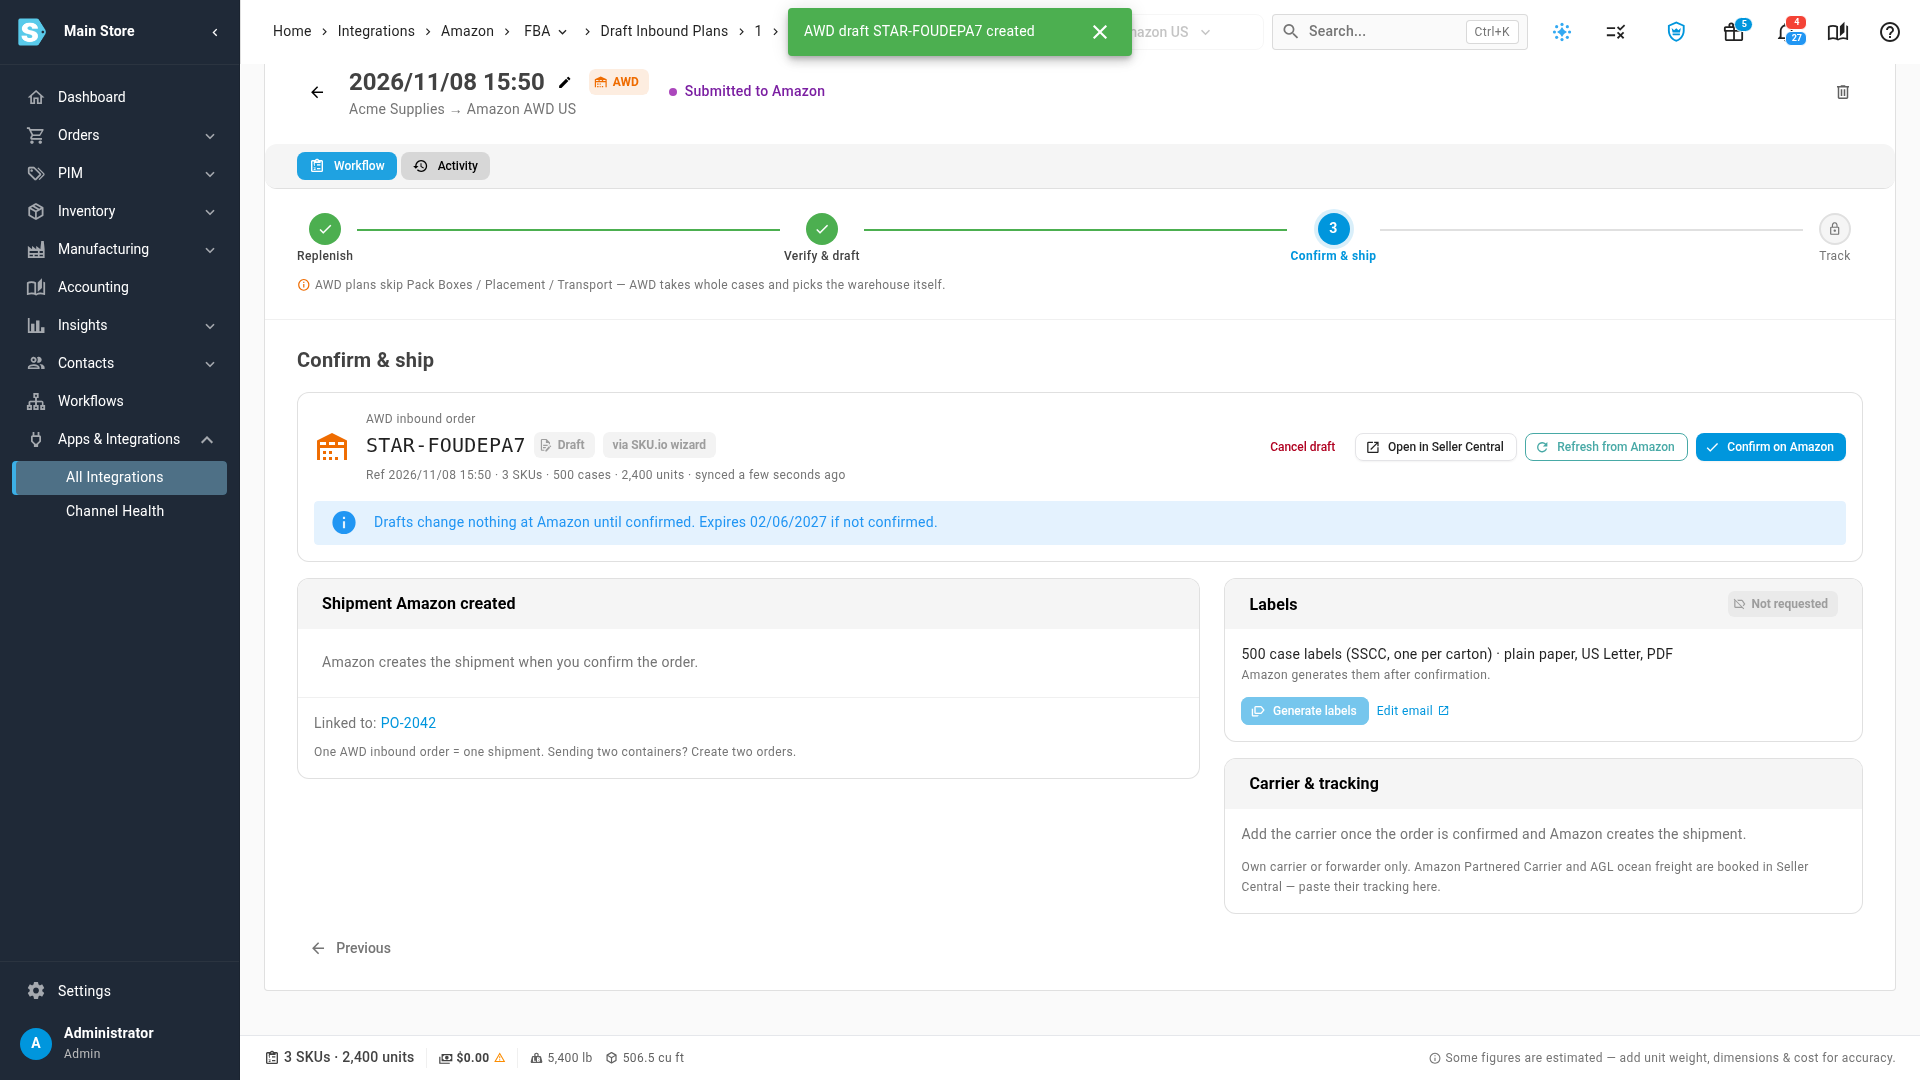
The plan moves to Confirm & ship, with the order number and a Draft status.
Confirm the order
A draft changes nothing at Amazon. It expires 90 days after it's created if you don't confirm it; the page shows the date.
- Click Confirm on Amazon.
- In Confirm this AWD order?, click Confirm order. After confirming, you can't edit the order, only cancel it before it ships.
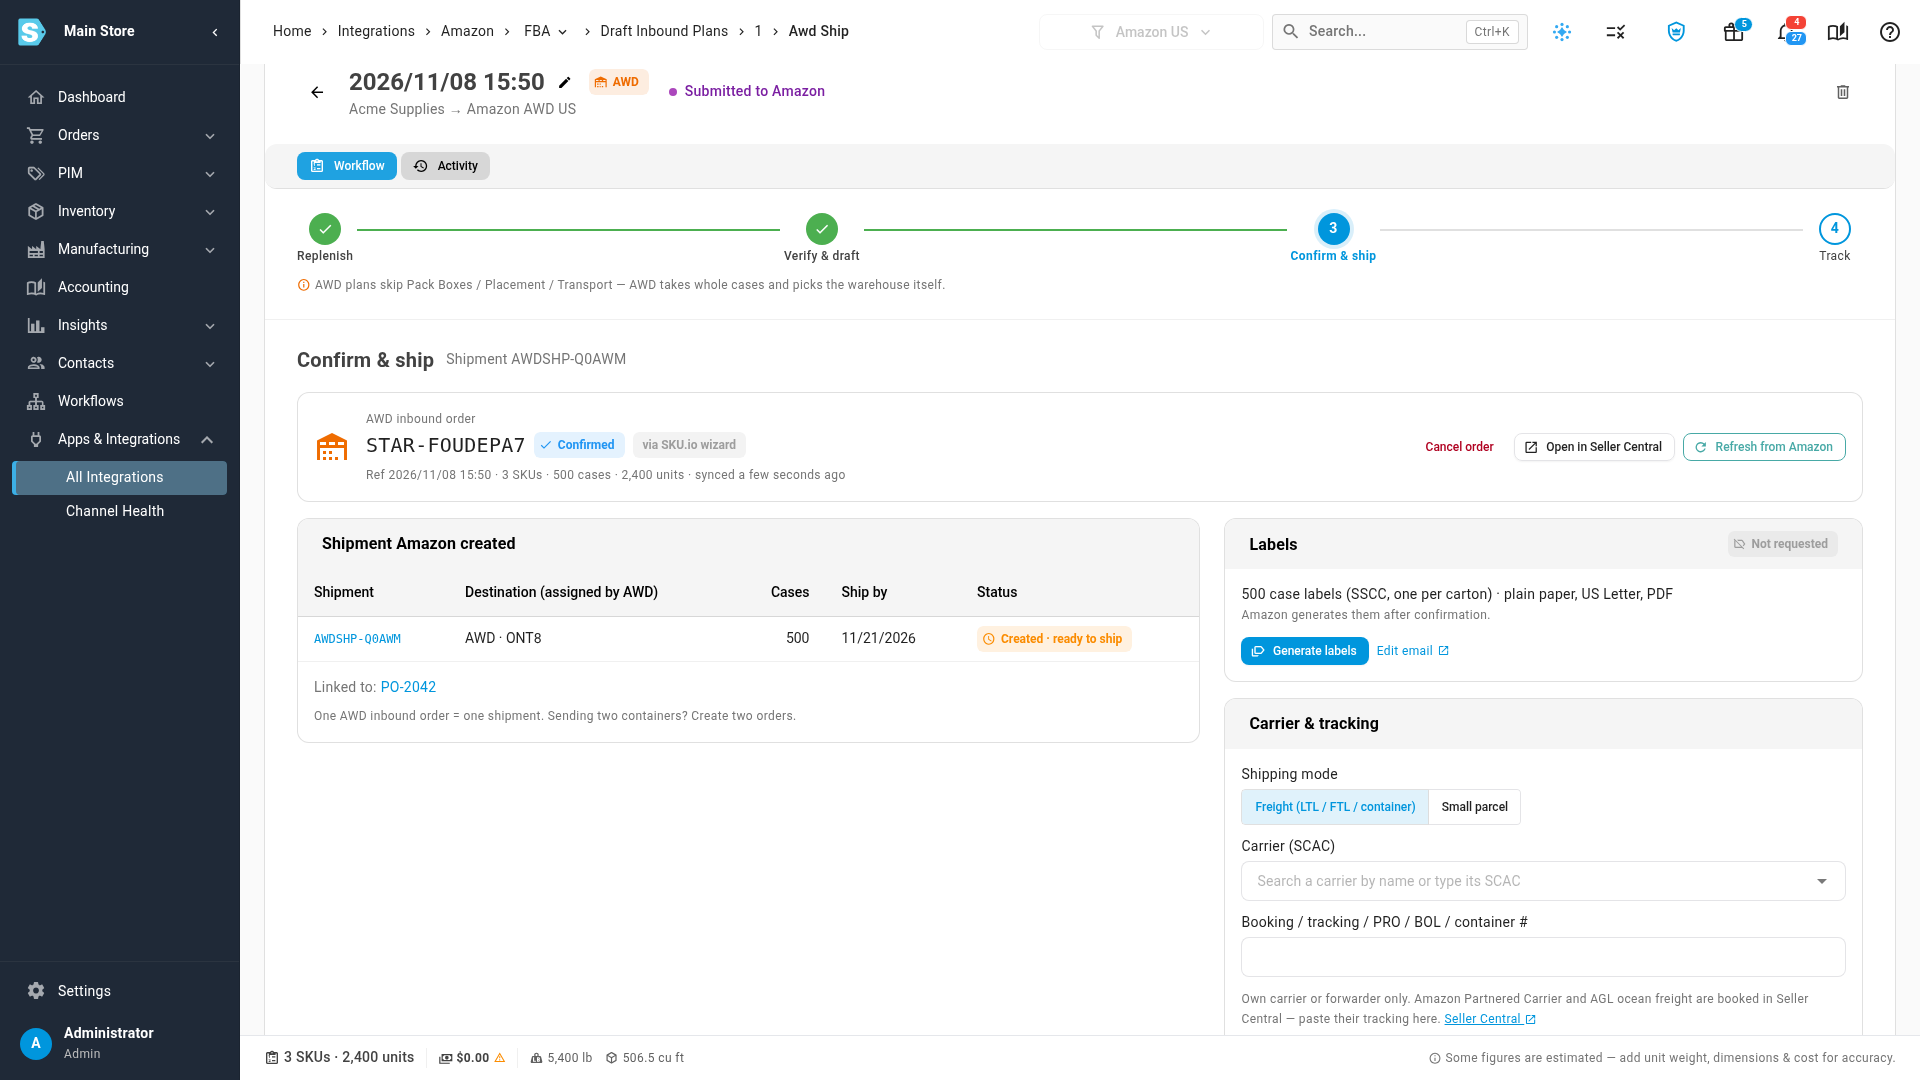
Amazon creates the shipment. Shipment Amazon created shows the shipment number, the AWD warehouse Amazon assigned, the cases and the ship-by date. One AWD order is one shipment, so to send two containers, create two orders.
Generate labels and send them to the supplier
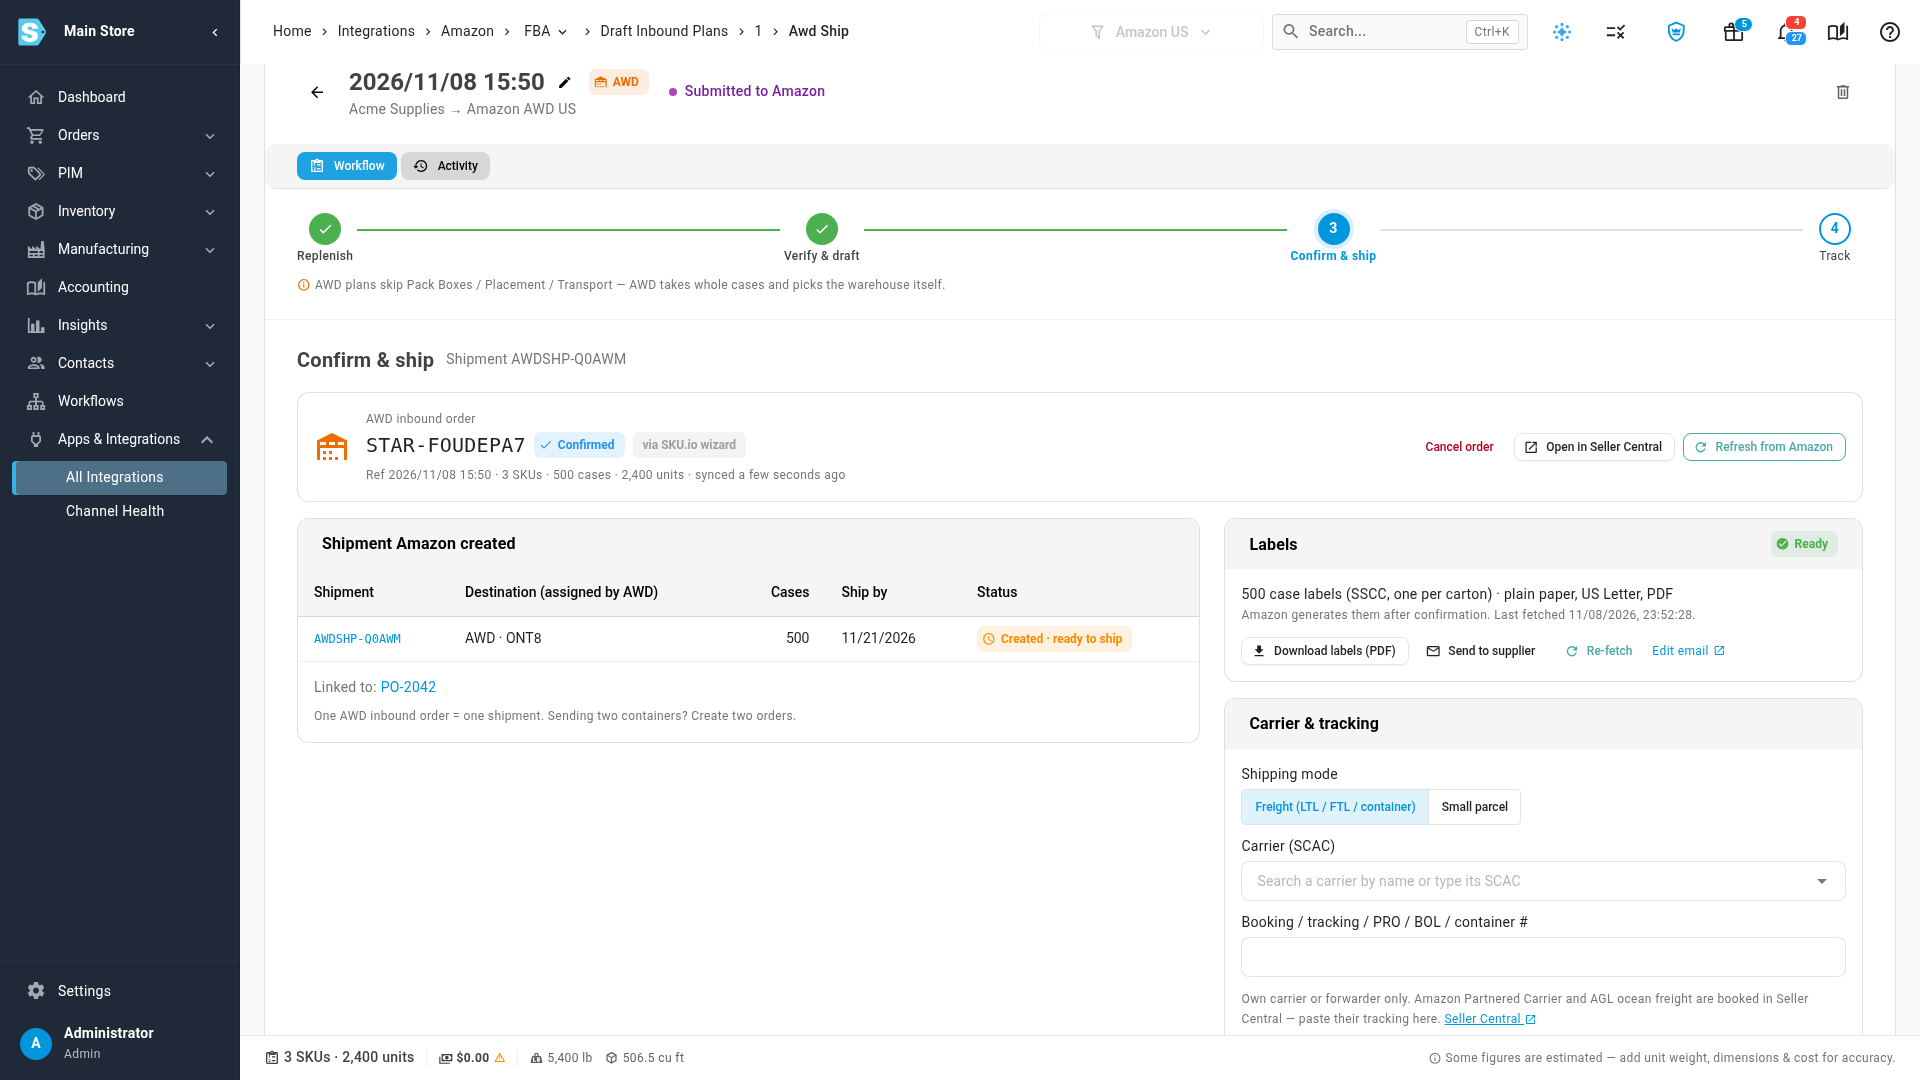
- Under Labels, click Generate labels. Labels are generated in the background; the status changes to Ready when they're done. You get one case label per carton, on plain US Letter paper, as a PDF.
- Click Download labels (PDF) to print them yourself, or click Send to supplier to email them.
- In Send labels to supplier, check the address in Send to. It's filled in from the supplier on a supplier-source plan, and you can change it. For a warehouse-source plan, type the address.
- Click Send.
To change what the email says, click Edit email. It opens the Amazon AWD Inbound Labels template under Settings → Email Templates.
Add the carrier
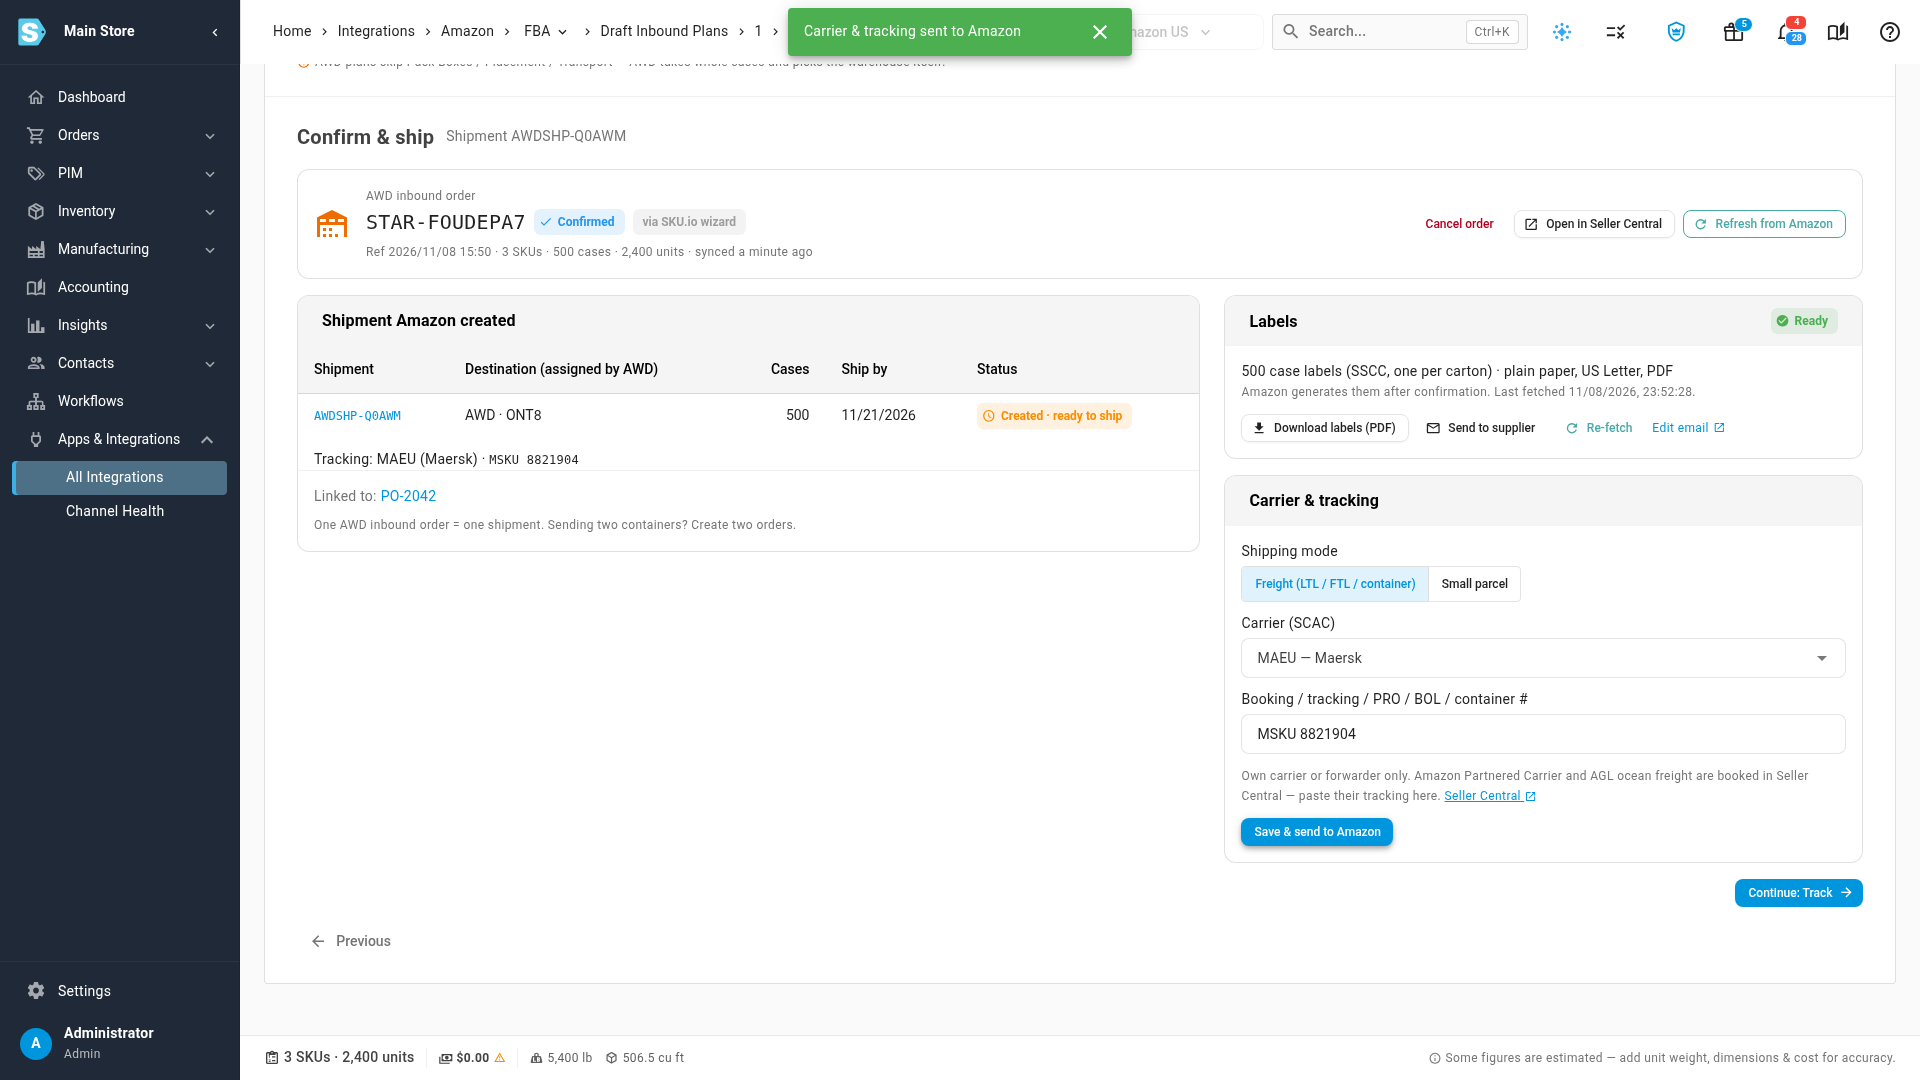
- Under Carrier & tracking, choose the Shipping mode: Freight (LTL / FTL / container) or Small parcel.
- Choose the Carrier (SCAC).
- For freight, enter the booking, tracking, PRO, BOL or container number. For small parcel, paste Tracking numbers — one per case, one per line or separated by commas. The field counts them, and warns you if the count doesn't match the cases.
- Click Save & send to Amazon.
Follow the shipment
Click Continue: Track. Track shows the shipment's progress from Created · ready to ship through Shipped, In transit, Receiving and Closed, the units shipped, received and short, and the expected and received quantities for each MSKU. Click Refresh from Amazon for the latest.
The order also stays on AWD Inbound → Inbound Orders, and the shipment appears on AWD Inbound → Shipments.
When you need Seller Central
SKU.io hands off to Seller Central in three cases:
- Amazon Partnered Carrier and AGL ocean freight are booked in Seller Central. Click Open in Seller Central on the order, book it there, then paste the tracking into Carrier & tracking.
- Amazon rejects the draft. Amazon AWD rejected the draft lists each rejected SKU and Amazon's reason. Choose Fix in SKU selection, Remove the N SKU and retry, or Enter in Seller Central instead.
- An order created in Seller Central. It's listed via Seller Central and is view-only in SKU.io, because Amazon doesn't let other apps change those orders.
Start from a purchase order
You can skip the first steps by starting from an open purchase order.
-
Open the purchase order, click Send to Amazon, then click Send to Amazon AWD.
-
In the dialog, check the Amazon account and Ship from, and the plan name. The dialog shows how many open lines, boxes and units it will bring across.
-
Click Continue to SKU selection. The plan opens on SKU Selection with the PO's open lines as cases.
-
Carry on from Add what you're sending.
A PO ships to one Amazon network at a time. When every line is already on an AWD plan, the dialog says "Every line of PO is already on an AWD plan" and Continue to SKU selection is greyed out.
Next steps
- Track AWD inventory
- Map merchant SKUs AWD can't match
- Create shipment drafts, to send to AWD from the Send Planner
- Send stock to FBA with an inbound plan
Video transcript
This walkthrough builds an AWD order from start to finish. Click AWD Inbound. Then click the Inbound Orders tab. This list holds every AWD order on the account. Each row says where it came from: this wizard, the Send Planner, or Seller Central. To start a new order, click New AWD inbound. The plan name fills in for you, and you can rename the plan. United States is selected, and Send To is set to Amazon Warehousing and Distribution. AWD warehouse linked means this account is ready. Now choose the source of the stock. For stock at a factory, choose the Supplier card. Next, pick the warehouse that will ship this order to AWD. For your own stock, you would click Warehouse. Click Next: SKU Selection. SKU.io creates the plan for you. To pull in a purchase order, click Import from PO. Choose an open order from this supplier. Click Import lines to add its lines to this plan. To add products one by one, use Add SKUs. AWD takes whole cases only. Each row shows the case pack, the case size, the cases and the units. Ready means AWD has what it needs for that SKU. Click Next: Verification to check the stock before it ships. For a supplier, decide how you confirm the units. Here we choose Verify Manually. Then click Mark As Verified to unlock the draft step. Click Next: AWD Draft. Click Check AWD eligibility. Amazon reviews each case group before you create anything. Keep Create draft only to review everything first. Then click Create AWD draft order. A draft changes nothing yet, and your stock stays allocated until the shipment departs. When it looks right, click Confirm on Amazon. In the dialog, click Confirm order. The shipment is created, and an AWD warehouse is assigned. Now click Generate labels. There is one label for every case. Download the PDF, or email it to your supplier. Click Send to supplier. The address is already filled in, and you can change the address. Click Send. To change the wording of the message, use Edit email. Under Carrier and tracking, choose your carrier from the list, such as Maersk for ocean freight. Enter the booking number for this shipment. Then click Save and send to Amazon to record the carrier on the order. Amazon's Partnered Carrier and AGL ocean freight are booked outside this page. Open in Seller Central takes you to Amazon, and you paste the tracking into this card afterwards. You can also start from a purchase order. On any open PO, click Send to Amazon, and choose Send to Amazon AWD from the menu. The dialog shows the account, the ship-from warehouse and the open lines. Click Continue to SKU selection. Then carry on exactly as before. Your confirmed order now shows on Inbound Orders, and you can follow it through to AWD from this list.