Connect Authorize.net
To take card and eCheck payments through your Authorize.net merchant account, connect it to SKU.io with its API credentials. SKU.io checks them with Authorize.net before it saves anything, then reads your account's currencies and payment methods. You can connect a live account, or a sandbox account to try things out.
Before you begin
- Have your Authorize.net API Login ID and Transaction Key. In the Authorize.net Merchant Interface, open Account › Settings › Security Settings › API Credentials & Keys. The API Login ID is shown there. Authorize.net shows a Transaction Key only once, so if you didn't save it, create a new one on the same page.
- To save customers' cards, your Authorize.net account needs a Public Client Key, under Account › Security Settings › Manage Public Client Key. Without one you can still connect, and charge cards saved earlier.
- Optionally, have your Signature Key from the same page. It turns on instant updates.
- To connect and manage the account, your SKU.io role needs Integrations → Manage.
Steps
-
Go to Apps & Integrations, and type Authorize in the search box.
-
Choose Authorize.net under Payment Processors, and click Connect Authorize.net.
-
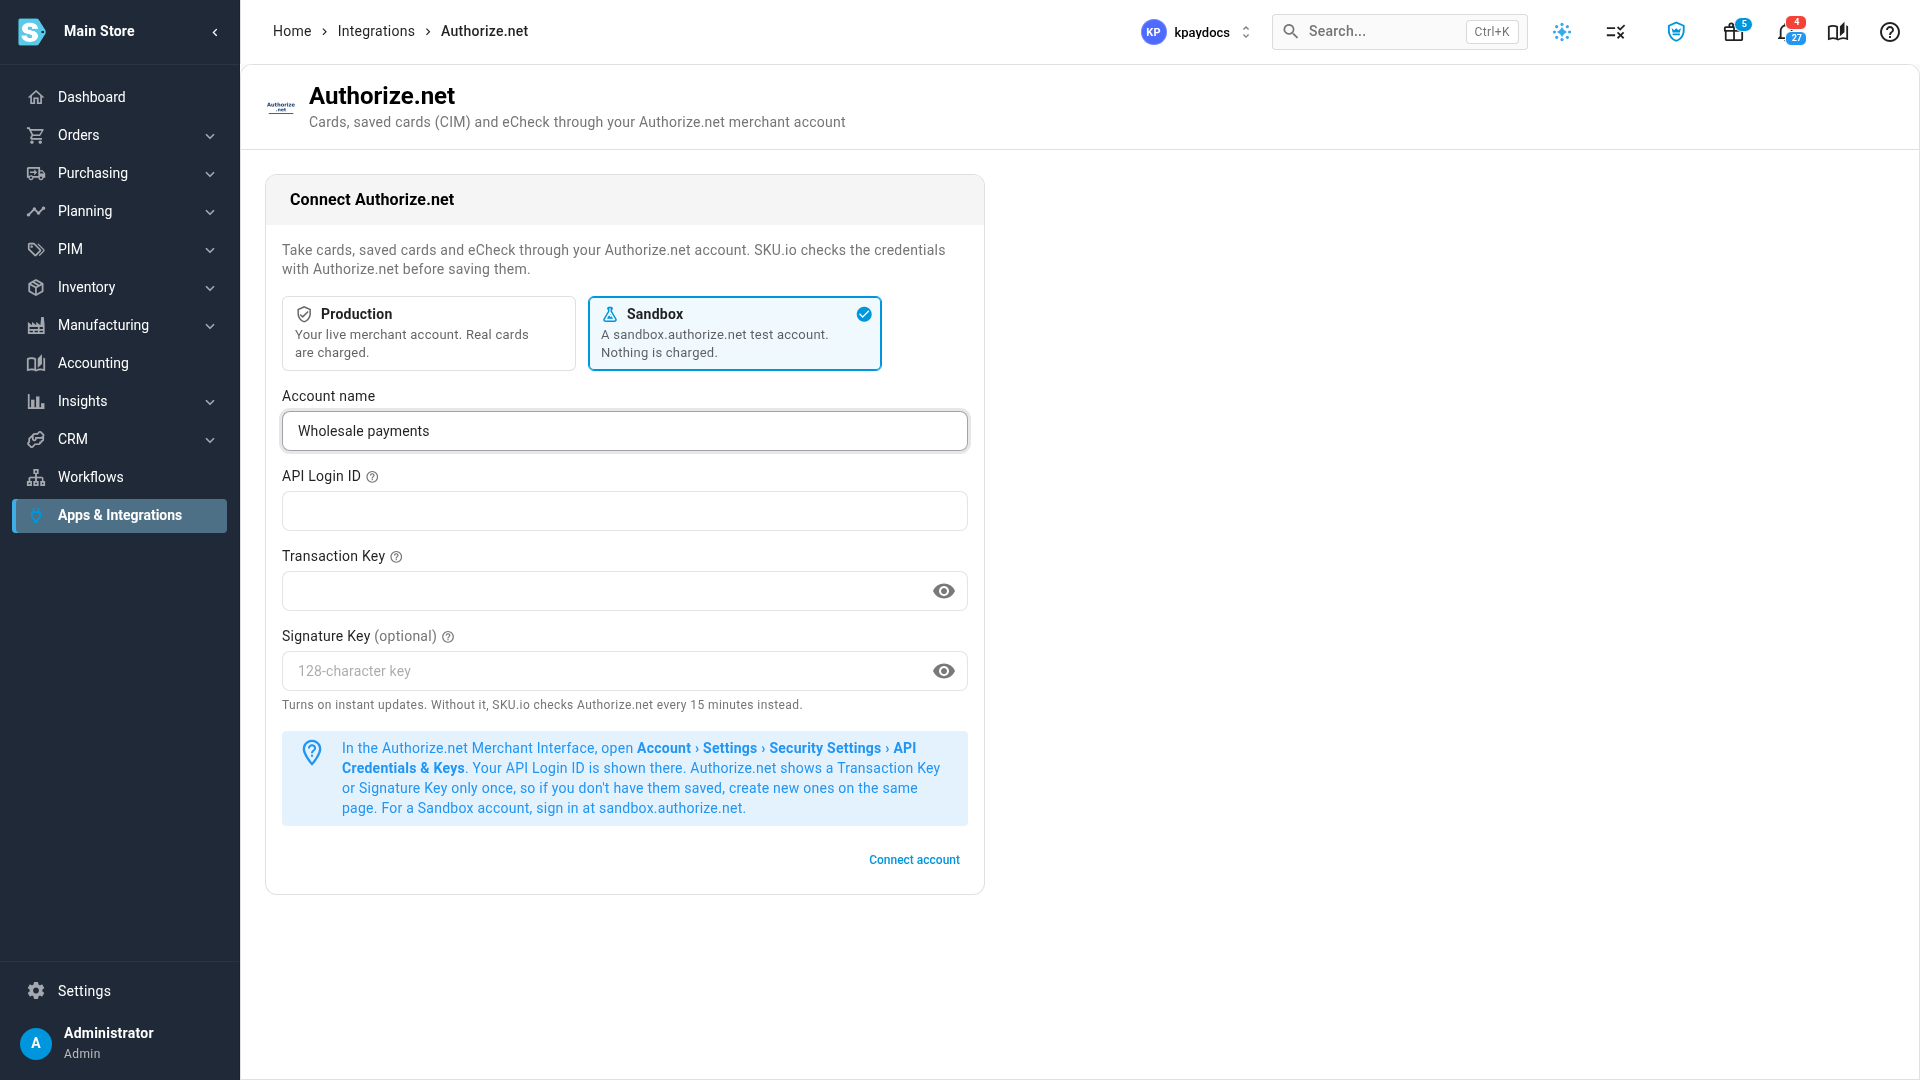
Choose the Environment: Production for your live merchant account, where real cards are charged, or Sandbox for a sandbox.authorize.net test account, where nothing is charged.
-
Optionally, type an Account name your team recognizes. If you leave it blank, SKU.io uses the merchant name from Authorize.net.
-
Paste the API Login ID.
-
Paste the Transaction Key.
-
Optionally, paste the Signature Key (optional).
-
Click Connect account.
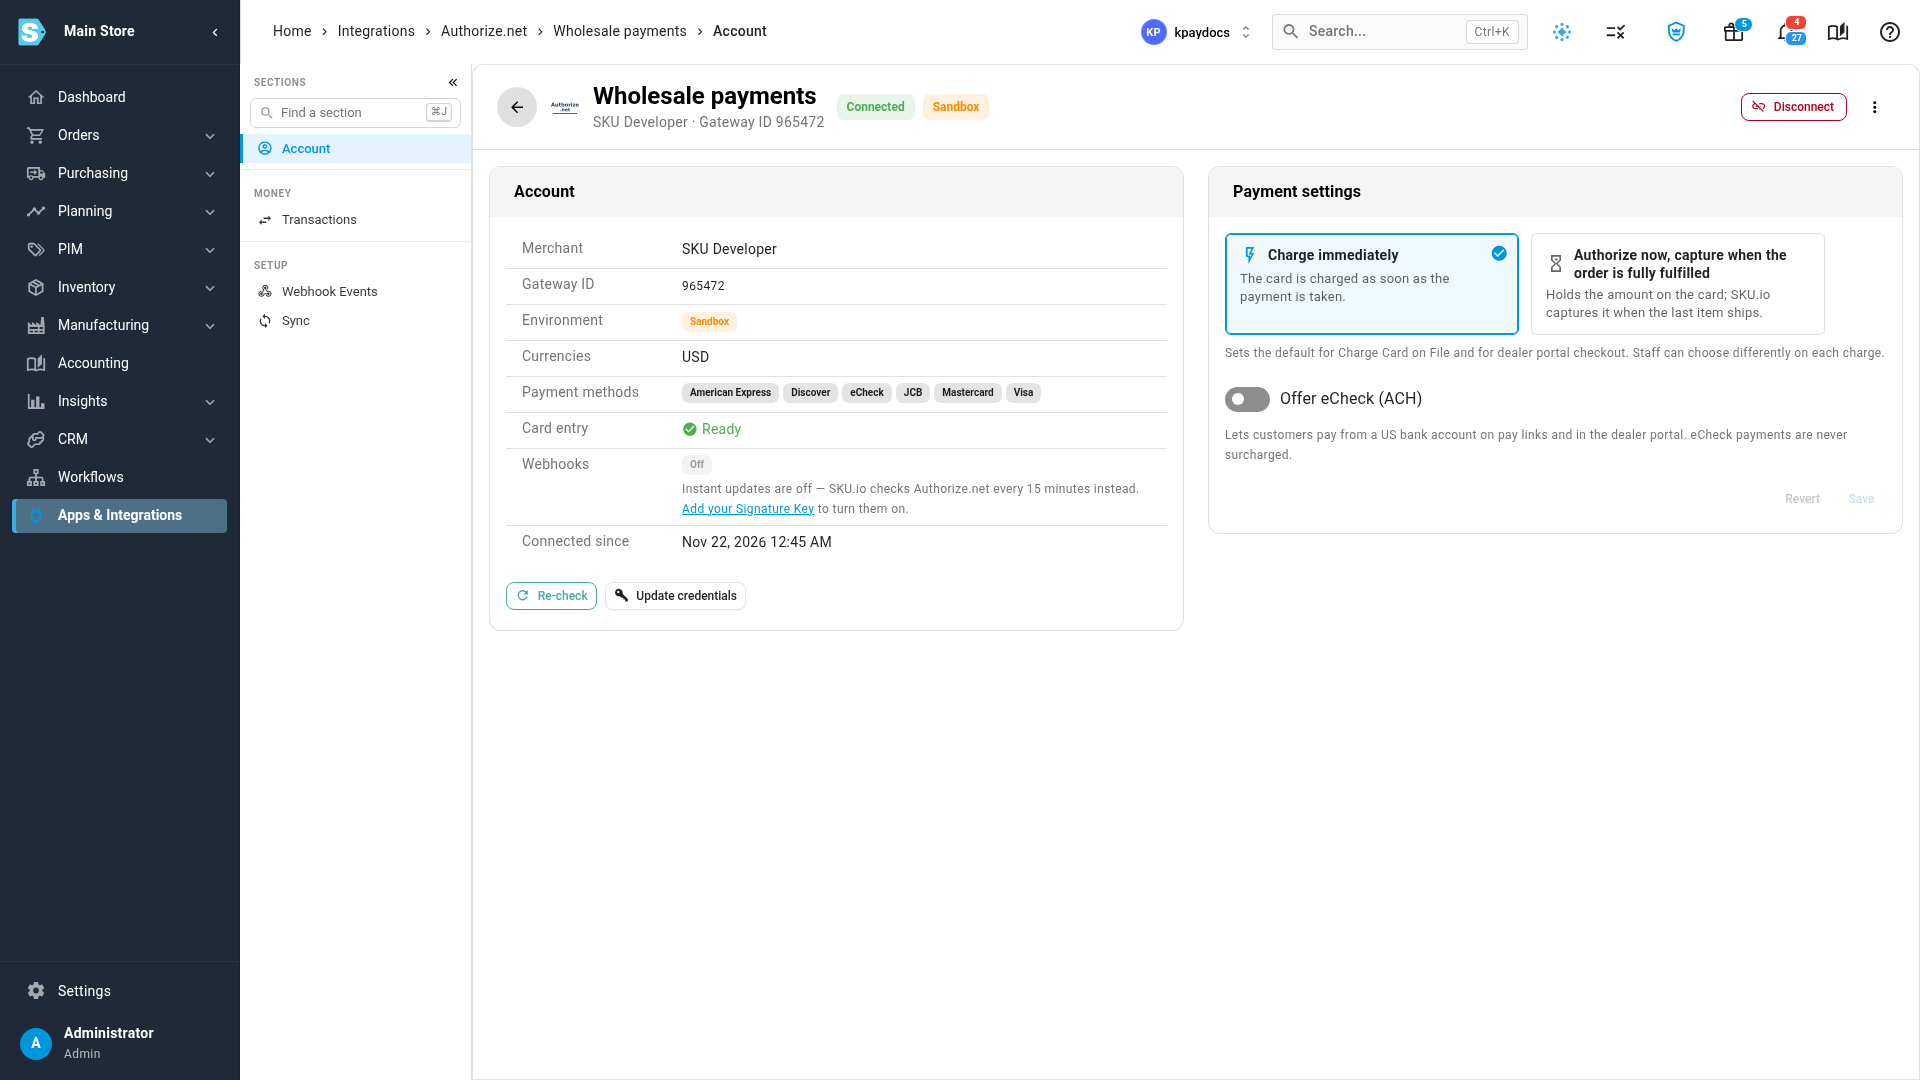
What you'll see: Authorize.net account connected. The account opens on its Account section, marked Connected, and Sandbox if it's a test account.
If the credentials are wrong, the form says so, and nothing is saved. Check that you pasted them for the right environment: sandbox credentials don't work in Production, and live ones don't work in Sandbox.
Check the account
The Account card shows what Authorize.net reports for the account:
| Row | What it shows |
|---|---|
| Merchant and Gateway ID | Your merchant account |
| Environment | Production or Sandbox |
| Currencies | The currencies the account takes. An order in another currency can't be charged through it |
| Payment methods | The card brands, and eCheck if your account supports it |
| Card entry | Ready when the account has a Public Client Key, so you and your customers can enter new cards. Not set up until you generate one in Authorize.net and click Re-check |
| Webhooks | Registered when instant updates are on, with the last event received. Off without a Signature Key: SKU.io checks Authorize.net every 15 minutes instead, so payments are still recorded, only not instantly |
| Connected since | When the account was connected |
Click Re-check to read the account from Authorize.net again, for example after you generate a Public Client Key or turn off Test Mode. If your Authorize.net account is in Test Mode, a banner says so: transactions aren't processed until you turn it off in the Merchant Interface.
Choose your payment settings
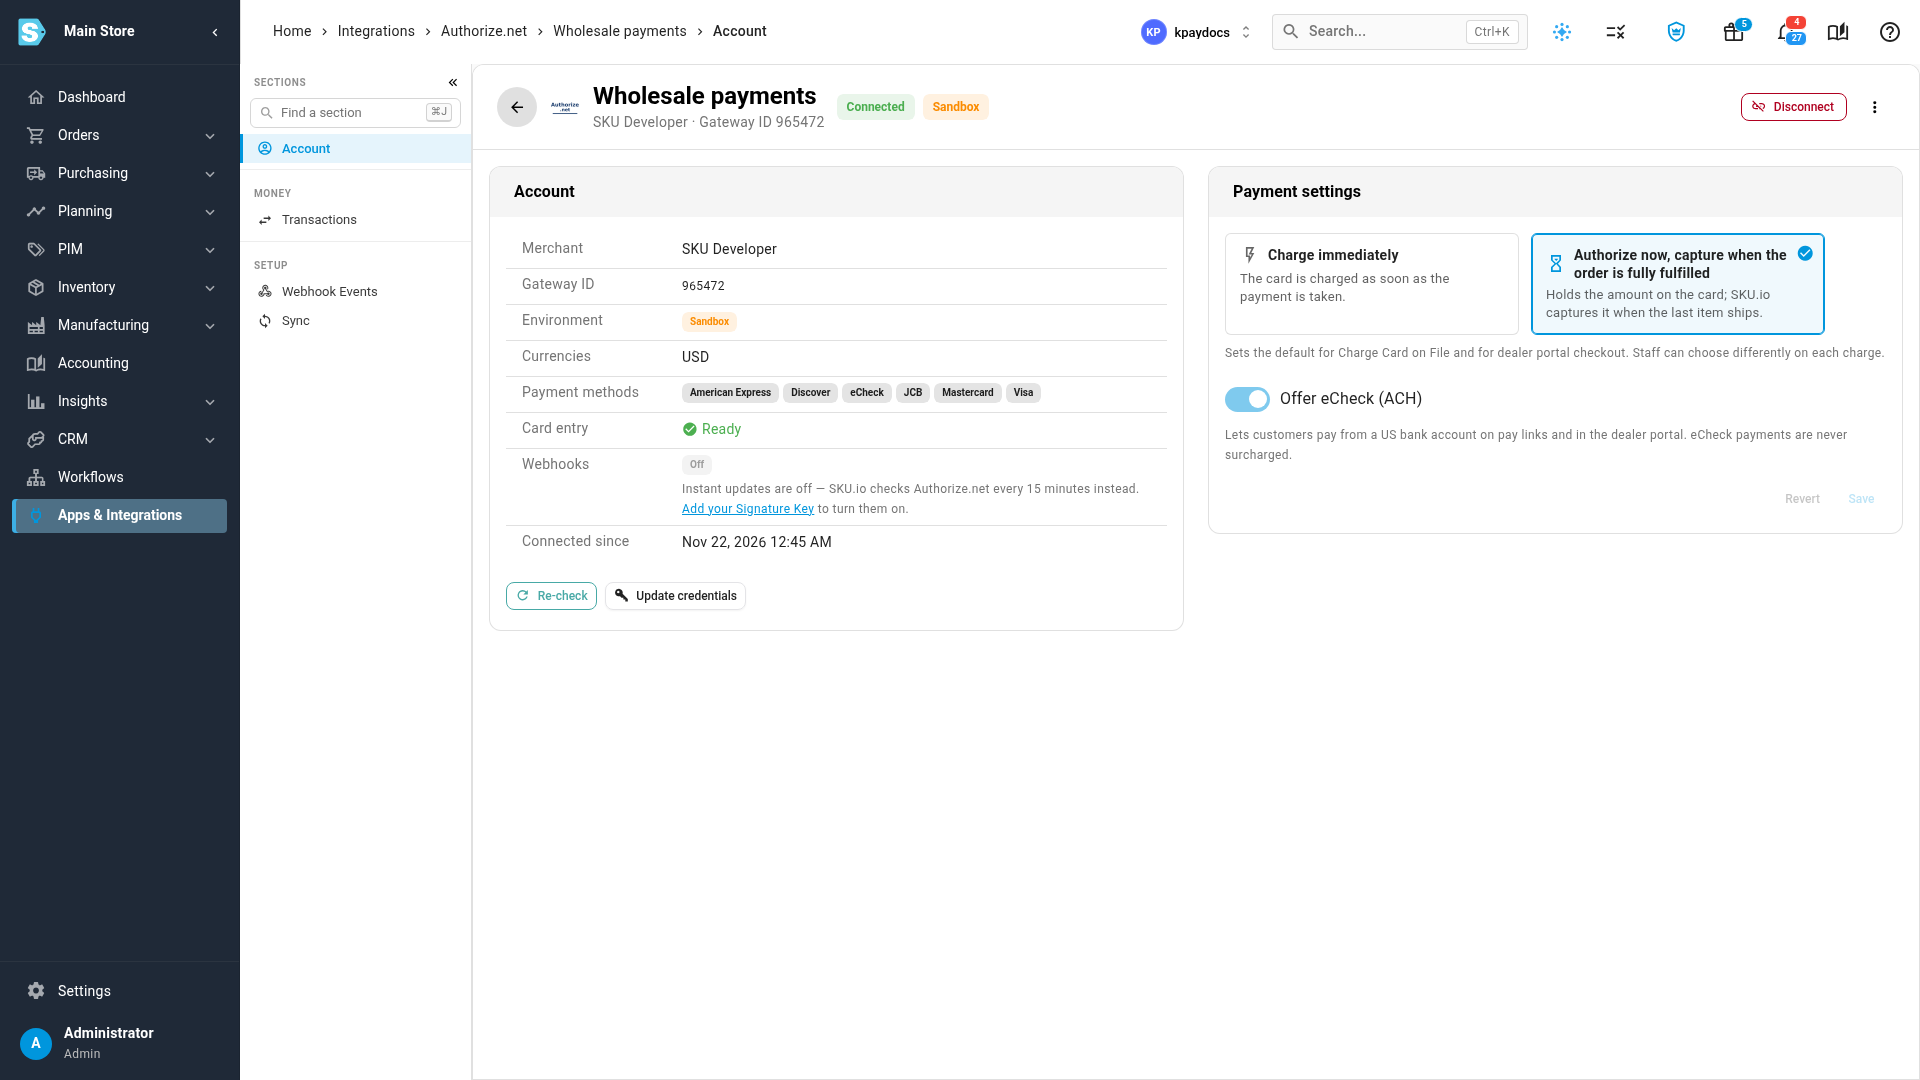
The Payment settings card applies to this account:
-
Under When to capture card payments, choose:
- Charge immediately: the card is charged as soon as the payment is taken.
- Authorize now, capture when the order is fully fulfilled: the amount is held on the card, and SKU.io captures it when the last item ships.
This sets the default for Charge Card on File and for portal checkout. Staff can choose differently on each charge.
-
To let customers pay from a US bank account on pay links and in the portal, turn on Offer eCheck (ACH). Your Authorize.net account must be enabled for
eCheck.Net: if it isn't, the switch is greyed out with the reason. eCheck payments are never surcharged. -
Click Save.
What you'll see: Payment settings saved.
Turn on instant updates
With a Signature Key, Authorize.net tells SKU.io the moment a payment, refund, void or fraud review changes, and SKU.io registers its webhook in your Authorize.net account for you. To add the key later, click Update credentials on the Account card, paste the Signature Key, and click Save credentials. Leave the other keys blank to keep them.
Update credentials, disconnect or delete
- Update credentials replaces the API Login ID, Transaction Key or Signature Key. If Authorize.net rejects the saved credentials, a banner on the account says so, and charges, captures and refunds fail until you update them.
- Disconnect, at the top right, stops SKU.io using the account. Saved cards stay in Authorize.net and in SKU.io but can't be charged until you reconnect, open pay links stop accepting payments, and SKU.io removes its webhook. Transactions and webhook history are kept. Reconnect brings the account back.
- Delete account, in the ⋮ menu, removes the account from SKU.io. Nothing is deleted in Authorize.net. You can't delete an account that still has saved cards, open authorizations or recorded payments: disconnect it instead.
Next steps
- Save a customer's card and charge it
- Collect payment with an Authorize.net pay link
- Track Authorize.net transactions
Video transcript
To take card and eCheck payments through your Authorize.net account, connect it first. Open Apps and Integrations, where every connection lives, and search for Authorize. Choose Authorize.net under Payment Processors, and click Connect Authorize.net. For your live merchant account, choose Production, and for a test account, choose Sandbox. We'll use a sandbox account, so nothing is charged. Give the account a name your team will recognize. Paste the API Login ID and Transaction Key from your Authorize.net Merchant Interface. The note below the form shows exactly where to find them. A Signature Key is optional, and turns on instant updates. Click Connect account, at the bottom right of the form. SKU.io checks the credentials with Authorize.net before it saves anything, and opens the new account. The Account card shows what Authorize.net reports: the merchant, the currencies, and the payment methods it accepts. Card entry must say Ready before you can save customers' cards. Webhooks show Off until you add a Signature Key, so SKU.io checks Authorize.net every fifteen minutes instead. Under Payment settings, choose when card payments are captured. Charge immediately takes the money straight away. Or authorize now, and SKU.io captures it when the order is fully fulfilled. To let customers pay from a US bank account, turn on Offer eCheck. Your Authorize.net account needs eCheck enabled for this. Then click Save, at the bottom of the Payment settings card. Your account is now ready to take payments.