Add your warehouses
A warehouse is a place where your stock lives and ships from. The Getting started guide asks for at least one, with its full ship-from address, before you build your catalog. Every new account starts with one warehouse, named Default Warehouse, that has no address yet.
This page covers the locations you run yourself. A 3PL's warehouse is added differently: see Adding a 3PL.
Before you begin
- Save your core settings first. Add a warehouse stays locked in the guide until your inventory start date is set. See Set your foundation.
- Have each warehouse's full street address ready. SKU.io sends it to your shipping providers as the origin for labels and rates, and a partial address can get fulfillments rejected.
Steps
- Open the Getting started guide. It opens by itself the first time you sign in. After that, open Complete your setup at the top of the sidebar.
- If you haven't yet, enter your Inventory Start Date, check the Timezone and Date Format, and click Save & continue.
- In the guide's step list, click Add a warehouse.
- In Warehouse name, enter the name your team uses for this location.
- Under Ship-from address, enter the Address and the Zip / Postal Code. SKU.io fills in the City and State / Province from the ZIP code. Check them, and the Country.
- Click Save & continue. The guide moves on to the next step.
- To check the warehouse, click Add a warehouse again. It shows its full address and Ready to ship.
The sections below explain each step.
Open the guide and save your core settings
The guide opens by itself the first time you sign in, on its first step, Set your core settings. Until you finish it, Complete your setup sits at the top of the sidebar with how far you've got, and opens the guide again.
The guide keeps Add a warehouse locked until your core settings are saved, so enter your Inventory Start Date first. The Timezone is filled in from your location, and each Date Format option shows today's date in that timezone. Click Save & continue.
Enter the warehouse's name and address
Click Add a warehouse in the step list. On a new account, the step is one card for your Default Warehouse, marked Needs address.
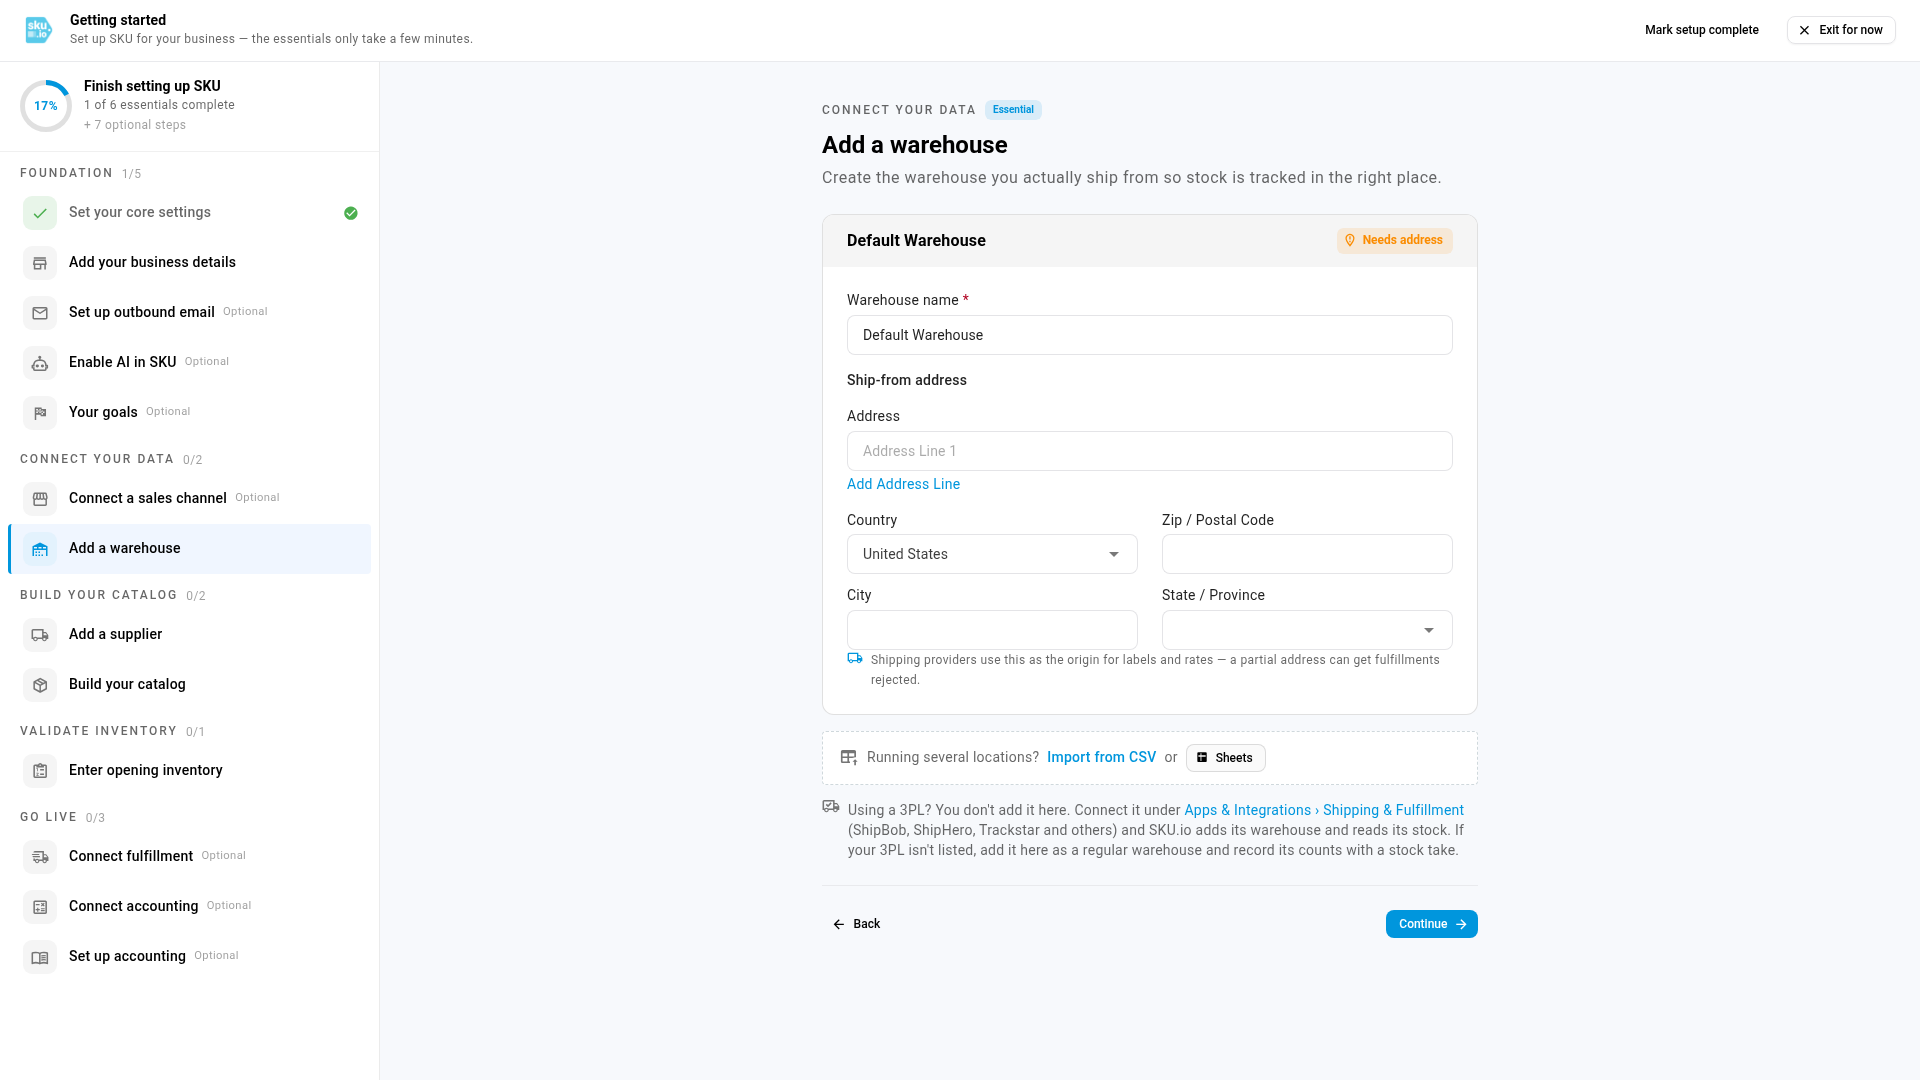
Rename the warehouse in Warehouse name, then fill in the Ship-from address. Enter the street in Address; click Add Address Line if it needs a second line, such as a suite number. When you enter a Zip / Postal Code, SKU.io looks it up and fills in the City and State / Province. Check that they're right, and type them in when it can't.
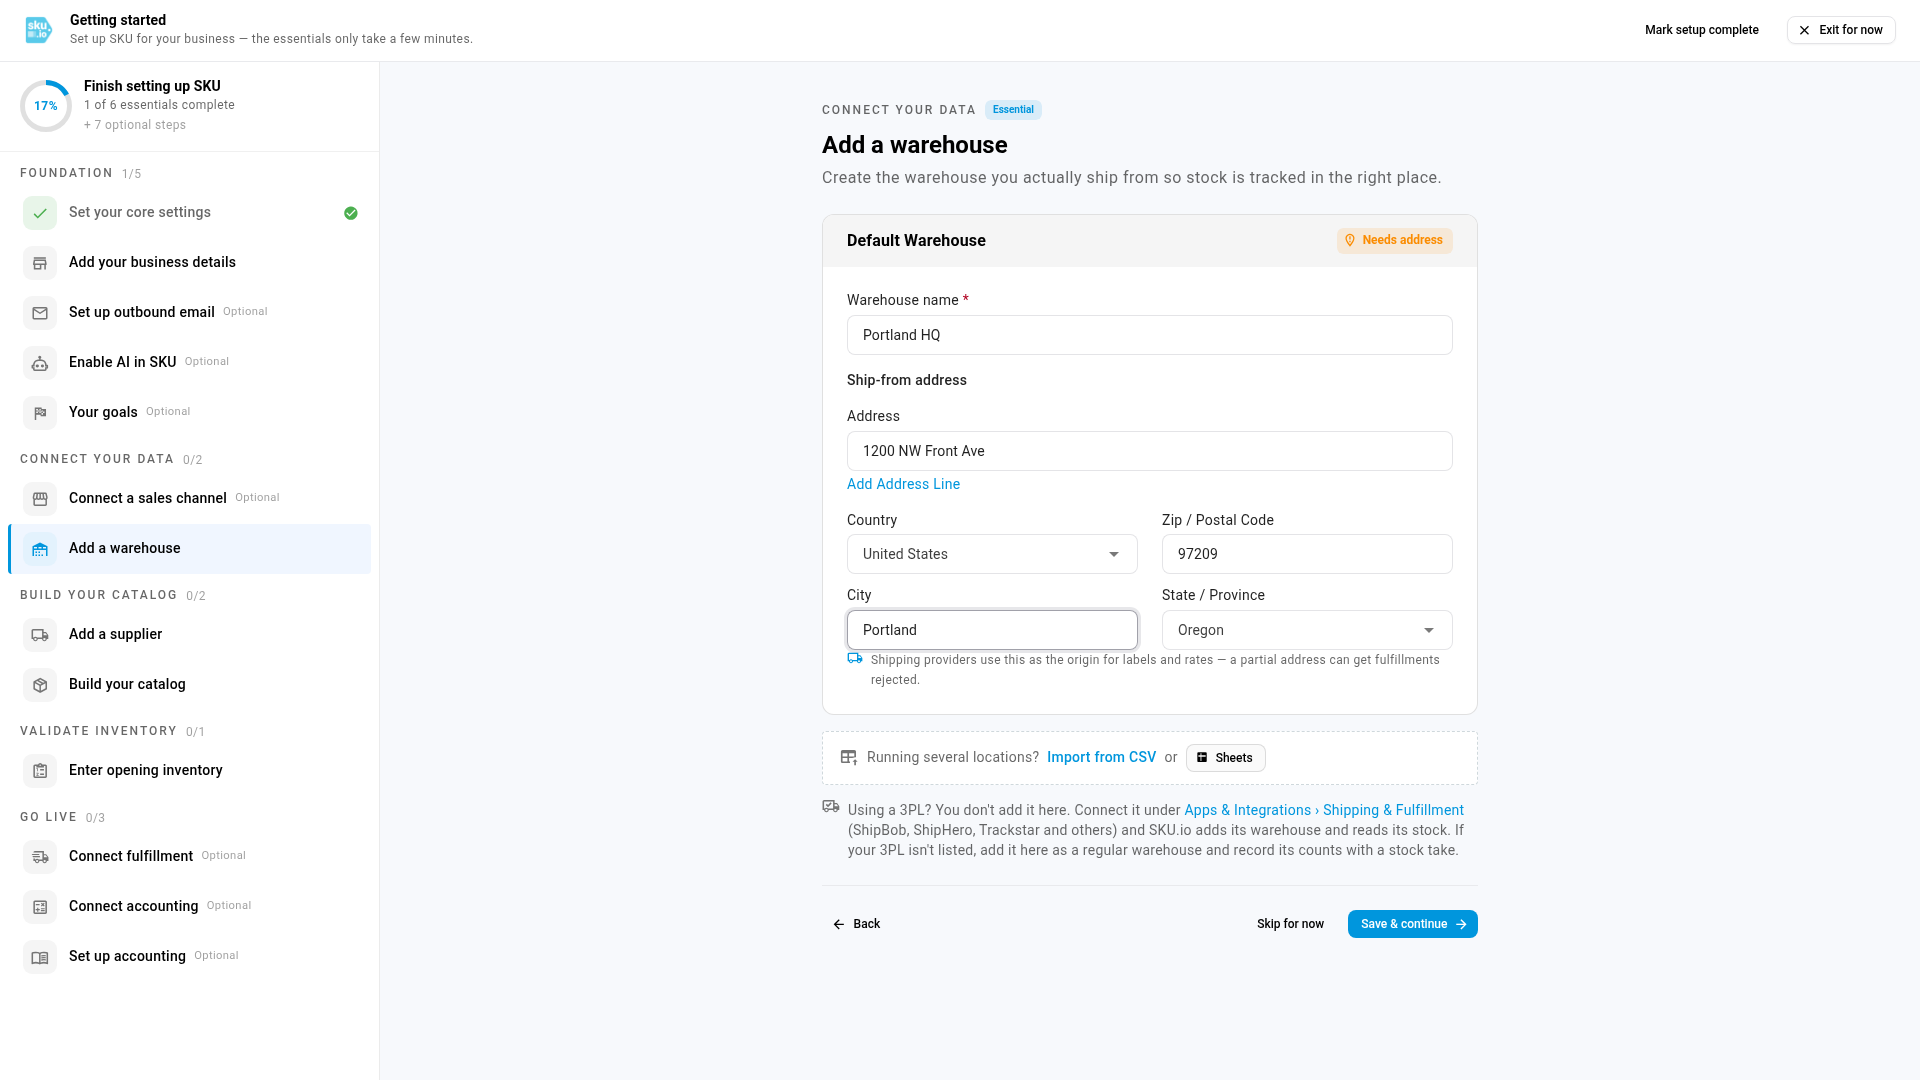
Click Save & continue. You see Warehouse saved, and the guide moves on to Add a supplier.
Check the warehouse list
Click Add a warehouse again to see your warehouses. Each row shows the warehouse's address and whether it's ready to ship from:
| Shows | Means |
|---|---|
| Ready to ship | The warehouse has a street address, a city and a country. Shipping providers can use it as an origin. |
| Incomplete address | Part of the address is missing, usually the street. The warehouse can hold stock, but it can't be used as a ship-from origin yet. |
| Needs address | The warehouse has no address at all. |
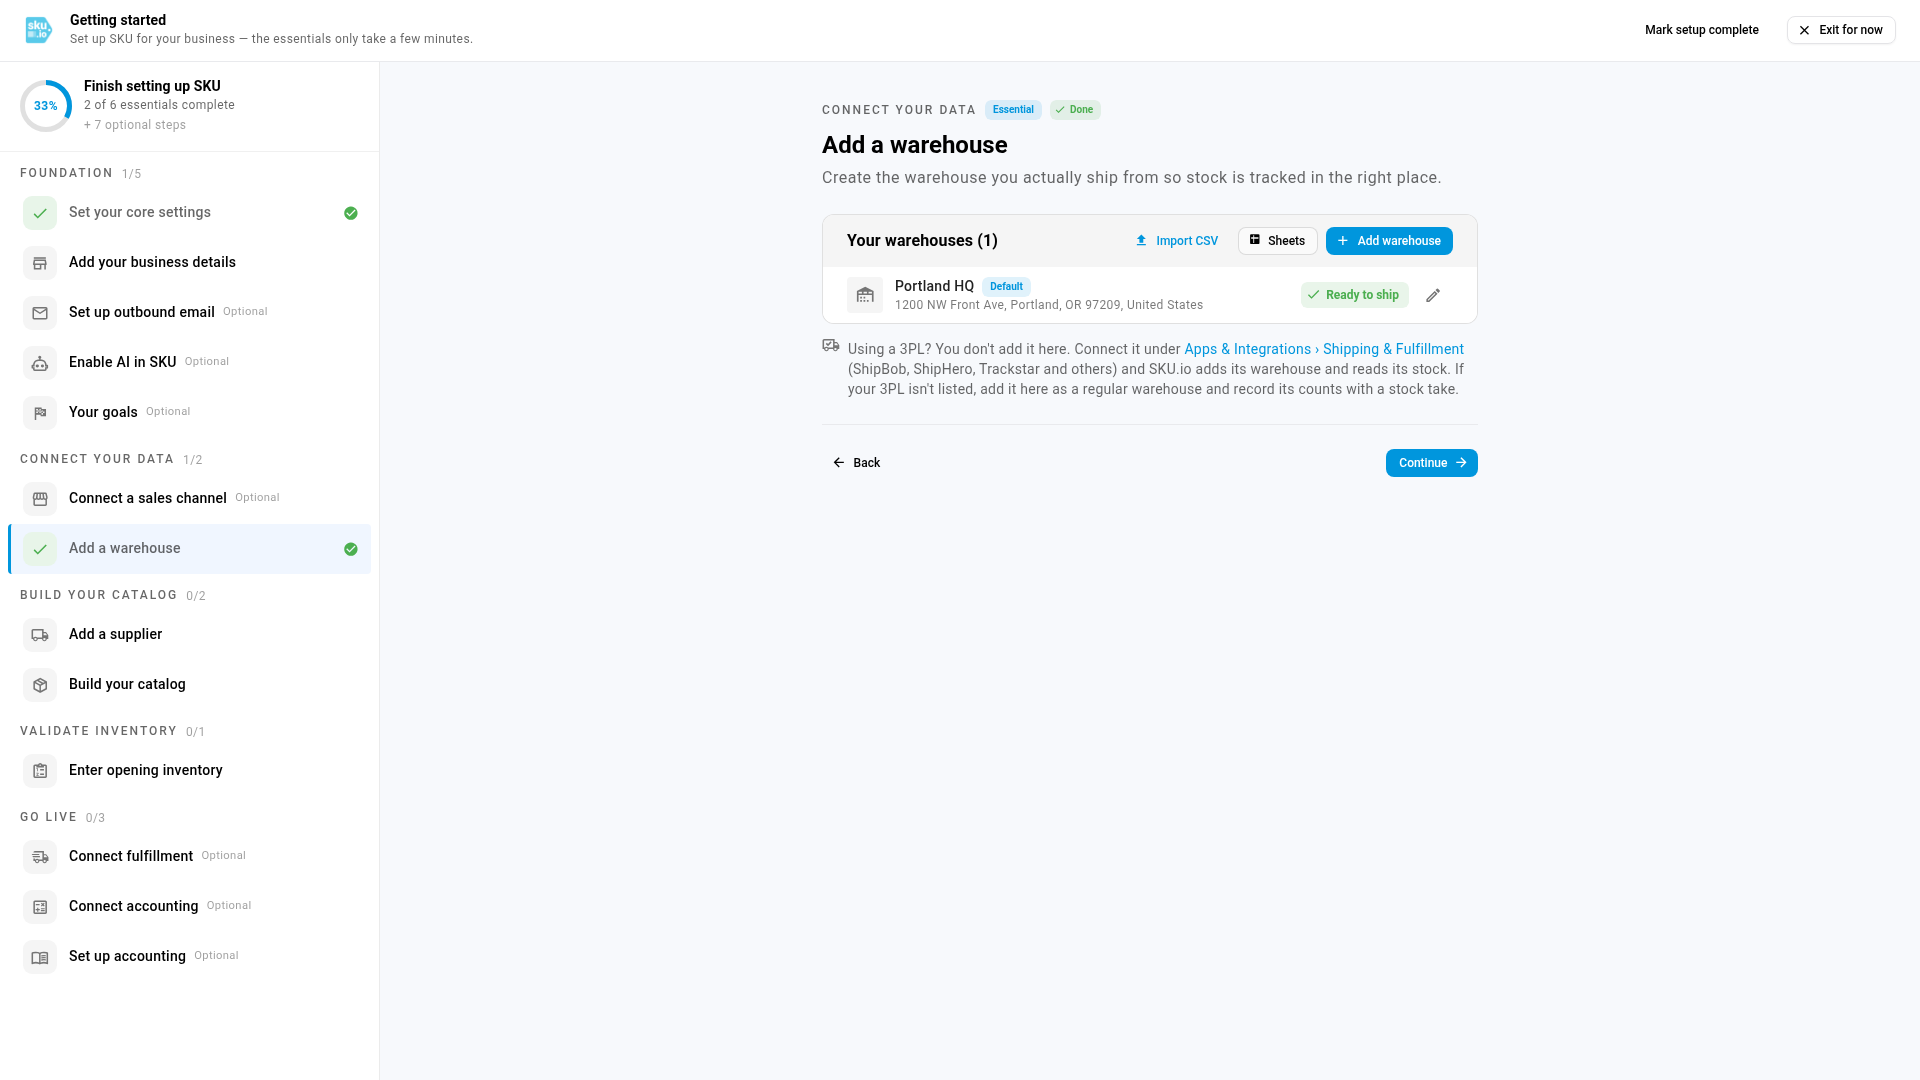
To change a warehouse, click the pencil on its row. The Edit warehouse dialog opens with the saved name and address filled in. Click Save warehouse to keep your changes.
Add another location
To add a location you run yourself, click Add warehouse, enter its name and address, and click Add warehouse in the dialog.
Running several locations? Click Import CSV, or use Sheets, to add them from a spreadsheet instead of one at a time.
Adding a 3PL
You don't add a 3PL's warehouse in this step. Connect the 3PL under Apps & Integrations, in Shipping & Fulfillment (ShipBob, ShipHero, Trackstar and others). SKU.io then adds the 3PL's warehouse and reads its stock. The link in the step opens that list for you.
If your 3PL isn't listed there, add it in this step as a regular warehouse. Record the 3PL's counts with a stock take, and compare them by hand.
Next steps
- Create and edit a warehouse covers a warehouse's other settings, such as routing and dispatch.
- Compare 3PL inventory with SKU.io once a 3PL is connected.
- Continue to Build a clean catalog.
Video transcript
When you first sign in, SKU.io opens the Getting started guide. It takes you through setup one step at a time, and tracks your progress. Add a warehouse stays locked until your core settings are saved. So start here, and pick your inventory start date from the calendar. It's the first day SKU.io counts your stock. Check that the timezone is right. Each date format shows today's date in that zone. When everything looks right, click Save and continue. Saving takes a moment. Then the guide moves on, and Add a warehouse unlocks in the list on the left. Choose that step from the list. Every new account starts with one warehouse, and it still needs an address. Give the warehouse the name your team uses for this location. Then enter the first line of its street address. Shipping providers use this address as the origin for labels and rates. Next, type the ZIP code into the Zip or Postal Code box. SKU.io looks up that ZIP code, and fills in the city and state on its own. Check that the city and state are right. A partial address can get your fulfillments rejected, so fill out every line. With every line filled in, the address is complete. Click Save and continue. The guide saves the warehouse, and moves on to suppliers. To check the result, go back to Add a warehouse. The warehouse now shows its full address, and it's marked Ready to ship. To change a warehouse later, click the pencil on its row. The dialog opens with the saved address already in place. To add another location that you run yourself, click Add warehouse at the top of the list. If you use a 3PL, you don't add its warehouse in this step. Connect the 3PL under Apps and Integrations, and SKU.io creates the 3PL's warehouse. If your 3PL isn't listed there, add it here as a regular location.