Connect Shippo
Connect your Shippo account with an API token. Then tell SKU.io which of your shipping methods each Shippo service level stands for, and give every warehouse you ship from a Shippo ship-from address. Until a warehouse has one, you can't buy labels for orders that ship from it.
Before you begin
- You need permission to connect integrations.
- In Shippo, go to Settings → Advanced → API. Under Tokens, click Generate Token and copy a Test token (
shippo_test_…) to try things out, or a Live token (shippo_live_…) to buy real labels. - Connect any carrier accounts you want to use at your own rates in Shippo first. A new Shippo account already includes Shippo's own carrier accounts.
Create the connection
-
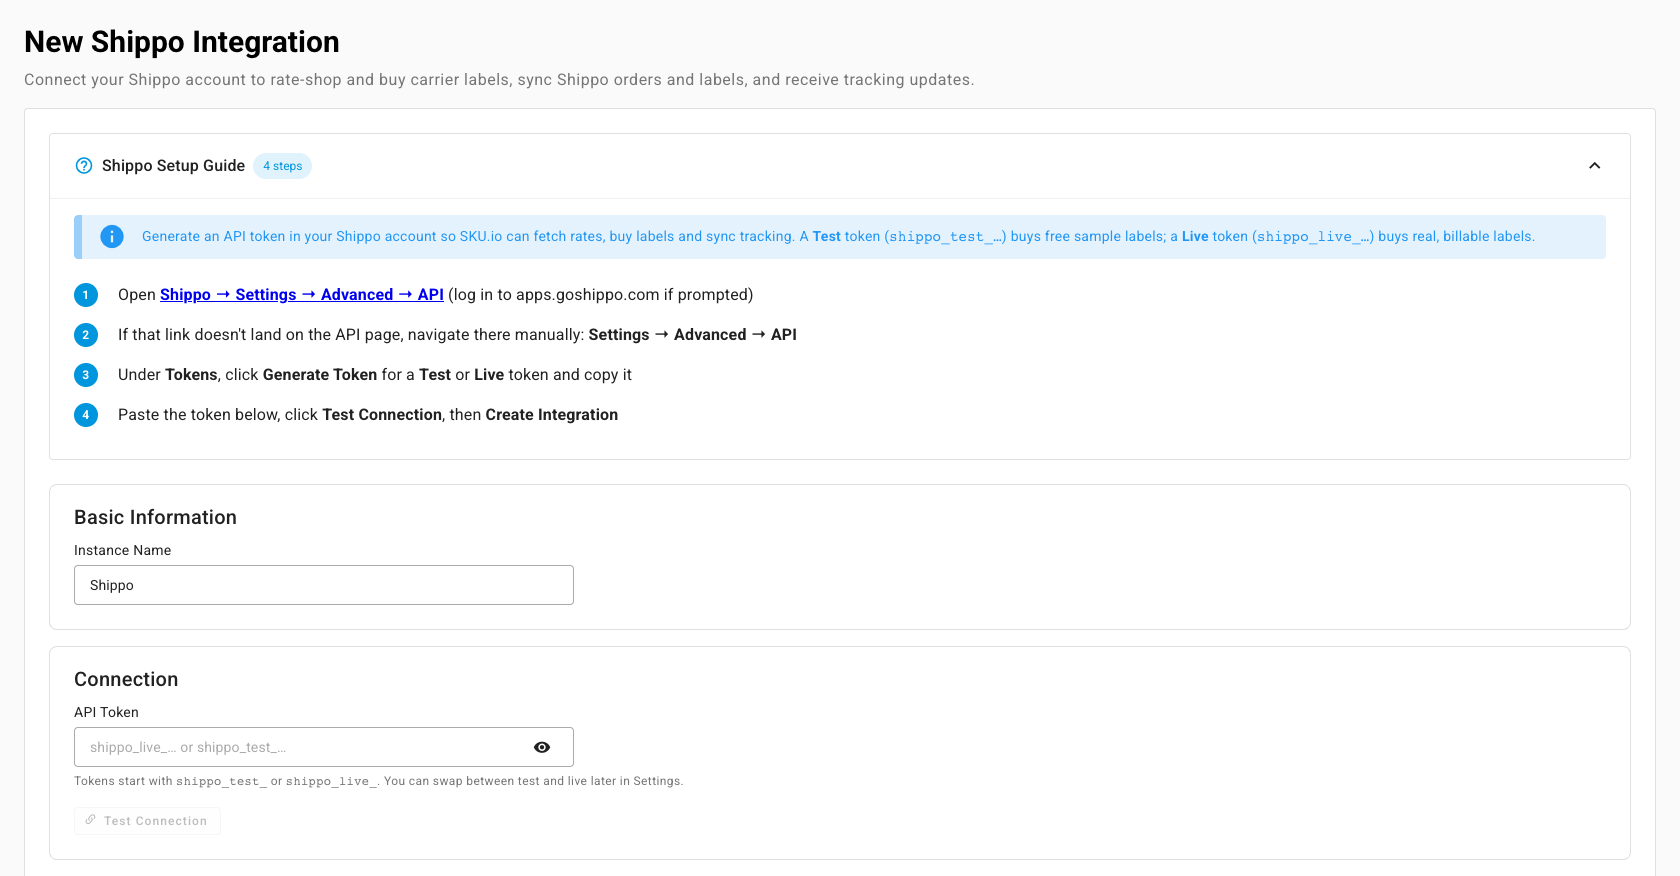
Go to Apps & Integrations, open Shipping & Fulfillment, and choose Shippo. The New Shippo Integration page opens, with the Shippo Setup Guide at the top.
-
Enter an Instance Name. It defaults to Shippo.
-
Paste the API Token.
-
Click Test Connection. SKU.io confirms that Shippo accepted the token, and whether it's a test or live token.
-
Under Sync Settings, check the Sync Start Date. Orders and labels created in Shippo from this date on come in with the first sync. It defaults to 30 days ago. Clear it to start from today.
-
Click Create Integration.
What you'll see: the Dashboard opens, and the first syncs of your carriers, orders, and labels run in the job tray. SKU.io registers its updates with Shippo for you. A test token shows a Test mode chip next to the connection's name.
You can connect only one Shippo account. If you try to add a second, SKU.io offers to open the existing one instead. To use another account, replace the token under Settings → Connection.
Map service levels to shipping methods
When you buy a label, the service you pick sets the shipment's shipping method from this mapping.
- Open the Carriers tab. Carrier Accounts lists each carrier on your Shippo account with how many of its service levels are mapped. Click a carrier to show only its service levels.
- Click Auto-match Unmapped. SKU.io links every unmapped service level whose name matches one of your shipping methods, and never changes a mapping you set yourself. It does this after every carrier sync too.
- For each service level that's still Unmapped, pick the SKU.io shipping method in SKU Shipping Method. It saves straight away. To set many at once, select the rows and use Set SKU shipping method…, then Apply to selected.
- Turn off Enabled on any service level you never want to buy. Disabled service levels don't appear among the rates when you buy a label.
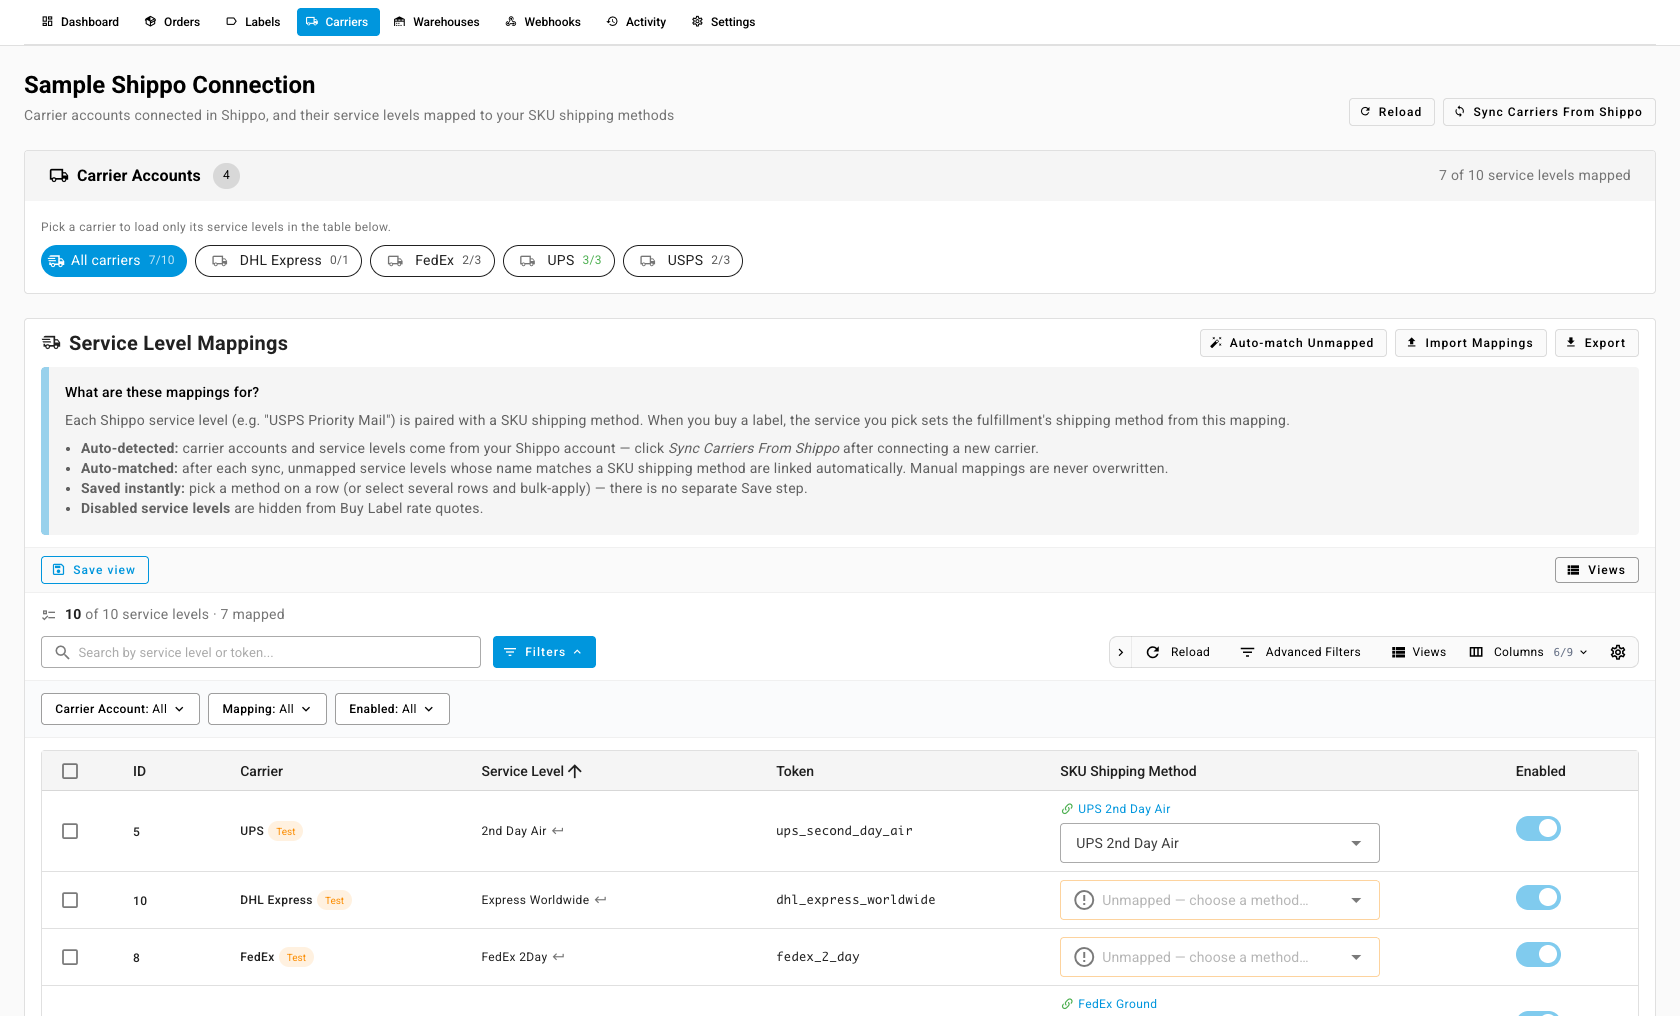
Connected a new carrier in Shippo? Click Sync Carriers From Shippo to bring its service levels in. To map many service levels from a spreadsheet, use Export and Import Mappings.
Add a ship-from address for each warehouse
Shippo has no warehouses of its own. Instead, each of your warehouses uses a Shippo sender address for rate quotes and labels.
-
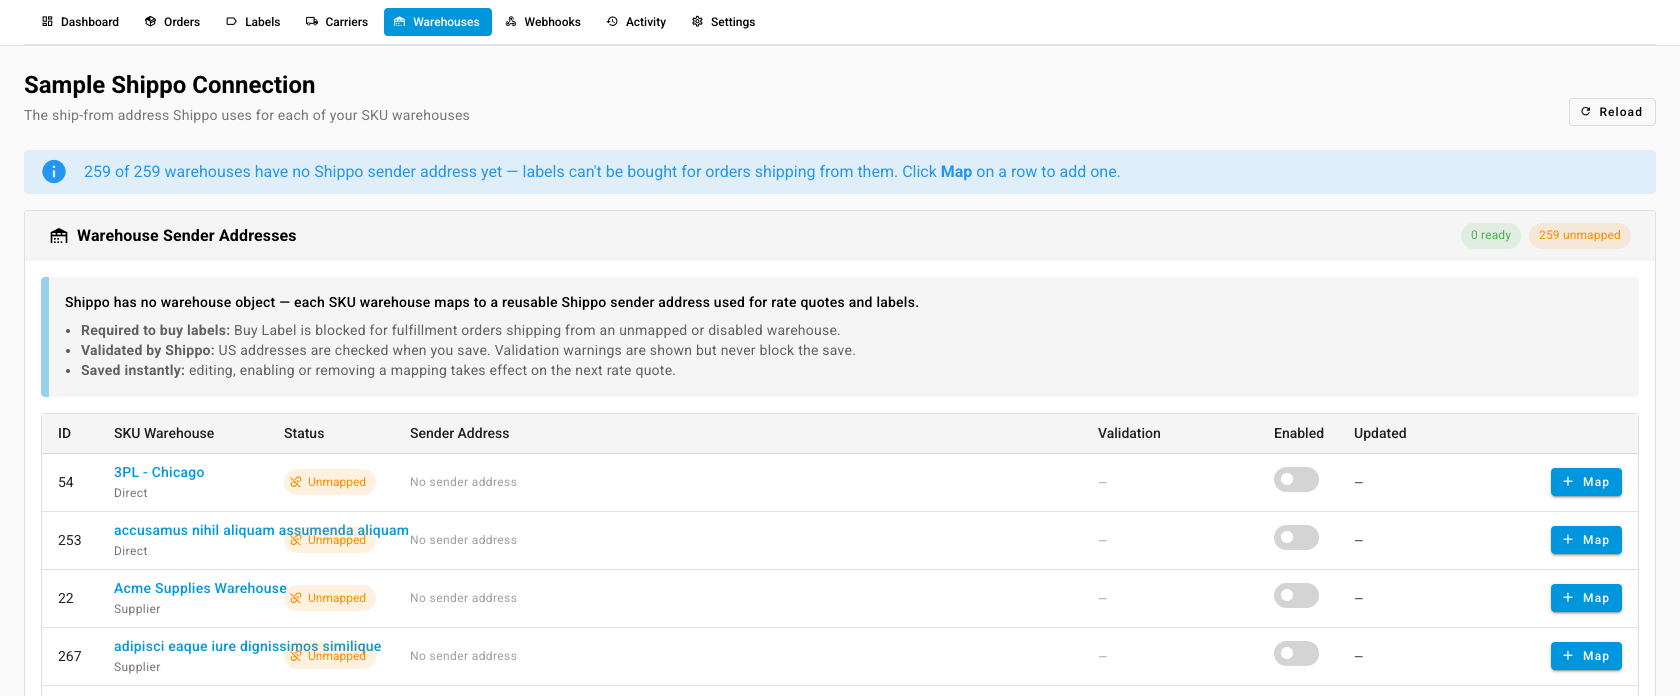
Open the Warehouses tab. The banner counts the warehouses that have no sender address yet.
-
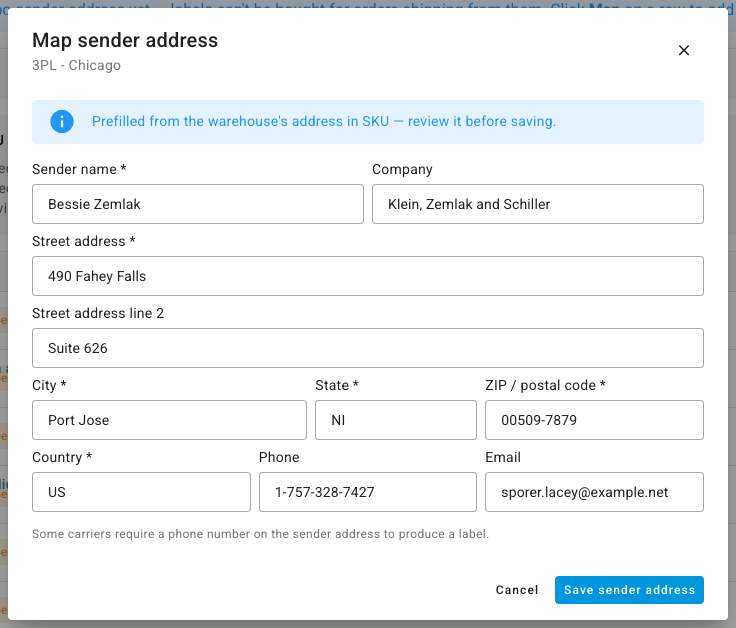
Click Map on the warehouse you ship from. Map sender address opens, filled in from the warehouse's address in SKU.io.
-
Check the Sender name, Street address, City, State, ZIP / postal code, and two-letter Country. Add a Phone: some carriers won't produce a label without one.
-
Click Save sender address.
What you'll see: the row shows Mapped, and its Validation column shows what Shippo made of a US address. A warning never blocks the save. Changes apply to your next rate quote. Turn off Enabled to stop a warehouse buying labels without losing its address.
Check the settings
| Tab | Setting | What it does |
|---|---|---|
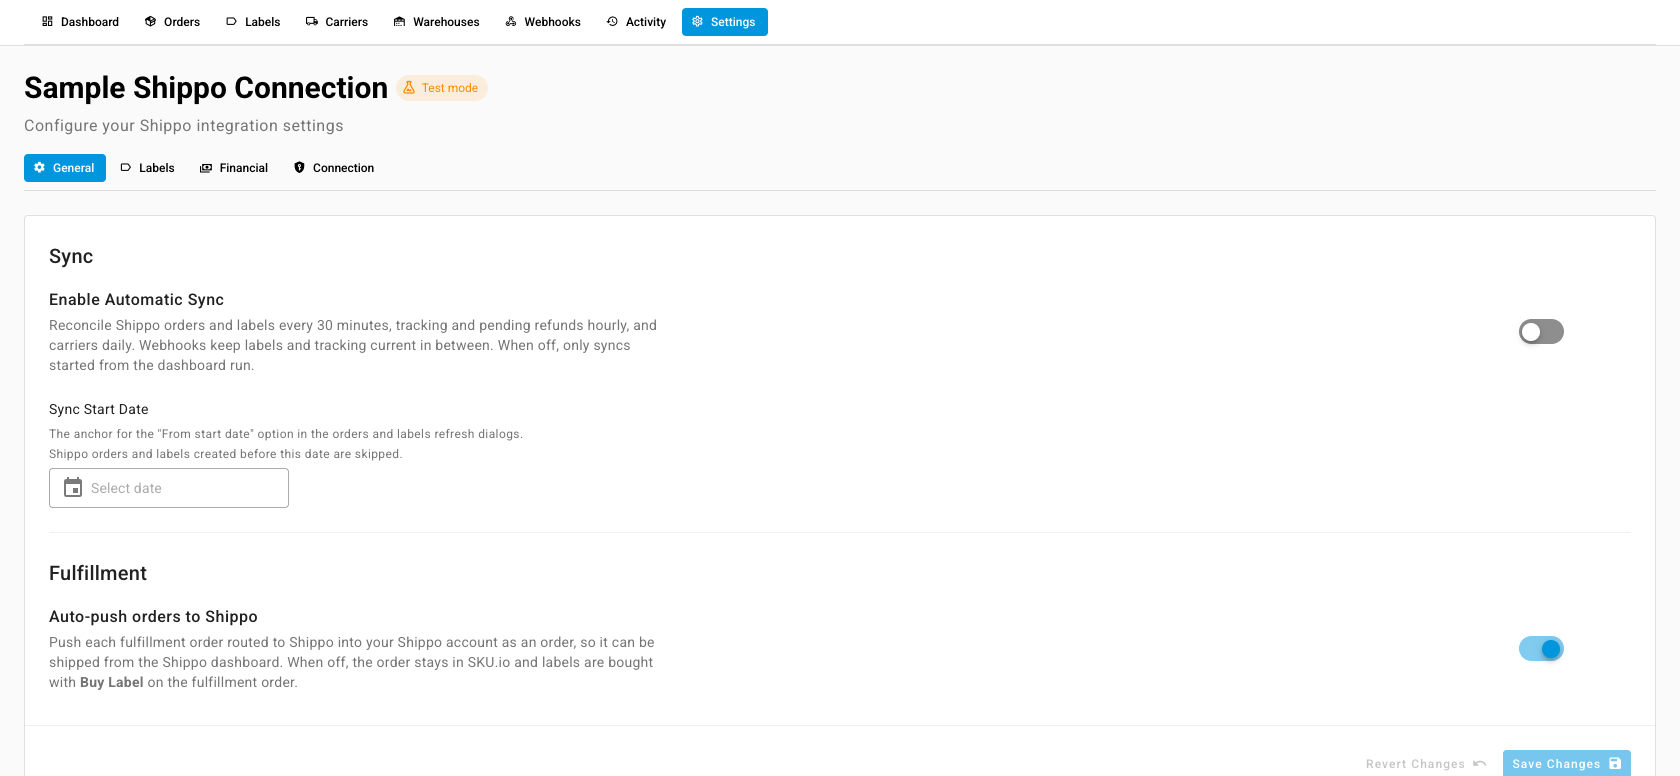
| General | Enable Automatic Sync | Syncs orders and labels every 30 minutes and carriers daily. Tracking and pending refunds are checked hourly either way. |
| General | Sync Start Date | Where the From start date option in the sync dialogs starts. Shippo orders and labels created earlier are skipped. |
| General | Auto-push orders to Shippo | Pushes each fulfillment order you submit to Shippo into your Shippo account as an order, so you can also ship it from the Shippo dashboard. It's on for new connections. When off, the order stays in SKU.io and you buy its label with Buy Label. |
| Labels | Default Label Format | The format the Buy Label dialog starts with: PDF 4×6 for thermal printers, PDF (Letter) or PDF A4 for office printers, ZPL II for Zebra printers, and more |
| Financial | Record shipping costs | Writes each label's cost, in the currency Shippo quoted, to its shipment and adds a matching Shipping Cost line to the sales order's financials. Refunding the label removes the cost and the line. When off, labels are still imported but no cost is recorded. Carrier adjustments made after a label is used aren't included. |
| Connection | API Token, Test Connection | Shows the current token masked. Paste a new one in Replace Token to swap it; swapping a test token for a live one switches the connection to live mode. |
| Connection | Disconnect | Removes the connection and everything synced from Shippo. Labels you already bought stay valid at Shippo. |
The Webhooks tab shows the three updates SKU.io registered with Shippo: label created, label updated, and tracking updated. If they show as not registered, click Register Webhooks.