Connect Rithum DSCO and sell drop-ship orders
Rithum DSCO is the drop-ship network that retailers such as Nordstrom, Neiman Marcus and DSW use to send their shoppers' orders to suppliers. Connect your DSCO supplier account to SKU.io and each DSCO purchase order becomes a customer drop-ship sales order. SKU.io acknowledges it, sends DSCO a ship confirmation with tracking when you ship, passes cancellations both ways, and sends your stock to DSCO every hour.
Acknowledgements, ship confirmations, line cancels and inventory batches have not yet been verified against a real DSCO account. That check is waiting on a Rithum staging account. These features were built and tested against DSCO's official version 3 API specification and a built-in emulator. The screenshots and video in this guide were recorded against that emulator, so the connection shows as Rithum DSCO (emulator).
Before you begin
- You need a DSCO supplier admin login, so you can create API credentials.
- You need permission to connect integrations in SKU.io.
- Decide which SKU.io store your DSCO orders belong to.
- Check your inventory start date under Settings → Inventory. The DSCO start date can't be earlier.
- Look up your cancel codes in DSCO under Settings → Mapping → Cancel Code Mapping. SKU.io needs one before it can send a cancellation.
If another tool also sends stock or tracking to DSCO for this supplier account, turn that off there so the two don't overwrite each other.
Connect your DSCO account
-
Go to Apps & Integrations.
-
Type DSCO into the search box and choose Rithum DSCO.
-
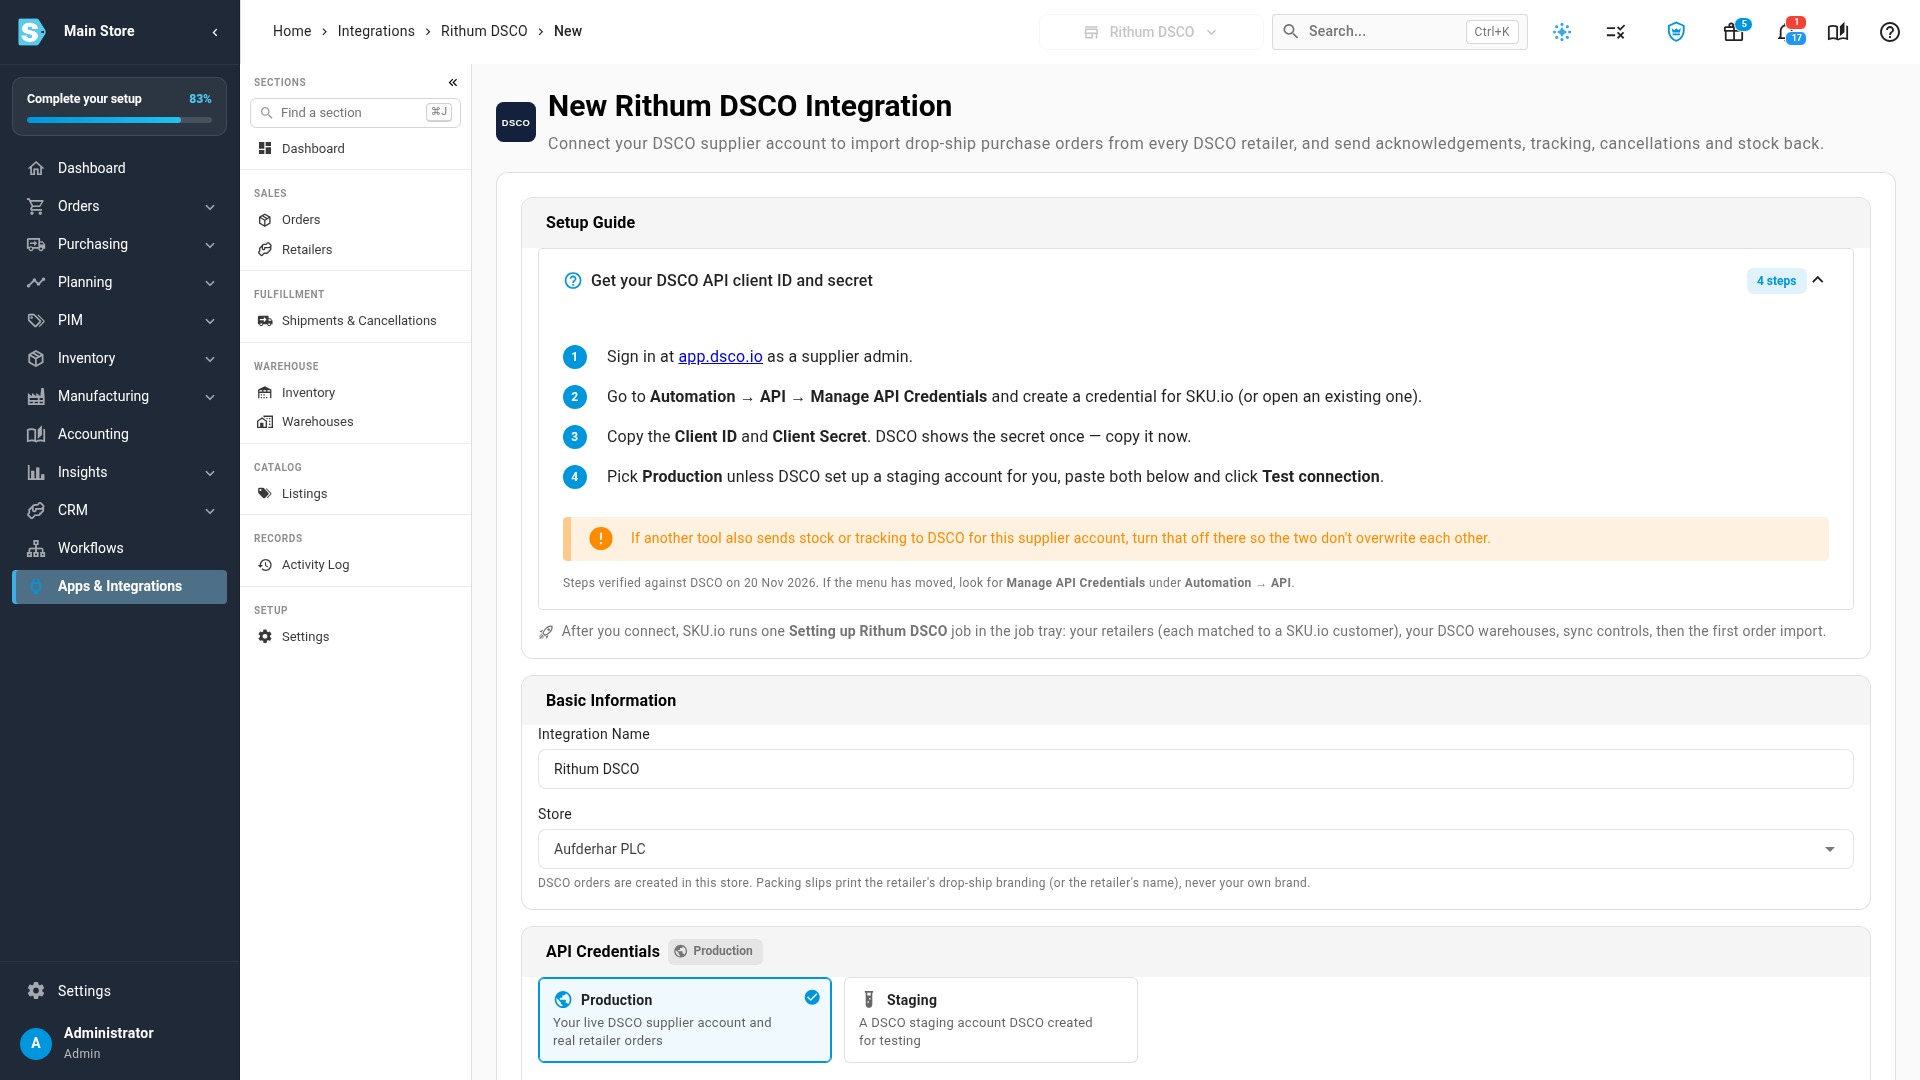
Click Add Instance. The New Rithum DSCO Integration page opens, with a Setup Guide at the top.
-
In DSCO, sign in at app.dsco.io as a supplier admin, go to Automation → API → Manage API Credentials, and create a credential for SKU.io (or open an existing one).
-
Copy the Client ID and Client Secret. DSCO shows the secret only once, so copy it now.
-
Back in SKU.io, check the Integration Name and pick the Store. DSCO orders are created in this store.
-
Under API Credentials, keep Production selected unless DSCO set up a staging account for you.
-
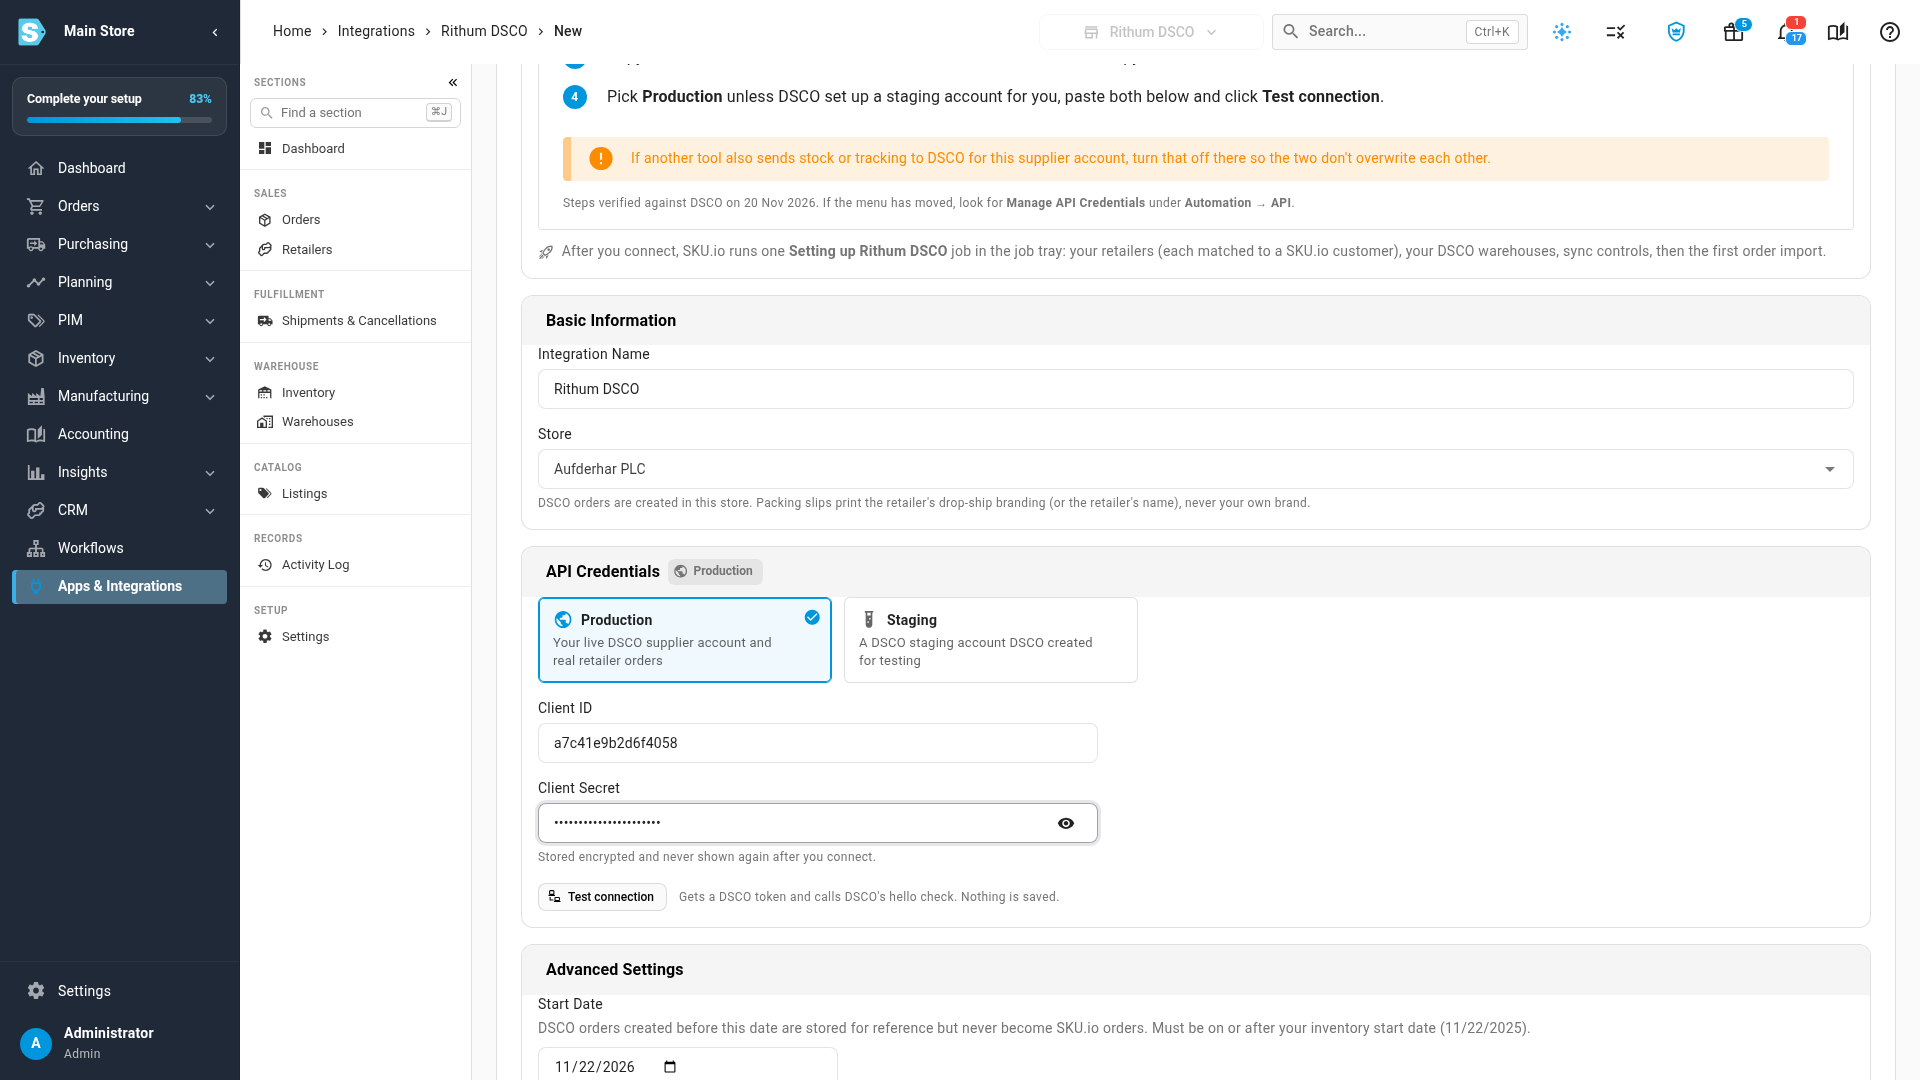
Paste the Client ID and Client Secret. The secret is stored encrypted and never shown again after you connect.
-
Click Test connection. It checks the credentials with DSCO and saves nothing.
-
Under Advanced Settings, check the Start Date. DSCO orders created before it are kept for reference on the Orders page but never become SKU.io orders. Leave Automatic Sync on to import orders every 5 minutes and send stock on the inventory schedule.
-
Click Connect.
SKU.io runs one Setting up Rithum DSCO job in the job tray. It brings in your retailers, each matched to an SKU.io customer, and your DSCO warehouses, then imports your first orders. When it finishes, the Rithum DSCO Dashboard shows your connection.
Map retailers to customers
Every DSCO retailer bills its orders to one SKU.io customer, so you can report on each retailer.
- Open Retailers from the sections on the left.
- Check the SKU Customer on each row. SKU.io matches a new retailer to a customer with the same company name, or creates a customer for it.
- To bill a retailer to a different customer, click the pencil next to the customer and pick another one.
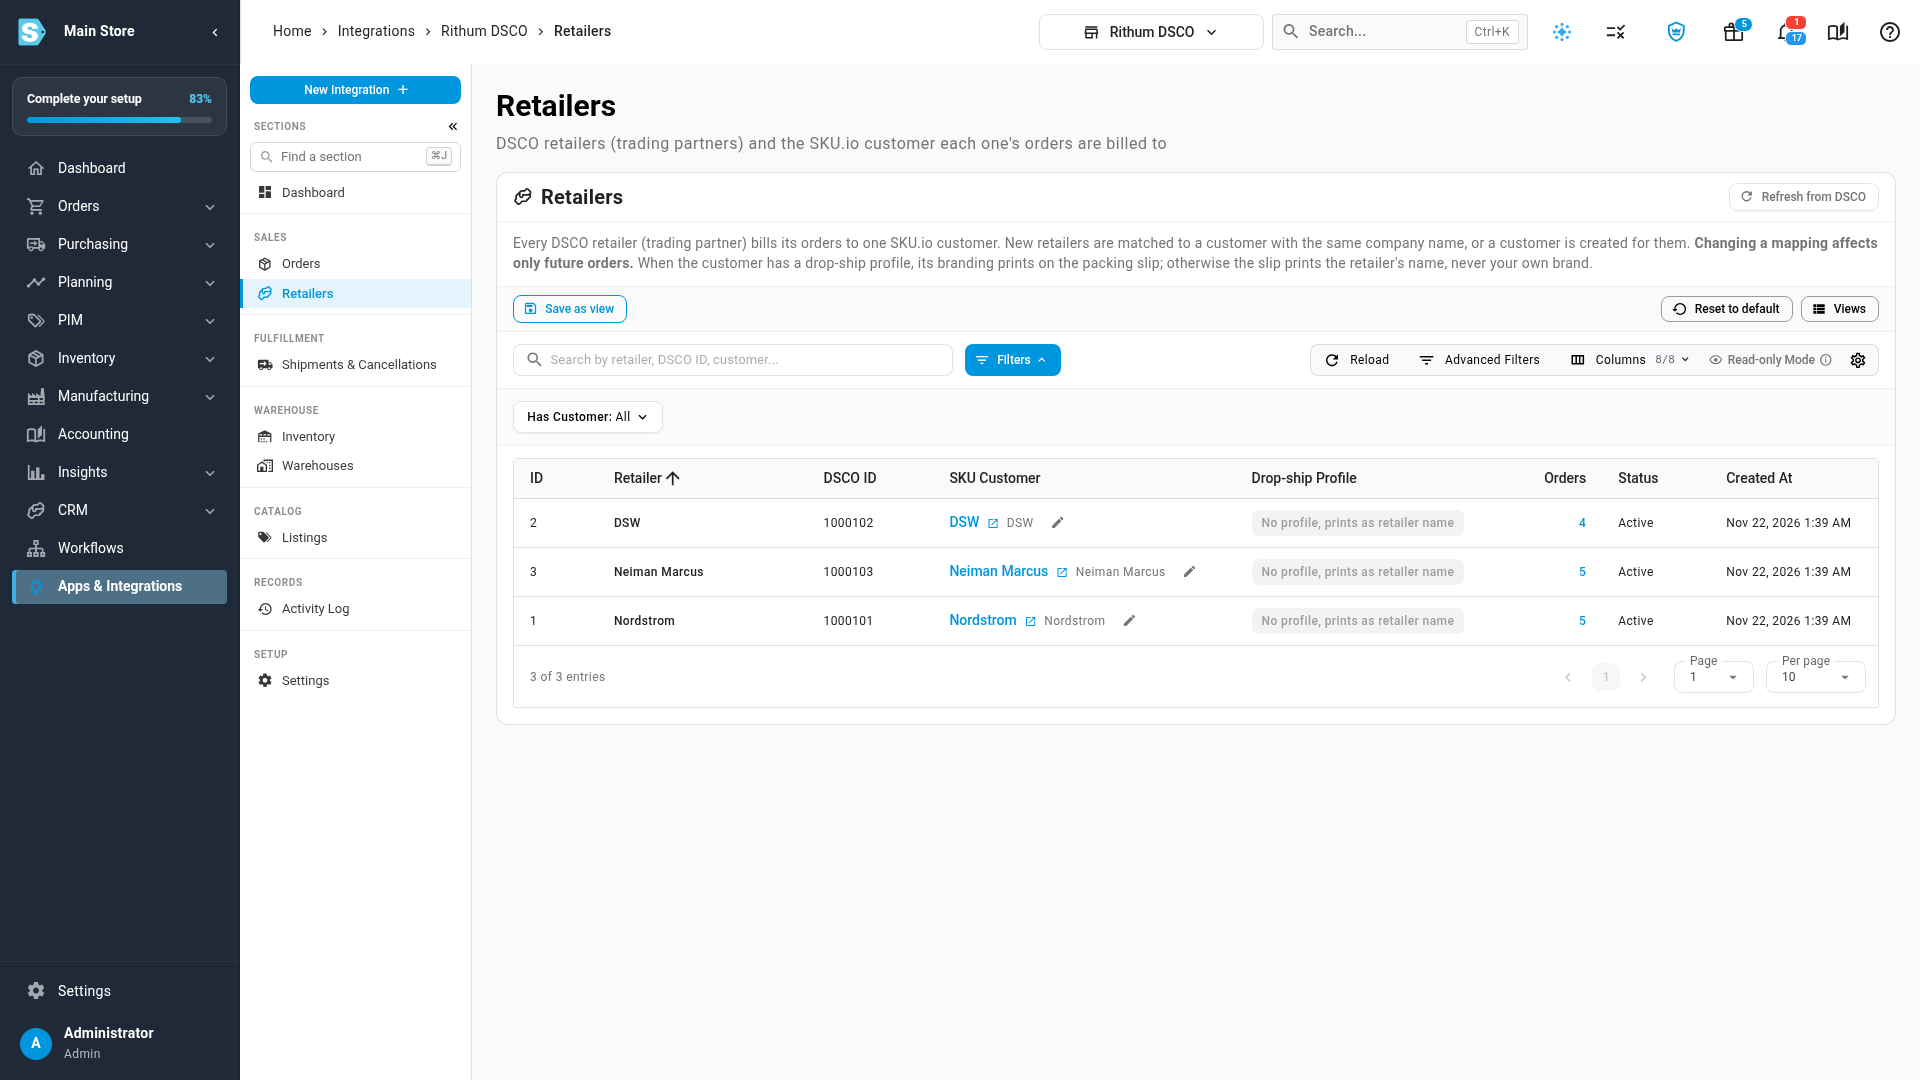
Changing a mapping affects only future orders. The Drop-ship Profile column shows how packing slips are branded: when the customer has a drop-ship profile, its branding prints on the slip. Otherwise the slip shows No profile, prints as retailer name, and the retailer's name prints instead. Your own brand never prints on a retailer's parcel.
Map warehouses and set safety stock
DSCO keeps stock per warehouse. Tell SKU.io which of your warehouses feed each DSCO warehouse.
- Open Settings, then Inventory Sync.
- Under Mappings, pick the SKU.io warehouses in Fed by SKU.io Warehouses for each DSCO warehouse.
- Set the Safety Stock to hold back for each one.
- Click Save Changes.
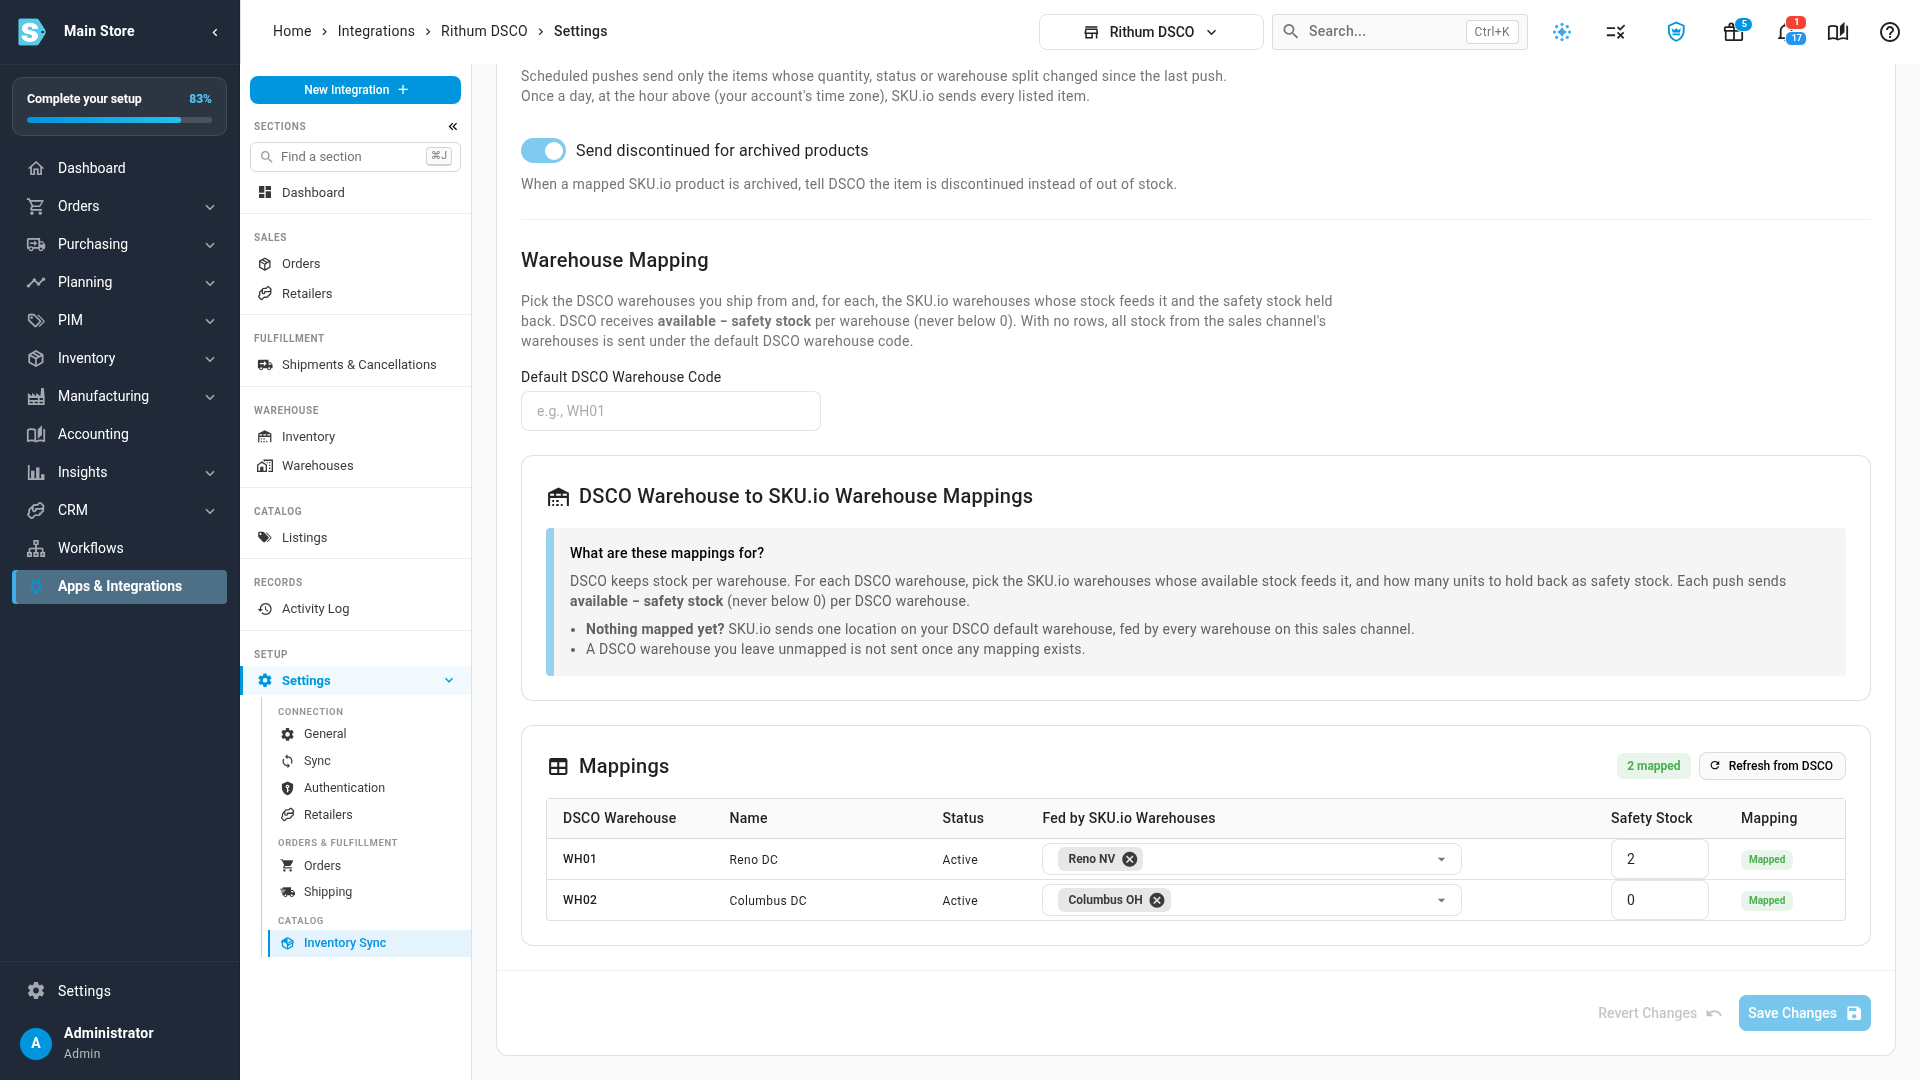
DSCO receives available − safety stock for each warehouse, never below zero. With no mappings, SKU.io sends all the stock from the sales channel's warehouses under the Default DSCO Warehouse Code. Once any mapping exists, a DSCO warehouse you leave unmapped isn't sent. The Warehouses page lists your DSCO warehouses and what feeds each one. Click Refresh from DSCO after you add a warehouse in DSCO.
Set the inventory feed schedule
On the same Inventory Sync tab, under Schedule:
| Setting | What it does |
|---|---|
| Push Frequency | How often SKU.io sends stock: every 15 minutes, every 30 minutes, Hourly (the default), every 4 hours, or daily. Each scheduled push sends only the items whose quantity, status or warehouse split changed. |
| Daily Full Push At | Once a day at this hour (your account's time zone), SKU.io sends every listed item. 02:00 by default. |
| Send discontinued for archived products | When a mapped SKU.io product is archived, DSCO is told the item is discontinued instead of out of stock. On by default. |
DSCO only accepts stock for items already in its catalog. A listing marked Not in DSCO catalog isn't sent until you add the item in DSCO and click Verify in DSCO on the Listings page.
Set up order handling
Open Settings, then Orders:
| Setting | What it does |
|---|---|
| Automatically create SKU.io orders | Every 5 minutes, new DSCO purchase orders become customer drop-ship sales orders billed to the retailer's customer. When it's off, orders still import, and you create SKU.io orders from the Orders page. |
| Include test orders | Off by default. Retailers send test orders while onboarding. They stay on the Orders page with a Test chip and never become SKU.io orders. |
| Acknowledge orders automatically | On by default. SKU.io acknowledges each order once its SKU.io order exists, and sends the sales order number as your supplier order number. |
| Resend Unconfirmed Acknowledgements After (minutes) | 30 by default. When DSCO hasn't confirmed an acknowledgement after this long, SKU.io sends it once more, then flags the order on the dashboard. |
| Default Cancel Code and Default Cancel Reason | The code and reason SKU.io sends with each cancellation. DSCO checks every code against your account's own cancel code mapping. Without a default code, cancellations are held back. |
Work your DSCO orders
Open Orders to see every DSCO purchase order.
- The SKU Order column links to the customer drop-ship sales order. An order still waiting for one shows Create.
- Lifecycle changes to Acknowledged once DSCO confirms the acknowledgement.
- The SLA chips show each order's acknowledge-by, ship-by and cancel-after dates.
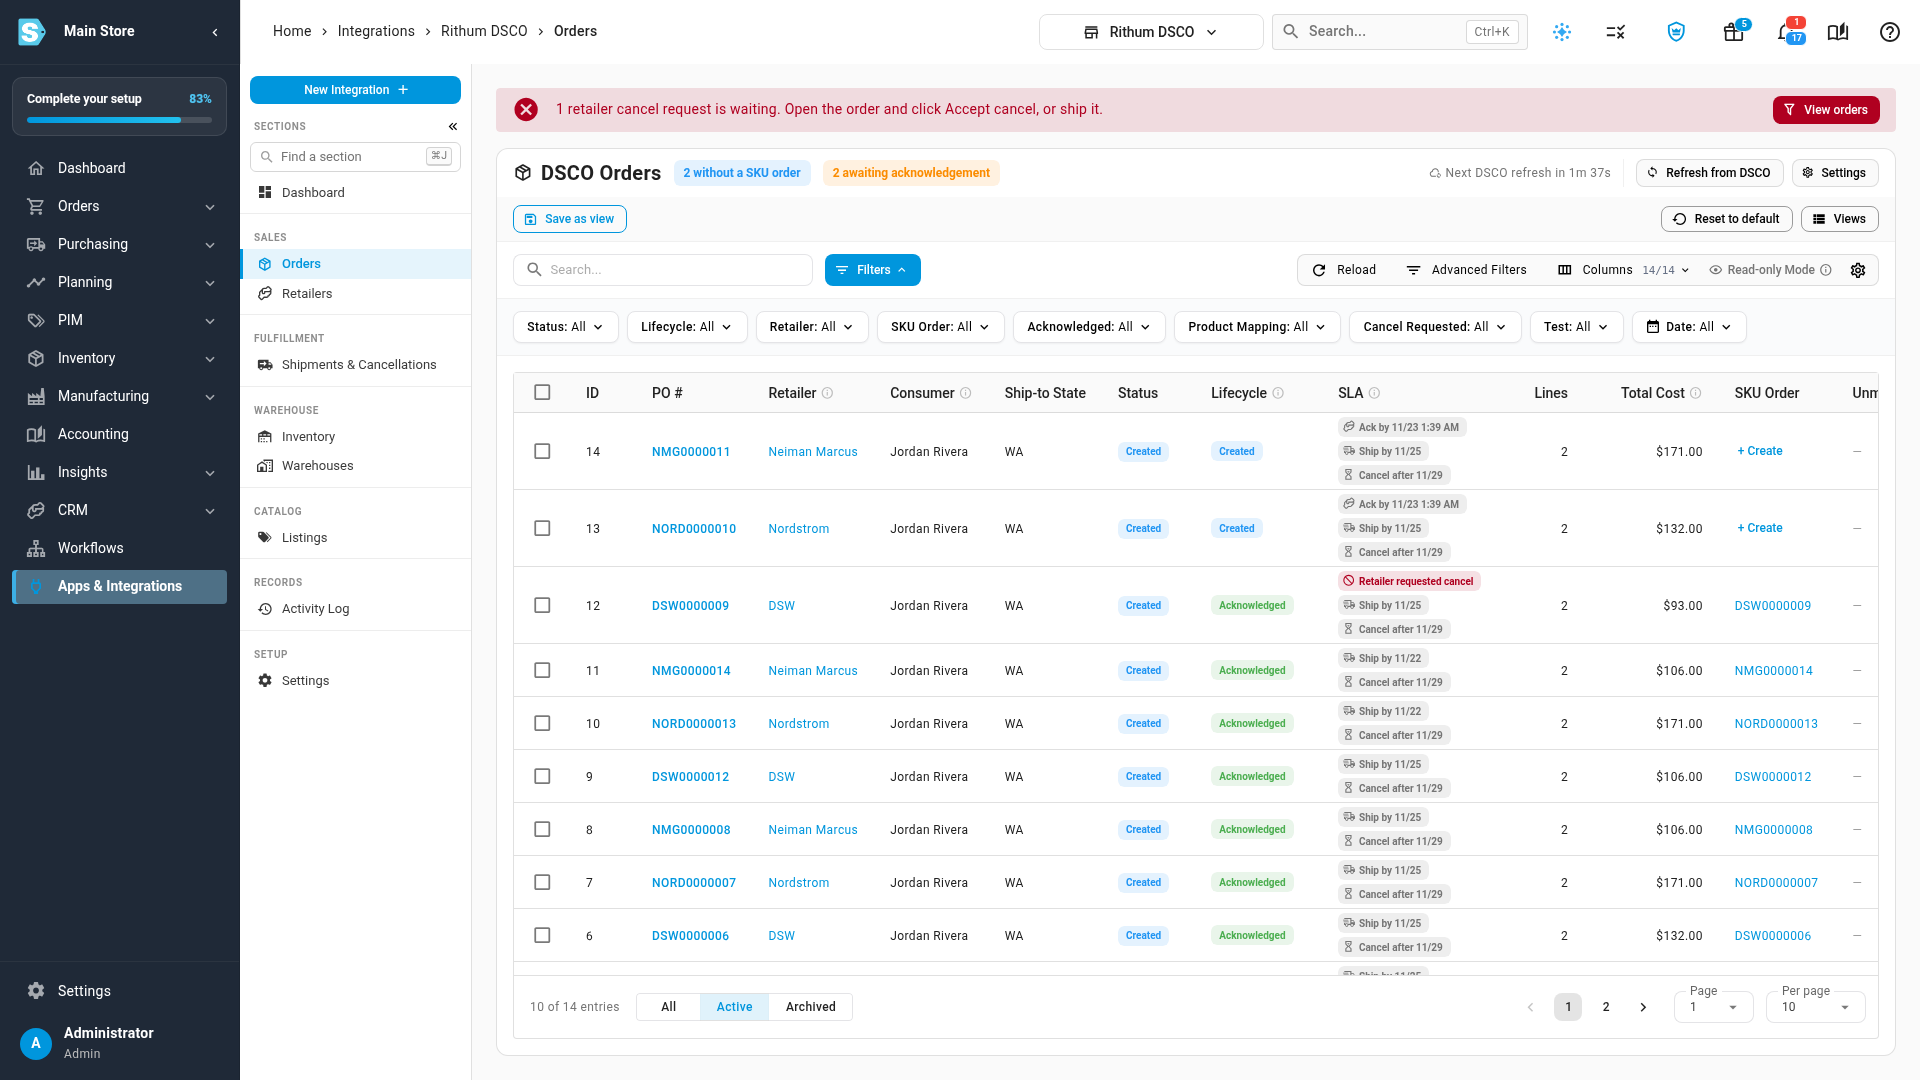
Click a PO number to open the order. It shows the retailer and consumer, every date, the line items with their mapped products, and the ship confirmations and cancellations sent for it.
Ship an order
Ship the SKU.io sales order as usual. When its fulfillment has a tracking number, SKU.io sends DSCO a ship confirmation automatically: one shipment for each tracking number, partial shipments included.
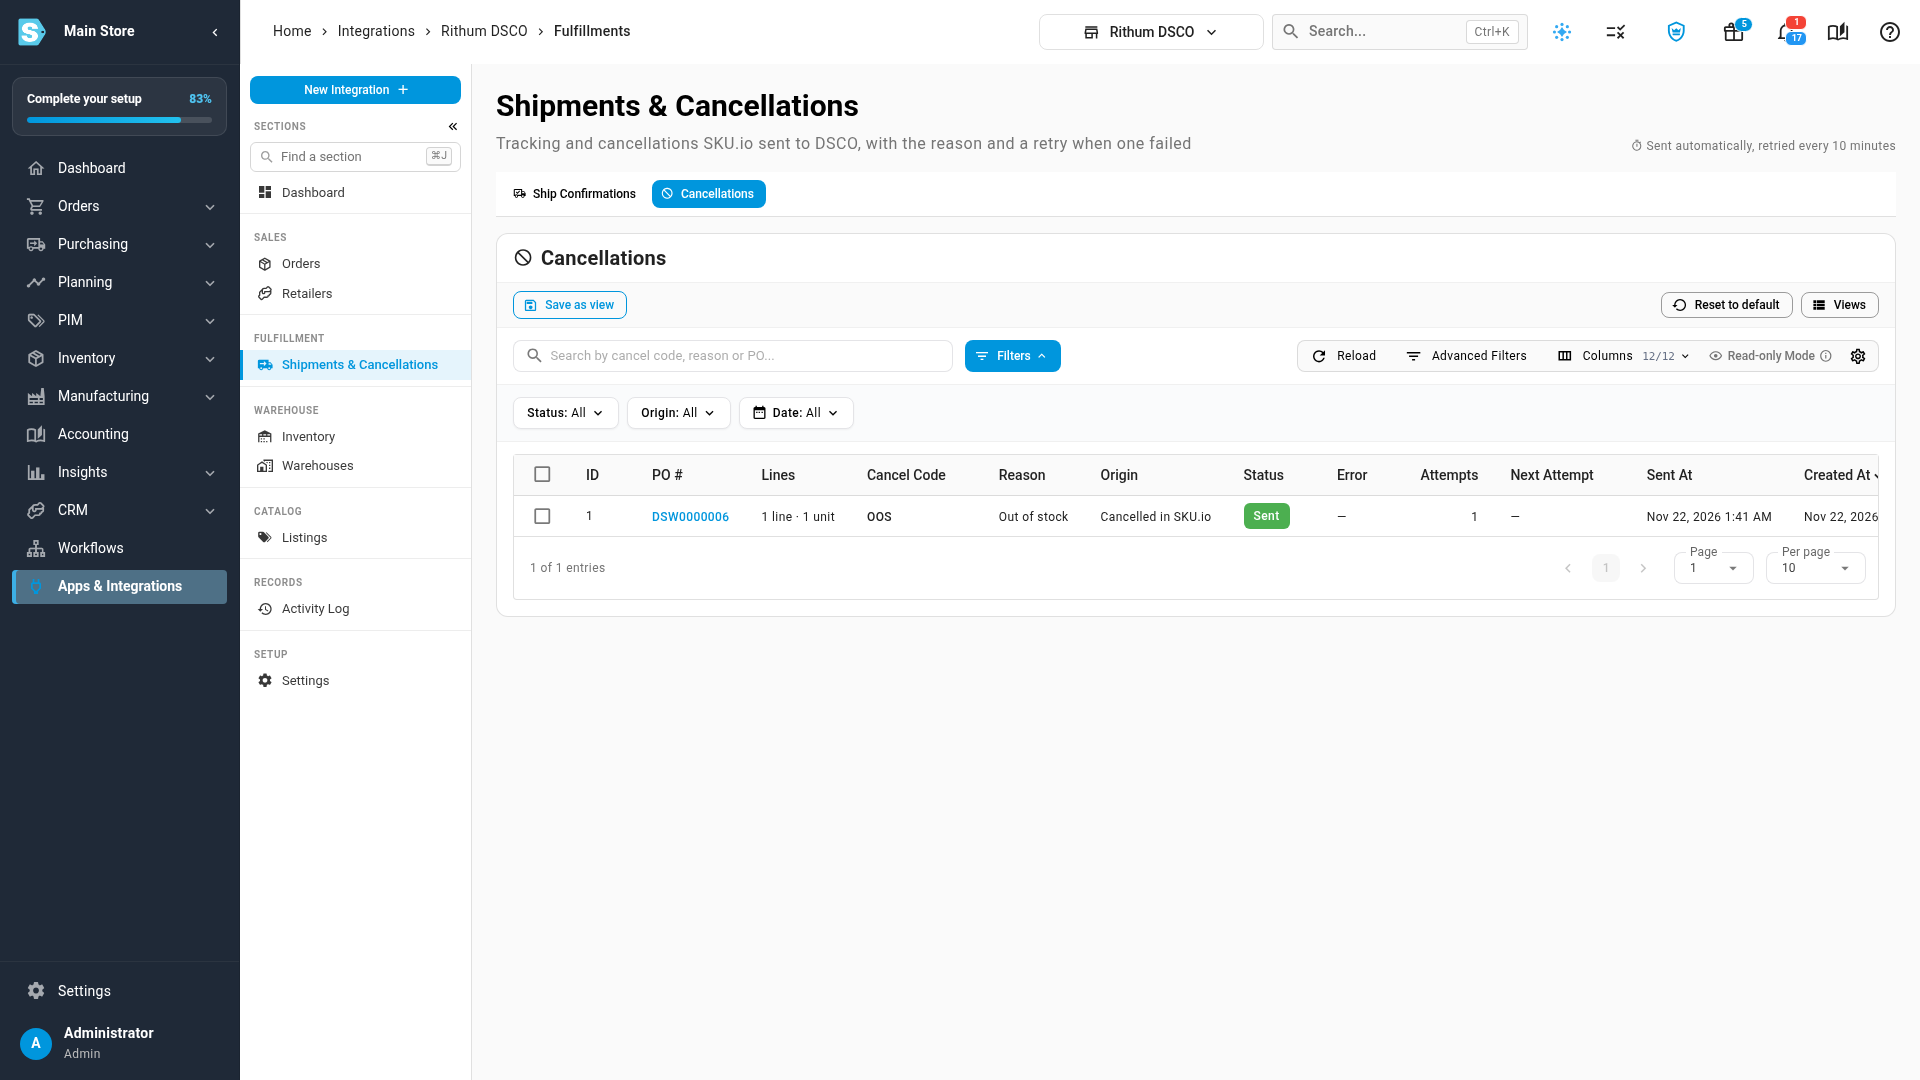
Open Shipments & Cancellations to see each confirmation:
- Sent: DSCO accepted it.
- Retrying: DSCO was busy or limiting requests. SKU.io sends it again automatically.
- Failed or Blocked: the Error column gives DSCO's reason, or what SKU.io is waiting for. Fix it, then select the row and click Retry.
Answer a retailer's cancel request
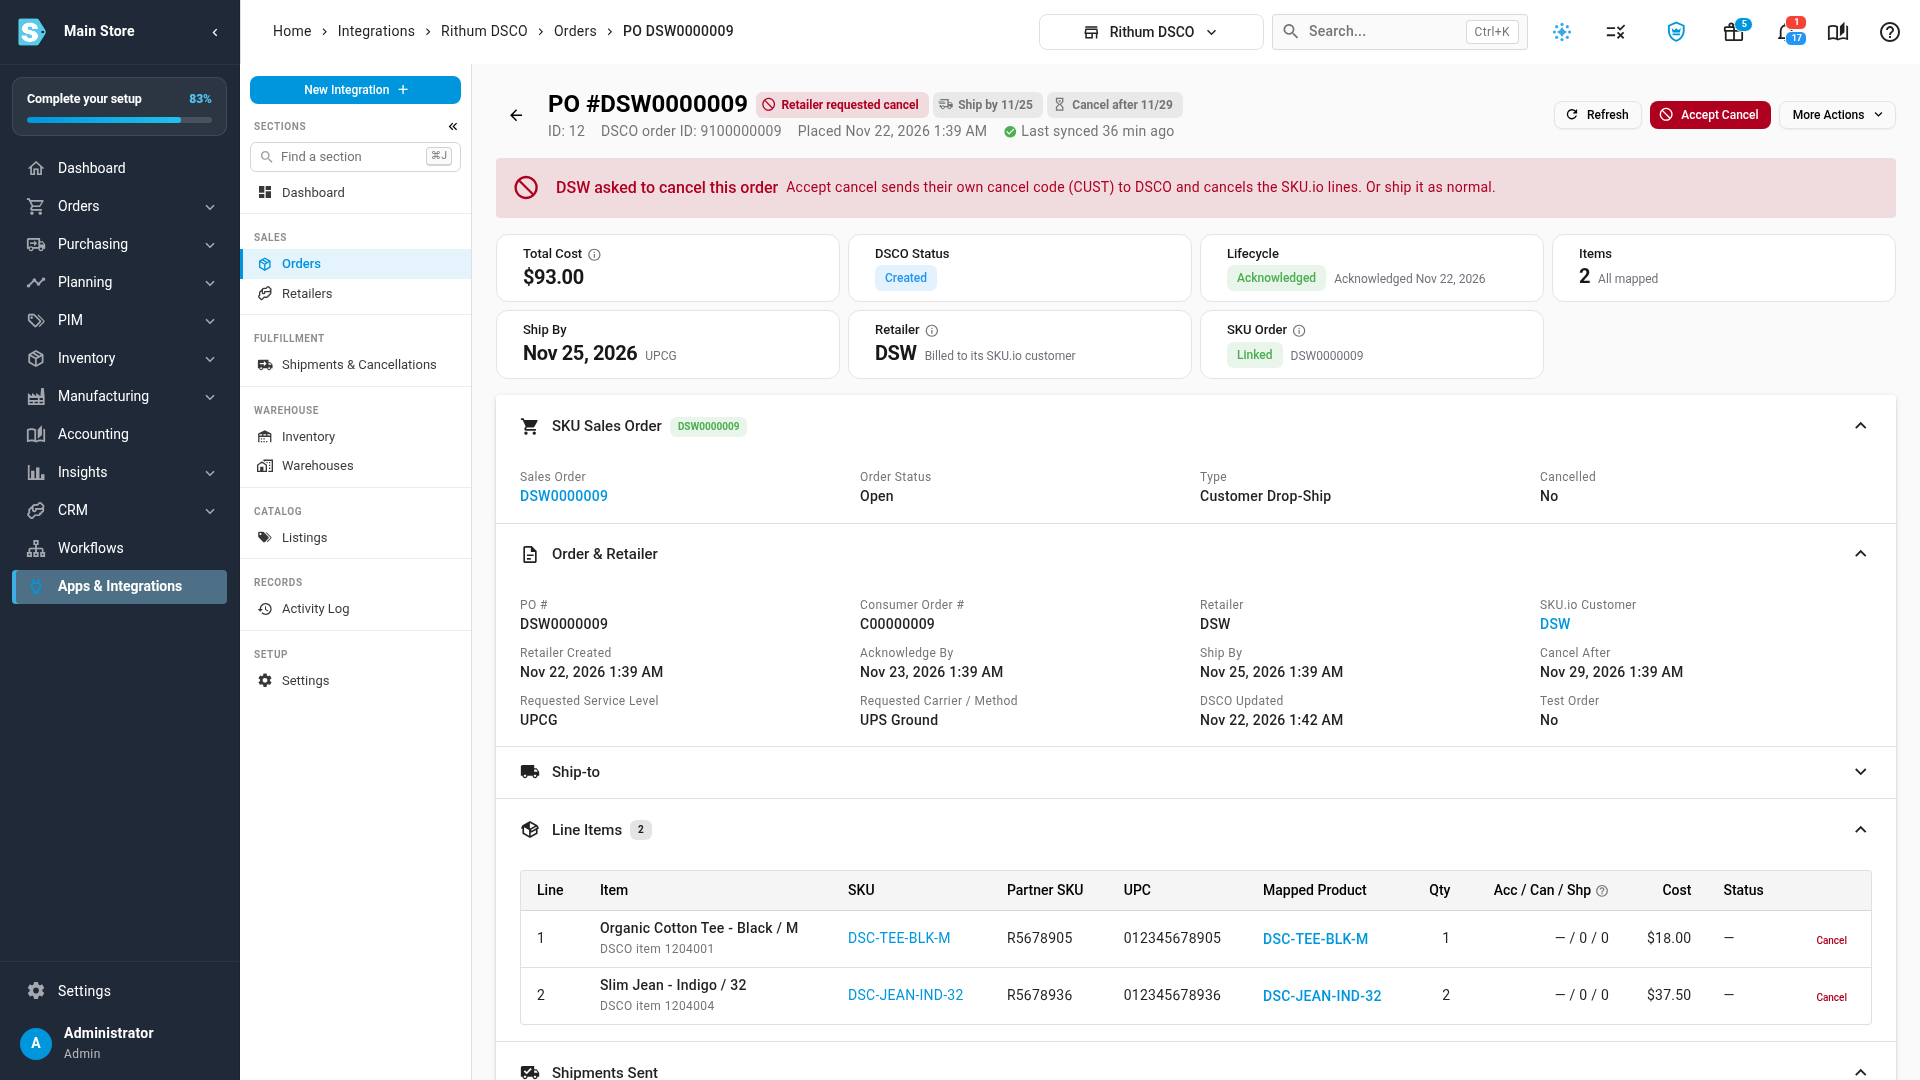
When a retailer asks to cancel, the order shows Retailer requested cancel and a red banner names the retailer.
- Open the order.
- Click Accept Cancel. SKU.io sends the retailer's own cancel code to DSCO and cancels the SKU.io lines.
Or ship the order as normal. When a retailer cancels lines outright in DSCO, SKU.io cancels the matching SKU.io lines on its next refresh.
Cancel lines yourself
Cancelling the SKU.io sales order, or some of its lines, sends the cancel to DSCO automatically with your default cancel code. To cancel from the DSCO order instead:
- Open the order and click More Actions → Cancel lines on DSCO.
- Set the Cancel qty on each line.
- Check the Cancel code. It must be a code in DSCO's Cancel Code Mapping.
- Click Cancel on DSCO. This can't be undone in DSCO, and the linked SKU.io lines are cancelled too.
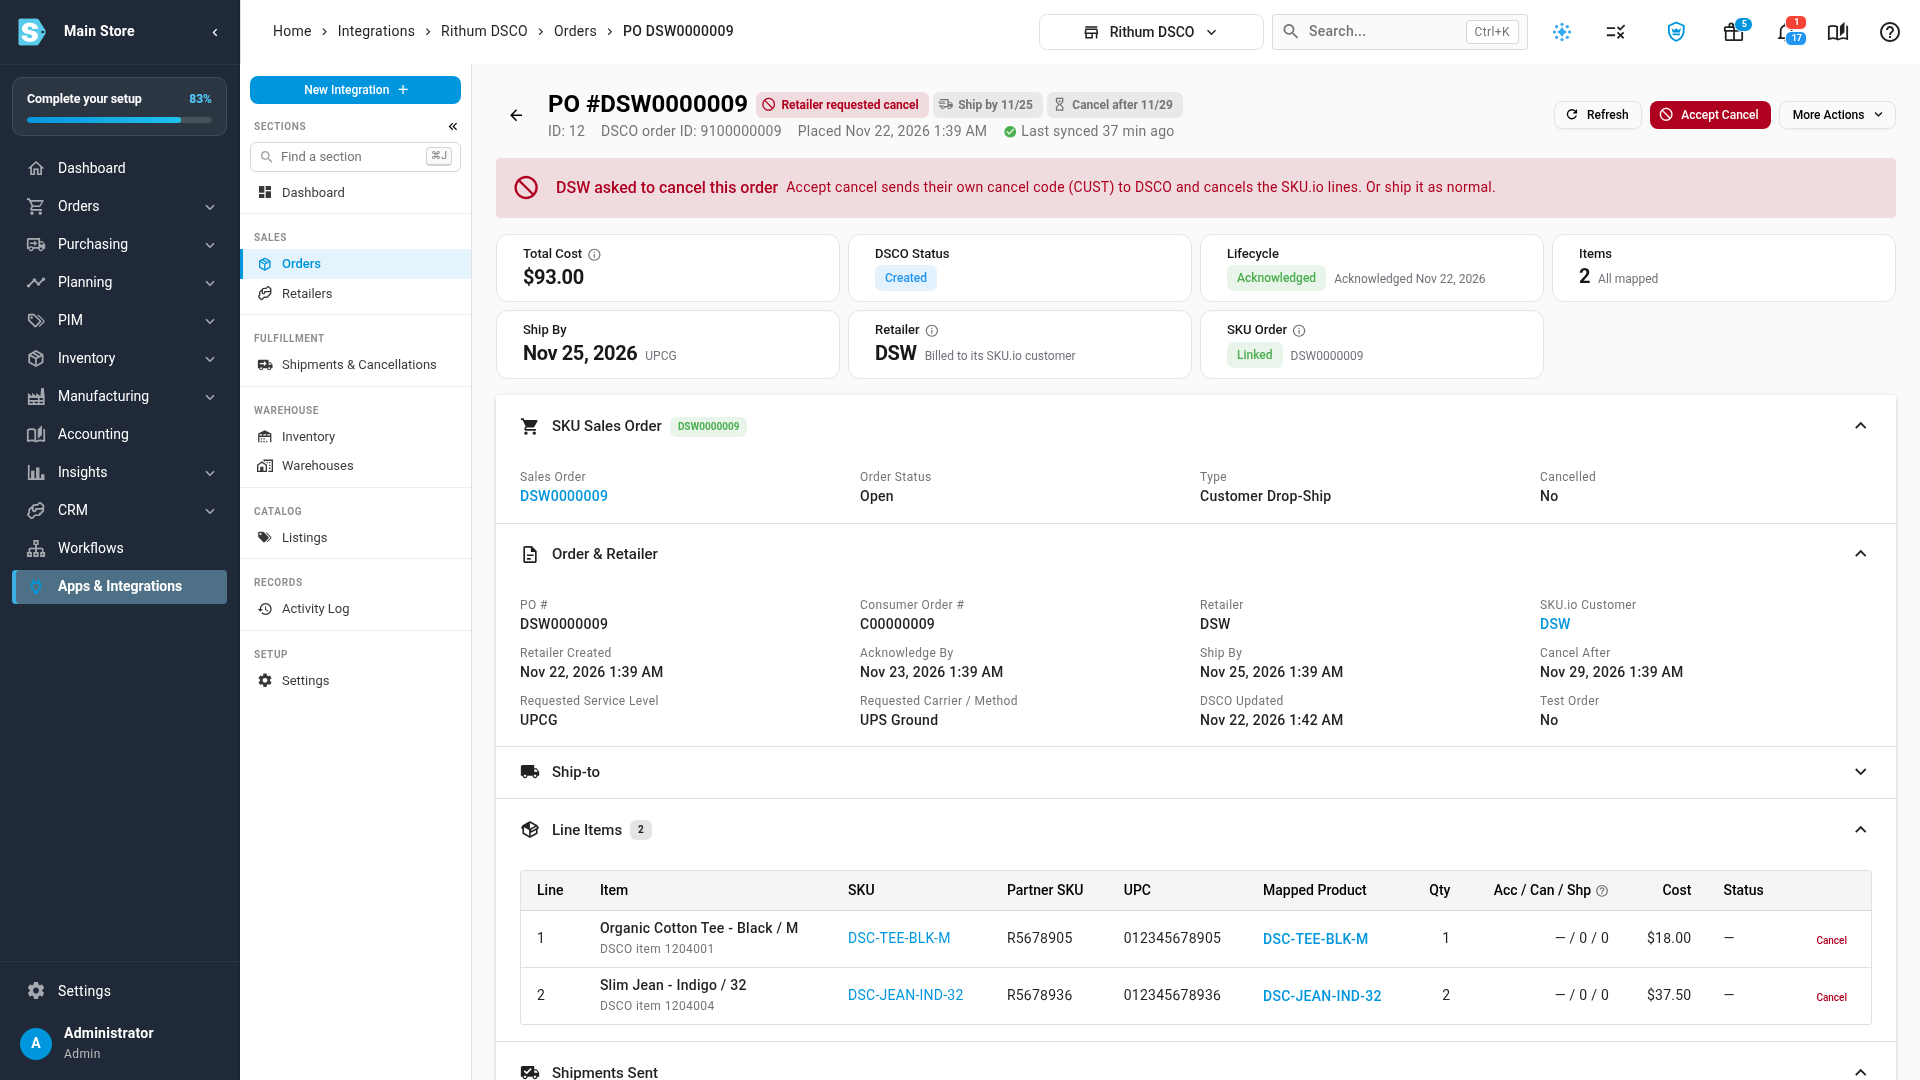
The Cancellations tab on Shipments & Cancellations lists every cancel sent, with its code, reason and status.
Check the inventory feed
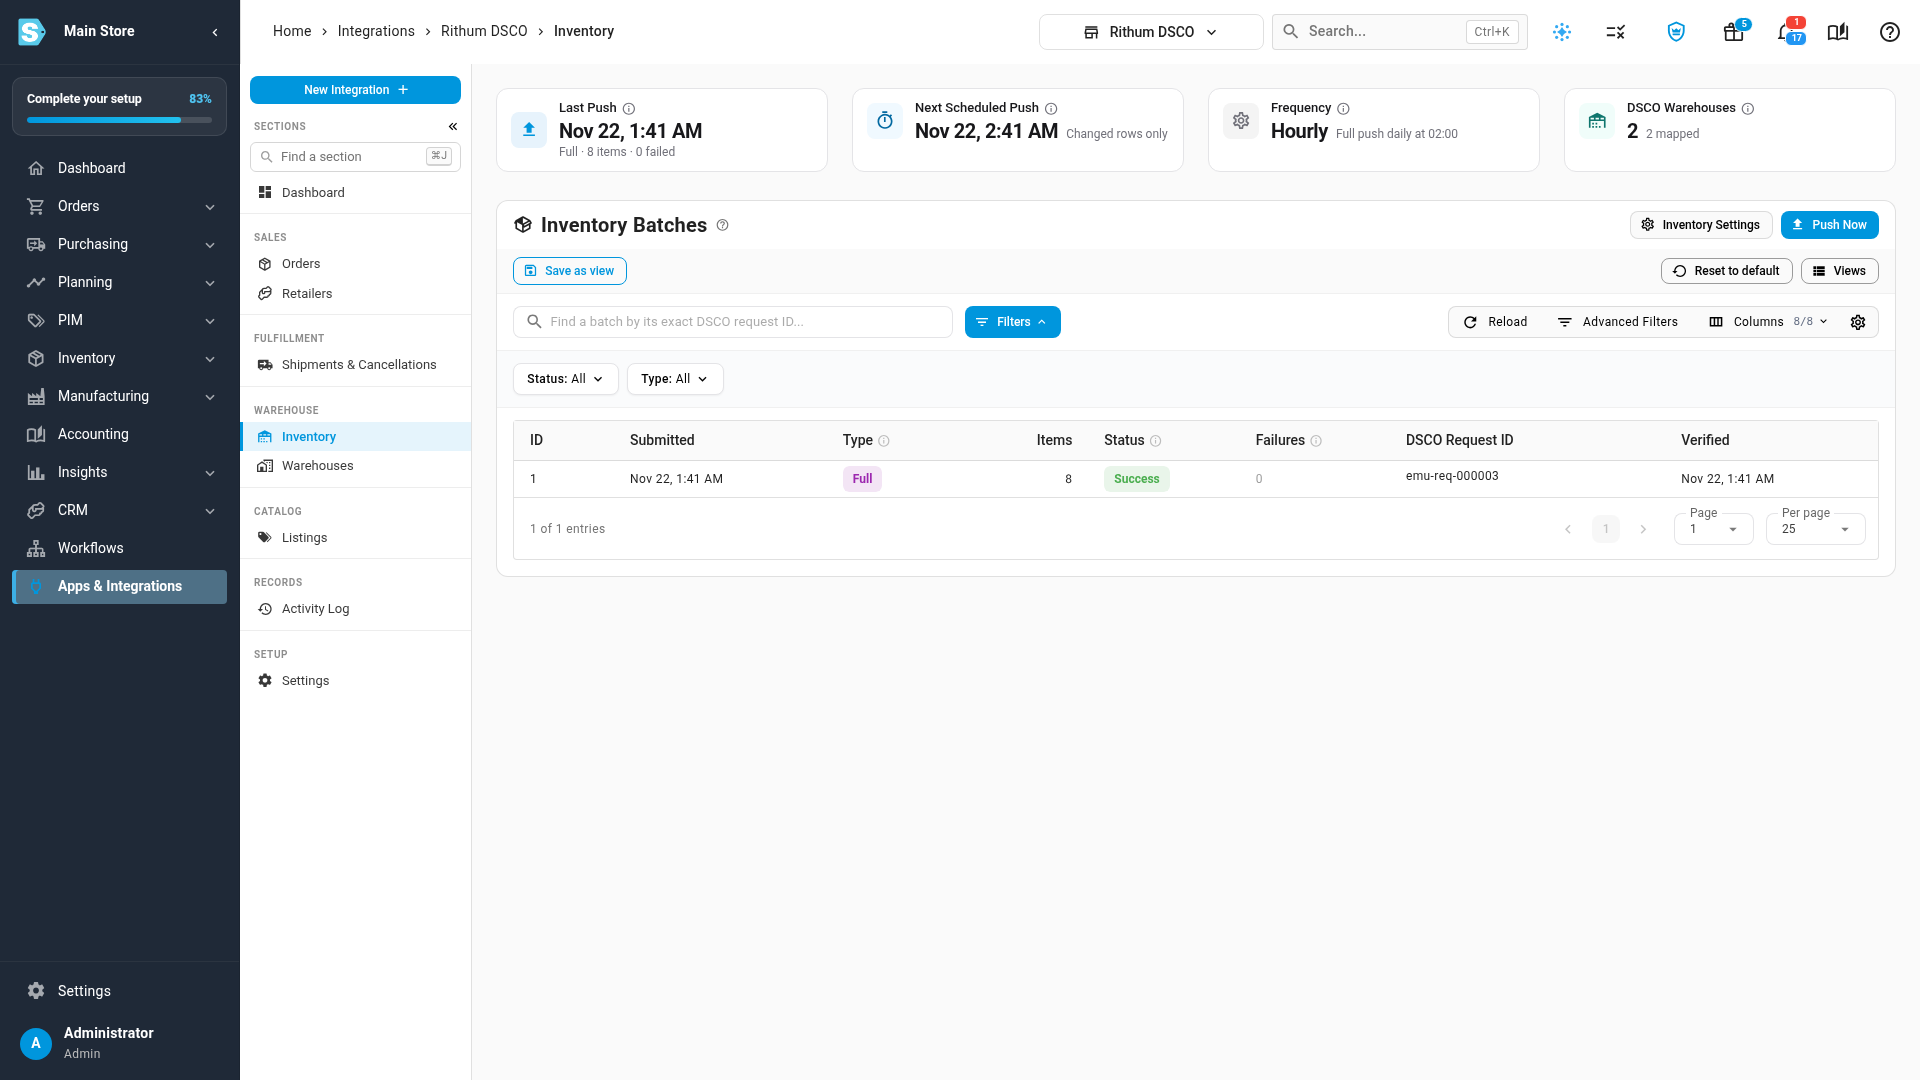
Open Inventory. The cards show the Last Push, the Next Scheduled Push, the Frequency and your DSCO warehouses. Inventory Batches lists each batch with its items, status and Failures. Click Push Now to send the whole feed right away.
Watch the drop-ship health tiles
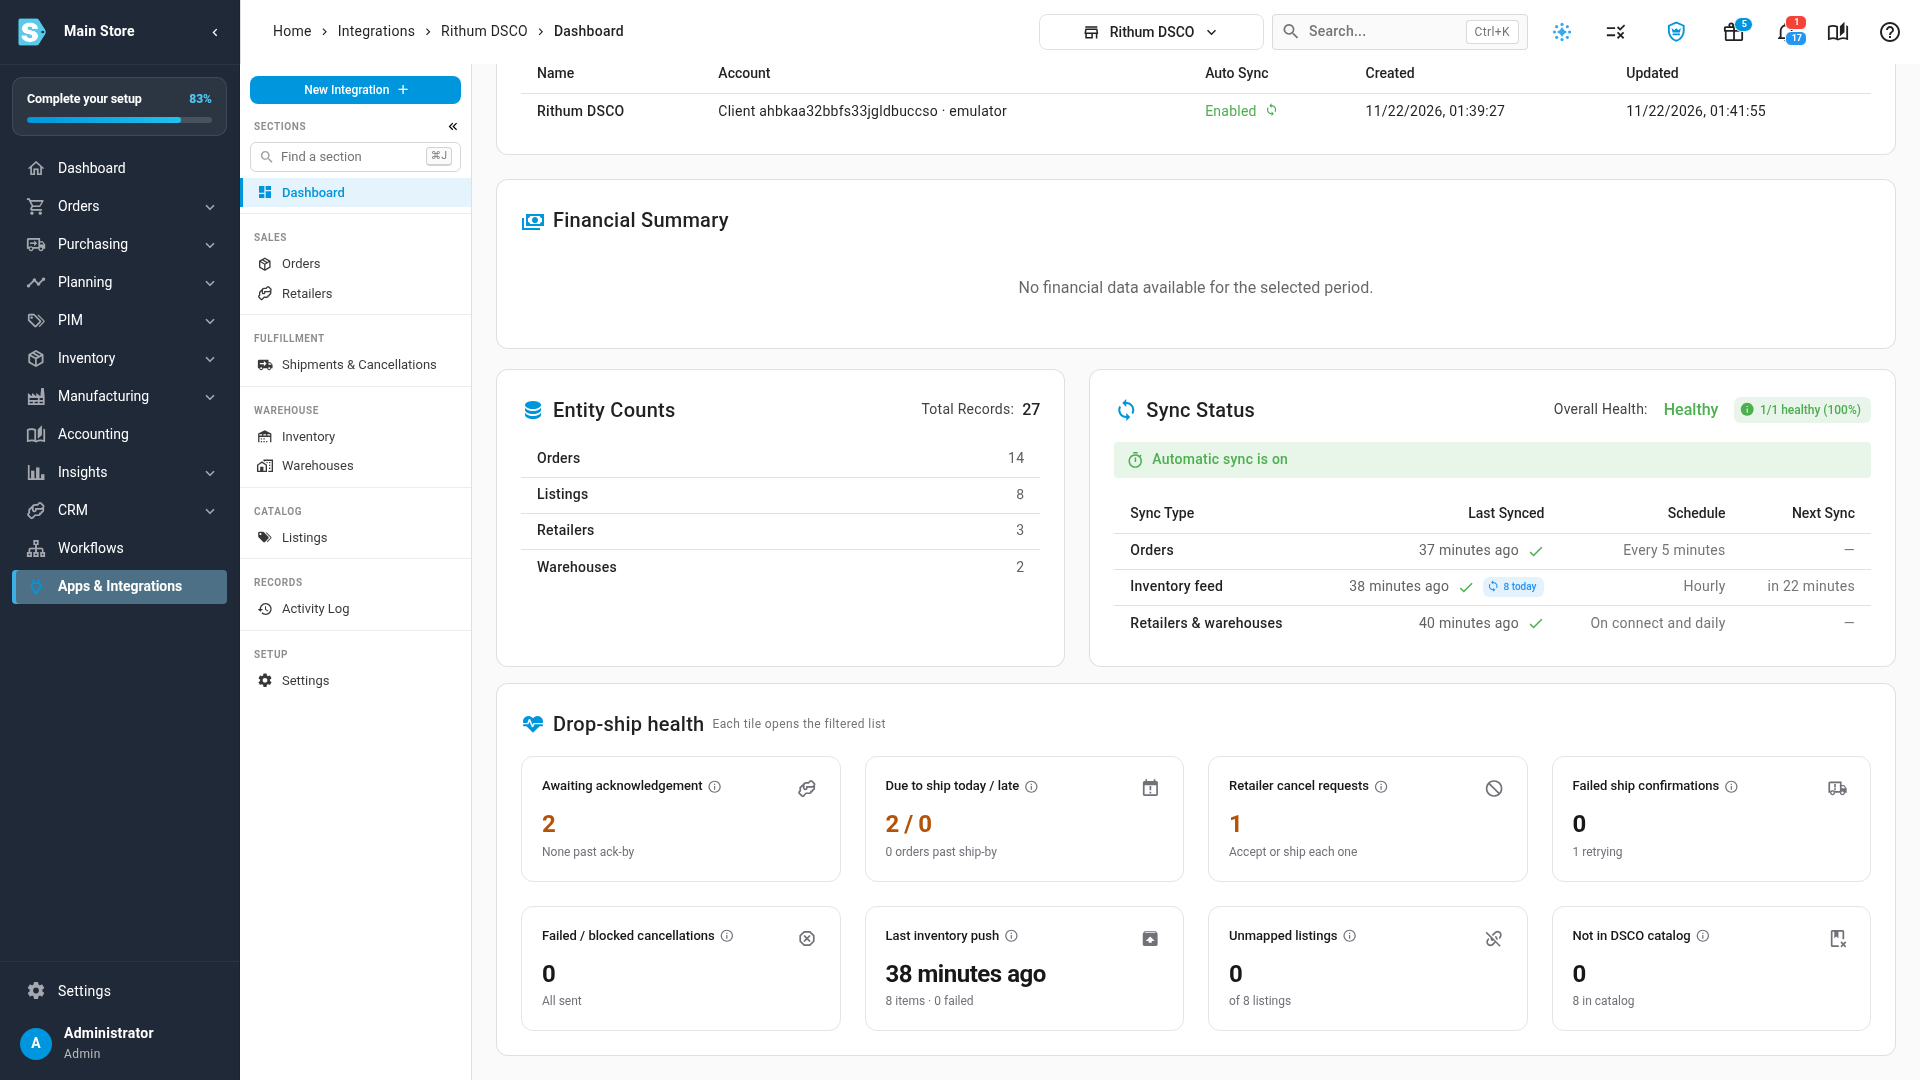
The Dashboard ends with Drop-ship health. Each tile opens the filtered list.
| Tile | Counts |
|---|---|
| Awaiting acknowledgement | Open orders DSCO hasn't confirmed as acknowledged yet, and how many are past their acknowledge-by date |
| Due to ship today / late | Open orders due to ship today, and open orders past their ship-by date with nothing shipped |
| Retailer cancel requests | Orders a retailer asked to cancel |
| Failed ship confirmations | Ship confirmations DSCO refused, and how many are retrying |
| Failed / blocked cancellations | Cancellations DSCO refused, or that SKU.io held back (for example, with no default cancel code) |
| Last inventory push | When stock was last sent, how many items, and how many DSCO rejected |
| Unmapped listings | DSCO listings with no SKU.io product. Their stock isn't sent. |
| Not in DSCO catalog | Listings DSCO doesn't have in its catalog yet |
If DSCO rejects your credentials, the dashboard shows DSCO rejected the API credentials with a button to Settings → Authentication. Click Replace there to paste a new client secret.
Review the activity log
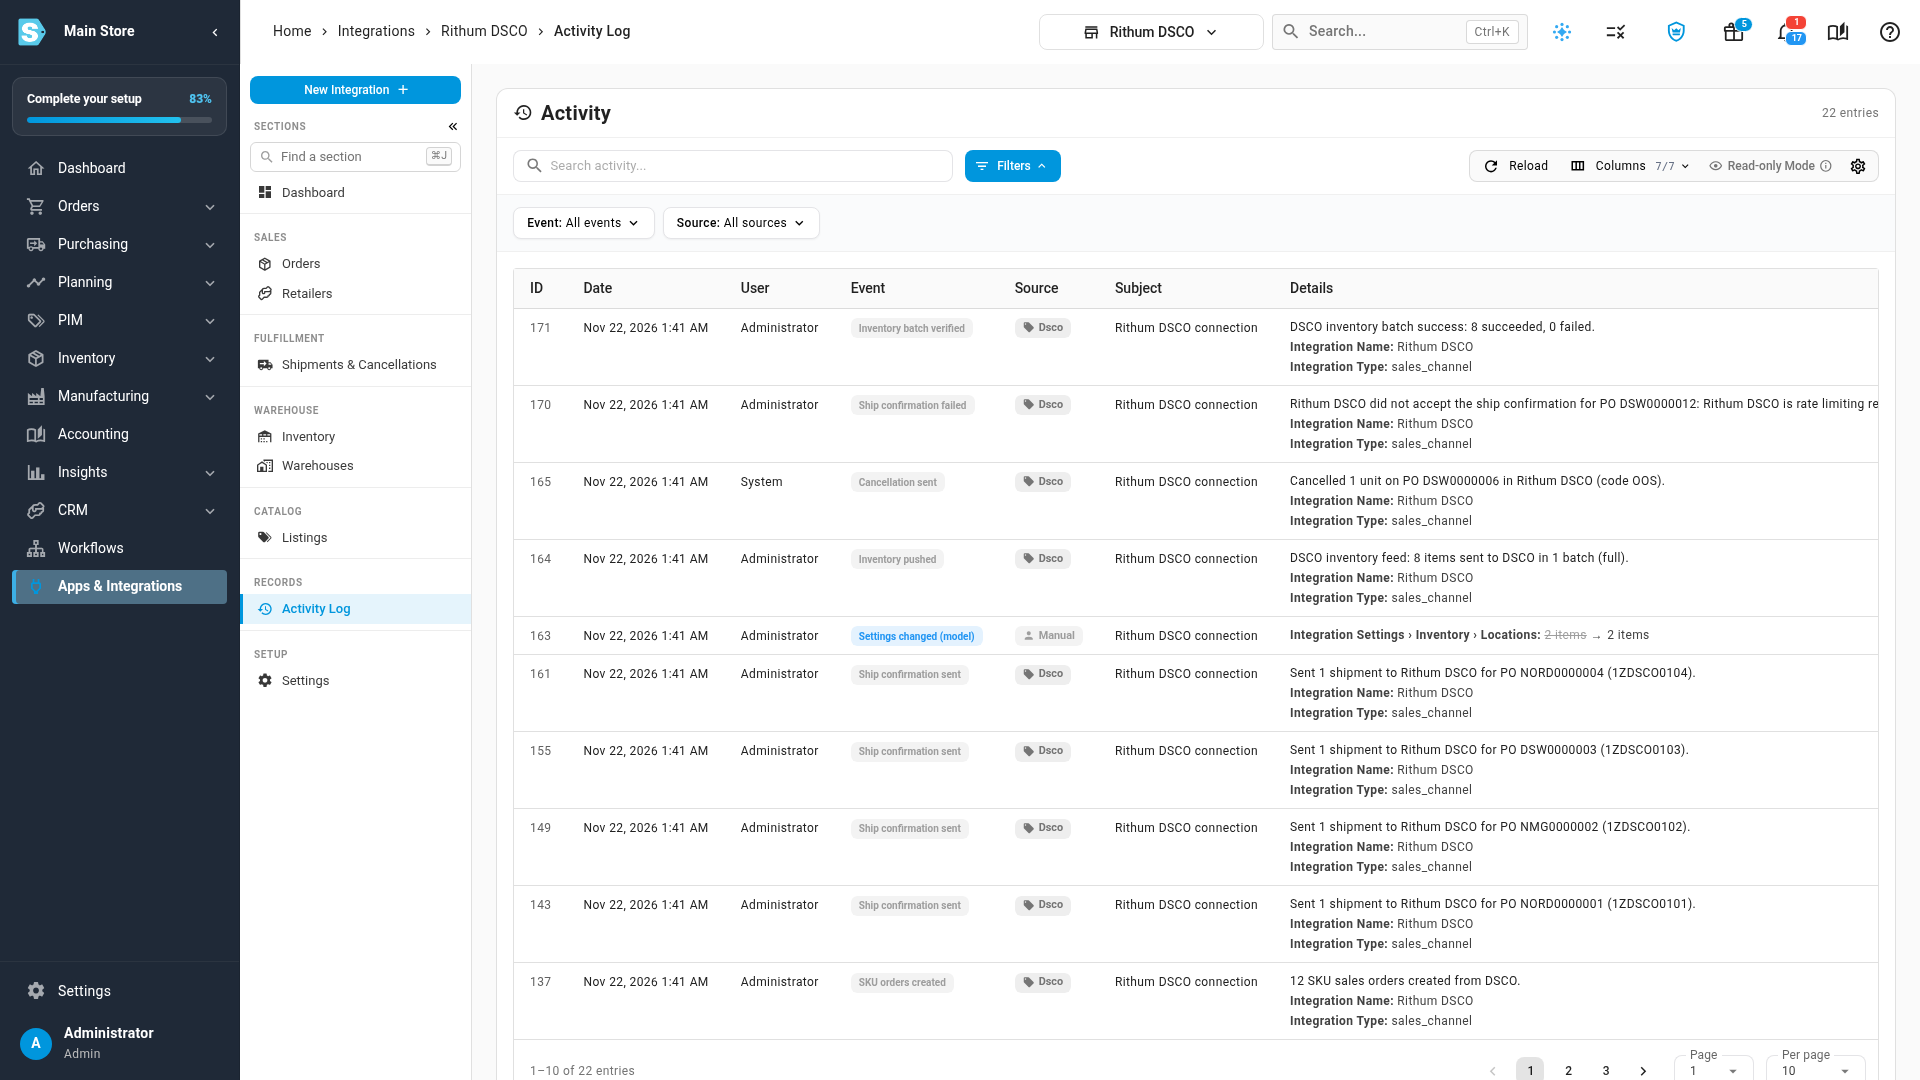
Open Activity Log. It records connections, settings changes, retailers matched or created, acknowledgements, ship confirmations, cancels and inventory batches. Each entry's Details say what happened, and why something failed.
Next steps
- Rithum DSCO: every Rithum DSCO page and what it's for.
- Connect more than one store or account: connect a second DSCO supplier account.
- Integration Basics: the controls every channel shares.
Video transcript
To connect Rithum DSCO, open Apps and Integrations.
Type DSCO into the search box, and choose Rithum DSCO.
Then click Add Instance.
The New Rithum DSCO Integration page opens, with a setup guide at the top.
Your credentials live in DSCO, under Automation, API, Manage API Credentials.
Create a credential for SKU.io, and copy its client ID and secret.
DSCO shows the secret only once.
Back in SKU.io, keep Production selected, and paste both values.
Click Test connection to check them.
Then click Connect to save your connection.
Connecting starts a Setting up Rithum DSCO job in the job tray.
It brings in your retailers and DSCO warehouses, then imports your first orders.
When it finishes, the dashboard shows your connection.
Every DSCO retailer bills its orders to one SKU.io customer.
Open Retailers.
SKU.io matches each retailer to a customer with the same company name, or creates a new customer.
To bill a retailer elsewhere, click the pencil and pick another customer.
Changing a mapping affects only future orders.
Without a drop-ship profile, packing slips print the retailer's name, never your brand.
Next, decide which stock DSCO sees.
Open Settings, then Inventory Sync.
For each DSCO warehouse, pick the SKU.io warehouses whose stock it gets.
Then set a safety stock to hold back.
DSCO receives available stock minus safety stock, never below zero.
Click Save Changes when you change a mapping.
Higher up, Push Frequency is hourly by default.
Each scheduled push sends only the items that changed.
Once a day, at the hour you pick, SKU.io sends every listed item.
SKU.io checks DSCO for new orders every five minutes.
Open Orders to see each purchase order.
Each one becomes a customer drop-ship sales order, billed to the retailer's customer.
SKU.io acknowledges it to DSCO, and Lifecycle changes to Acknowledged.
The SLA chips show the acknowledge-by, ship-by and cancel-after dates.
An order that is still waiting shows Create in the SKU Order column.
Sometimes a retailer asks to cancel an order.
The order shows Retailer requested cancel, and a red banner names the retailer.
Open the order, then click Accept Cancel.
SKU.io sends the retailer's own cancel code to DSCO, and cancels the SKU.io lines.
Or ship the order as normal.
To cancel lines yourself, click More Actions, then Cancel lines on DSCO.
Set the quantity to cancel on each line, and check the cancel code.
DSCO only accepts codes from your own cancel code mapping.
Cancelling lines on the SKU.io order also sends a cancel to DSCO.
When the SKU.io order ships with a tracking number, SKU.io sends DSCO a ship confirmation.
Open Shipments and Cancellations to see each confirmation.
Sent means DSCO accepted the confirmation.
Retrying means DSCO was busy, and SKU.io sends it again automatically.
The Cancellations tab lists every cancel code you sent.
Open Inventory to check the feed.
The cards show the last push, the next scheduled push and the frequency.
Each batch shows its items, and how many DSCO rejected.
Push Now sends the whole feed outside the schedule.
On the Dashboard, scroll to Drop-ship health.
These tiles count what needs you, like orders awaiting acknowledgement, or due to ship.
They also count retailer cancel requests, and failed confirmations and cancellations.
Click any tile to open the filtered list.
Finally, open Activity Log.
It records every acknowledgement, ship confirmation, cancel and inventory batch.
Each entry says what happened, and why something failed.