Send an ASN to a Trackstar warehouse
When a 3PL's warehouse system is connected through Trackstar, Send ASN on a purchase order or transfer creates the inbound shipment in that system for you, so the warehouse sees the stock coming without anyone retyping an emailed spreadsheet. For a warehouse running Logiwa, such as MWD, the inbound shipment is a receipt order.
Before you begin
- Connect the warehouse through Trackstar, and map its warehouse on the connection's Warehouse Mappings tab. Only a mapped, active warehouse sends its ASNs this way.
- The warehouse system must let Trackstar create inbound shipments. The connection's Dashboard lists what the system supports under Available actions.
- The destination must be a 3PL warehouse in SKU.io.
- You need permission to edit purchase orders (for a purchase order) or warehouse transfers (for a transfer).
Check the warehouse mapping
-
Go to Apps & Integrations, open your Trackstar connection, and go to Warehouse Mappings.
-
Find the warehouse system's warehouse, and check that its SKU.io Warehouse is the warehouse your purchase orders and transfers are sent to, and that Active is on.

Choose a receipt type (optional)
Some warehouse systems file each inbound shipment under a receipt type, such as a purchase-order receipt or a return.
- On the Trackstar connection, open Settings.
- Under ASN receipt type, pick one of the types the warehouse system offers.
- Click Save Settings.
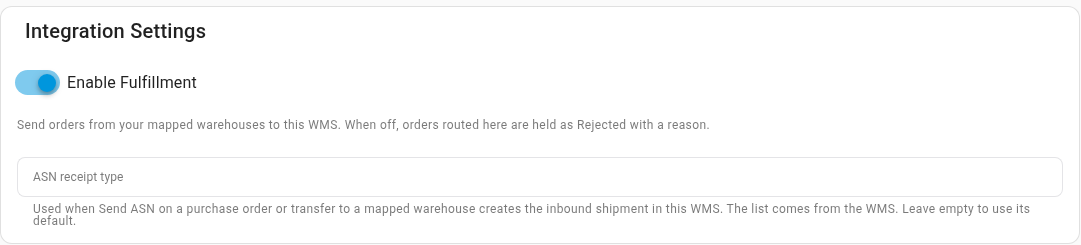
Leave the field empty to use the warehouse system's default. The list comes from the warehouse system itself, so it stays empty when the system has no receipt types. If you choose a type the system later stops accepting, the send is refused with a message asking you to choose another one.
Send the ASN for a purchase order
-
Go to Orders → Purchase Orders and open the purchase order. Its Destination must be the mapped warehouse.
-
Open the More menu.
-
Click Send ASN to, followed by your Trackstar connection's name. The line under it reads Creates the inbound shipment in, followed by the connection's name.
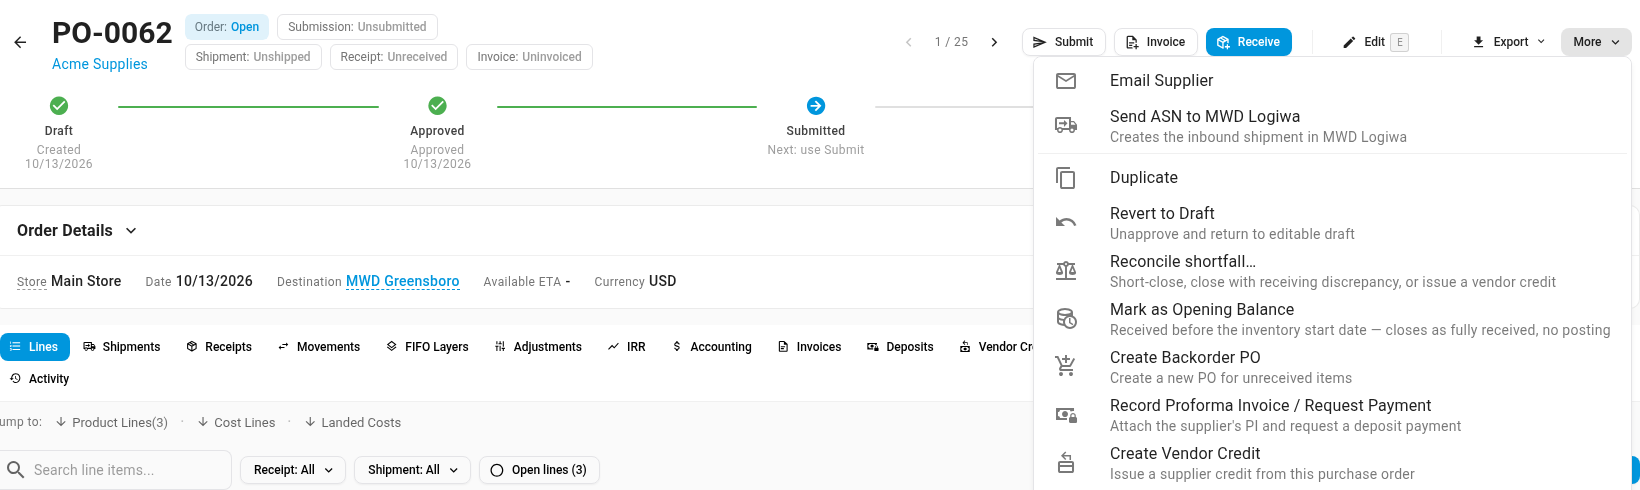
What happens: SKU.io creates the inbound shipment in the warehouse system and confirms it with a message that includes the warehouse system's shipment number. The shipment carries:
- the purchase order number,
- the supplier's name,
- one line per SKU with the ordered quantity (two lines for the same SKU are combined), and
- the receipt type you chose, if any.
Send the ASN for a transfer
-
Go to Inventory → Transfers and open a transfer whose destination is the mapped warehouse.
-
In the action bar, click Send ASN to, followed by your Trackstar connection's name.

For a transfer, the inbound shipment carries the transfer number, and the source warehouse's name as the supplier.
After you send it
- It's sent once. Trackstar can't change the lines of an inbound shipment it has already created. Afterward, the purchase order's menu item reads ASN sent to, followed by the connection's name, with "Already created in … Make any changes there." On a transfer, the button reads the same and is greyed out; hover over it to see why. If you need to add or change lines, change the inbound shipment in the warehouse system.
- A second send is refused. If the ASN is sent again from somewhere else, SKU.io refuses it and names the date and the inbound shipment it already created, instead of creating a duplicate.
- It links back. On the Trackstar connection's Inbound Shipments tab, the Sent from SKU.io column shows the purchase order or transfer that created each shipment. Click it to open that record.
When the send is refused
SKU.io and the warehouse system check every ASN before anything is created, and nothing is created when either refuses it. The message on screen says why. The usual causes:
| Message says | What to do |
|---|---|
| A line has a product with no SKU | Give the product a SKU. The warehouse system matches lines by SKU. |
| A SKU has a fractional quantity | Warehouse systems only receive whole units. Change the line's quantity. |
| The order has no quantities to receive | Add product lines, or quantities above zero. |
| The warehouse system doesn't accept the receipt type | Choose another ASN receipt type on the connection's Settings tab, or clear it. |
| The warehouse system refused the ASN, followed by its reason | Fix what the warehouse system names, for example a SKU it doesn't stock yet. Push the product first, then send again. |
Warehouses that aren't mapped
When the destination isn't mapped to a Trackstar connection that can create inbound shipments, Send ASN works as before: SKU.io emails the ASN to the warehouse's email address. See Send an ASN to a 3PL destination for purchase orders and Send an Advanced Shipment Notice for transfers.
Next steps
- Push products to a Trackstar warehouse: the warehouse system needs every SKU on file before it can receive it.
- Receive stock against a purchase order
- Trackstar overview
Video transcript
When your 3PL's system is connected through Trackstar, SKU.io can send it your ASNs directly. This works for each warehouse on the connection's Warehouse Mappings tab. Here, MWD Greensboro has an active mapping. Next, open Settings. ASN receipt type sets the kind of receipt the warehouse system creates. Pick one of the types it offers, or leave it empty to use its default. Now open Orders in the menu on the left, and then choose Purchase Orders. This list shows everything you've bought from your suppliers. Open one that's headed to the mapped warehouse. Under Order Details, the destination is the warehouse you mapped a moment ago. Then open the More menu, at the top right of the page. Send ASN now names your connection, instead of emailing the 3PL. Click it to create the inbound shipment in the warehouse system. Each product line is sent with its SKU and quantity. You send each order once. Afterwards, this item reads ASN sent, and any changes are made in the warehouse system. Stock you move between your own warehouses works the same way. To see it, open Inventory in the menu, and then choose Transfers from the list. Then open one that's going to the mapped warehouse. Its action bar has the same Send ASN button. If a warehouse isn't mapped, it emails the ASN instead, as before.