Recover warranty costs from a supplier
When a repair's diagnosis puts the fault on a supplier — a bad clasp spring, a component that fails early — you don't have to absorb that cost. Supplier recovery charges it back: a claim you send the supplier, with evidence, that settles as a credit or a free replacement once they agree.
Before you begin
- You need the Supplier recovery permission in the Repairs & Warranty permission group (
repairs.recovery). - A unit only becomes claimable once its repair's diagnosis puts the fault on the supplier, or a cost on it is billed to the supplier — there's nothing to configure beyond diagnosing repairs normally.
Orders → Repairs → Supplier recovery opens on three tabs — To claim, Claims, and Quality spikes — with four summary cards above them for the last 12 months: Claimed (with the number of claims raised), Recovered (settled by vendor credit or replacement, flagged when it's above zero), Recovery rate (recovered ÷ claimed, flagged under 50%), and Oldest open claim in days (flagged past 30 days). A Recovery report button and a link to Warranty reserve sit at the top of the page.
See what's ready to claim
The To claim tab groups every unclaimed line by supplier, each group showing its unit count and running totals for unit cost and repair cost. Filter to one supplier with the dropdown at the top. A line's Created date shows the day only; hover it for the time.
| Column | Meaning |
|---|---|
| Root cause | The root cause found on diagnosis |
| Unit cost | What you paid this supplier for the piece — its FIFO cost |
| Repair cost | Parts, labour, vendor fees and freight spent fixing it, billed to the supplier |
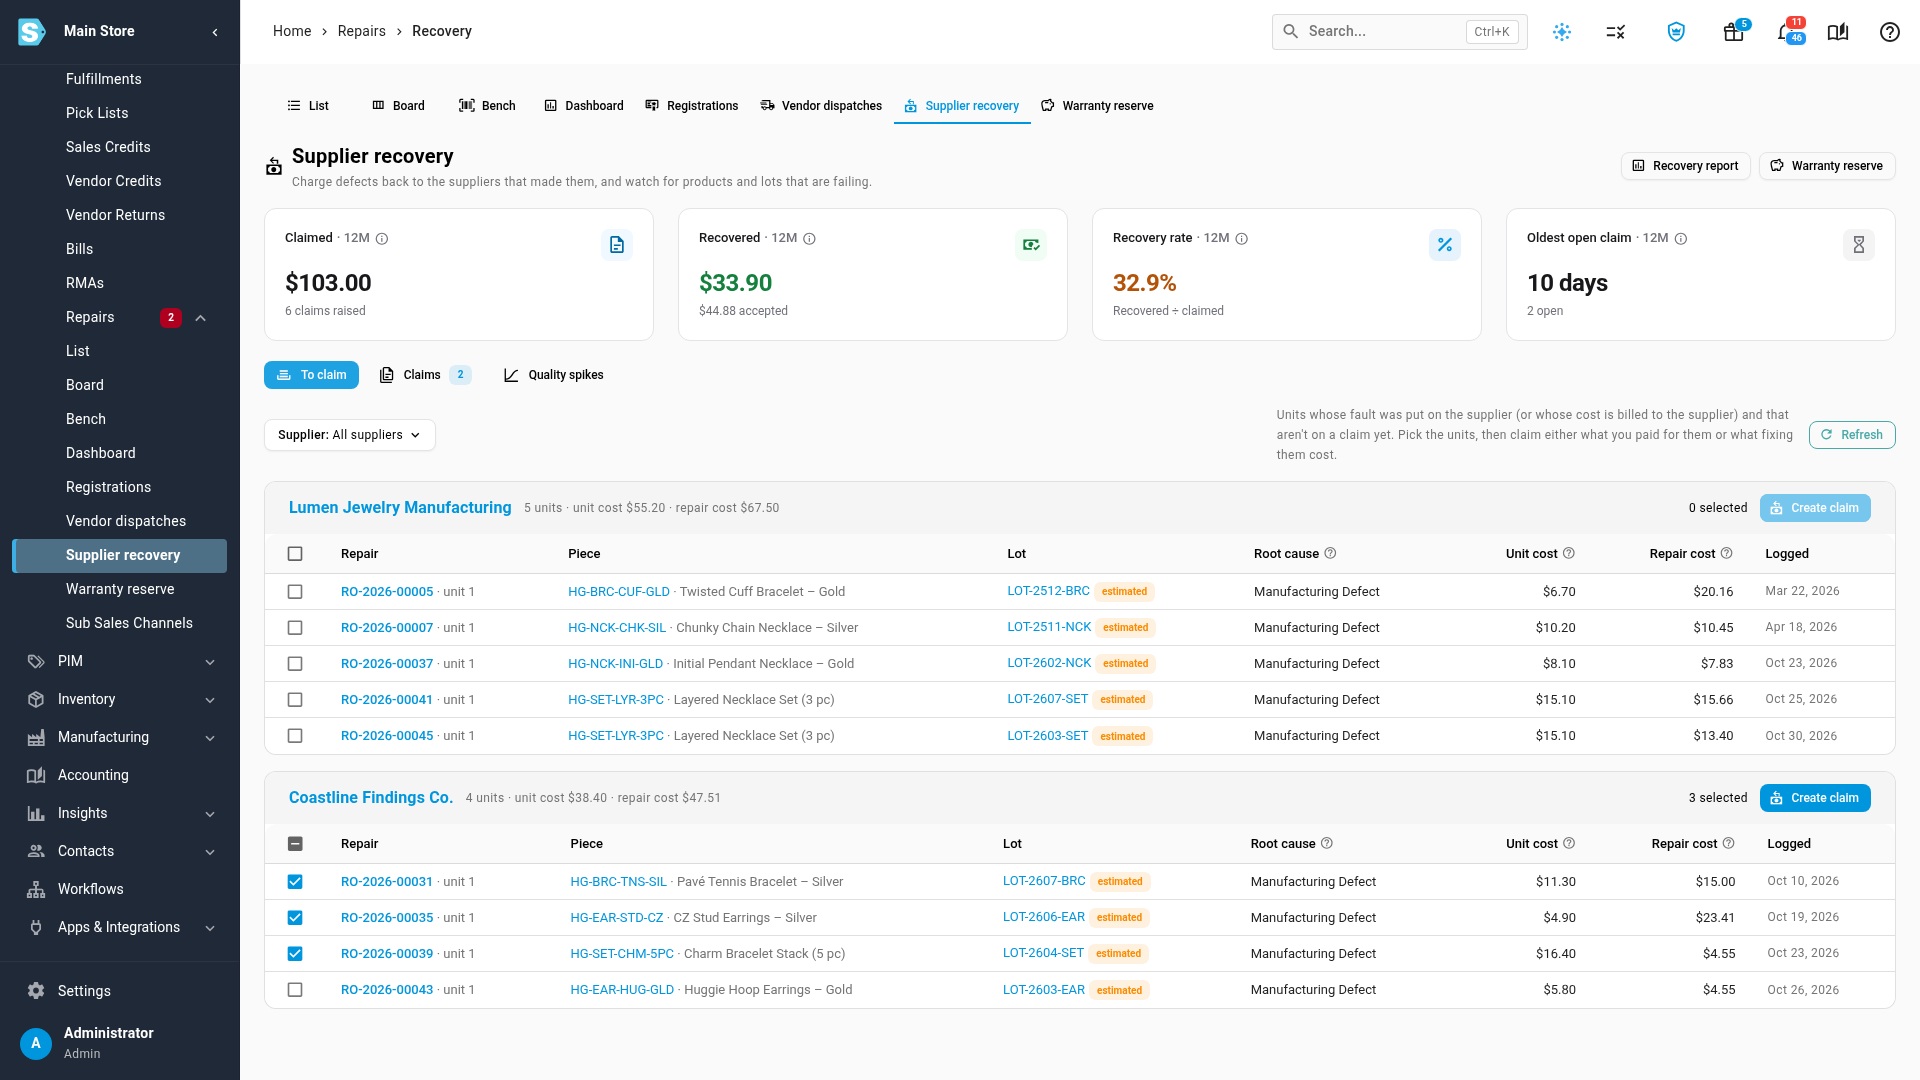
A line traced to an unserialized, mixed-layer product carries an estimated chip, because its origin supplier was inferred by date rather than tracked exactly. If a supplier filter leaves the list empty, the empty state names it and offers Show all suppliers.
Create a claim
- On the To claim tab, tick the units you want to claim for one supplier, then click Create claim.
- Choose what the claim charges — Unit cost (what you paid for the pieces) or Repair cost (parts, labour, vendor fees and freight spent fixing them, never anything already billed to the customer). Either fills in every line's Claim amount to the cent shown in its column (always with two decimals, for example 8.10), still editable per line, and the Claim total adds them up.
- Under Evidence, tick the photos and documents you want attached to the claim email — each claimed unit's intake and diagnosis photos are listed as chips, already ticked, alongside any files on the repair itself; untick what you'd rather leave out. Photos of other units on the same repair aren't offered. When none of the units has a photo, the section reads "No photos on these units yet." The ticked photos then show in the claim page's Evidence count and in each unit's Evidence column. While the dialog looks for photos, the section reads "Looking for photos on these units…"; you can choose the basis meanwhile, and your choice is kept.
- Add Notes for the supplier, then click Create draft claim.
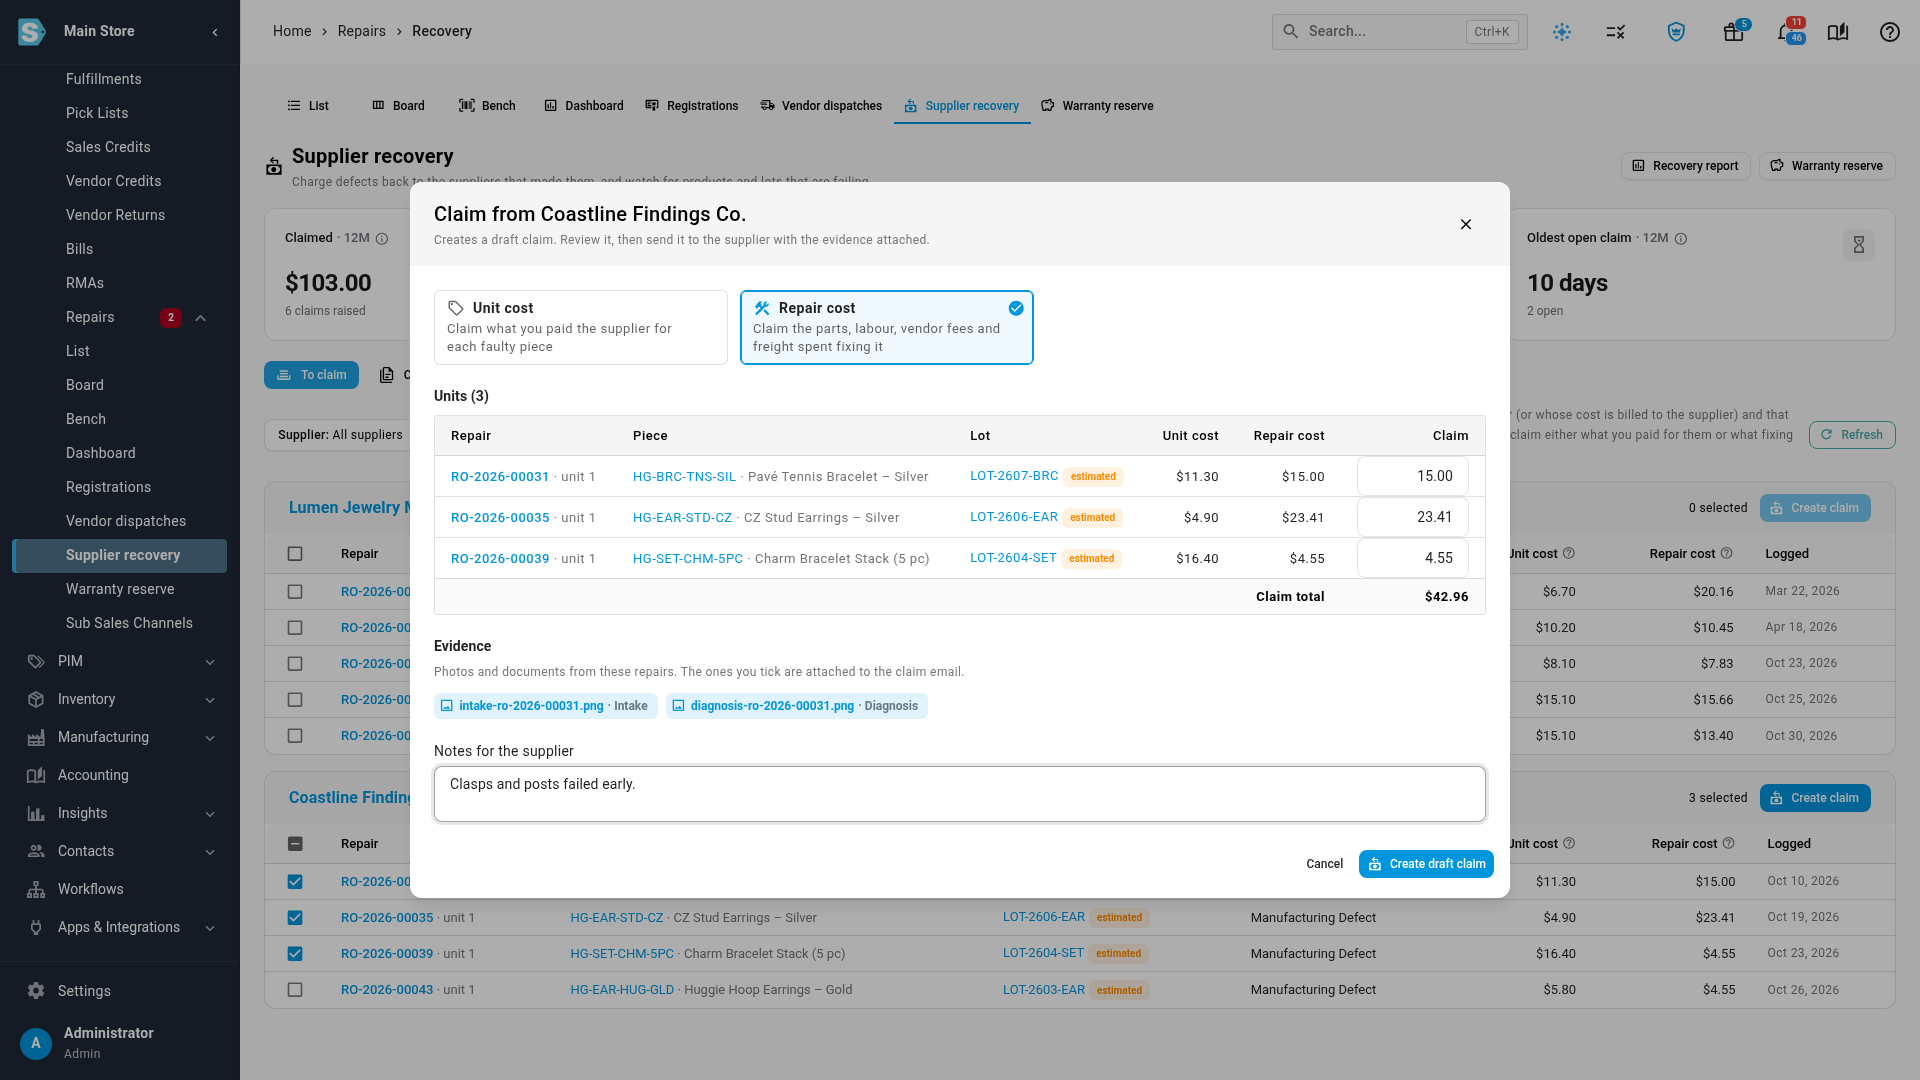
This raises a numbered claim (for example RRC-2026-00012) in Draft and opens it. A line already on another live claim (anything other than rejected or a deleted draft) can't be added to a second one, and every line has to trace to the claimed supplier — or, for a claim raised from a vendor dispatch's missing units, to that specific dispatch. On a very large claim, evidence only loads from the first 25 distinct repairs involved, so photos on later repairs may not appear to pick from.
Work a claim: send it, and record the answer
A claim's header shows its Sent, Settled, and Created dates as the day only, for example Nov 8, 2026; hover one for the time. The page shows Claimed, Accepted and Recovered stat cards, the per-unit table, an evidence gallery, a Progress checklist (Draft created → Sent → Supplier answered → Settled — Supplier answered keeps the supplier's answer, Accepted or Partially accepted, even after the claim settles), and Linked records (the supplier, the eventual vendor credit or replacement PO, the source dispatch for a vendor-loss claim, and every repair involved). While it's still a Draft, click Edit amounts to change the claimed amounts, basis or notes, or delete it entirely — deleting returns its units to the To claim tab. Once sent, a claim can only move forward by recording the supplier's answer.
- Click Send to supplier. The To address starts as the supplier's main email (or their purchase-order email if they have no main one). Review or edit it and add an extra message, then click Send. This emails the claim number, unit count, claimed amount, a line per unit, and the chosen evidence as attachments, using the "Supplier repair recovery claim" email template. It's refused with a clear reason if that template is switched off, or the supplier has no email address. You can Resend any time while the claim is still Sent.
- Once the supplier replies, click Record supplier's answer (or Change answer later). Choose:
- Accepted — every unit at the amount claimed.
- Partly — enter the amount accepted per unit; a running total compares it against what was claimed. An accepted amount can never exceed what was claimed for that unit, and at least one line needs a non-zero accepted amount.
- Rejected — frees the units' costs so they can be put on a different claim.
- Add a note and click Save answer.
Settle an accepted claim
Once a claim is Accepted or Partially accepted, click Settle and choose how:
- Vendor credit — raises a vendor credit for the accepted amount, one line per unit, with an optional Credit date and the supplier's own reference. The credit line's account defaults to warranty expense (or the warranty reserve, when reserve accounting is accruing), so the recovery directly offsets your warranty cost — leave Credit account blank for that, or pick a different account. Settling fails with nothing-to-credit if every unit's accepted amount is $0.
- Replacement pieces — adds the accepted units as free-of-charge lines (reason: warranty replacement) onto an open purchase order to that supplier, or starts a brand-new draft PO if you leave it blank, so the replacements arrive at zero cost. You can also pick the delivery warehouse; it defaults to the PO's own. This is refused if the chosen PO already carries a line for one of the replaced products — pick a different PO, or leave it blank for a fresh draft.
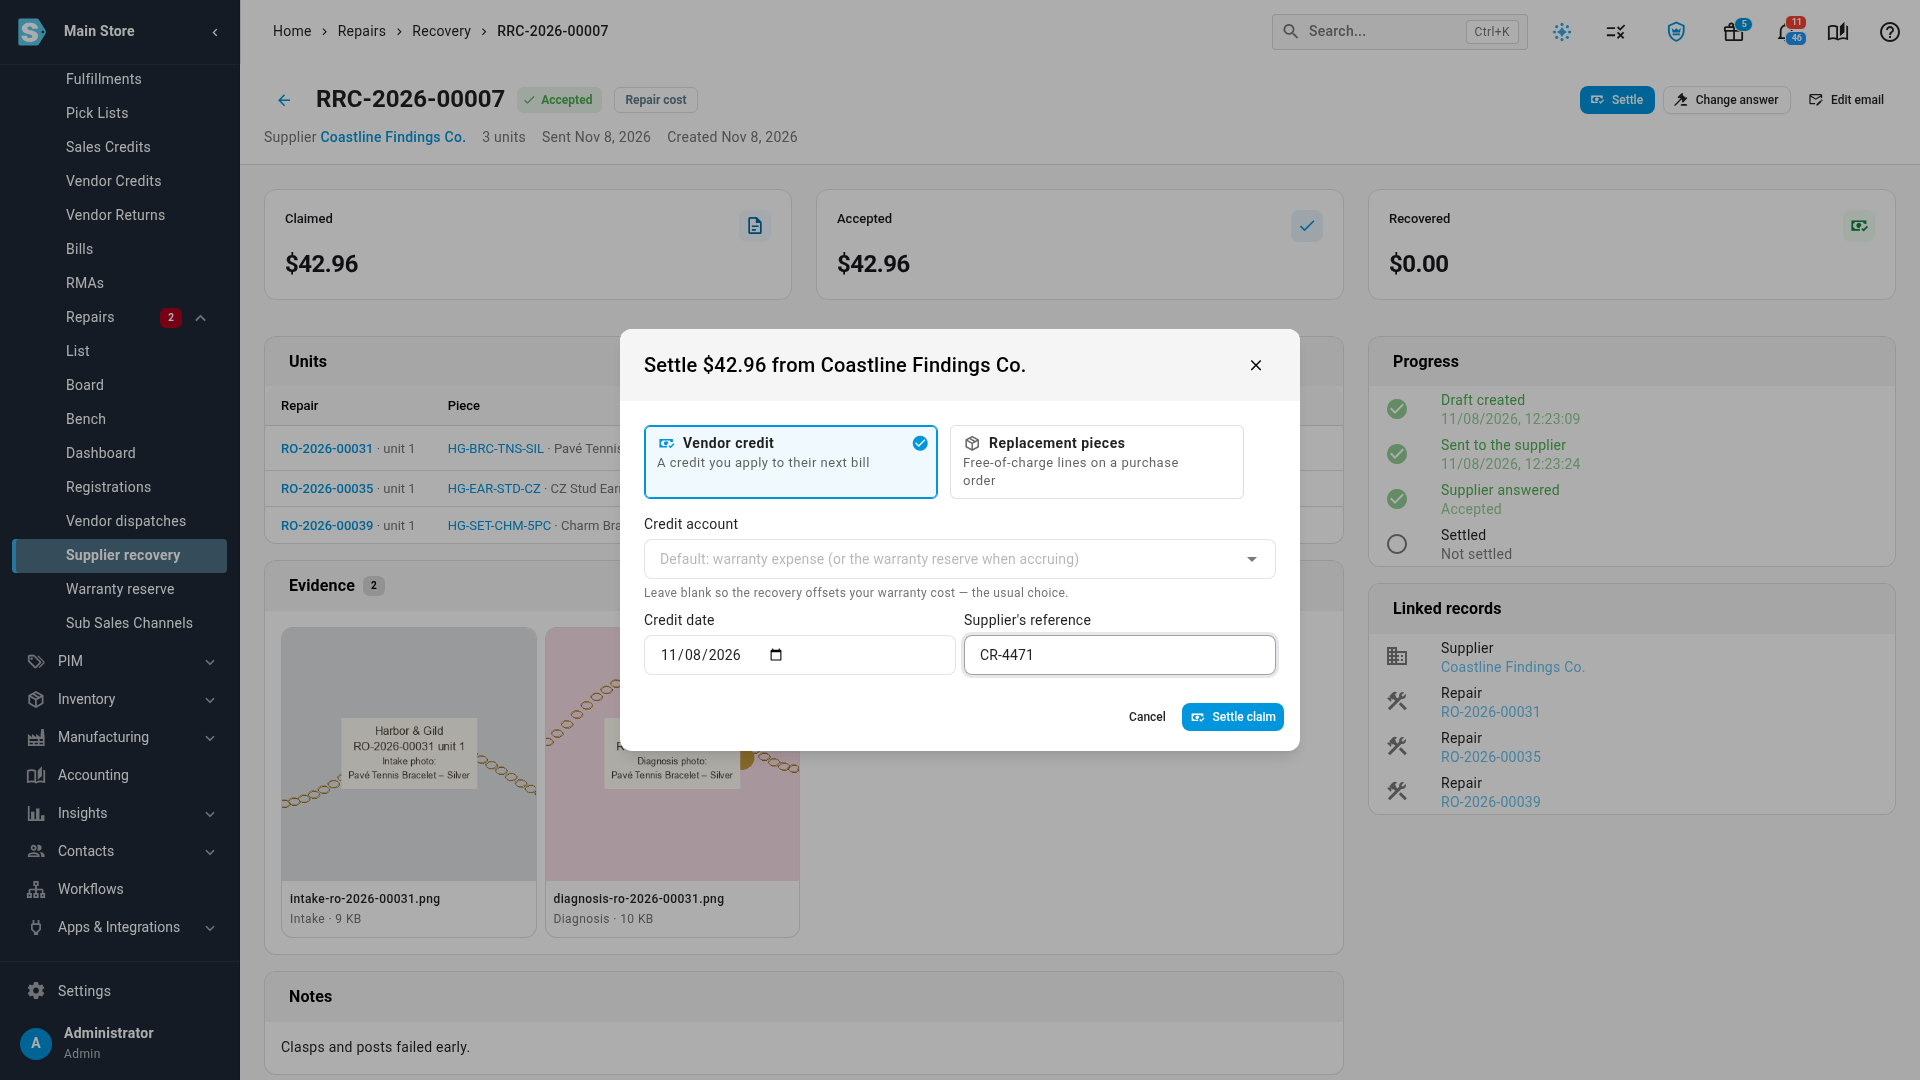
Click Settle claim to finish. See Create & allocate vendor credits and How repair costs reach the ledger for what happens to the posting afterwards.
Find and export claims
The Claims tab lists every claim — status, supplier, basis, units, claimed, accepted, recovered, what it was settled with (linking to the vendor credit or replacement PO), sent and settled dates (the day only, for example Nov 8, 2026, with the time on hover) — with saved views, filters, and the same All / Active / Closed toggle used on Vendor dispatches (Active = draft, sent, or accepted and waiting to settle; Closed = settled or rejected). Until you tick a row, a dashed hint above the table reads "Tick claims to delete drafts or export several at once." Tick rows and it becomes the bulk bar in the same spot, without moving the rows, with Delete drafts (skips any already-sent rows) and Export.
Export, like the dispatches export, builds a CSV in your browser from the rows you ticked — no job tray, nothing server-side — and downloads recovery-claims.csv instantly with these columns: Claim, Status, Supplier, Basis, Units, Claimed, Accepted, Recovered, Vendor credit, Replacement PO, Sent, Settled. It also carries a UTF-8 marker so characters display correctly in Excel, and the "All Filtered" scope is disabled — export only works on the rows you've ticked.
Spot and quarantine a quality problem
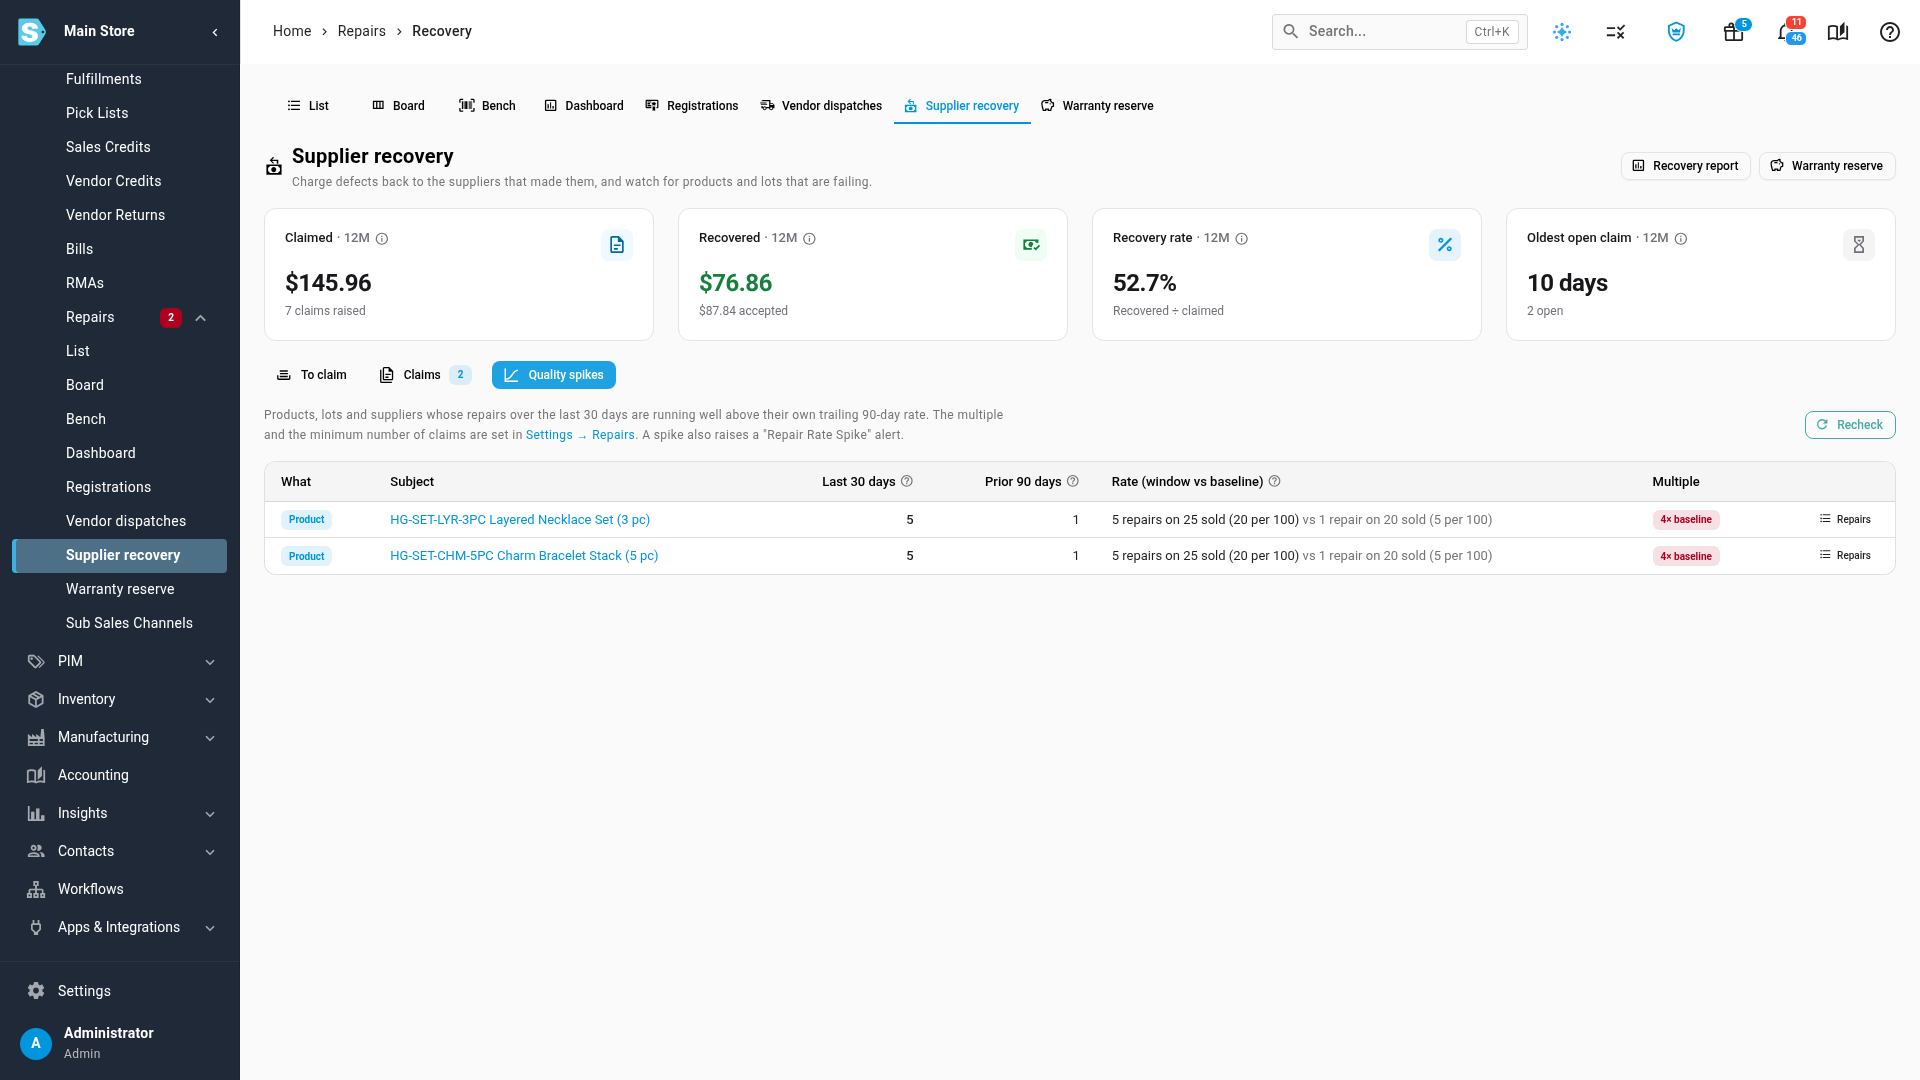
The Quality spikes tab flags any product, lot, or supplier whose repair volume in the last 30 days is running well above its own trailing 90-day rate — worst multiple first. For a product with sales in both periods, the rate reads as repairs per 100 sold (since a busy month's repairs can come from pieces sold earlier, so it can pass 100); otherwise it reads as repairs per day. For example, a row reading 5 repairs on 25 sold (20 per 100) against 1 repair on 20 sold (5 per 100) shows 4× baseline. The multiple and the minimum number of repairs needed before something counts as a spike are both set in Settings → Repairs & Warranty → General. Each spike also raises a "Repair Rate Spike" alert, and its Repairs button filters the repairs list down to that window and subject. A Shipped date shows the day only, with the time on hover.
For a lot-level spike, Quarantine lot puts every on-hand FIFO layer of that lot on a quality-control stock hold and quarantines its in-stock serials, then shows the recall impact — every already-shipped serial from that lot, with its sales order and customer, so you know who to contact. It needs the Update repairs permission, fails with "No stock of lot <X> of <SKU> is on hand to quarantine" if nothing of that lot remains, and the hold has to be released by hand later from the product's inventory once the lot is cleared.
Next steps
- Manage a vendor dispatch — claiming units a vendor never sent back starts there.
- Run the warranty reserve and accrual
- Create & allocate vendor credits
- Vendor dispatch & recovery claim status reference
- Use supplier analytics — the scorecard these two repair dimensions extend.
Video transcript
To charge a supplier for a defect, open Orders in the sidebar, then Repairs. Then choose Supplier recovery, the home of every warranty claim. The cards across the top track what you claimed, recovered, and your recovery rate. The To claim tab groups every unclaimed unit by its supplier. Tick each unit you want to charge back to that supplier. Add the other units the same way, with the checkbox on each row. The count beside Create claim keeps a running total of your picked units. With the units ticked, click Create claim. A form opens with every unit you picked. Choose what to charge, the unit cost or the repair cost. The Claim total adds up each unit's amount. Under Evidence, the units' own photos are already ticked as attachments. Then add a note for the supplier, describing the fault you found in each piece. When everything looks right, click Create draft claim. The new claim opens on its own page, with its status set to Draft. To send it, click Send to supplier. Check the To address, and add an optional message for the supplier. Then click Send, and the claim moves to Sent status. When the supplier replies, click Record supplier's answer. Pick Accepted, Partly or Rejected as their answer. Partly lets you enter each unit's accepted amount. Then click Save answer, and the claim records the supplier's decision. Once the supplier accepts, click Settle on the claim. Choose a vendor credit, or free replacement pieces on a purchase order. Leave the credit account blank to offset your warranty cost. Then enter the supplier's own reference from their credit note. Check the details, then click Settle claim to finish the settlement. Settling then raises a vendor credit for the full accepted amount. The Recovered card now shows the amount you got back. Linked records adds the new vendor credit. To find a claim later, click Supplier recovery again in the sidebar under Repairs. Then open the Claims tab at the top of the list. Active lists open claims; the Closed toggle below lists settled and rejected claims. Tick the claims you want to export, using the checkbox on each row. The Export button above the table downloads the ticked claims as a spreadsheet file. Finally, open the Quality spikes tab. It flags products, lots and suppliers repairing above their usual rate. The Multiple column shows how far each spike runs above its own baseline.