Manage a vendor dispatch
Once you've sent units to a repair vendor, the dispatch is the record of that trip — what you sent, what it's costing, and what's come back. This guide covers the dispatch from shipping through to receiving it, including the private page the vendor themselves uses.
Before you begin
- You need the Send to vendors permission (
repairs.vendor) to ship, receive, cancel or notify on a dispatch — disabled controls call this the "Send to vendors" permission. - You need the Supplier recovery permission (
repairs.recovery) to claim units a vendor never sent back.
Find a dispatch
Go to Orders → Repairs → Vendor dispatches. The list shows every dispatch — status, vendor, service and finish, units, expected-back date, shipped and received dates, fees, the service PO, and the warehouse transfer for brand-owned pieces — with saved views, search, and quick and advanced filters. The Shipped, Received, and Created columns show the date only, for example Oct 31, 2026; hover one for the time. An All / Active / Closed toggle at the bottom defaults to Active (draft, shipped, or partly received); dispatches are never archived, they simply close. An overdue dispatch — past its expected-back date while still at the vendor — shows a red overdue marker on the Expected back column.
Before anything is ticked, a dashed hint sits above the table — "Tick dispatches to resend the vendor email, cancel drafts or export several at once." Tick one or more rows and the hint turns into the bulk bar in the same spot, so the rows never move under your pointer:
- Resend vendor email — re-sends the dispatch notice to each selected vendor.
- Cancel drafts — cancels every selected draft; anything already shipped is skipped.
- Export — downloads the selected rows as a CSV (see Export dispatches below). It only works on rows you've ticked — the "All Filtered" scope is disabled for this button.
Read a dispatch
A dispatch's own page shows its key dates in the header, for example Shipped Oct 31, 2026 or Received Nov 8, 2026; hover a date for the time. The page has three tabs:
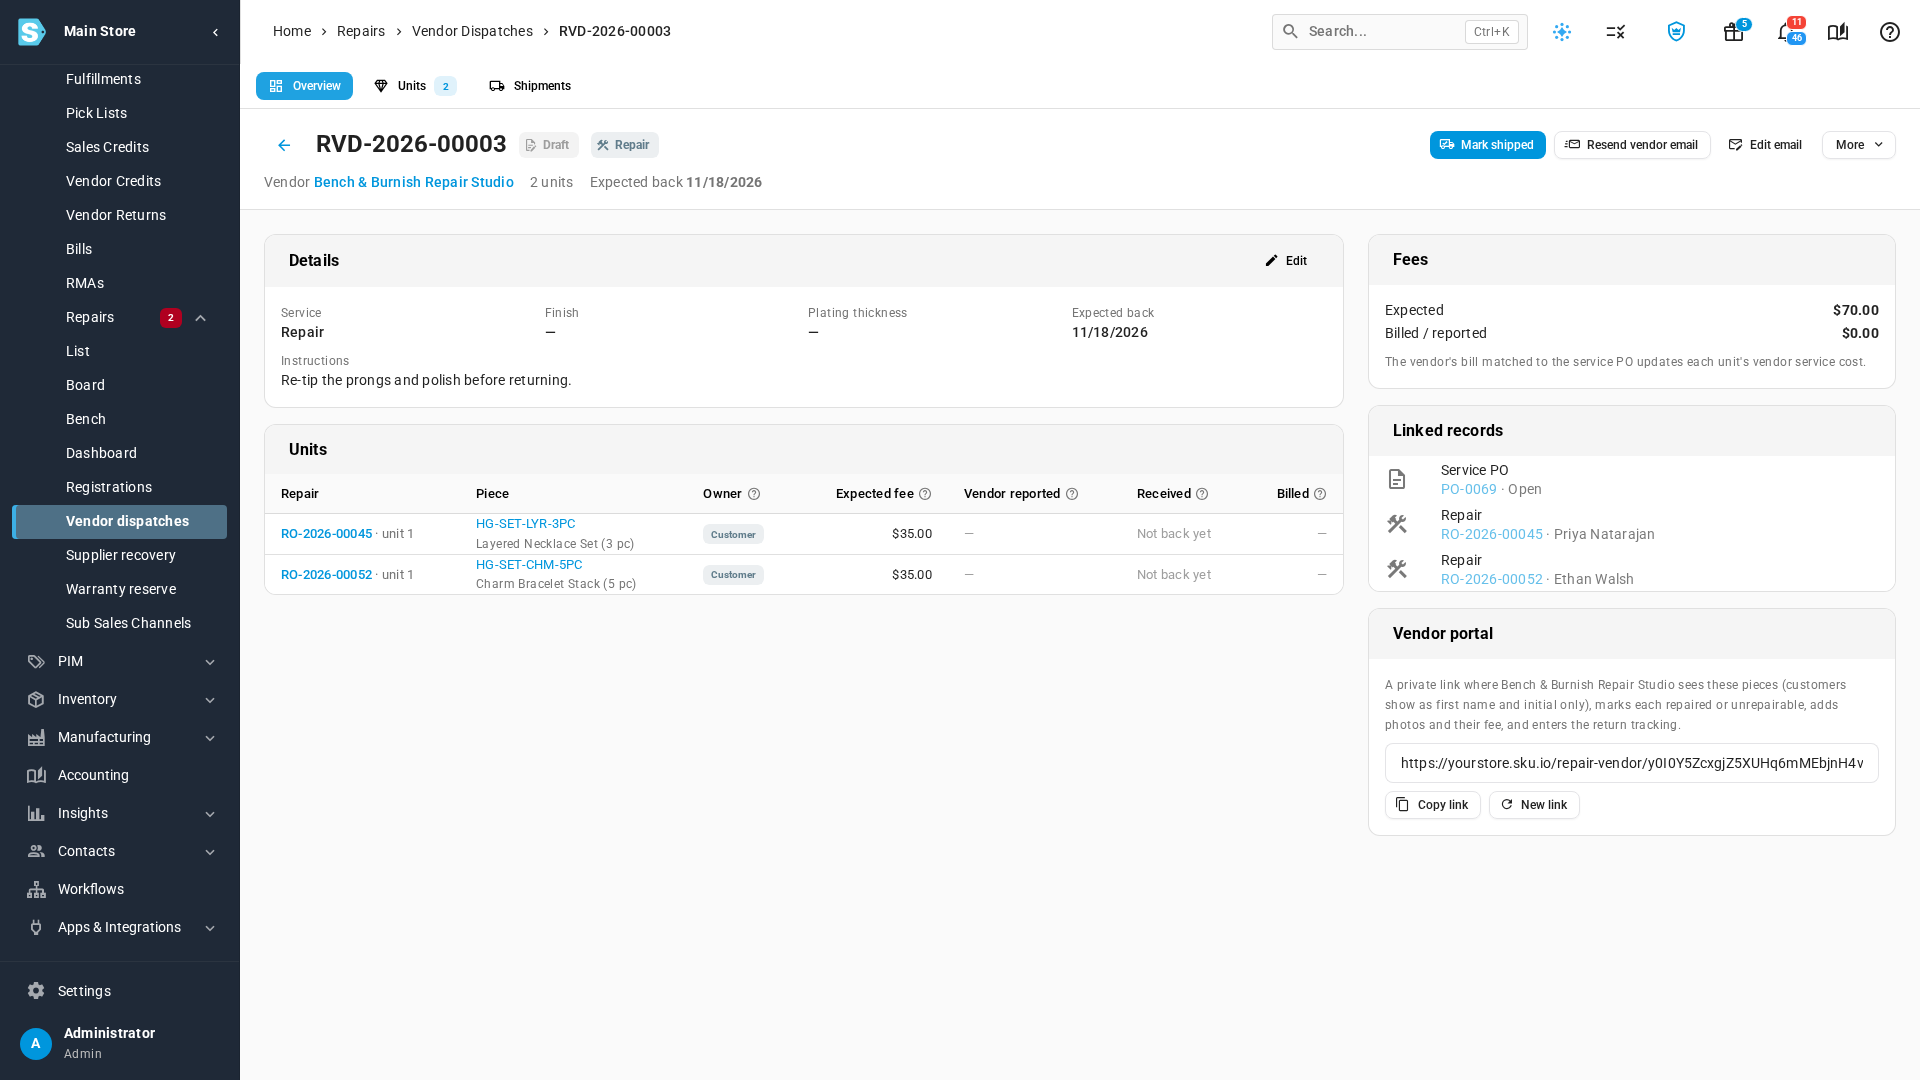
- Overview — the service, finish, thickness and expected-back date (editable with Edit until the dispatch is Received or Canceled), the Instructions you sent, a compact Units table, a Fees card comparing the Expected fee (from the vendor's rate card, or typed in when you sent the units) with what's billed or reported, a Linked records card (service PO, warehouse transfer, every repair on the dispatch), and the Vendor portal card described below.
- Units — the full per-unit table: repair, piece, customer, owner, expected fee, what the vendor reported in their own portal, what you recorded on receiving it, the fee actually billed, and any photos the vendor added. A unit still with the vendor is flagged Still at vendor.
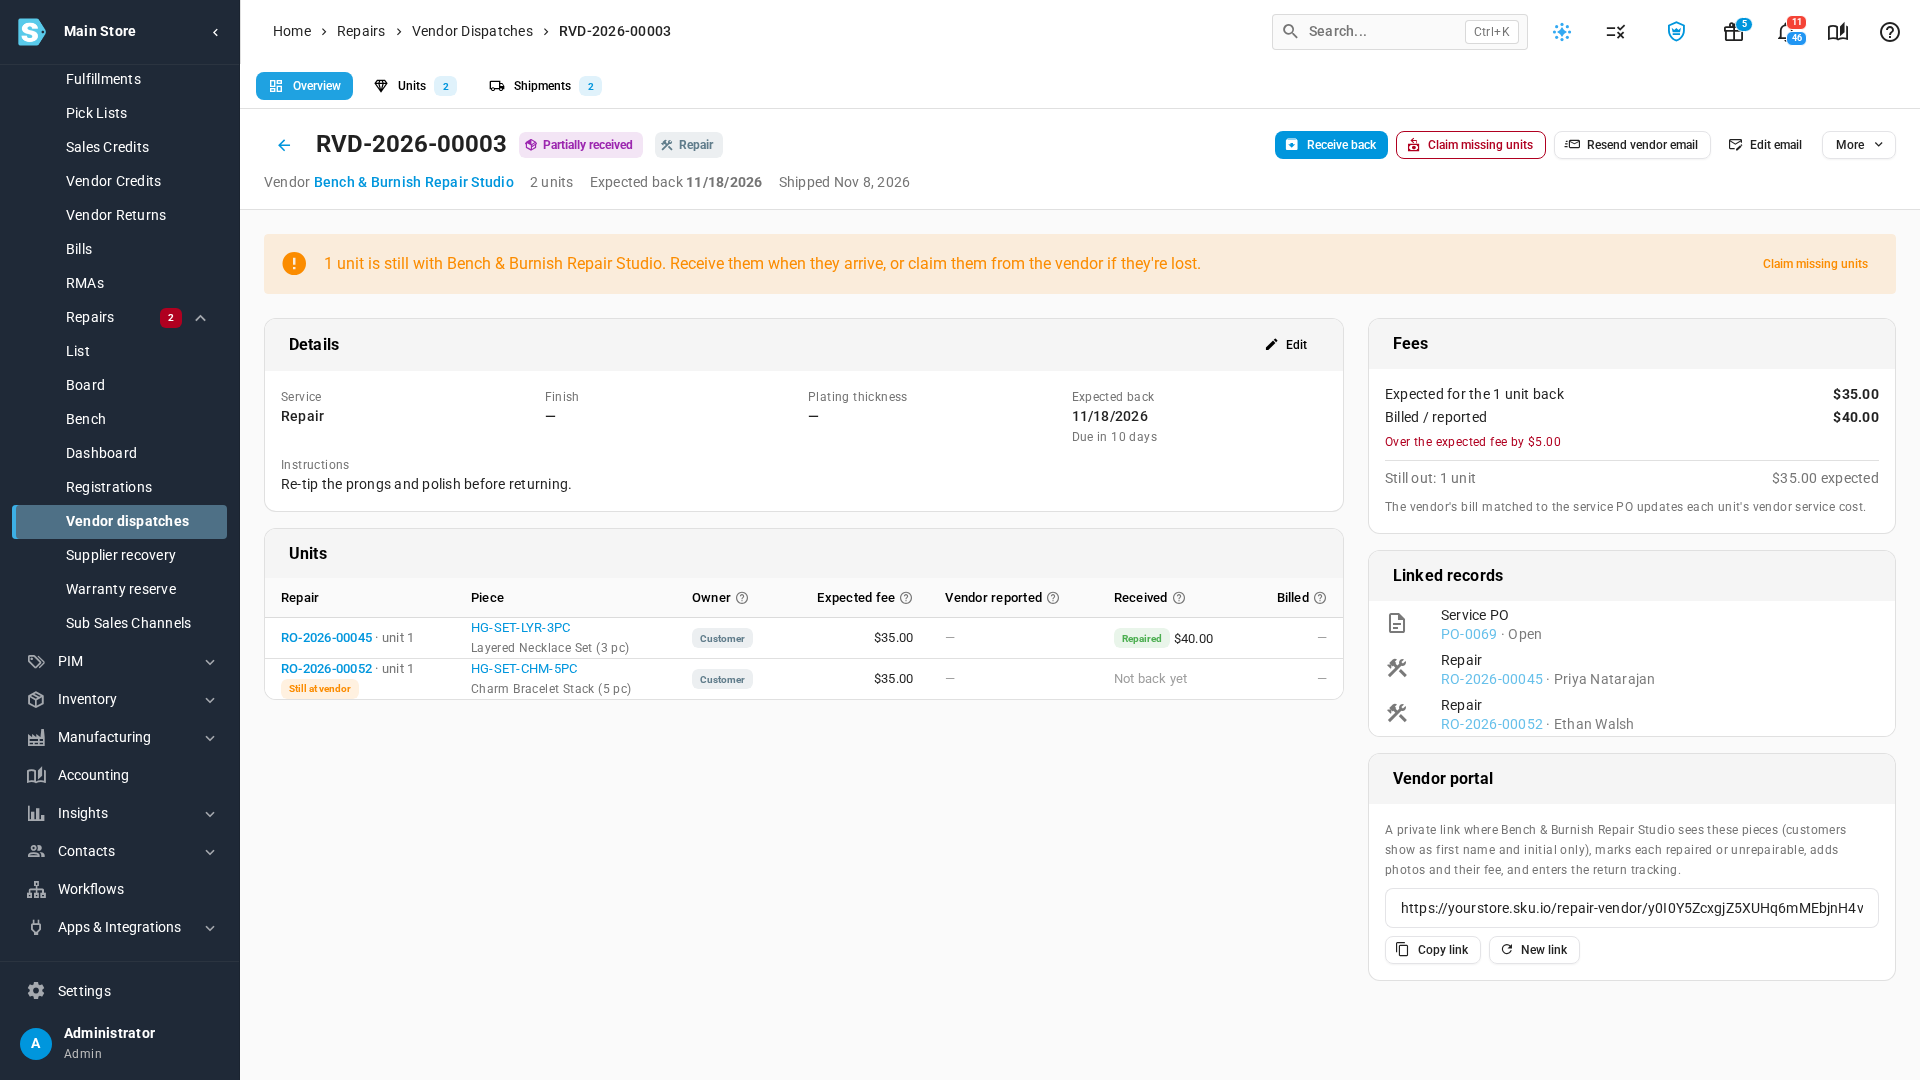
On the Fees card, a line under the figures reads Over or Under the expected fee by the difference — red when over, green when under. After a partial receive, both figures cover only the units back so far, so a half-returned dispatch isn't compared with its full estimate: Expected for the 1 unit back $35.00 beside Billed / reported $40.00, then "Over the expected fee by $5.00", and a bottom row for the rest — Still out: 1 unit · $35.00 expected. A unit counts as back once it's received or billed.
- Shipments — every outbound ("Us → vendor") and return ("Vendor → us") parcel tied to the dispatch, with carrier, tracking, status and cost, each linking back to its repair. Its dates show the day only, with the time on hover. It's empty until the dispatch is marked shipped.
Ship it to the vendor
Once a draft dispatch is ready to go, click Mark shipped on its page.
- Choose I have tracking if you already bought a label elsewhere, or Buy a label to get live rates from your connected shipping providers.
- I have tracking — enter the Carrier, Service, Tracking #, the Shipped on date (today's date in your account's timezone by default), and an optional one-time Postage cost and who it's billed to (warranty, goodwill, the customer, or the supplier — defaulting to the unit's own coverage).
- Buy a label — enter the parcel's weight and dimensions, click Get rates, and pick a rate from the table. Buying the label works the same way as any other SKU.io shipment.
- Click Mark shipped (or Buy label & mark shipped). The header then reads Shipped with the date, for example Shipped Oct 31, 2026.
Postage for a dispatch covering several repairs is booked once, on the first repair in the parcel. Any brand-owned units' warehouse transfer ships at the same moment, so inventory leaves your warehouse in step with the physical parcel.
Receive the pieces back
Click Receive back (available once the dispatch has shipped).
- Tick every piece that actually arrived in this parcel — pieces left unticked stay with the vendor for a later, partial receipt.
- For each ticked piece, choose Repaired or Unrepairable, and confirm or edit the Fee — wide enough to show the full amount, cents included (it defaults to what the vendor reported in their portal, else what was billed, else the rate-card estimate — never silently $0 unless that's genuinely what's owed).
- Add any Notes, set Received on (today's date in your account's timezone by default), and click Receive
<n>.
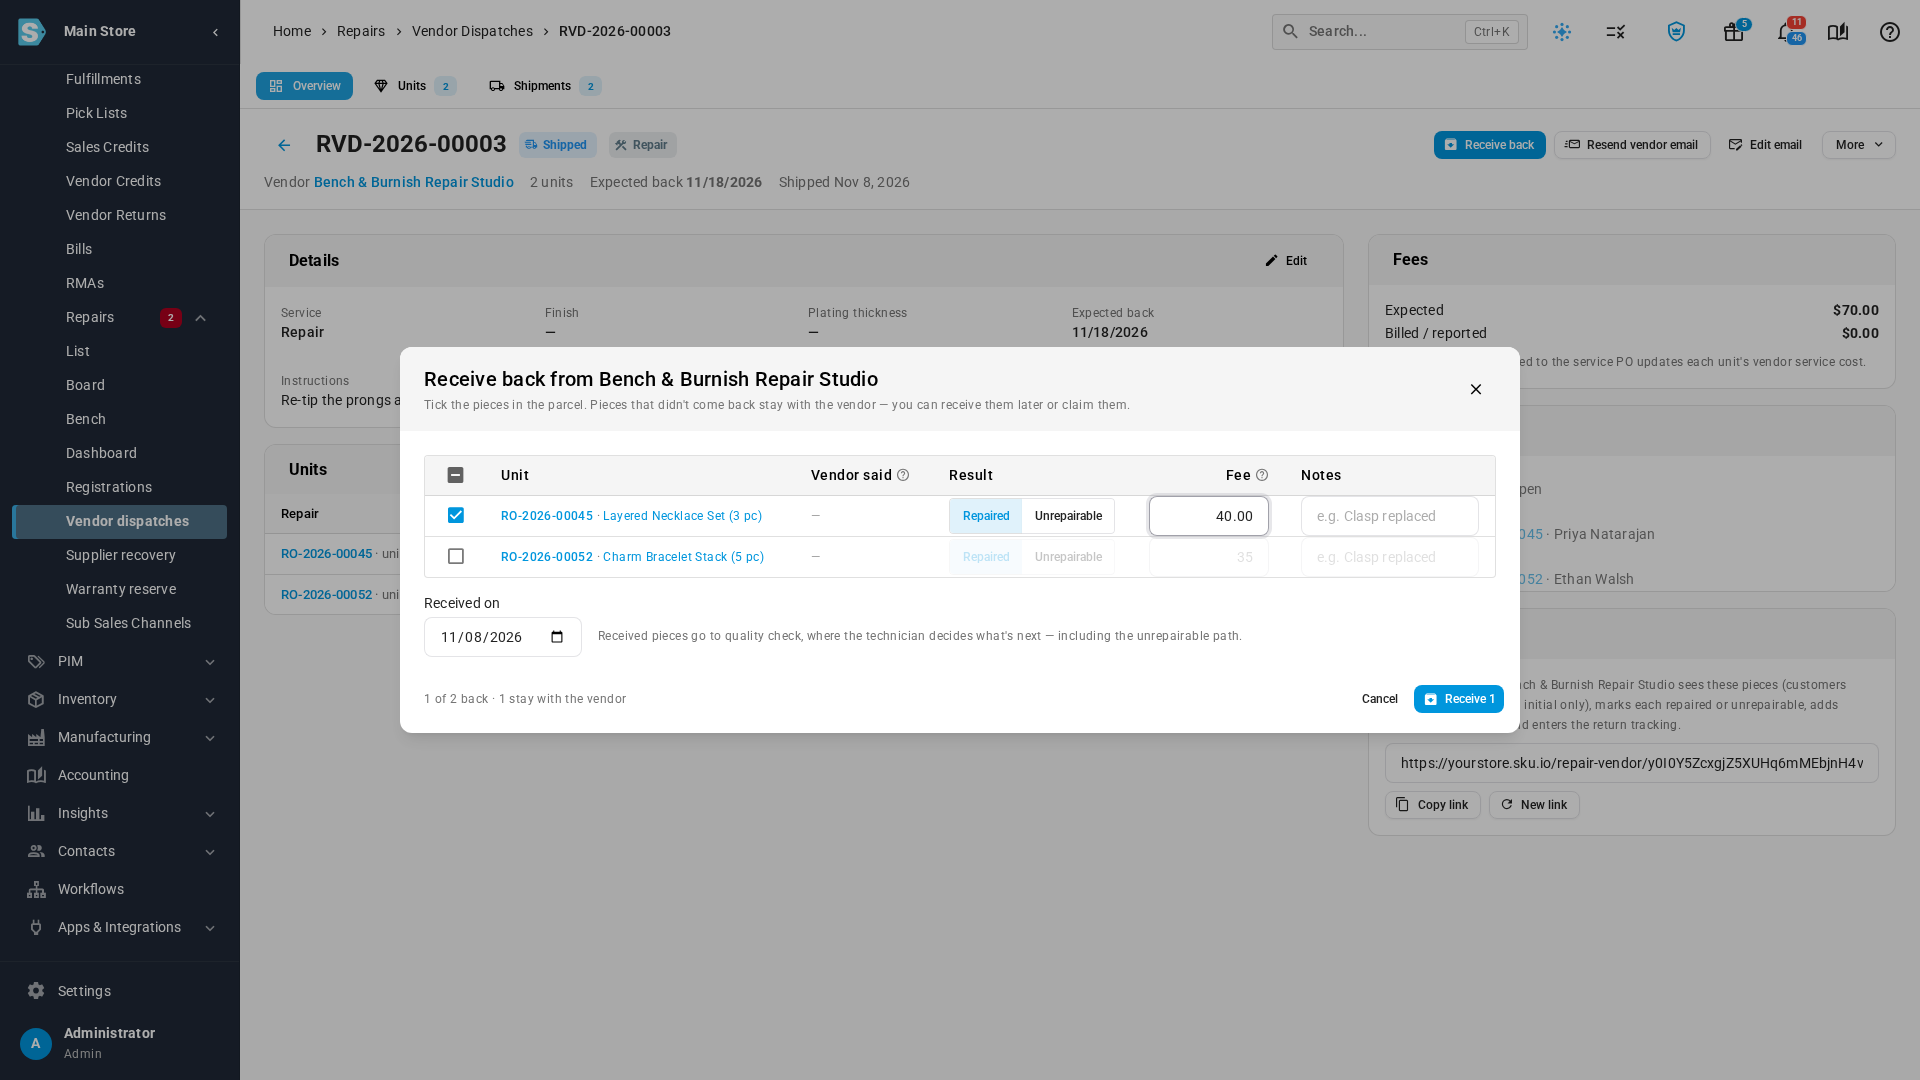
Confirming books that fee as the unit's vendor-service cost, returns custody to on-hand (a brand-owned piece rides its warehouse transfer home), and sends the unit to Quality check for the technician to decide what happens next. A green message confirms it, for example "1 unit received back from the vendor.", or "All units received back from the vendor." when nothing is left out. A line that's already been received can't be received a second time.
Cancel a dispatch
A Draft dispatch (not yet shipped) can be canceled from the dispatch's More menu, or in bulk from the list. Canceling puts every unit back on the bench in In repair, removes the service PO's fee lines, and deletes the draft warehouse transfer if there was one. This can't be undone — create a new dispatch to send the pieces again. Once a dispatch has shipped, cancel is no longer available; receive the units back instead.
Resend the notice, and the vendor's portal link
- Resend vendor email sends (or re-sends) the dispatch notice using the "Repair vendor dispatch" email template — the units, your instructions, the expected-back date, and the vendor's portal link. It's refused, with a clear reason, if the template is switched off in Settings → Email Templates or the vendor has no email address.
- The Vendor portal card holds a private 64-character link the vendor uses with no login of their own. Copy link copies it as-is. New link (or Issue a new vendor link from the More menu) rotates the token — the old link stops working immediately, so you'll need to resend the email afterwards.
Claim units the vendor never sent back
A dispatch can have units claimed as missing once it's Partially received, or once it's Shipped and past its Expected back date with nothing back yet. Then an orange banner says how many units are still with the vendor — for example "1 unit is still with Bench & Burnish Repair Studio. Receive them when they arrive, or claim them from the vendor if they're lost." — each unit is flagged Still at vendor in the Units table, and a Claim missing units button appears beside Receive back. Before a shipped dispatch's expected-back date, there's nothing to claim yet. Click Claim missing units, tick the pieces you want to write off as lost, add any notes, and click Raise claim. This opens a draft supplier recovery claim against the vendor, pre-filled at each piece's cost, which you review before sending. A unit the vendor has already returned can't be added to a missing-units claim, and raising one needs the Supplier recovery permission, separate from the permission to send dispatches in the first place.
The service purchase order and the vendor's bill
Creating a dispatch raises one repair-service purchase order with a fee line per unit — editable while that fee hasn't been billed yet. When the vendor's actual bill arrives, record it against that PO the normal way, through invoicing and the 3-way match; SKU.io matches each fee line back to its unit and trues up the vendor-service cost to what was actually billed, with the invoice linked from the Units tab (its Billed column reads "—" until then).
If the bill comes in above or below the original estimate, the difference posts as its own current-dated "Vendor repair variance" cost line rather than editing history — so the estimate and the correction both stay visible — and a bill below the estimate simply reverses the usual debit/credit direction for the shortfall. This still applies even to a unit received at $0: the whole billed amount becomes the variance. If the unit's refurbish has already been capitalized into a new SKU's cost, the original estimate line can no longer be edited at all, and the whole variance posts fresh.
Export dispatches to a spreadsheet
Tick one or more rows on the Vendor dispatches list and choose Export from the bulk bar. It builds the file in your browser from the rows you selected — there's no background job and nothing to wait for — and downloads vendor-dispatches.csv immediately with these columns:
| Column | From |
|---|---|
| Dispatch | Dispatch number |
| Status | Draft / Shipped / Partially received / Received / Canceled |
| Vendor | The repair vendor's name |
| Service | Repair / Replate |
| Finish | Blank unless the service is a replate |
| Thickness (µm) | Plating thickness, replates only |
| Units | Unit count |
| Expected back | The expected-back date |
| Shipped | When it was marked shipped |
| Received | When it was marked received |
| Expected fees | The rate-card total |
| Fees | What's actually billed or reported |
| Service PO | The linked purchase order's number |
The file carries a UTF-8 marker so characters like µm display correctly when opened in Excel. Because export only ever works on the rows you've ticked, there's no "All Filtered" option here.
What the vendor sees and does
The link in the dispatch notice opens a page the vendor uses with no SKU.io account of their own — branded, mobile-friendly, and listing only what's on this one dispatch. Customers are shown as first name and initial only.
For each editable unit the vendor can:
- Pick Repaired or Can't be repaired, enter their fee, and add notes on what they did or why it couldn't be fixed.
- Add photo — attach a photo or PDF (JPG, PNG, WEBP, HEIC or PDF, up to about 10 MB), which shows up on your Units tab as a vendor attachment.
- Enter the carrier and tracking number for the parcel coming back, under Sending the units back.
Clicking Send update saves every changed unit at once; it stays disabled until something has actually changed. None of this moves anything on your side — it's only the vendor's claim, which you confirm (and can override) when you Receive back. A unit you've already received back becomes read-only in the portal, and once the whole dispatch is Received or Canceled, the portal turns fully read-only with the message "This dispatch is closed. Contact the sender if something needs to change." An invalid or expired-looking link shows "This repair link is no longer valid" without even reaching the server.
Next steps
- Set up and send units to a repair vendor
- Recover warranty costs from a supplier
- Buy a shipping label with Shippo
- Invoicing and the 3-way match
- Vendor dispatch & recovery claim status reference
Video transcript
To find a dispatch, open Orders in the sidebar. Inside Orders, expand the Repairs group. Choose Vendor dispatches to see each piece that's currently out with a repair vendor. The newest dispatch is at the top, and late return dates show in red. Each row shows its status, such as Draft, plus the vendor and the Fees. Click a dispatch number in the first column to open the dispatch's own page. Every dispatch page has three tabs: Overview, Units and Shipments. The Overview tab compares expected and charged fees, and lists the linked records. When the parcel leaves your bench, click Mark shipped on the dispatch. If you already bought a label, keep the I have tracking option. Type the carrier, such as USPS, into the Carrier field. Then click the Tracking field and type the label's tracking number. The Shipped on field defaults to today's date. When everything looks right, click Mark shipped at the bottom to confirm the shipment. When the vendor's parcel comes back, click Receive back at the top of the page. Every piece starts ticked in the Unit column. Untick any piece that's still with the vendor. Choose Repaired or Unrepairable for each ticked piece. Then enter the fee the vendor charged for the repair. Click Receive to book the fee and return the piece. The dispatch is now Partially received. Now the Fees card compares just the returned unit's fee. A banner shows the count of outstanding pieces. If a piece is lost, click Claim missing units. Raise claim starts a draft recovery claim against the vendor. Click Cancel instead to keep waiting for the piece. The vendor works from a private link, with no account of their own. There they mark each piece repaired or unrepairable and enter their fee. Copy link copies the link so you can send it yourself. New link replaces it, and the old link stops working. To export, go back to the Vendor dispatches list in the sidebar. Tick the box beside each dispatch you want to include, in the list's first column. A bar of bulk actions now replaces the hint above the table. Export downloads the ticked rows as a spreadsheet. The file includes the status, the fees and the service purchase order.