Set up and send units to a repair vendor
Some repairs and replating go to an outside jeweller, repair shop or plater instead of your own bench. Before you can send them anything, mark the supplier as a repair vendor — that's what makes them selectable on Send to vendor, raises their dispatches as a purchase order, and starts tracking their turnaround.
Before you begin
- You need the Update suppliers permission to mark a supplier as a repair vendor.
- You need the Send to vendors permission in the Repairs & Warranty permission group (
repairs.vendor) to send a dispatch — the on-screen messages for this one call it the "Send to vendors" permission. - The supplier record has to exist first. See Create & edit a supplier if you haven't added them yet.
- The pieces you're sending need to already be on a repair, on the bench — in Diagnosing, In repair, or Awaiting parts.
Mark a supplier as a repair vendor
- Go to Contacts → Suppliers and open the supplier who repairs or replates pieces for you.
- Go to the supplier's Settings tab and find the Repair vendor card.
- Turn on This supplier repairs or replates pieces for us. Two more fields appear:
- Turnaround (days) — sets the expected-back date on every dispatch you send them, and is what "on time" is measured against. Leave it blank and SKU.io defaults to 14 days.
- Rate card — click Add fee to add a row for what they charge per issue type, or leave the issue type blank for one default row covering their usual price. A unit's expected fee is the sum of the fees of its matching issue types, or the default row's fee when none match.
- Click Save repair vendor.
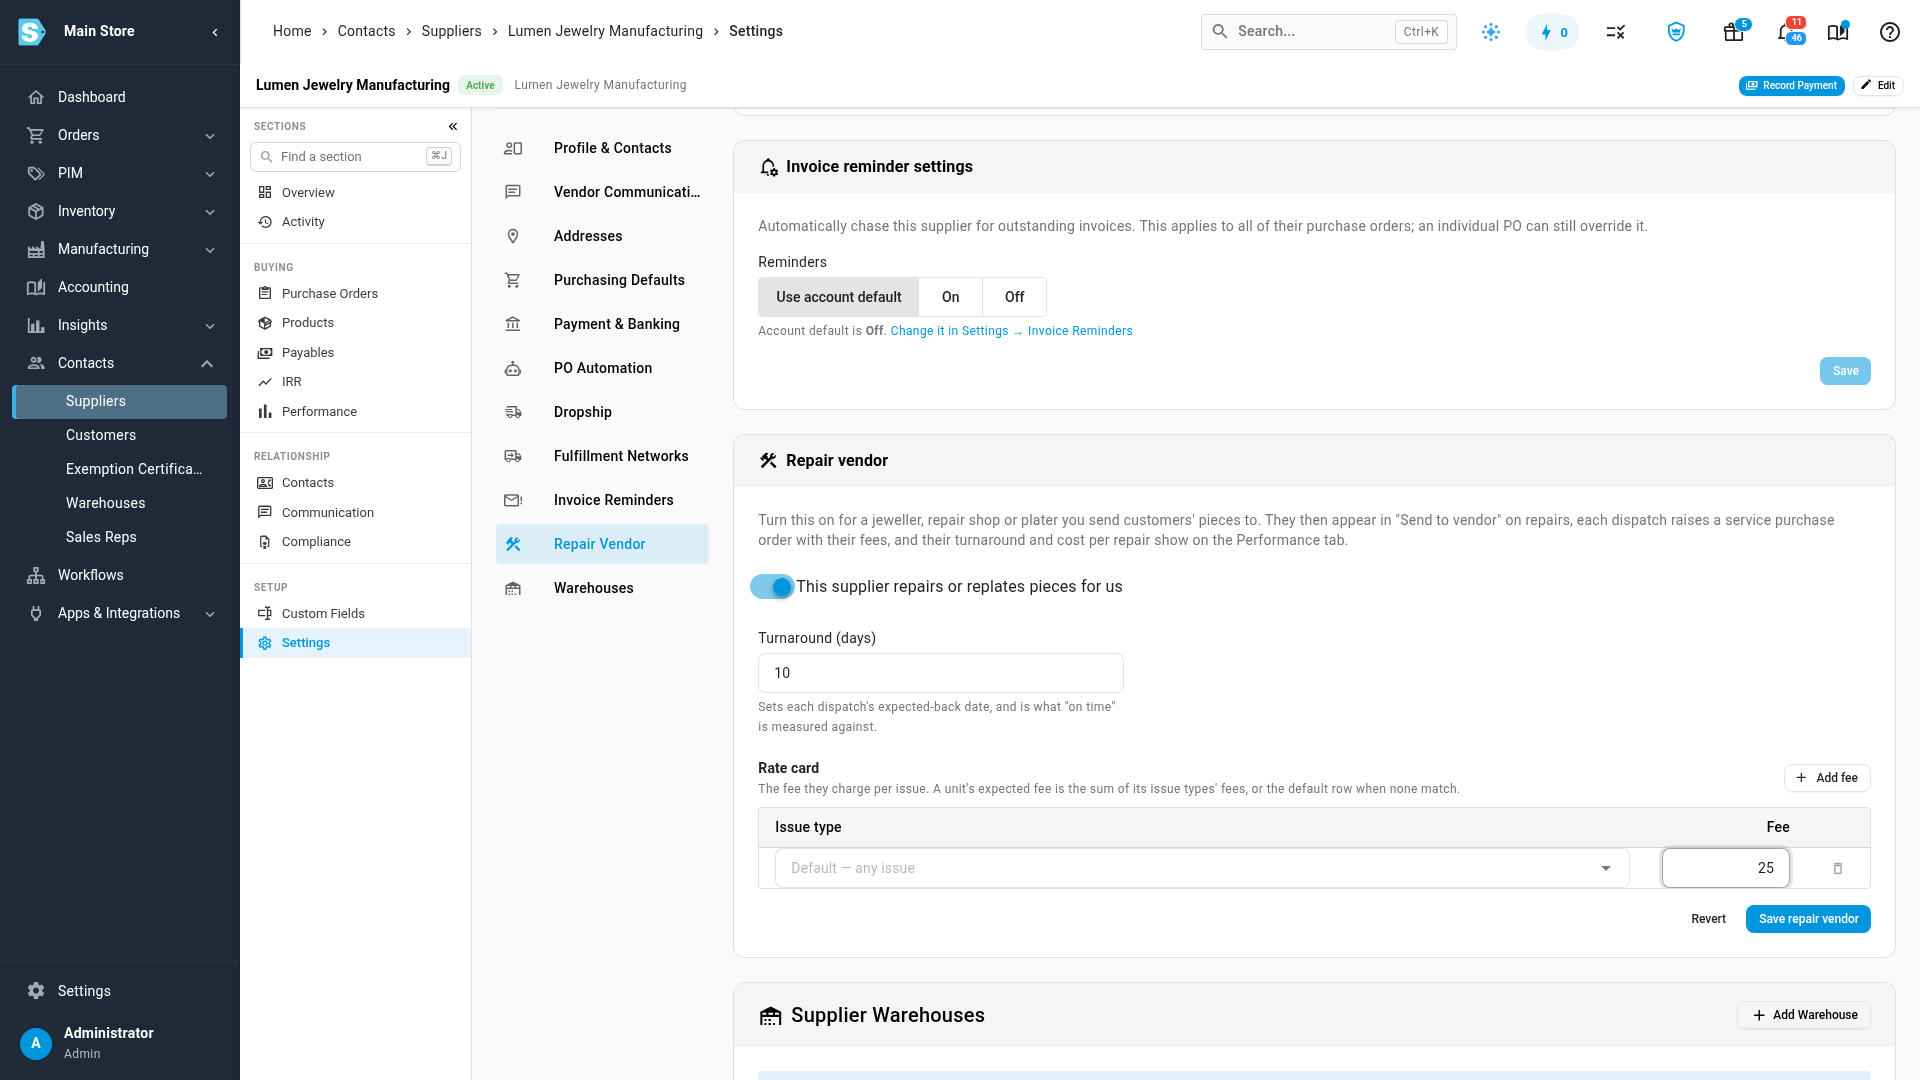
The card adds a View dispatches shortcut once saved, which filters the Vendor dispatches list down to this one supplier.
If the save is blocked
- "Each issue type (and the default row) can appear once." — your rate card has the same issue type (or two blank default rows) more than once. Remove the duplicate.
- "Turnaround is a whole number of days, up to 365."
- On an archived supplier the whole card is disabled: "Archived suppliers are read-only — unarchive to edit."
Find every repair vendor in one place
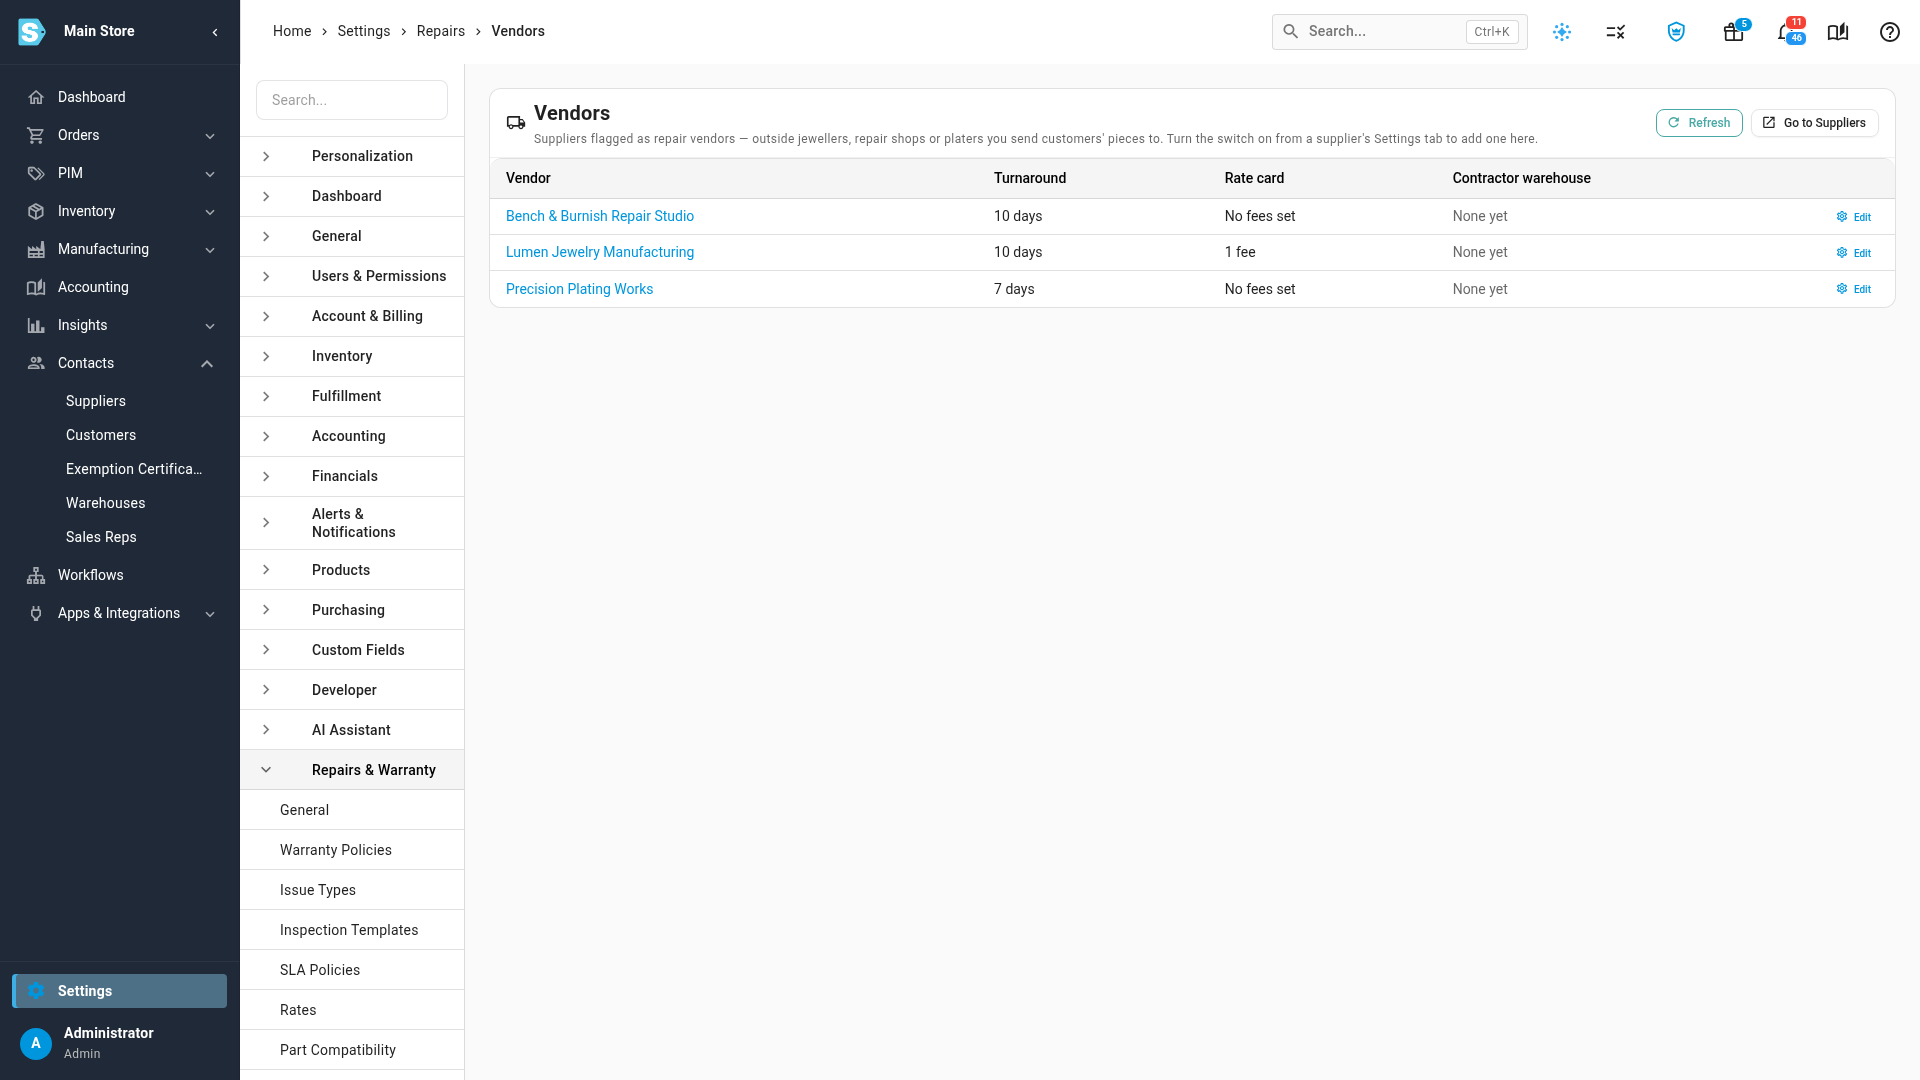
Settings → Repairs & Warranty → Vendors lists every supplier flagged as a repair vendor — their turnaround, how many fees are on their rate card, and their contractor warehouse (see below) if they have one — each linking straight to that supplier's Settings tab to edit it. It's a read-only shortcut list: the actual switch, turnaround and rate card are still set on the supplier, never here. If nobody has been flagged yet, the page tells you to open a supplier, go to its Settings tab, and turn on Repair vendor.
See how a vendor is performing
Once a vendor has had at least one dispatch, their supplier page's Performance tab shows a Repair vendor performance card for the period you're viewing: average turnaround from shipping to receiving back, the share received by the expected-back date ("on time"), cost per repair, and the rework rate (repairs that came back again within 90 days). A vendor who both repairs and replates gets the same figures broken out by service type. Outside the chosen period the card reads "No pieces were sent to this vendor in this period."
Send units to a vendor
- From the Repairs list, board, or a repair's own page, select the units going out and choose Send to vendor.
- Pick the Repair vendor. If none exists yet, the picker says "No repair vendors yet" with a link to open Suppliers and flag one. If the list can't load, a red line under the field reads "Couldn't load repair vendors." with the reason and a Retry button.
- Set Expected back — it defaults to the vendor's turnaround, and the hint under it says where the date came from. Before you pick a vendor it reads just "Defaults to 14 days"; once you do, it reads, for example, "Defaults to 10 days — the vendor's turnaround", or "Defaults to 14 days — no turnaround set on the vendor".
- Choose the Service: Repair, or Replate — which adds a Finish field (e.g. gold, silver, rose gold) and a Plating thickness (microns) field. As a guide, gold vermeil needs at least 2.5 µm and flash plating is under 0.5 µm.
- For each unit in the Units table, review the Owner chip (Customer or Ours — see below) and the Expected fee, pre-filled from the vendor's rate card and editable per unit. If the vendor has no rate card yet, every fee starts at $0 with a link straight to the supplier's Settings tab to add one.
- Add Instructions for the vendor if you have any — these print on the dispatch notice and the vendor's own portal.
- Leave Prepare a shipping label on if you want a draft outbound shipment added so you can buy the label when you ship the parcel.
- Leave Email the vendor on (it's disabled if the vendor has no email address) to send them the dispatch notice straight away, with a link to edit that email template.
- Click Create dispatch.
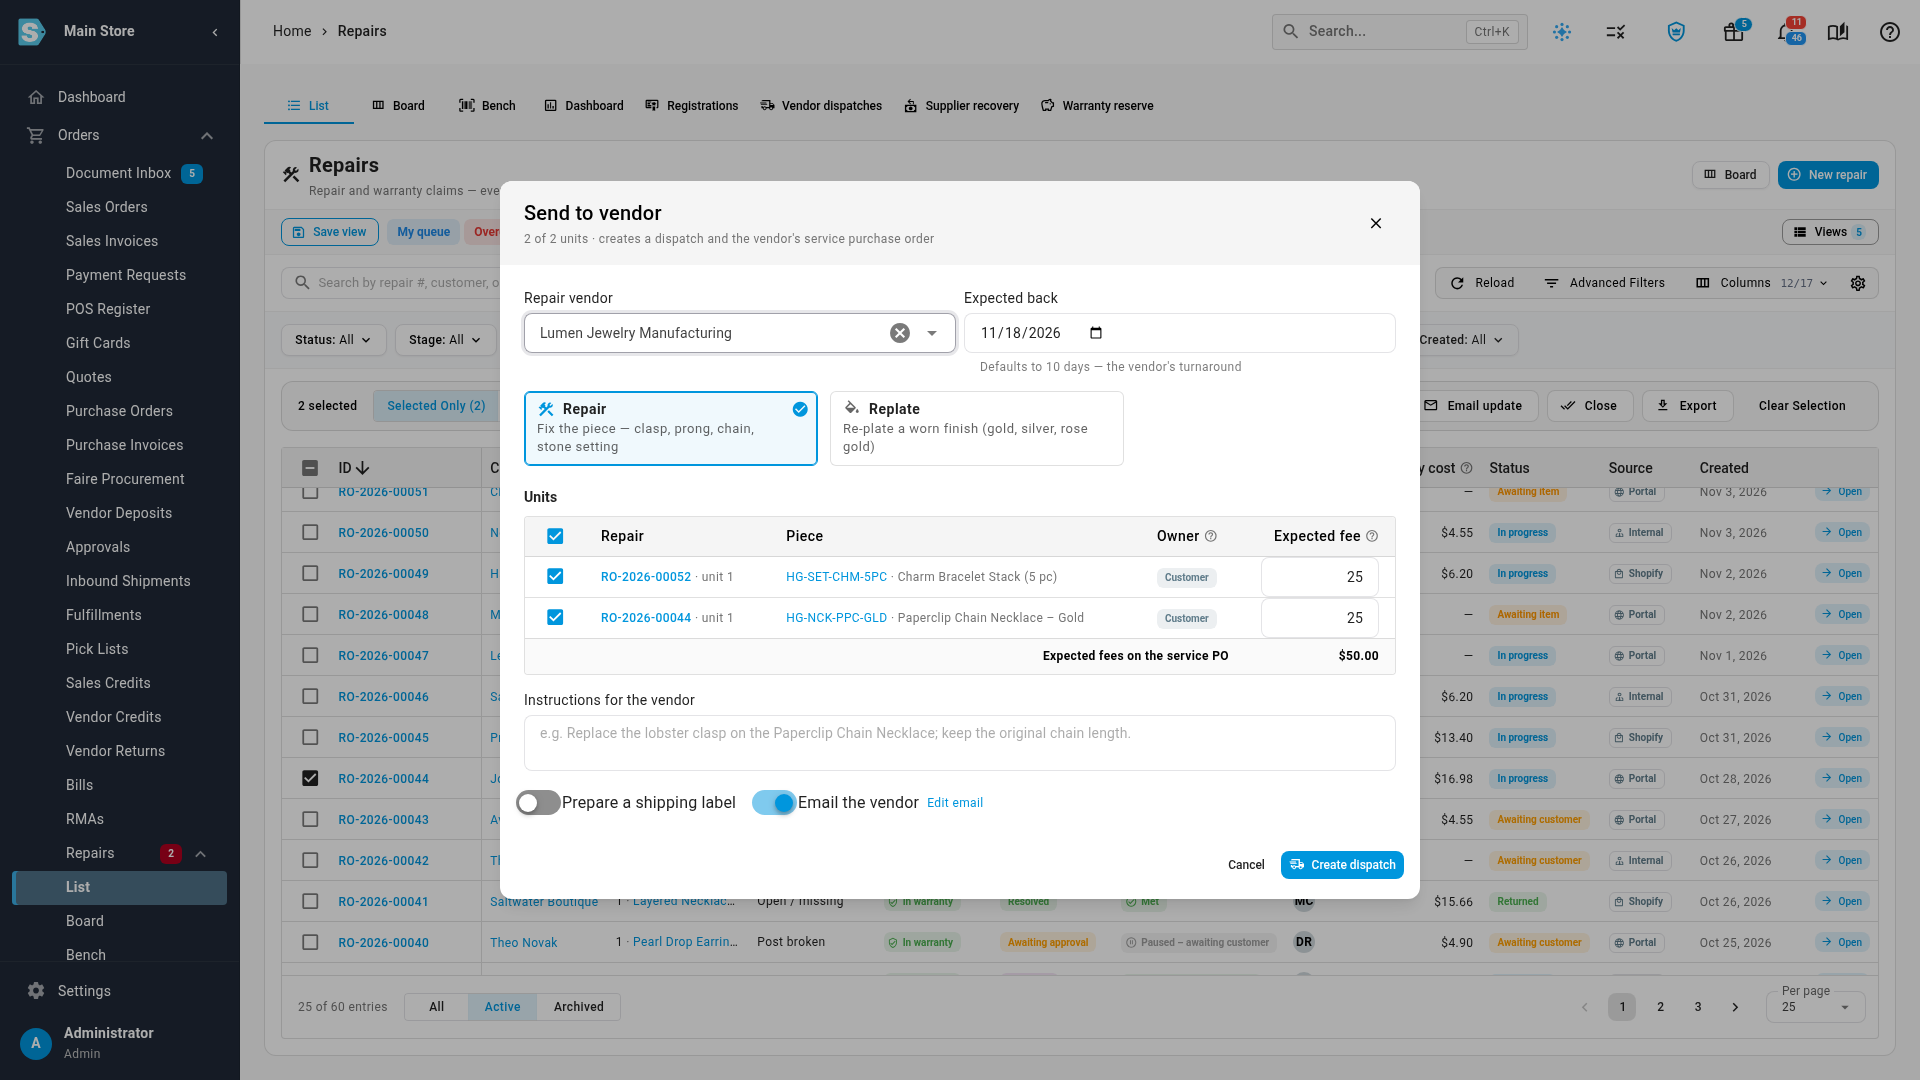
Creating the dispatch raises a numbered dispatch (for example RVD-2026-0031), a service purchase order with one fee line per unit, and moves every chosen unit's stage to At vendor. It opens the new dispatch — see Manage a vendor dispatch for everything from here.
Customer pieces vs. pieces you own
The Owner column matters because the two travel differently:
- Customer pieces travel to the vendor with no inventory movement at all — only their custody flag changes to At vendor. Nothing happens to your stock count.
- Ours pieces are brand-owned units you're refurbishing back to your own stock, so they're real inventory. They ride a warehouse transfer to the vendor's contractor warehouse — a warehouse that stands for the vendor's own bench, linked on the supplier record — and back again on the way home, so your stock count stays right the whole trip. SKU.io reuses the same contractor-warehouse mechanism as outsourced manufacturing; see Manufacture with a contract manufacturer for how that warehouse behaves in general.
If the vendor doesn't have a contractor warehouse yet and you're sending a brand-owned piece, the dialog shows an alert and a Create a contractor warehouse for <vendor> switch, on by default. Turn it off and the dialog blocks submitting with "Pieces you own need a contractor warehouse — turn on 'Create a contractor warehouse'."
Which units can go out
Only units in Diagnosing, In repair or Awaiting parts can be sent. A unit already on another open (not yet received or canceled) dispatch is rejected with its own message, for example "Line 2 of RO-2026-00412 is already on dispatch RVD-2026-0031." Every unit in one dispatch has to come from the same repair warehouse — mixing warehouses is rejected with "Send units from one warehouse at a time." A unit still in Diagnosing must have its diagnosis checklist finished first; otherwise Create dispatch is refused with a message naming the unit, for example "Line 2 of RO-2026-00412 can't go to a vendor yet. Complete the diagnosis checklist …" Finish the checklist on the unit's card (see Diagnose and work a unit), or untick that unit and send the rest.
Build a plating batch for several finishes at once
Sending several pieces out for replating one at a time, each with its own dispatch, is slow when you have a bench full of gold and silver pieces waiting. Build plating batch groups them for you.
- Open it from Repairs → Vendor dispatches → Build plating batch, or select pieces on the Repairs list, board, or a repair's page and choose Build plating batch… from the Actions menu.
- SKU.io proposes one batch per finish and warehouse — so a gold batch and a silver batch never mix into one dispatch — each showing how many pieces and units it covers, with a chip naming its finish — for example 14k Gold Plate or Sterling Silver Plate — coloured by metal: gold amber, silver blue-grey, rose gold pink. The same colours mark the finish on the Vendor dispatches list and on each dispatch's header. Show pieces expands the list, with a checkbox on each piece. Untick a batch you don't want to send yet, or untick single pieces; the batch's own checkbox then shows partly ticked.
- Check for pieces that aren't ready. A piece still in Diagnosing whose diagnosis checklist isn't finished shows Checklist not done, with its checkbox greyed out; hover it to see which checklist and which items are left. Its batch header shows an amber N not ready chip and opens on its own. These pieces stay out of the batch: the piece counts, the footer (N batches · N pieces), and the Create
<n>dispatches button count only pieces that can go. To include one, finish its diagnosis checklist first (see Diagnose and work a unit), then reopen the dialog. - Pick the Plater and, beside it, the Expected back date for every batch you're sending (with the same "Defaults to …" hint as Send to vendor). On the row below, set a shared Thickness (microns) and add Instructions for the plater.
- Leave Create a contractor warehouse if needed and Email the plater on unless you have a reason not to.
- Click Create
<n>dispatches. A message confirms the batches, the dialog closes, and one new draft dispatch per finish joins the Vendor dispatches list.
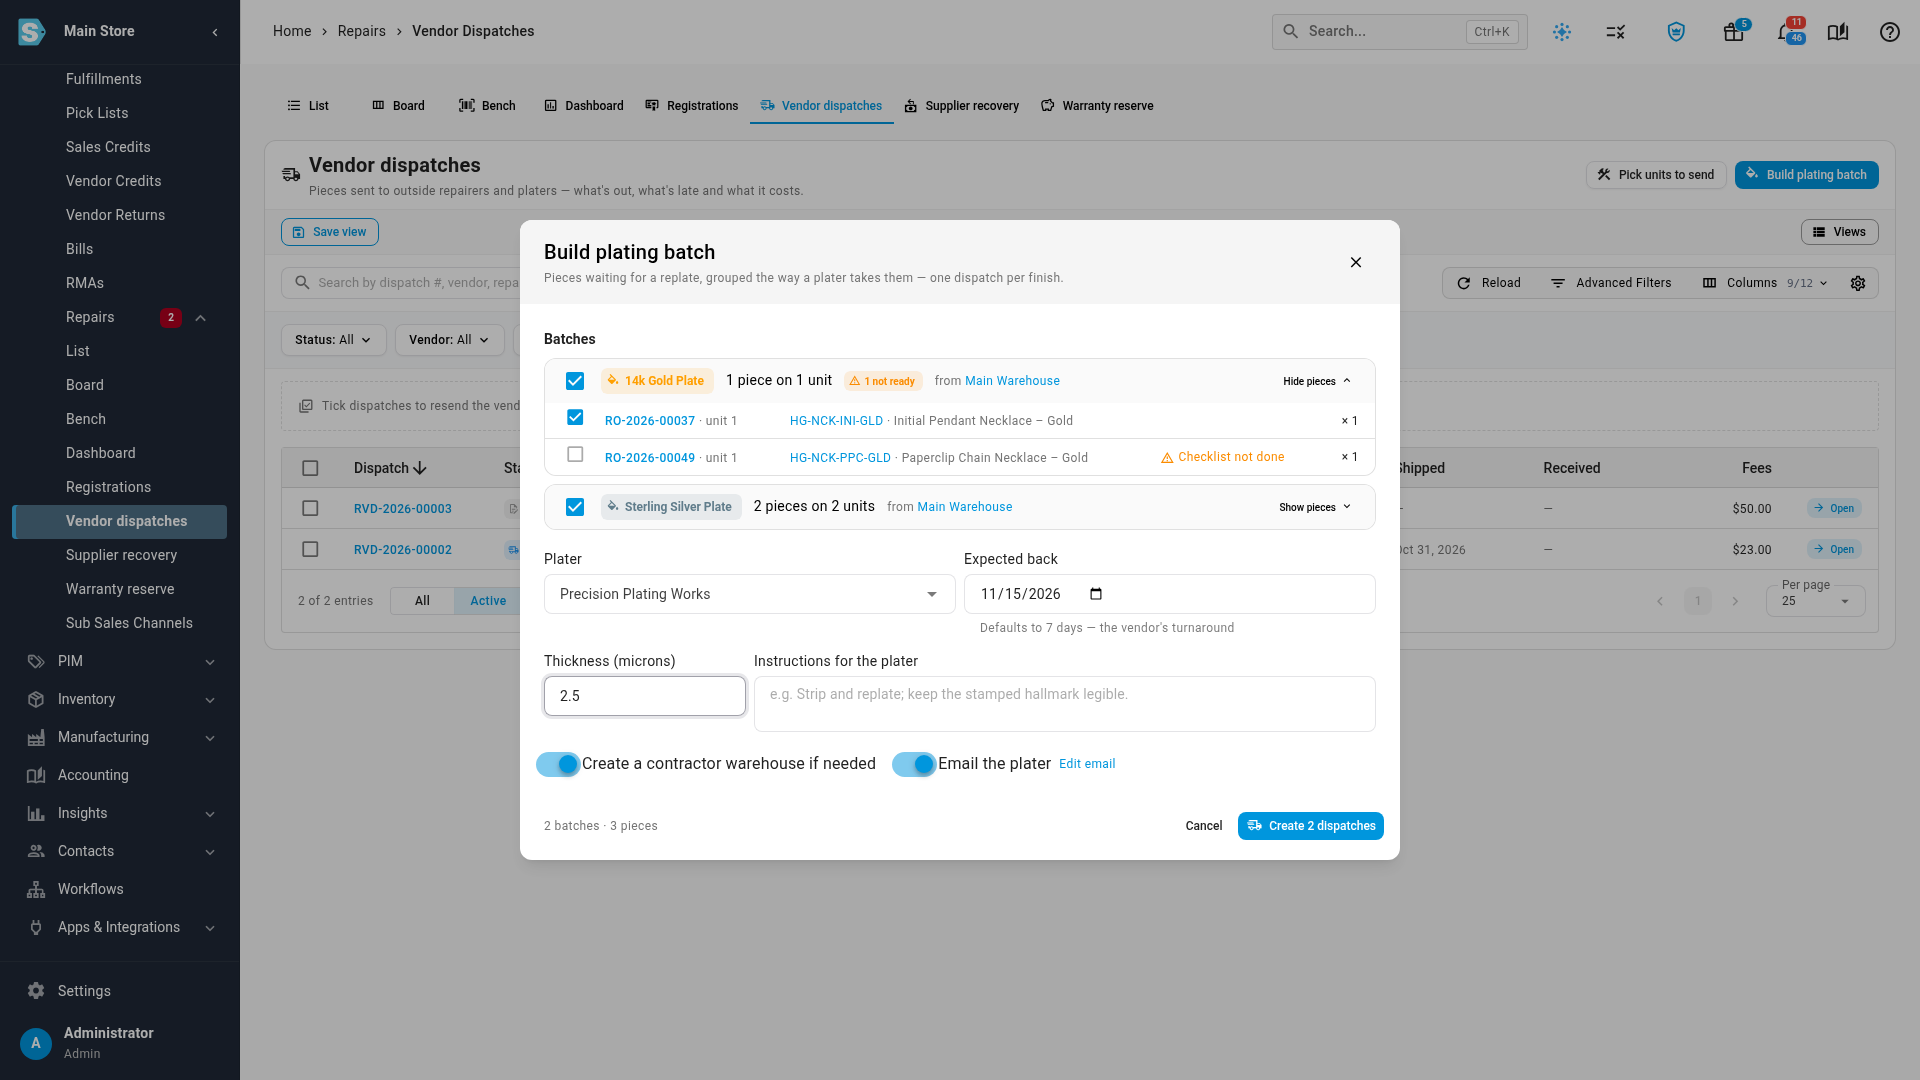
Each finish becomes its own vendor dispatch in one action. If nothing is waiting, the dialog says "No pieces are waiting for a replate" — a piece only appears here once its requested service is Replate and it's on the bench. If every waiting piece is still blocked by its checklist, the button stays disabled and its tooltip reads "None of the waiting pieces can go yet: finish their diagnosis checklists first."
Next steps
- Manage a vendor dispatch — shipping it, what the vendor sees, and receiving it back.
- Recover warranty costs from a supplier — if a vendor never sends pieces back, you can claim them as lost from there.
- Create & edit a supplier
- Diagnose and work a unit — the bench stages a unit has to be in before it can be dispatched.
- Roles & permissions reference
Video transcript
Before sending repairs out, mark the supplier as a repair vendor. Go to Contacts in the sidebar, then choose Suppliers from the list below. The list shows every supplier on your account. Open the supplier who repairs or replates your customers' pieces. On their page, open the Settings tab in the sections list. Then jump to the Repair Vendor section, near the bottom of that tab. Turn on the repair vendor switch at the top of the card. Two more fields appear below the switch. In the Turnaround field, enter how many days they usually take. It sets the expected-back date on every dispatch. To record what they charge, click Add fee in the rate card. Leave the issue type blank for one default row covering any issue. Then enter their usual fee in the Fee column for that row. When everything looks right, click Save repair vendor. A message confirms the settings are saved. Every repair vendor is also listed in one place. Go to Settings at the bottom of the sidebar to open the settings cards. Then open the Repairs and Warranty card to see its pages. Scroll down, and open Vendors at the end of the list. Each row shows the vendor's turnaround, their rate card, and their contractor warehouse. Next, send pieces out to a vendor, starting with the Orders group in the sidebar. Inside it, open the Repairs group, then choose List to see every repair. Each row is one unit, with the most recent repairs at the top. Select the units that are going out to the vendor. Tick the box beside each unit, scrolling down the list for the other units. Then click Send to vendor in the bar above the repairs list. Click the Repair vendor field to list your repair vendors. Then choose the supplier from the earlier steps. Expected back fills in from their turnaround. Each unit's expected fee comes from the rate card. Add any instructions for the vendor. Then click Create dispatch at the bottom of the dialog. The new dispatch opens, linked to its service purchase order. To send several pieces out for plating, go to Orders, then Repairs, then Vendor dispatches. Then click Build plating batch in the page header. SKU.io proposes one batch per finish, so gold and silver never mix. Pieces with an unfinished diagnosis checklist stay out of the batch. Click the Plater field to list your repair vendors. Then pick the shop that does your replating work. Set one shared thickness in microns for every finish. Finally, click Create dispatches to send each batch to the plater. A message confirms the batches, and the dialog closes. New draft dispatches join the top of the list, one for each finish.