Let buyers join with an invite code
An invite code lets new wholesale buyers sign themselves up on the Customer Portal, with no back-and-forth. You decide once what everyone who uses the code gets: their pricing tier, payment terms, credit limit and catalog. Then you hand the code out at a trade show, in an email campaign or on your website. A buyer who signs up with an instant code can order straight away. A review code sends them to Applications first, with the approve form already filled in from the code.
A code can also add people to a customer you already have, for example a dealer's new store staff, as extra logins on that one account.
Before you begin
- You need the portal.manage permission.
- Set up the pricing tier, payment terms and catalog you want new accounts to start on. Fields you leave blank on the code use your approval defaults, the same ones Review portal account applications uses.
- To invite one particular person to an account, use Invite buyers to the Customer Portal instead. A code is for many people you don't know by name yet.
Create an invite code
-
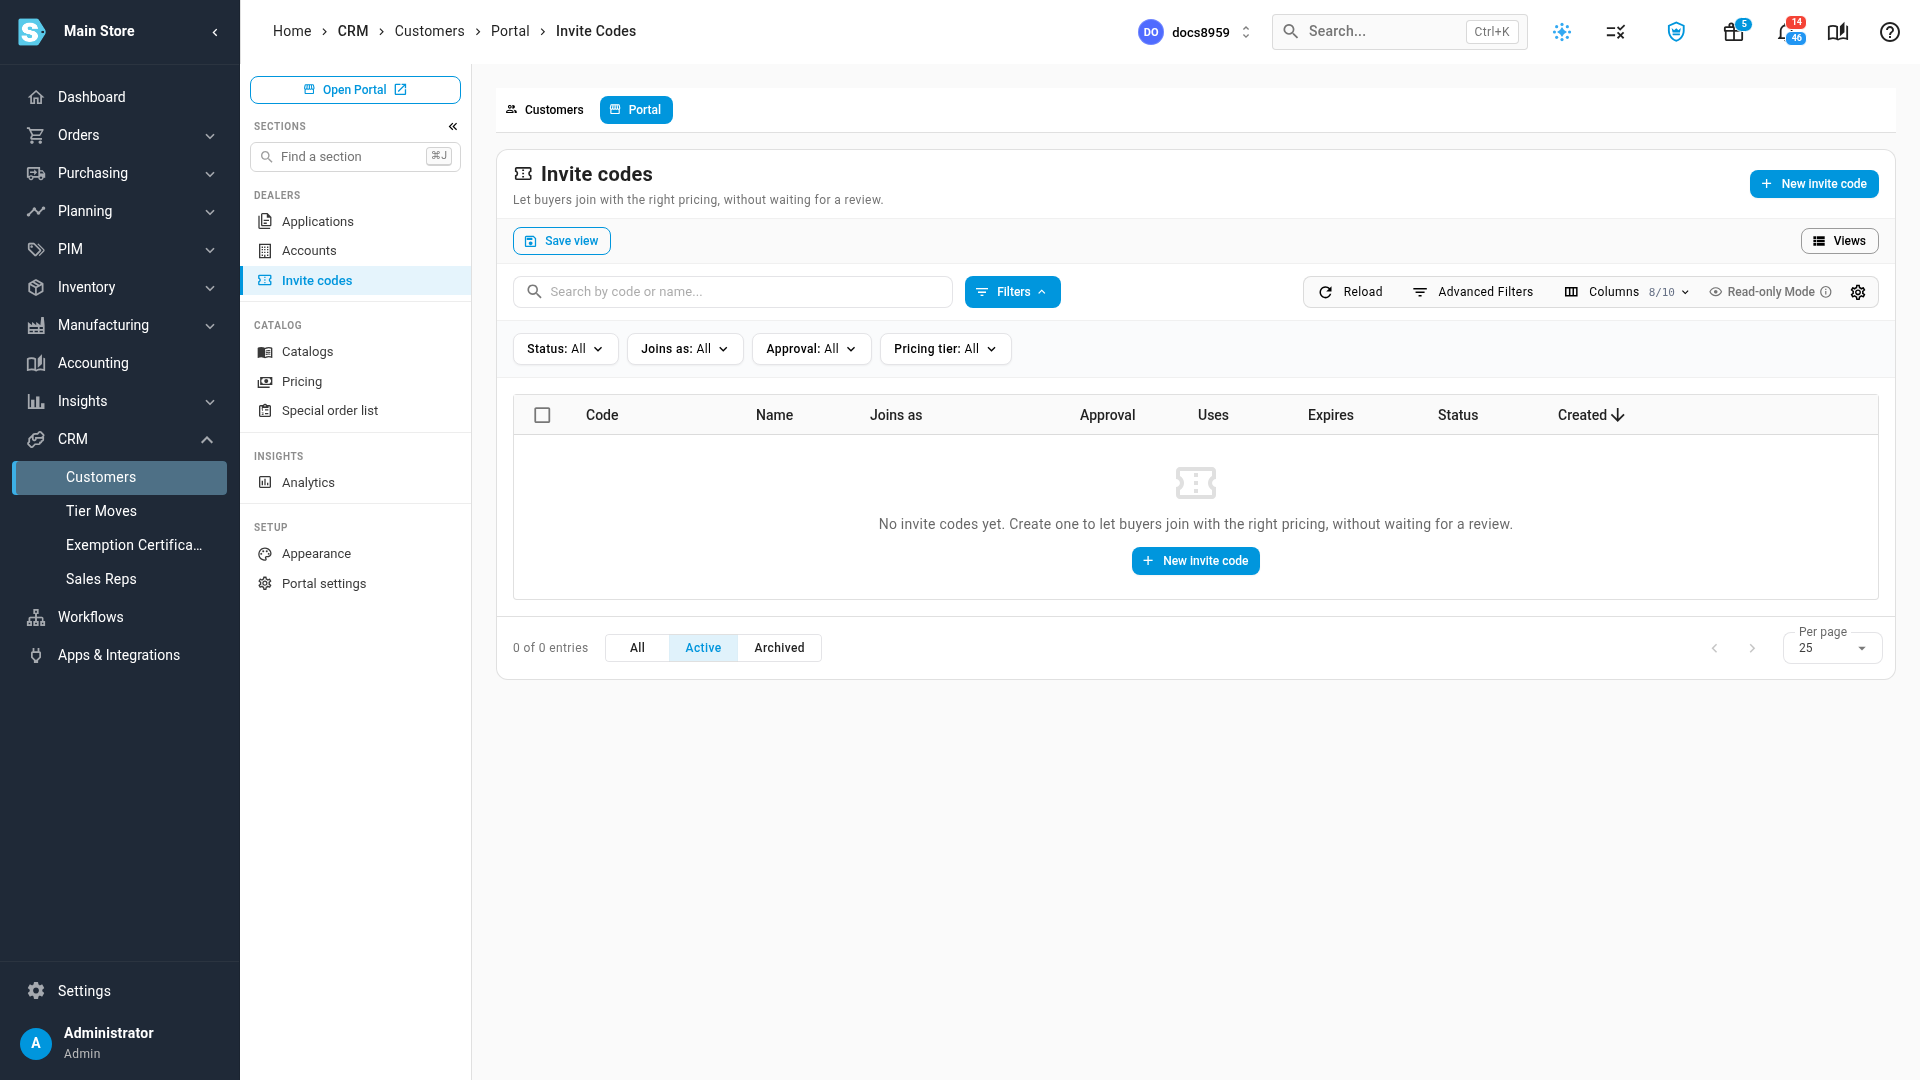
Go to CRM → Customers, click the Portal tab, and then click Invite codes under Dealers. The first time, the list is empty.
-
Click New invite code.
-
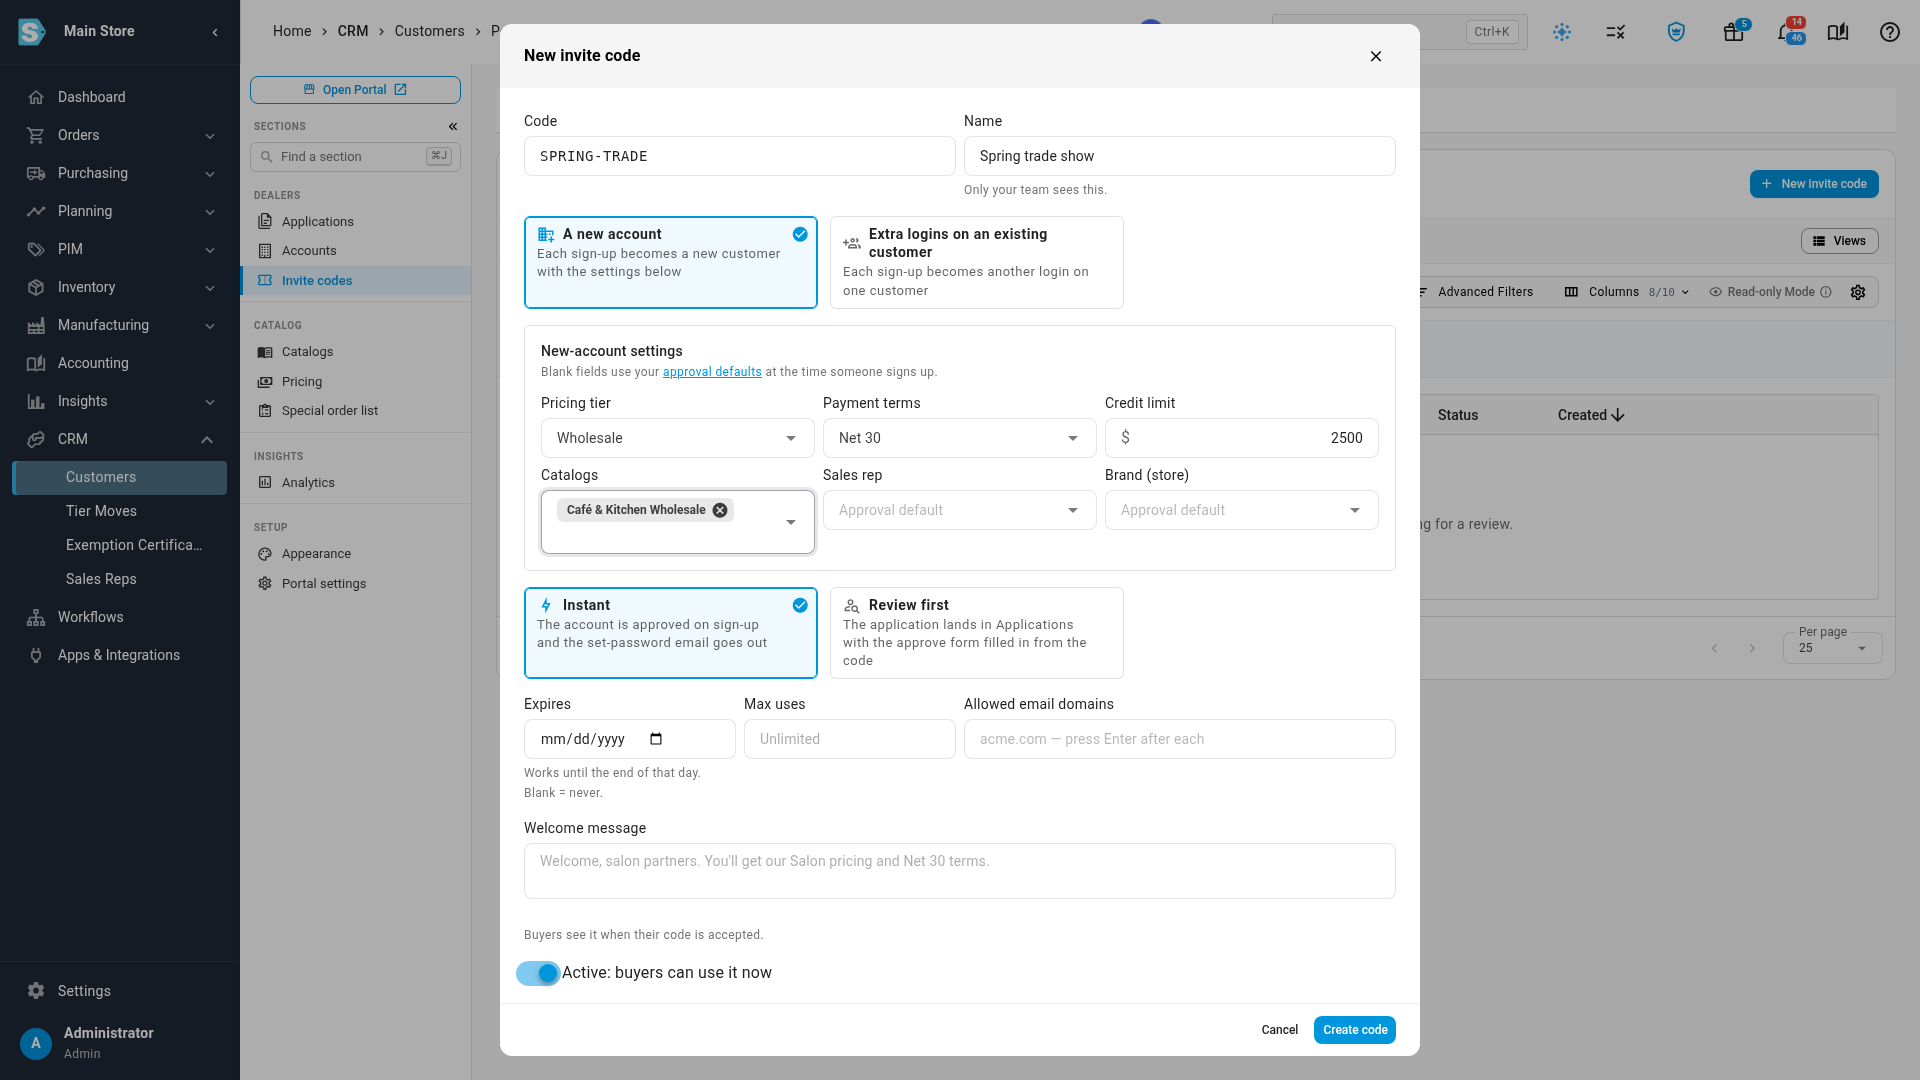
In Code, type the code buyers will enter (letters, numbers and dashes, 4 to 40 characters). Leave it blank and SKU.io generates one, such as
NPT3-GUGE. Codes are not case-sensitive, and a code is never reused, even after you archive it. -
In Name, describe the code for your team, for example the event it's for. Buyers never see the name.
-
Choose who joins:
- A new account: each sign-up becomes a new customer, with the settings below.
- Extra logins on an existing customer: each sign-up becomes another login on one customer you choose. See Add people to an existing customer.
-
For a new account, fill in New-account settings: Pricing tier, Payment terms, Credit limit, Catalogs, Sales rep and Brand (store). Leave a field blank to use your approval defaults at the time someone signs up.
-
Choose how sign-ups are approved:
- Instant: the account is approved as soon as the buyer submits the form, and the set-password email goes out.
- Review first: the sign-up lands in Applications, marked with the code, and the approve form opens already filled in from the code. You can still change anything before you approve.
-
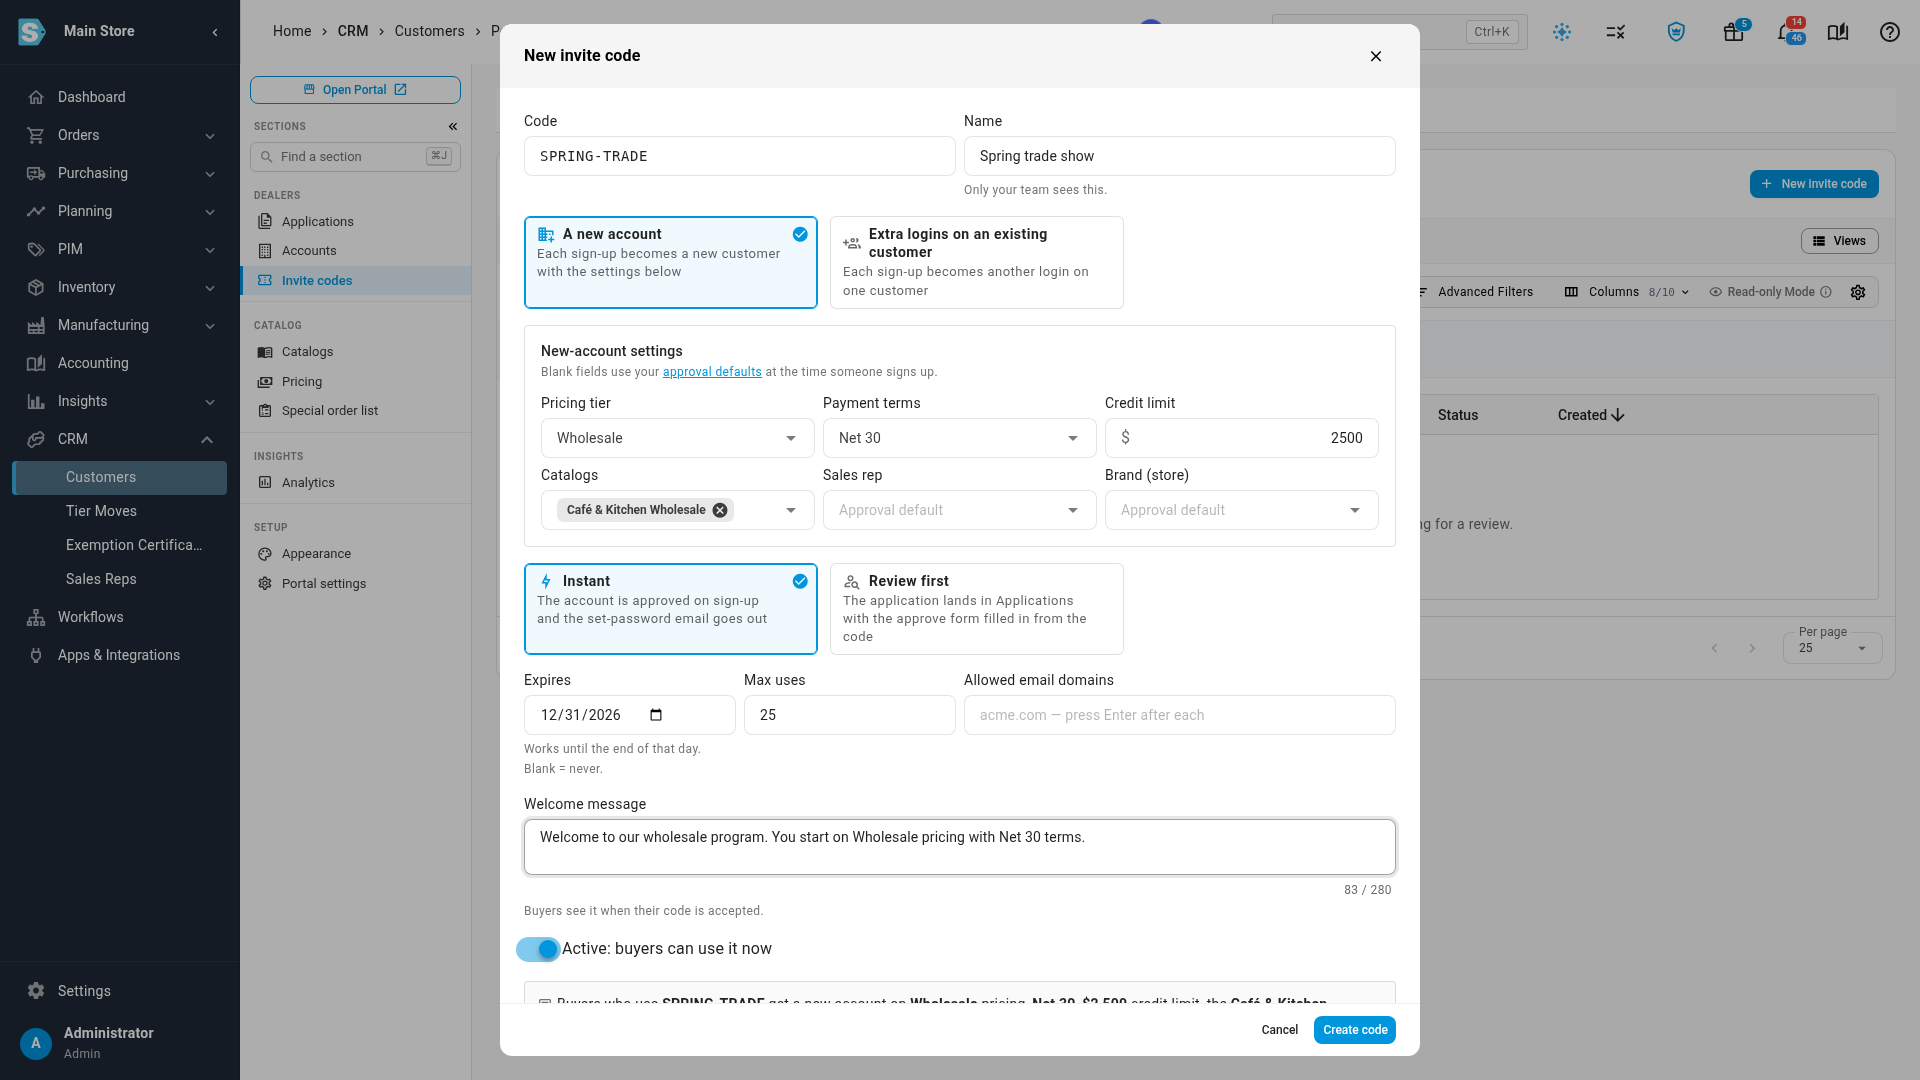
Optionally, limit the code:
- Expires: the code works until the end of that day. Leave it blank for no expiry.
- Max uses: how many sign-ups the code allows. Leave it blank for no limit.
- Allowed email domains: type a domain such as
acme.comand press Enter after each. Only email addresses at those domains can use the code.
-
Optionally, write a Welcome message (up to 280 characters). Buyers see it as soon as their code is accepted.
-
Check the summary at the bottom of the dialog. It spells out what every buyer who uses the code gets, for example a new account on Wholesale pricing, Net 30, $2,500 credit limit, the Café & Kitchen Wholesale catalog, instantly. 25 uses, until Dec 31, 2026.
-
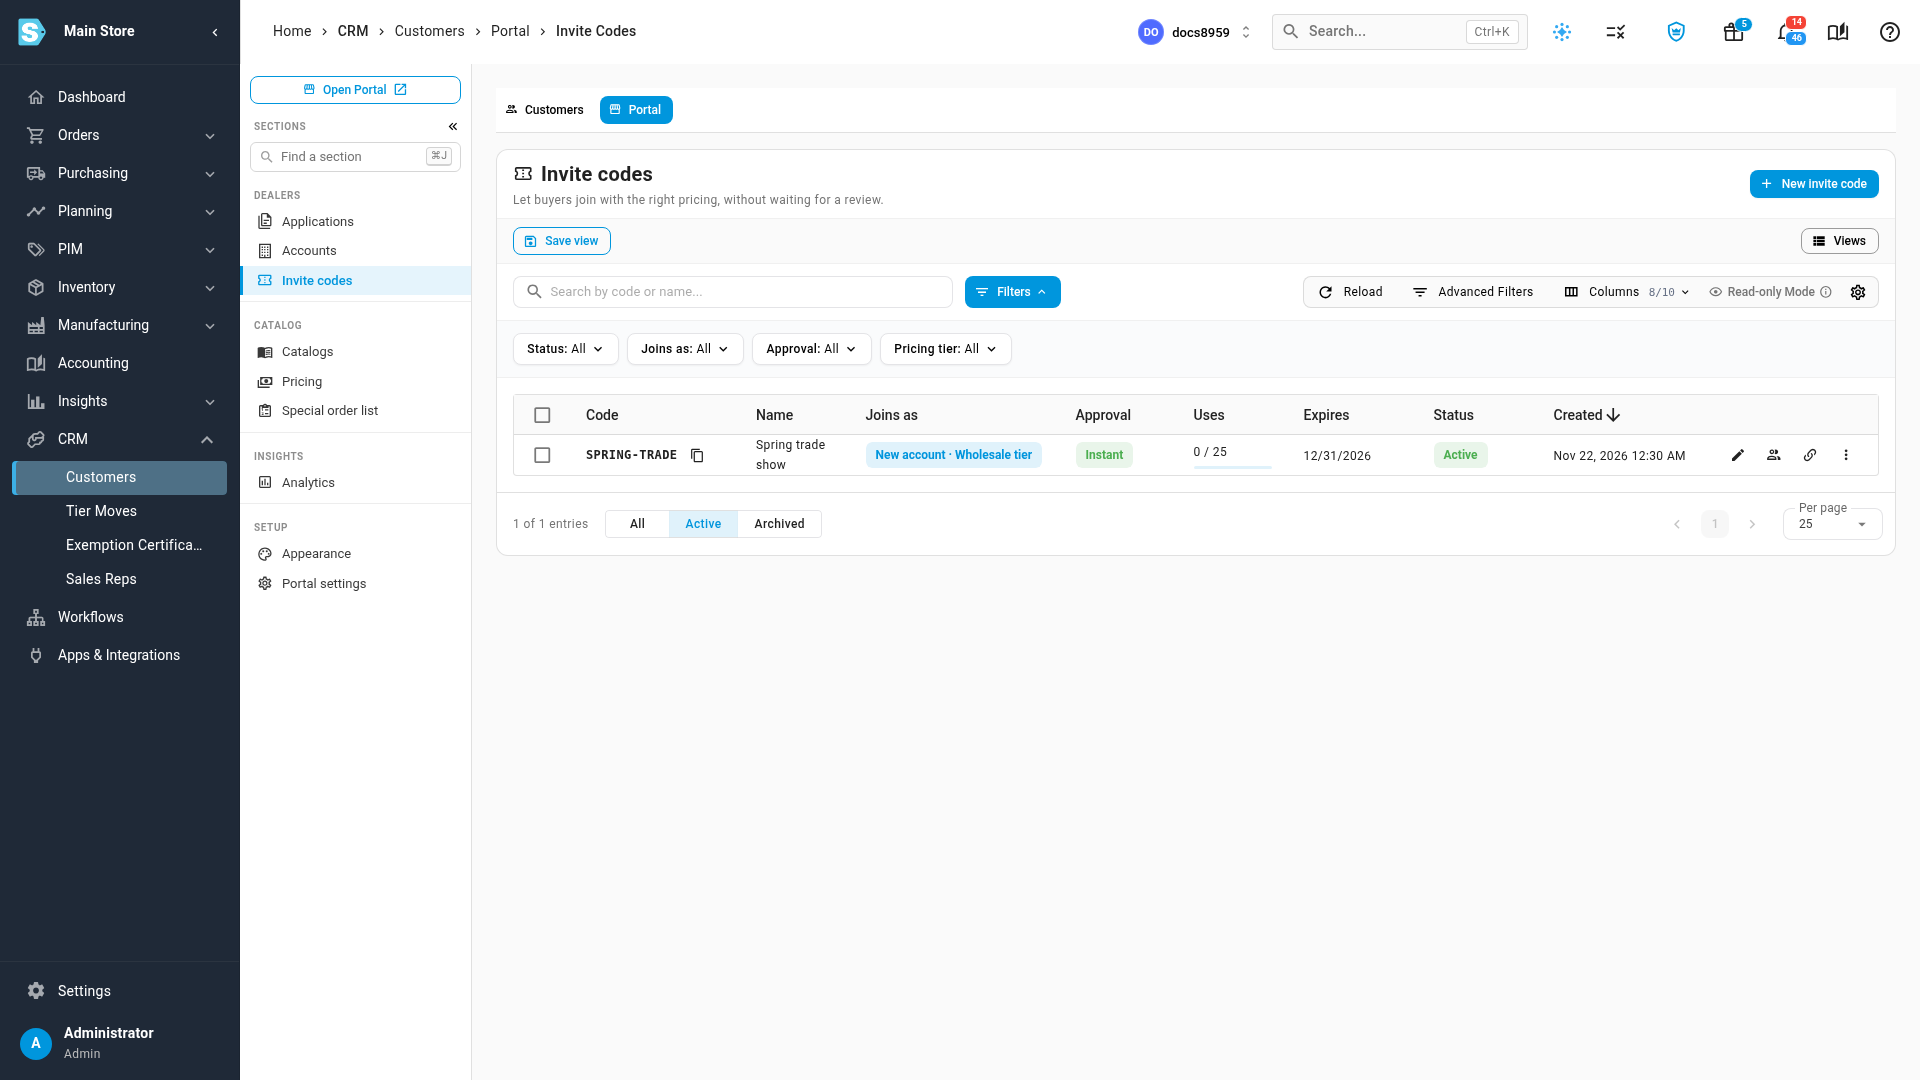
Click Create code. The code appears in the list as Active, with 0 / 25 uses.
Active in the dialog is on by default. Turn it off to save the code without letting anyone use it yet.
Share the sign-up link
On the code's row, click Copy sign-up link (the link icon). Send that link to your buyers or put it on your website. It opens the portal's sign-up page with the code filled in and already checked. If the code names a store, the link opens that store's branded page.
You can also click Copy code next to the code itself and let buyers type it: the sign-up page has a Have an invite code? link that opens the code field.
What the buyer sees
-
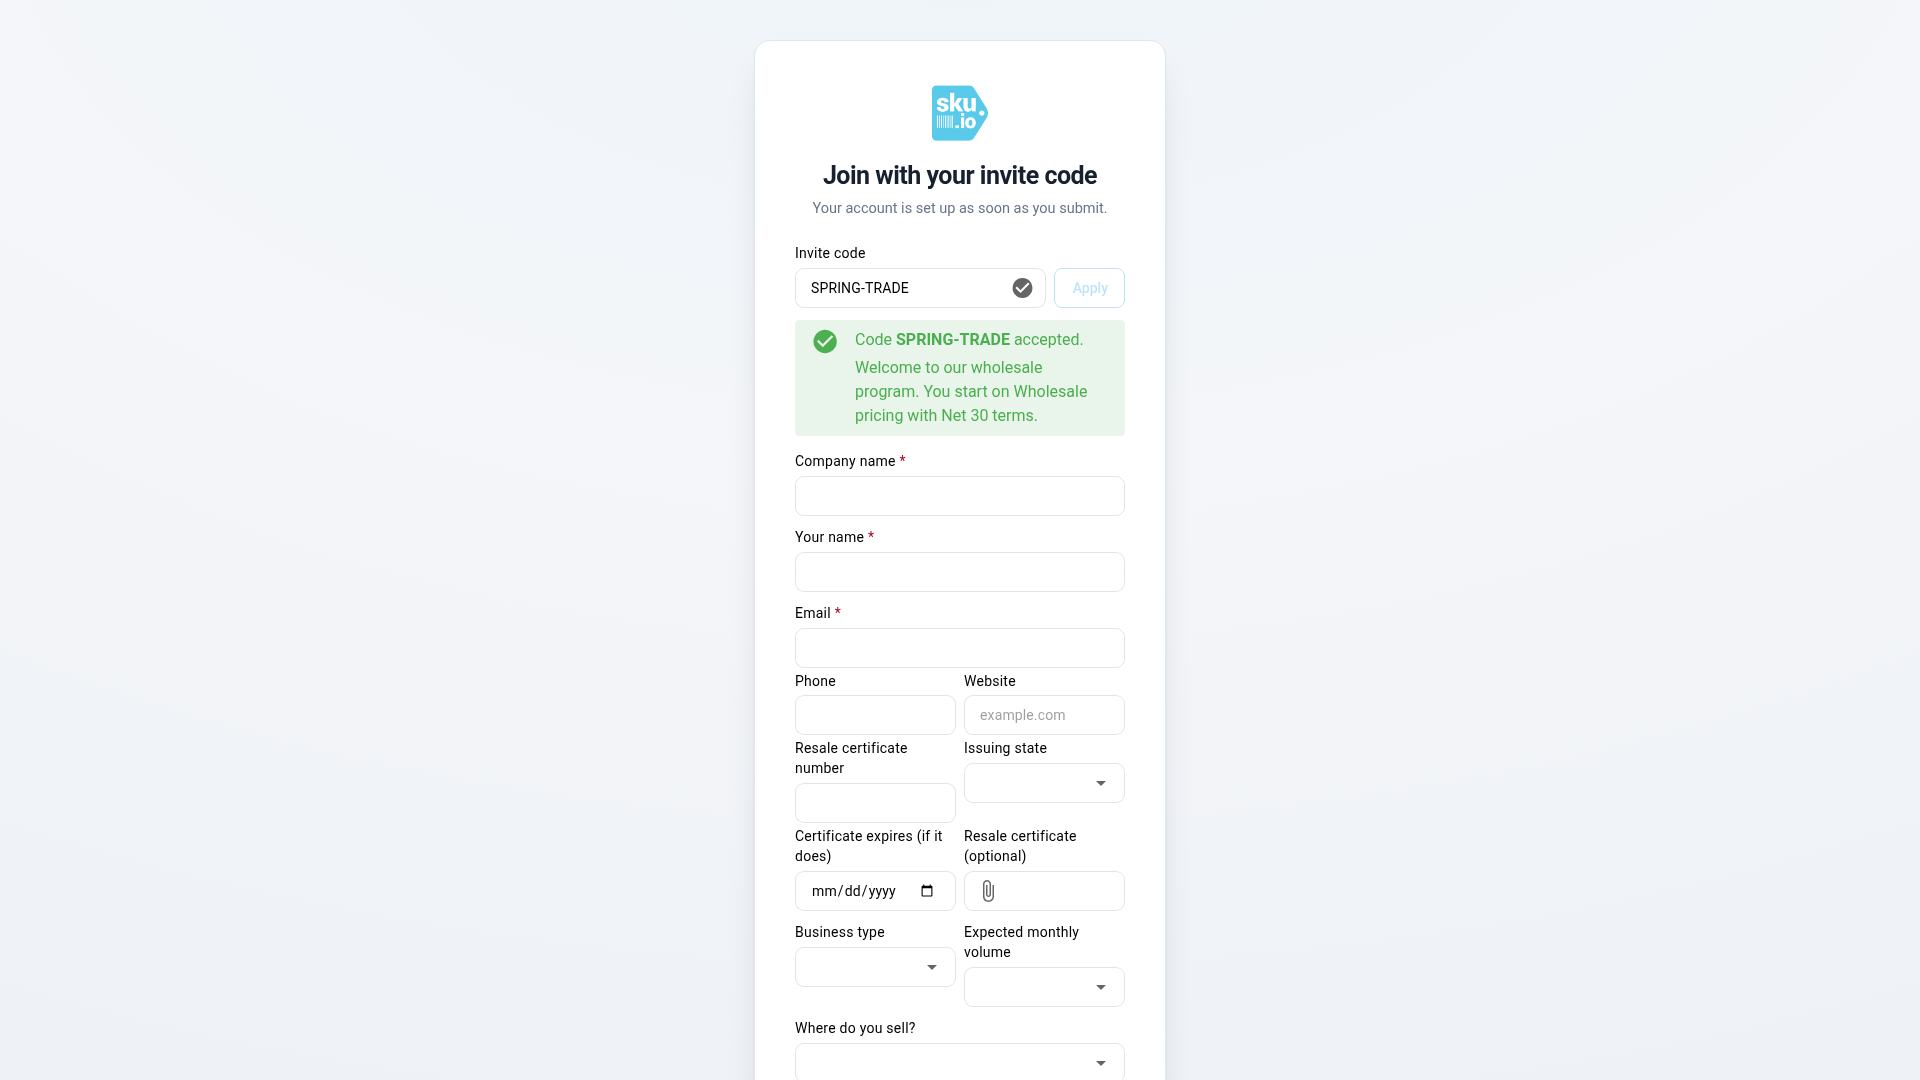
The sign-up page reads Join with your invite code. Under the code it shows Code … accepted and your welcome message. With an instant code, it says Your account is set up as soon as you submit. With a review code, it says you'll review their details and email them.
-
The buyer enters their Company name, Your name and Email, plus any of the optional details, and clicks Create account.
-
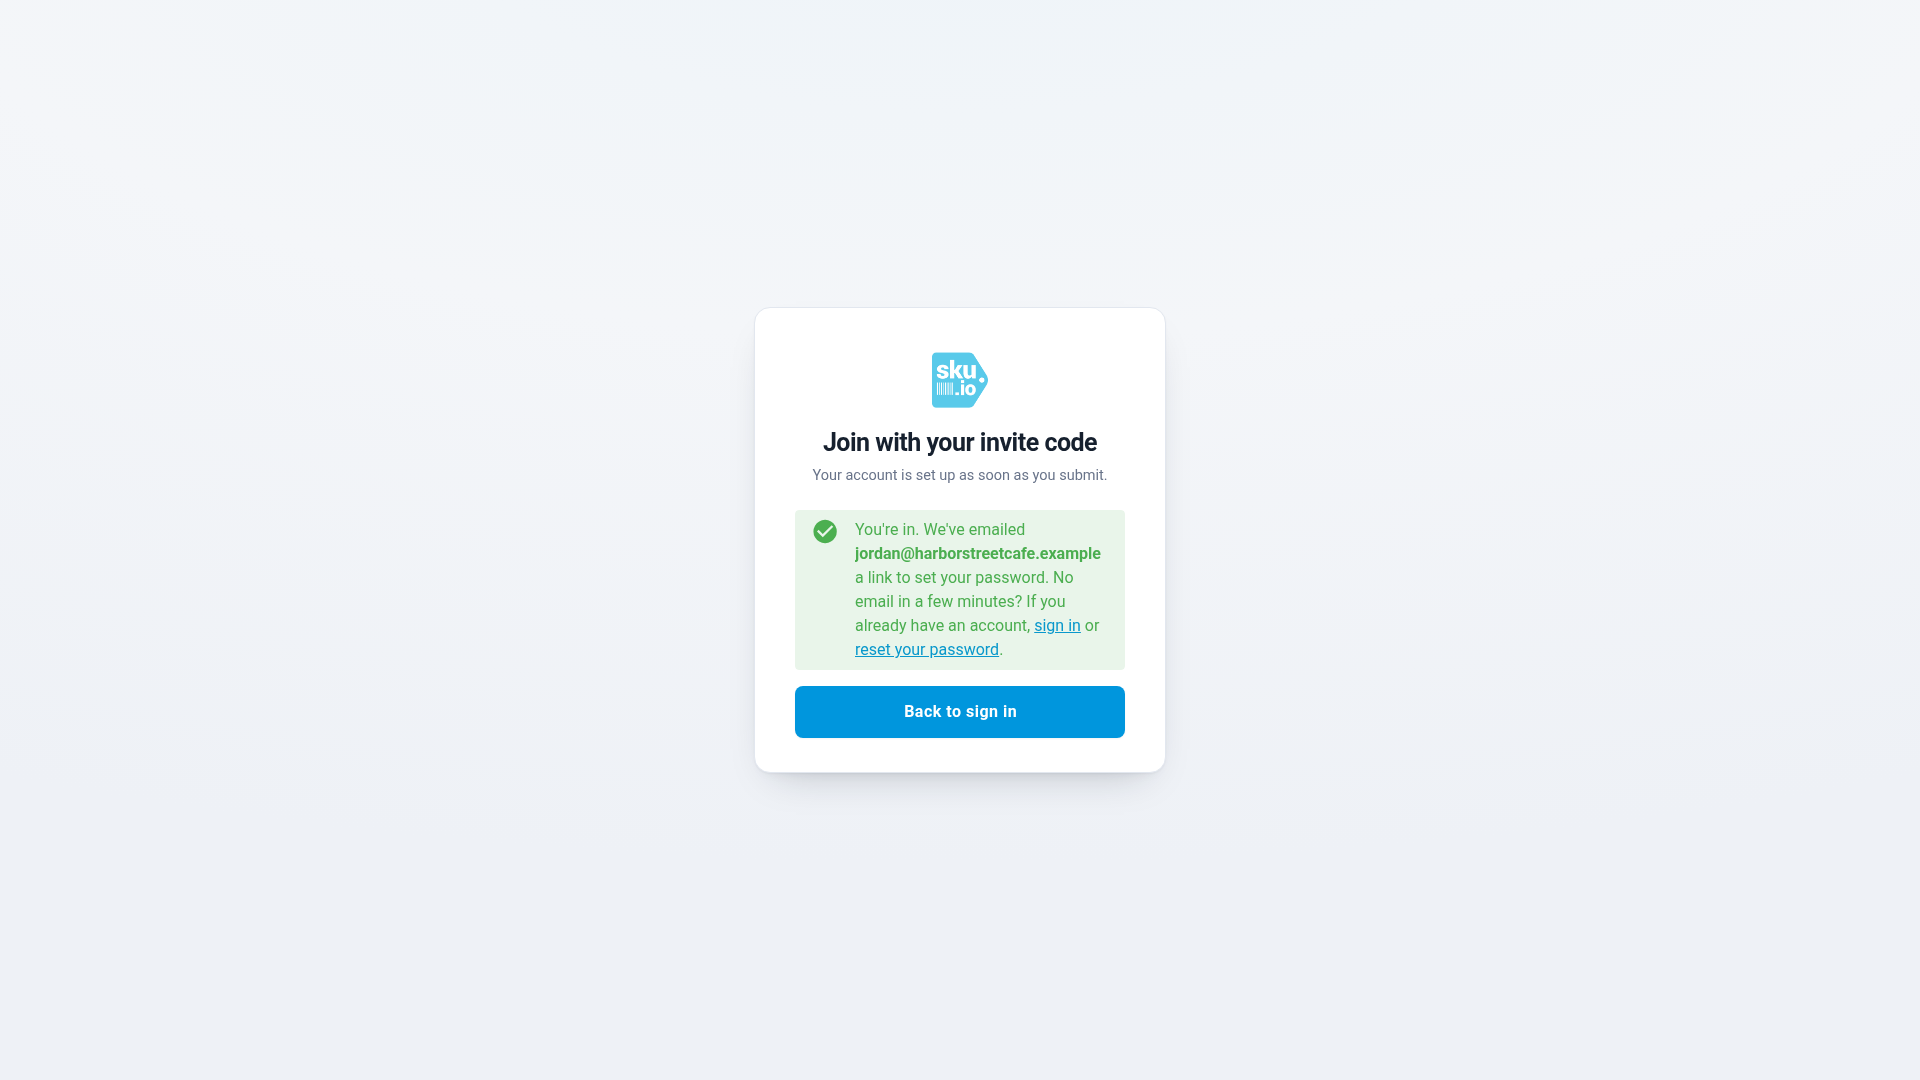
With an instant code, they see You're in. We've emailed … a link to set your password. The account is created with the code's settings, and they become its Company Admin. With a review code, they see that their application is pending review.
If the code can't be used, the code field says why:
| Message | Why |
|---|---|
| That code isn't valid. Check it, or apply without a code. | The code doesn't exist, or you disabled or archived it. |
| That code has expired. | Its Expires date has passed. |
| That code has reached its limit. | It has been used Max uses times. |
| This code is for @… email addresses. | The email isn't at one of the code's allowed domains. |
| Too many attempts. Try again in a minute. | Someone checked too many codes in a short time. |
The buyer can clear the code and apply without one. That application then goes to Applications for review as usual.
If the email already has a portal login, the buyer sees the same You're in message, so the page never reveals who already has an account. The sign-up waits in Applications as pending instead, and the buyer can sign in or reset their password.
See who used a code
The Uses column counts sign-ups against the limit, for example 1 / 25. Click View uses (the people icon) on the row to see each sign-up: when it happened, the company and email, its outcome (Approved, Pending review or Rejected), and links to the application and the new customer.
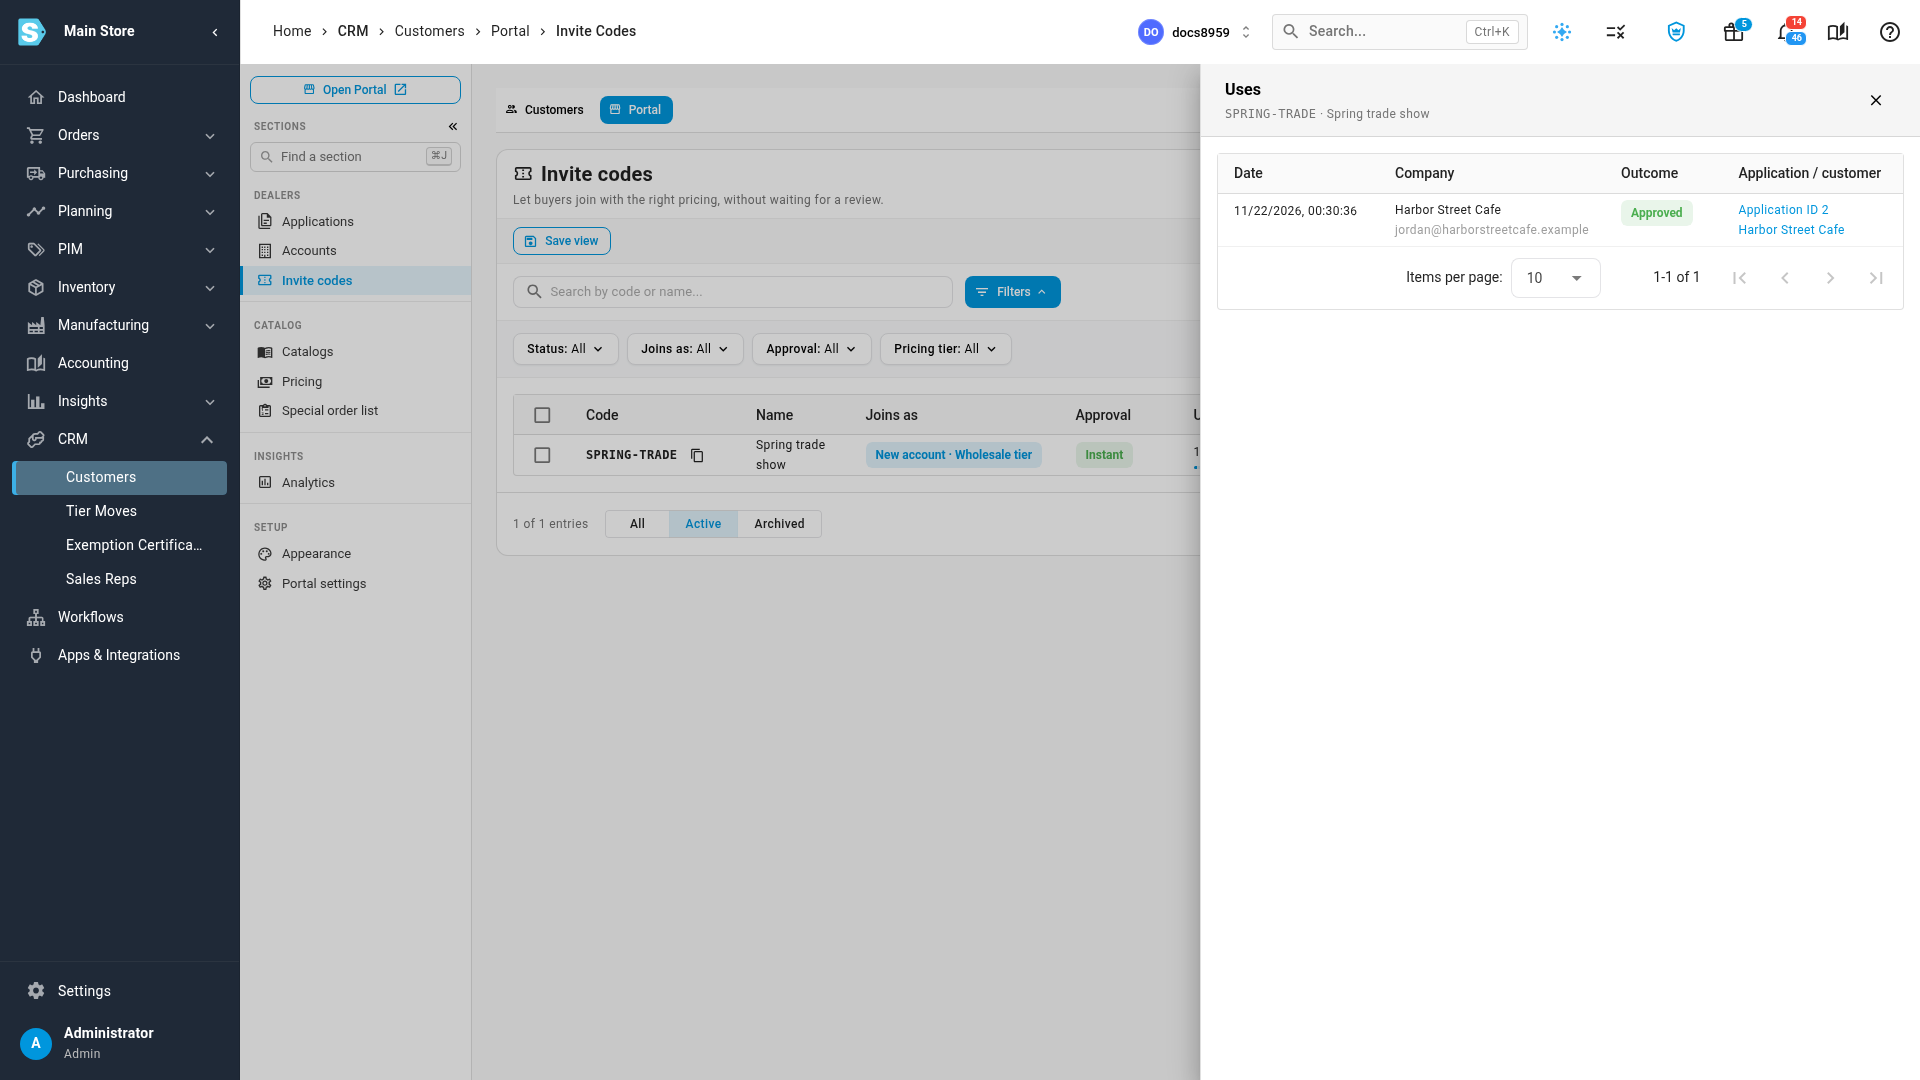
When you reject an application that came from a review code, the code gets that use back, and the sign-up shows as Rejected.
On Applications, the Invite code column shows which code each application came in with, and you can filter by code.
Add people to an existing customer
To let more people at a customer you already serve create their own logins:
- Create a code and choose Extra logins on an existing customer.
- In Existing customer, choose the customer.
- In Role for people who join, choose Buyer (browses and places orders), Approver (orders, and approves colleagues' orders) or Viewer (browses prices and orders, can't order). A code never makes someone a company admin.
- Add the customer's email domain under Allowed email domains. The dialog warns you when this is empty, because anyone with the code could otherwise join that account.
People who use the code see You're joining and the customer's name instead of the Company name field. The code doesn't change the customer's pricing or terms.
Edit, disable, archive or delete a code
Click the code's row menu (the three dots) for:
- Edit: change any setting. Changes apply to future sign-ups only. Accounts that already joined keep their settings, and the dialog says how many times the code was used.
- Disable / Enable: pause the code and start it again. A disabled code shows as Disabled, and buyers get That code isn't valid.
- Archive: retire the code. It stops working and leaves the list, but keeps its use history. Switch the list to Archived to see it, or to unarchive it.
- Delete: remove the code and its usage history. The accounts and applications it created are kept. The confirmation says how many sign-ups used the code and suggests archiving instead if you want to keep the history.
To disable, enable or archive several codes at once, select their rows and use the bulk actions at the top of the list.
Status shows Active, Disabled, Expired (past its date) or Used up (no uses left). Filter the list by Status, Joins as, Approval or Pricing tier, or search by code or name.
Next steps
- Review portal account applications: approve sign-ups from Review first codes.
- Enforce credit limits at portal checkout: decide what happens when a new account's order goes over its credit limit.
- Restrict what buyers see with portal catalogs
- Brand your customer portal: put your logo on the sign-up page.
Video transcript
To let new buyers sign themselves up, open CRM in the sidebar, and choose Customers. Click the Portal tab, then Invite codes, under Dealers. Everyone who joins with a code gets the same pricing and terms.
Now create the first code. Click New invite code, at the top of the list. In Code, type the code your buyers will enter. Leave the field blank for a random one. Then give the code a name. Only your team sees the name, so say what the code is for.
Next, choose who joins. A new account turns each sign-up into a new customer. Extra logins on an existing customer adds people to one customer you already have.
For a new account, set the terms that every sign-up gets. Choose the pricing tier, which sets the prices they buy at. Then choose their payment terms, which decide when their invoices fall due. Type the credit limit, the most they can owe you on account. Then choose the catalog, which decides the products they can see. Any field you leave blank uses your approval defaults, the same ones applications get.
Instant approves the account the moment the buyer submits. Review first sends each sign-up to Applications, with the approve form ready.
Add an expiry date if the code should stop working on a certain day. Set a maximum number of uses if you want a cap. Allowed email domains limits the code to addresses at those companies. Last, write a welcome message. It greets buyers on the sign-up page.
The summary at the bottom spells out what every buyer gets. When it reads the way you want, click Create code. The new code appears at the top of the list. It's active, with no uses yet.
To share it, use Copy sign-up link on the code's row. Send it to your buyers, or put it on your website.
Here is what buyers see. The link opens the sign-up page with the code already checked, and your welcome message.
The buyer fills in the rest of the form. They enter their company name, the way it should appear on their account. Then their own name, and the email address their login should use. When everything is filled in, they click Create account. With an instant code, the account is set up straight away. SKU.io emails them a link to set their password.
Back on Invite codes, the code now shows one use. Click View uses to see who signed up, and how it went. Each company links to its new customer.
When you've seen enough, close the panel with the X in its corner. To stop a code, click the menu at the end of its row. Disable pauses it, and Archive retires it for good. Delete removes the code, but keeps the accounts it created.