Show brands, collections and was-prices on the portal
Buyers shop by brand, by category and by what's on offer, and they compare your price with the price they'll sell at. You can dress up the Customer Portal catalog for that:
- Brands get a logo, a link to their marketing assets and a short description. Buyers get a Brands page listing every brand in their catalog, A to Z, and each brand opens on a page with its logo at the top.
- Categories get an image, shown at the top of the category's page.
- Collections turn a product tag, such as Clearance or New arrivals, into a page buyers can filter to and you can link to.
- A was-price shows a reference price, such as your recommended retail price, struck through next to the buyer's own price.
Buyers can also sort the whole catalog by price or newest, and save products to their account's wishlist with the heart on each card.
None of this is required. Until you add a logo, a brand shows its initials. Until you publish a collection, buyers see no collection filter. Until you pick a was-price tier, cards show one price.
Before you begin
- You need permission to manage the Customer Portal to change Catalog display, and permission to edit brands and categories for their logos and images.
- To publish a collection, the products must already carry the tag. Tag them on the product, or in bulk from the product list.
- To show a was-price, the products need a price on the tier you compare against, such as your Retail tier. See Set customer prices and volume breaks.
- Buyers only ever see brands, categories and collections for products in their own catalogs. See Restrict what buyers see with portal catalogs.
Give a brand a logo, an assets link and a description
-
Go to PIM → Brands.
-
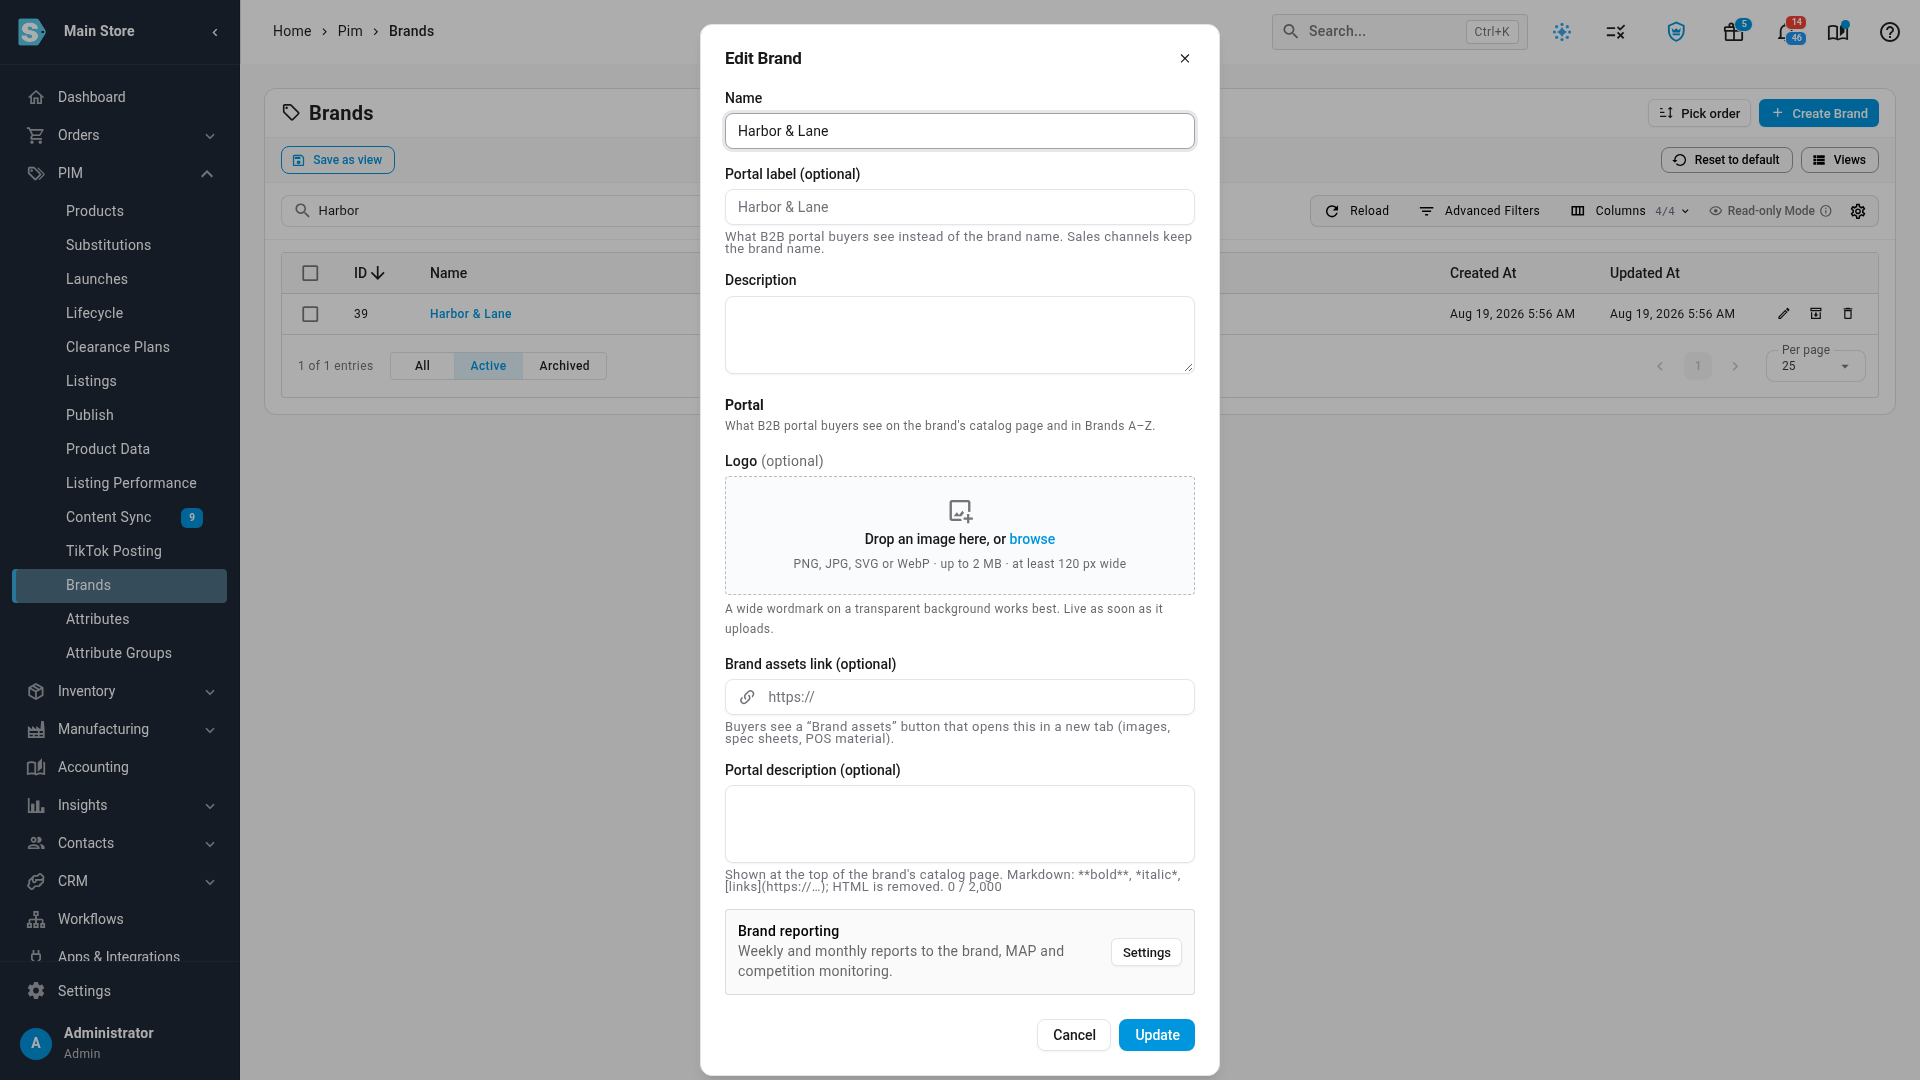
Search for the brand, then click its Edit button.
-
In the Portal section, drop the brand's logo on the Logo box, or click browse to choose the file. A wide wordmark on a transparent background works best. PNG, JPG, WEBP and SVG files up to 2 MB are accepted, at least 120 pixels wide. The logo goes live as soon as it uploads.
-
In Brand assets link, paste the address of the brand's marketing material: images, spec sheets, point-of-sale files. It must start with
https://orhttp://. Buyers see a Brand assets button that opens it in a new tab. -
In Portal description, write a sentence or two for the top of the brand's page. Plain text or Markdown works, up to 2,000 characters.
-
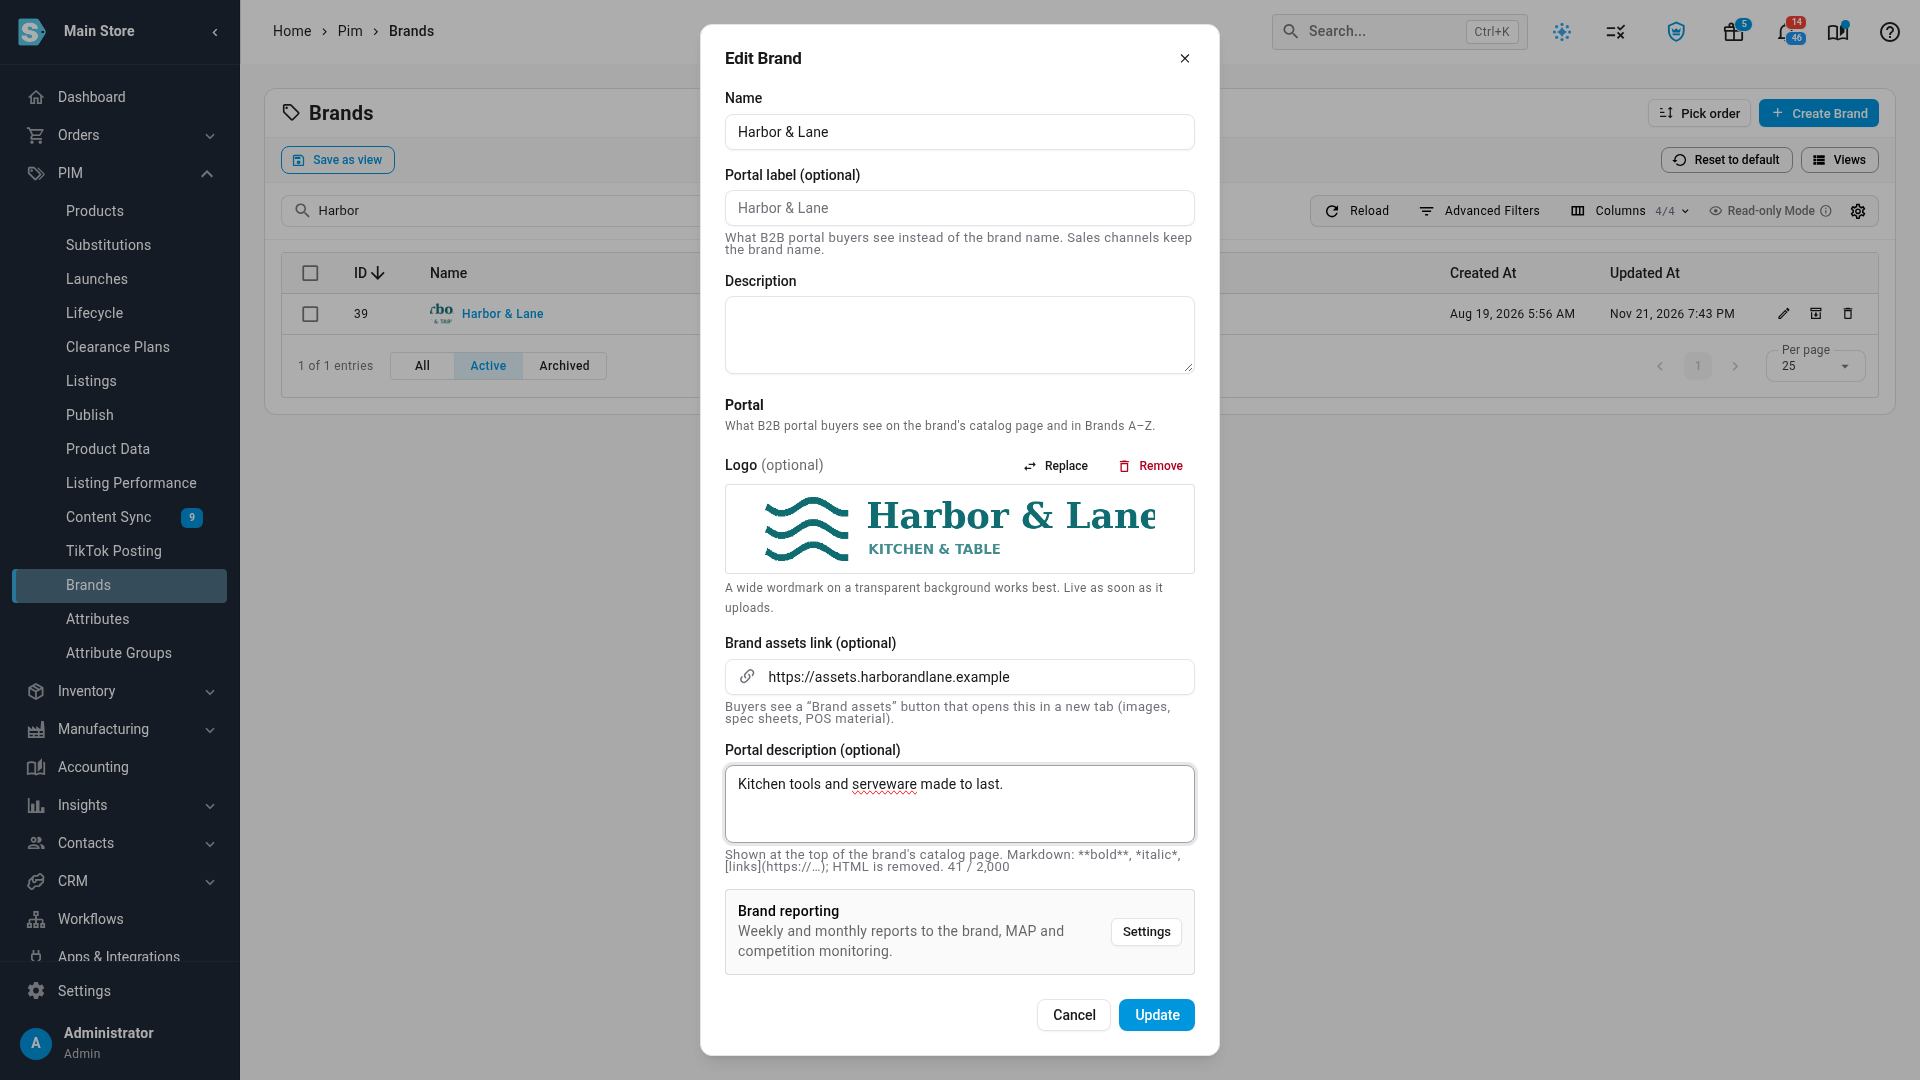
Click Update. The logo now shows beside the brand in the list.
To change the logo later, click Replace. Remove takes it off straight away, and buyers see the brand's initials instead. A new brand needs saving once before you can add its logo.
Give a category an image
- Go to Settings → Products → Categories.
- Click the category's name to edit it.
- Drop an image on the Image box, or click browse. Use an image at least 200 pixels wide, up to 2 MB. It goes live as soon as it uploads.
- Click Update to close the dialog.
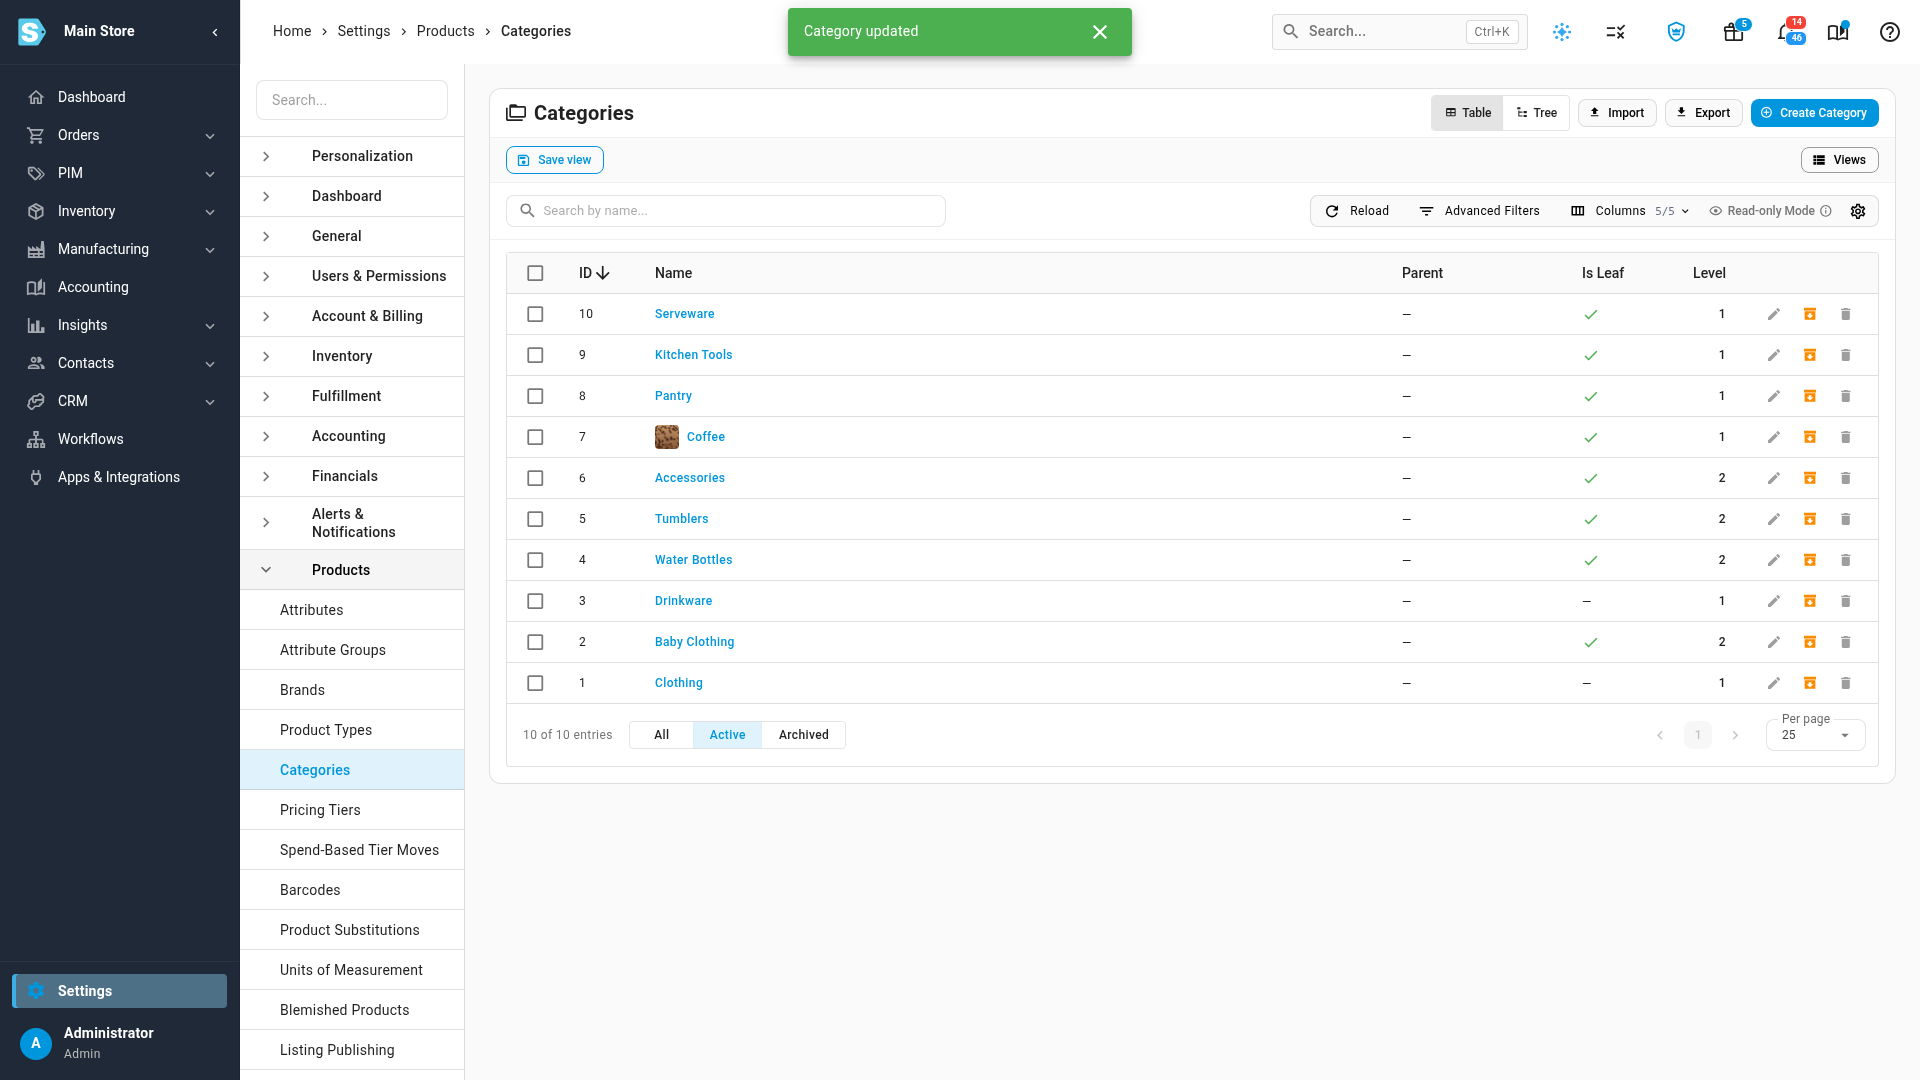
The image shows at the top of the category's page in the portal, and as a small thumbnail beside the category in the catalog filters.
Show a was-price
- Go to CRM → Customers, click the Portal tab, then Appearance.
- Scroll to the Catalog display card, to Was price.
- Under Pricing tier, choose the tier buyers compare against, for example Retail.
- In Label, type a short word for it, such as RRP (up to 20 characters).
- Click Save at the top of the page.
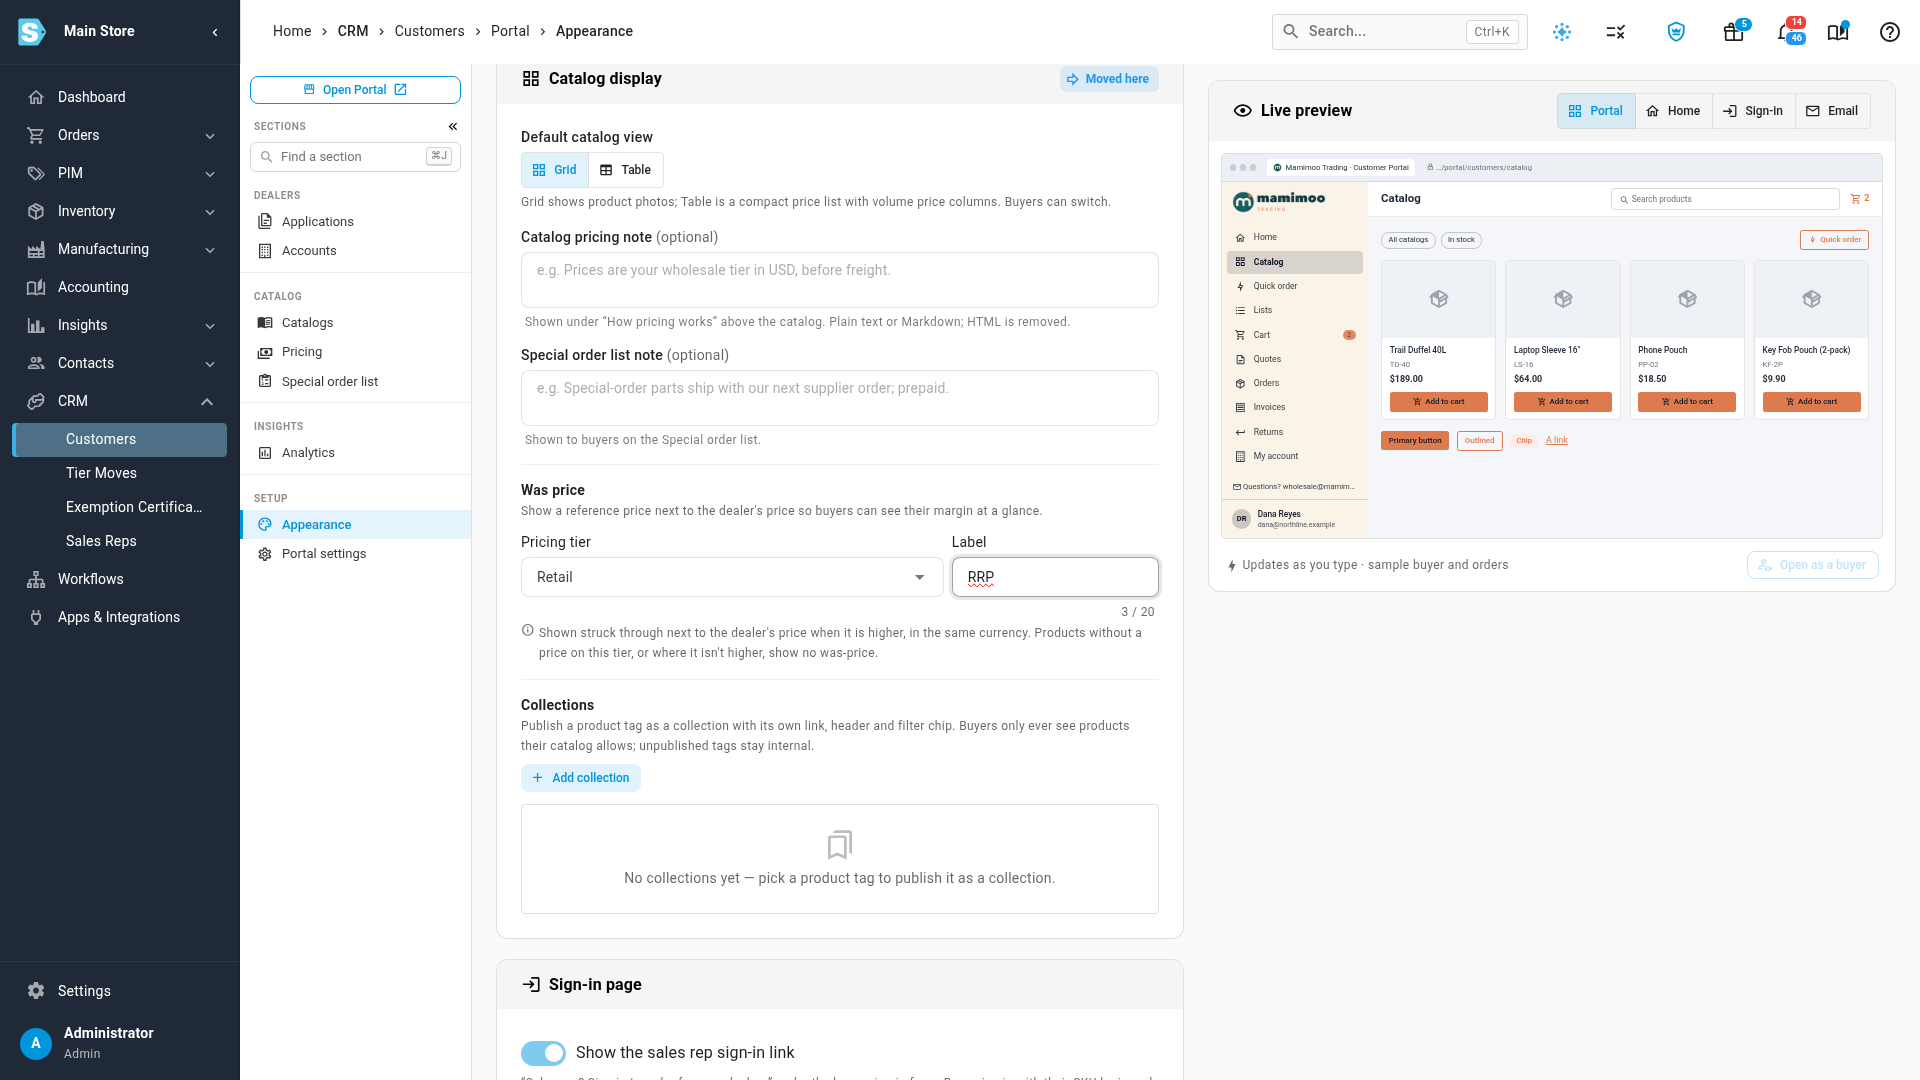
A card then shows the buyer's price, with the label and the was-price beside it, struck through. The was-price only shows when all of these are true:
- the product has a price on the was-price tier,
- that price is higher than the buyer's own price, and
- it is in the same currency as the buyer's price.
Otherwise the card shows one price. A product with options shows the was-price of its cheapest option, next to its From price. If you archive the was-price tier, buyers stop seeing was-prices, and the card asks you to choose another tier.
Publish a collection
A collection is a product tag you choose to show buyers. Tags you don't publish stay internal, so operational tags never appear on the portal.
- On the same Catalog display card, scroll to Collections and click Add collection.
- In Product tag, choose the tag, for example Clearance.
- In the title box, type the name buyers see. Leave it blank to use the tag's name.
- Under Sort, choose how the collection opens: Price high→low, Price low→high, Newest, Name, or None for the buyer's usual order.
- Optionally, add a Description for the top of the collection, up to 1,000 characters.
- Click Save at the top of the page.
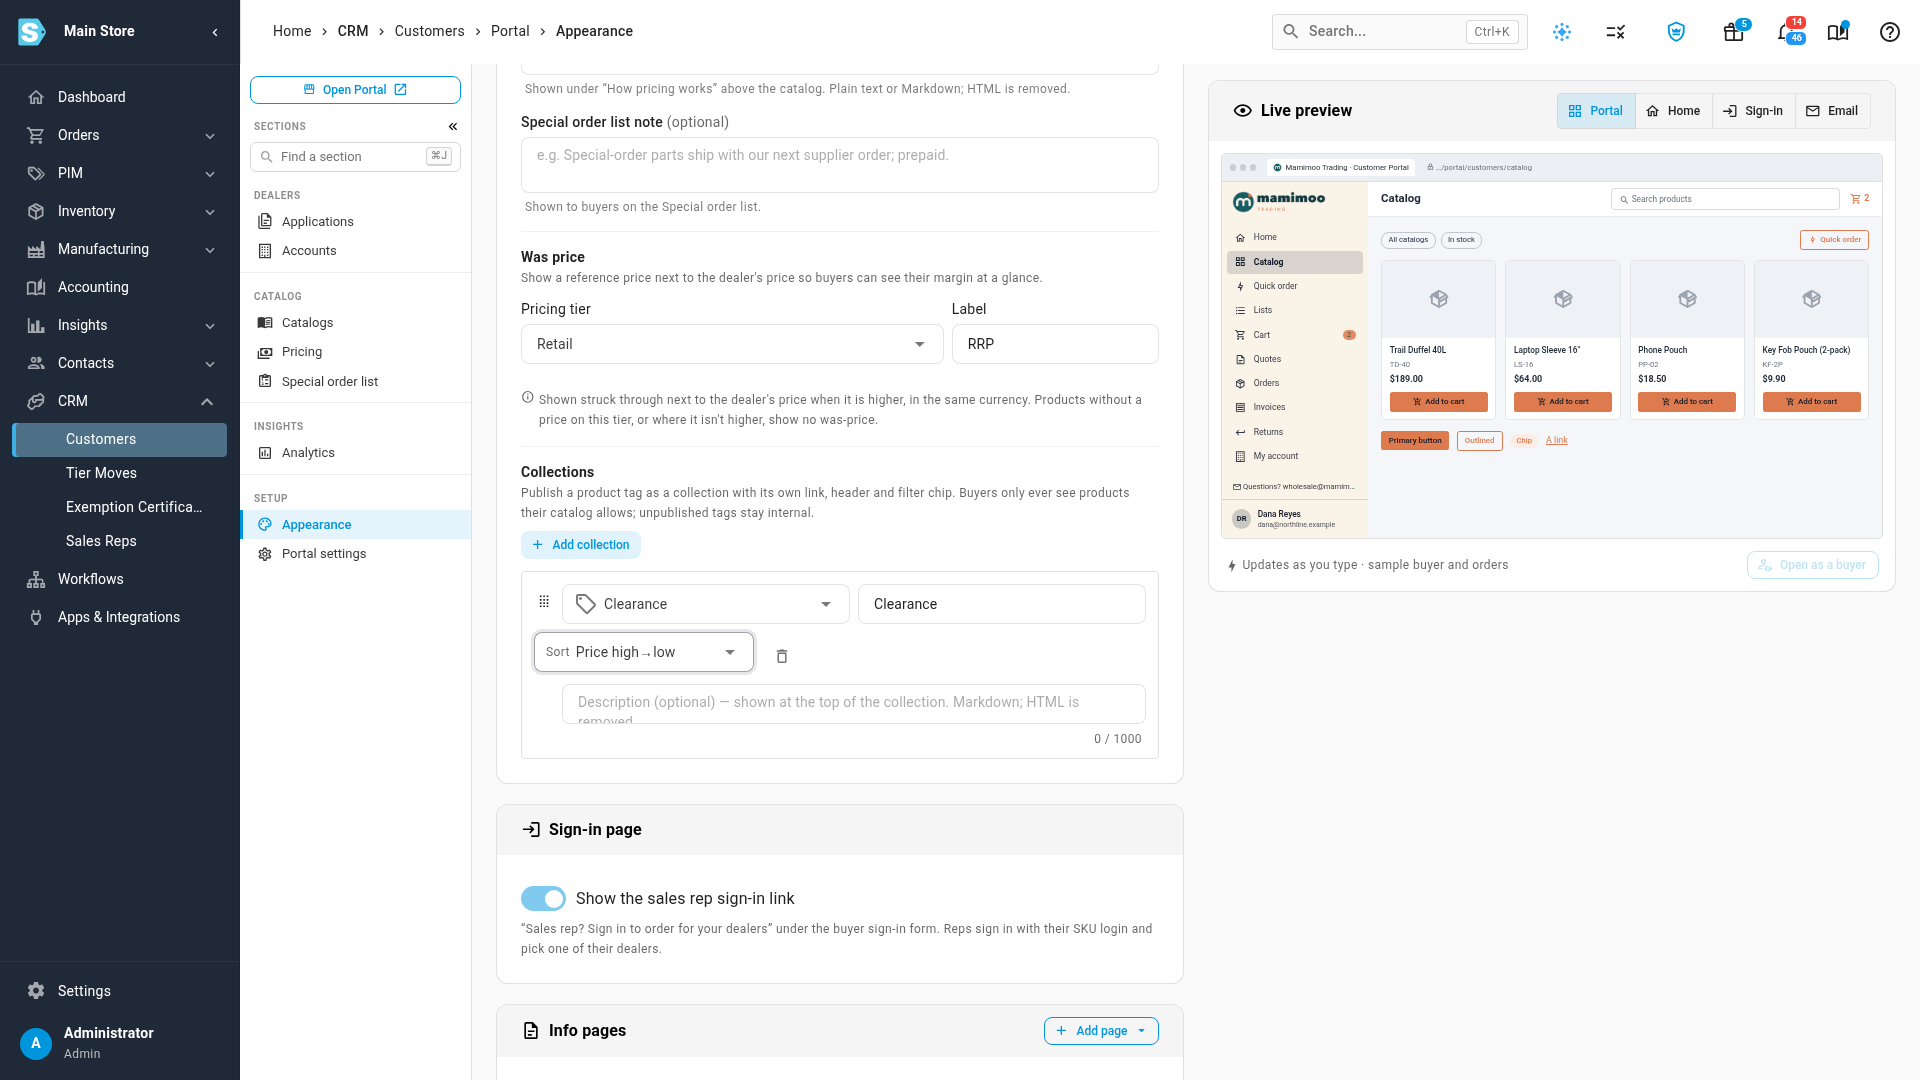
Add more collections the same way, up to 50, and drag them by the handle to set their order. Each tag can be published once. To take a collection off the portal, click its delete icon and save. The tag stays on the products.
What buyers see
Prices, sorting and the wishlist
On Catalog, each card shows the buyer's price. When you set a was-price, it shows beside it, struck through.
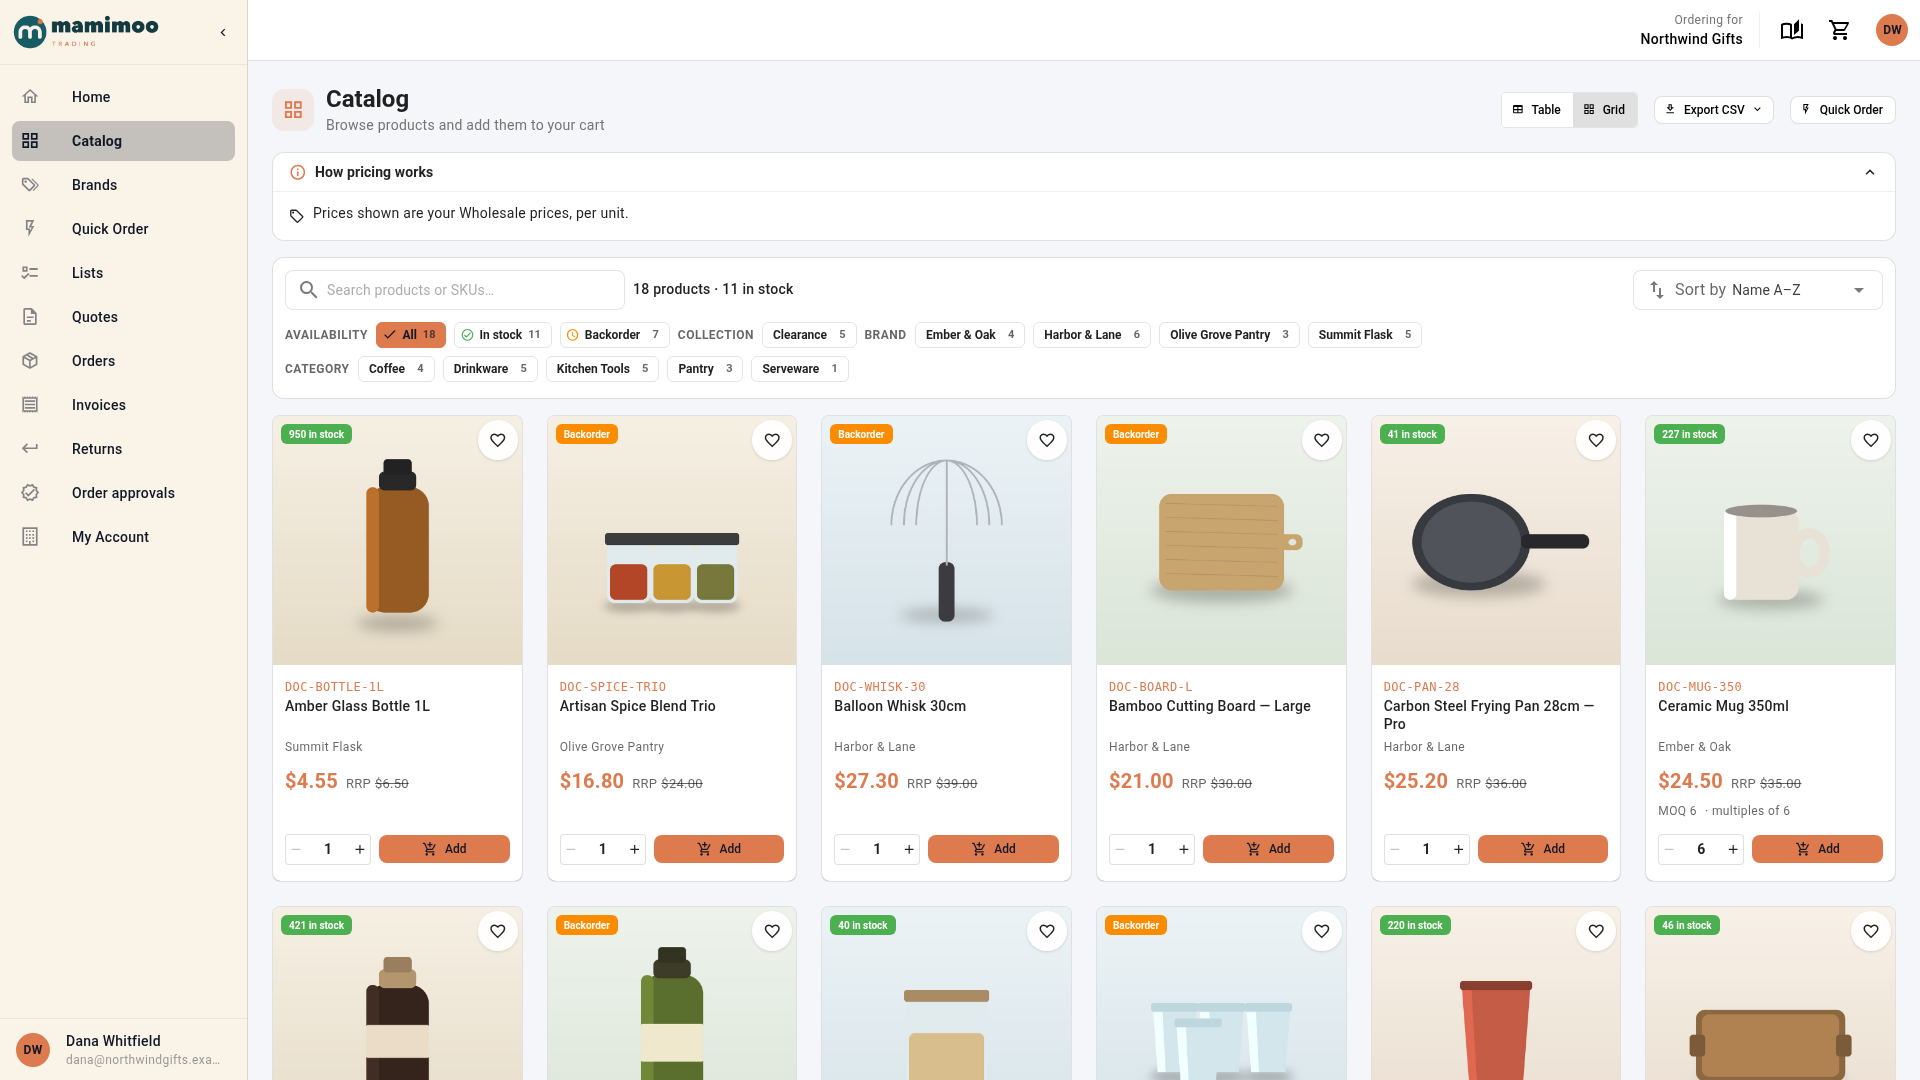
The Sort by menu above the products sorts the whole catalog, not just the page: Name A–Z, Name Z–A, Price low→high, Price high→low, Newest, Part # and Brand. Price sorts by the buyer's own price, including their customer and contract prices. Products with no price come last.
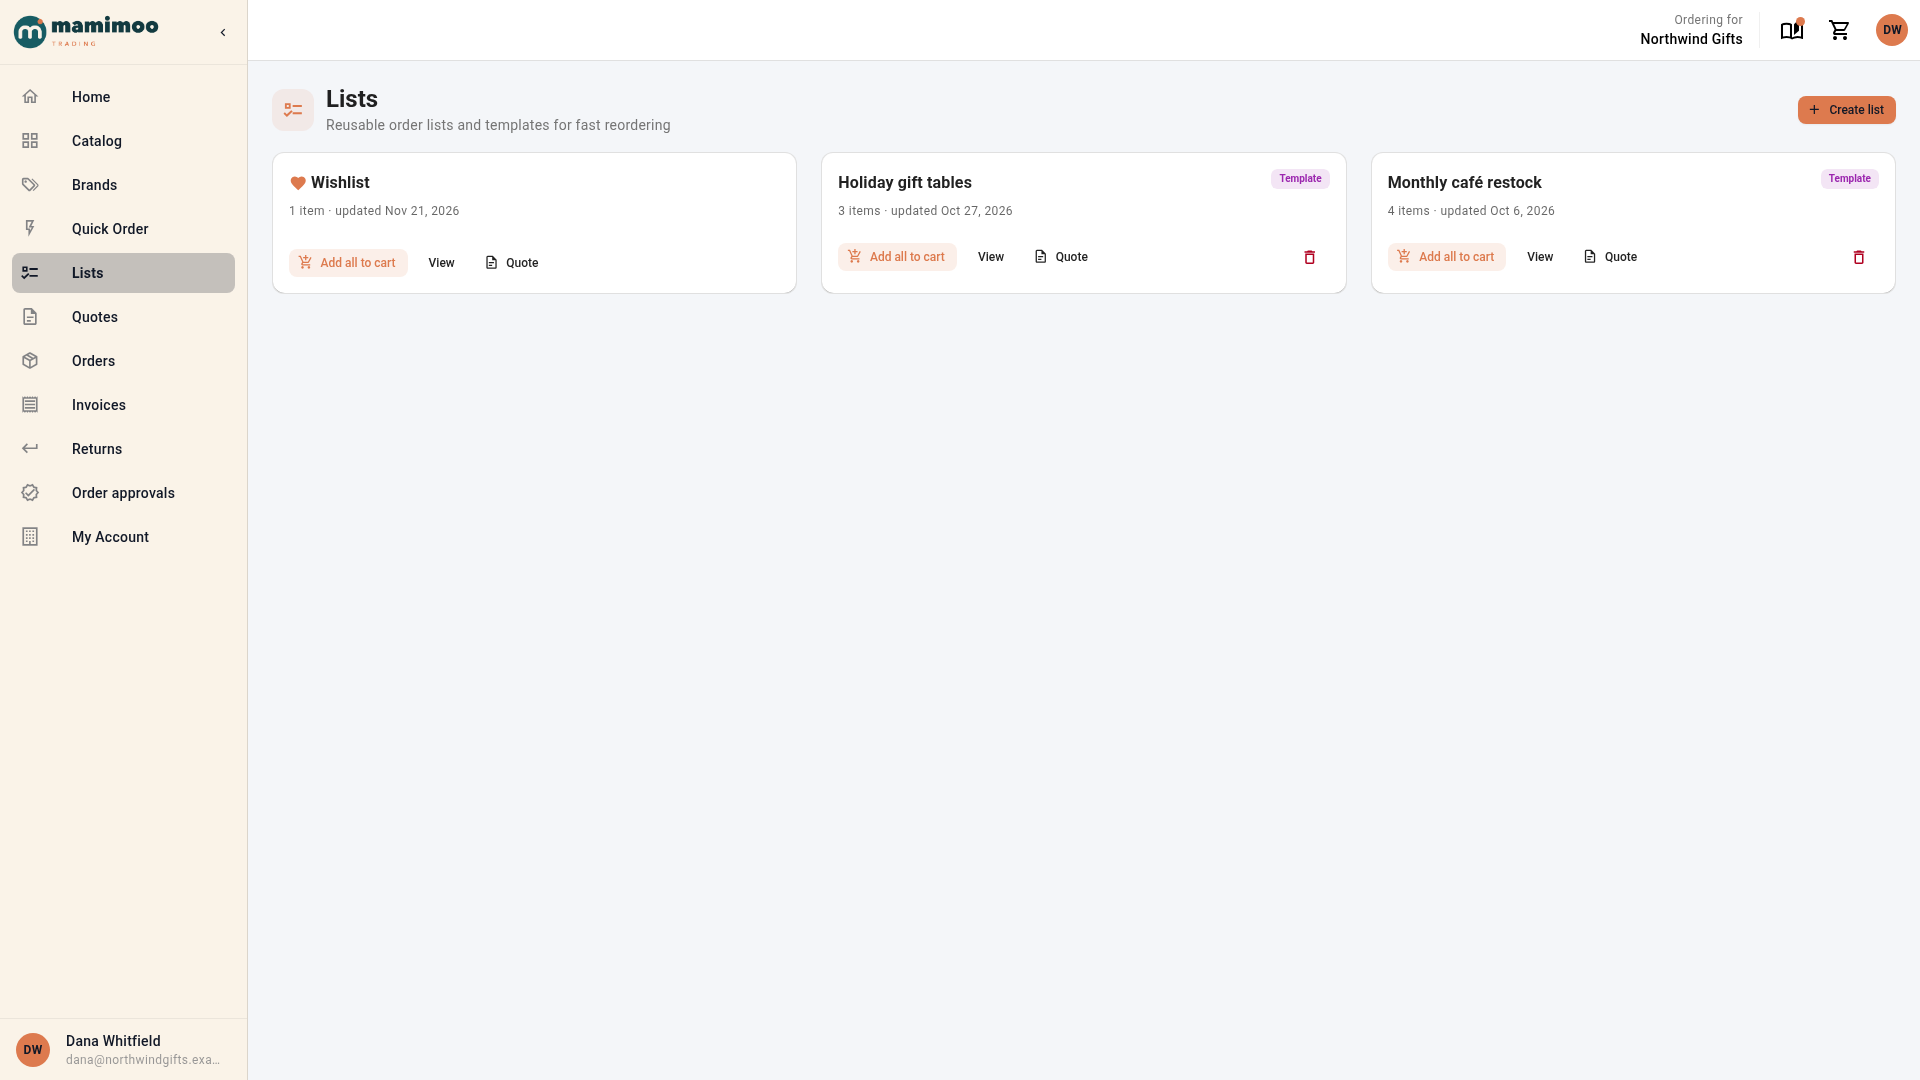
The heart on each card saves the product to the account's Wishlist. Everyone who buys for the account shares one wishlist. It's always first on the buyer's Lists page, where they can add it to the cart like any other list.
Brands A to Z and brand pages
Brands in the portal menu lists every brand that has products in the buyer's catalog, grouped by letter, with a letter bar to jump. A brand without a logo shows its initials.
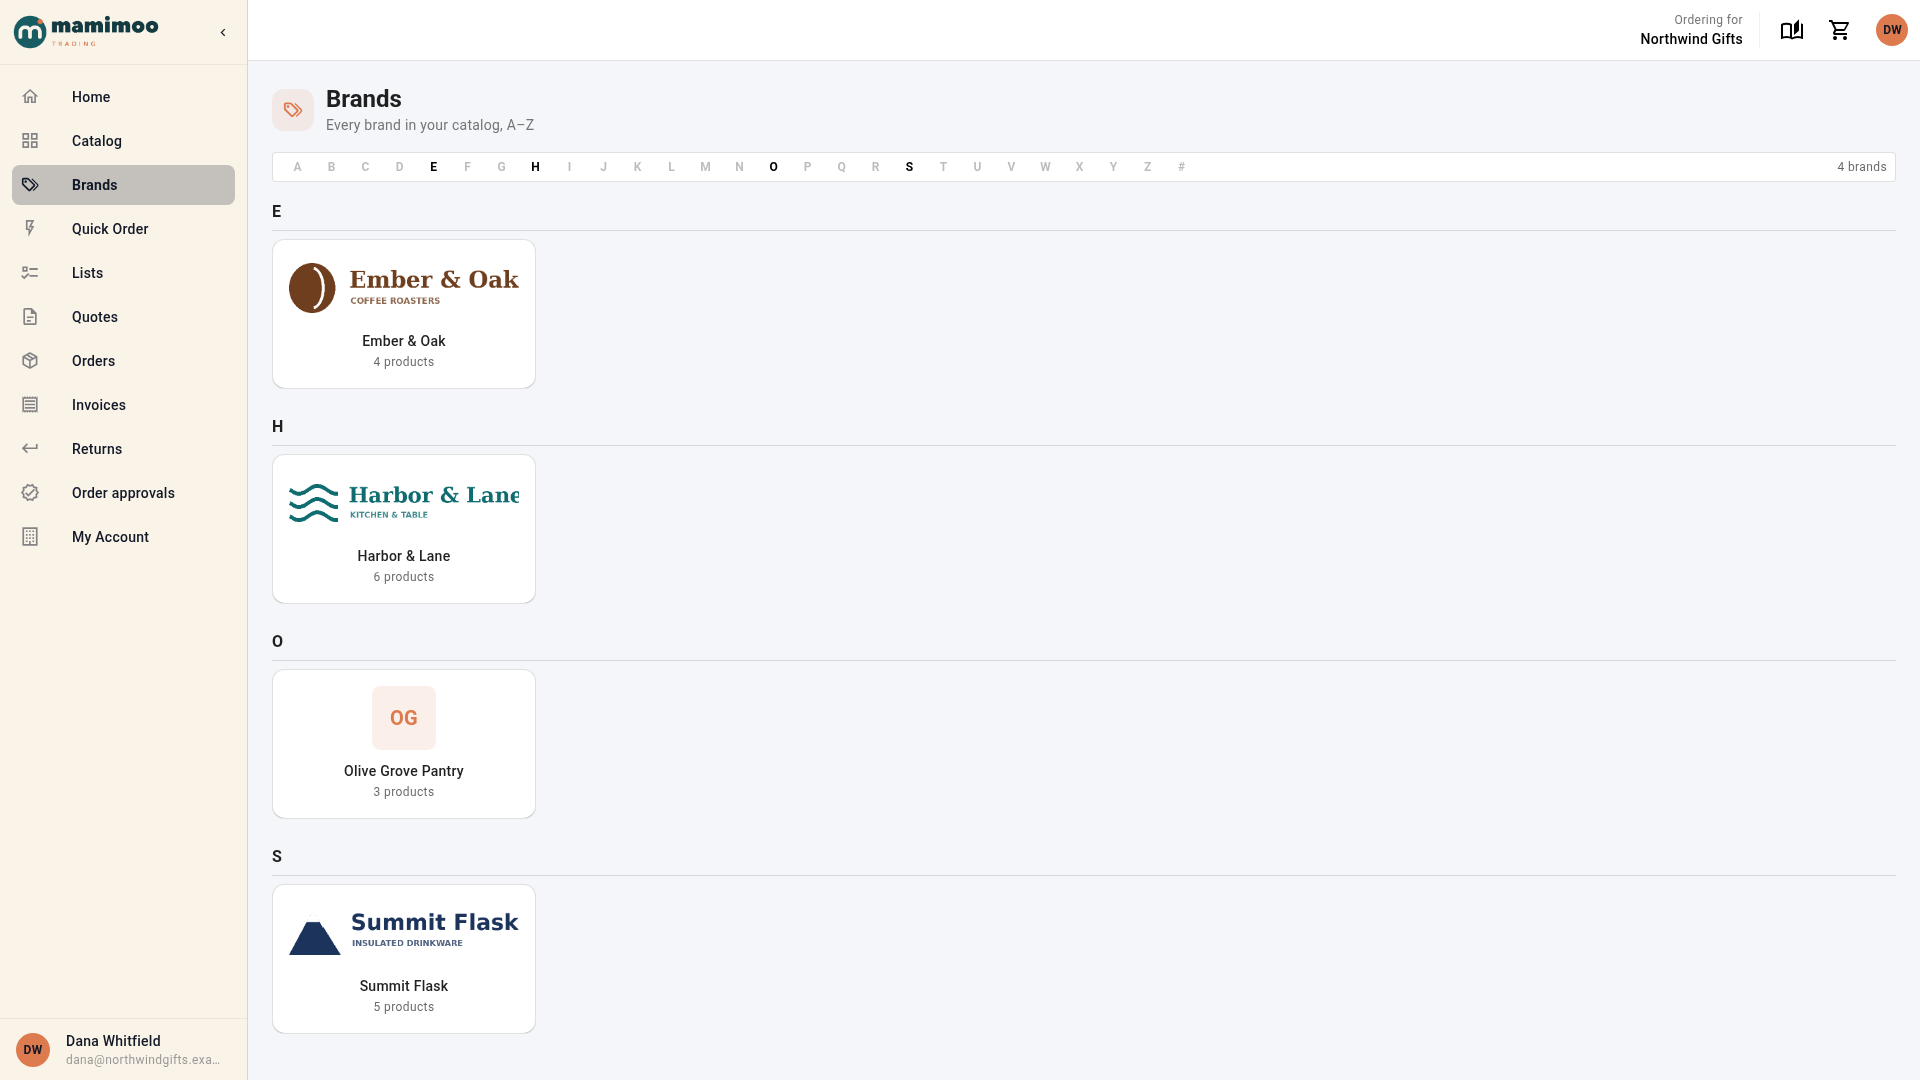
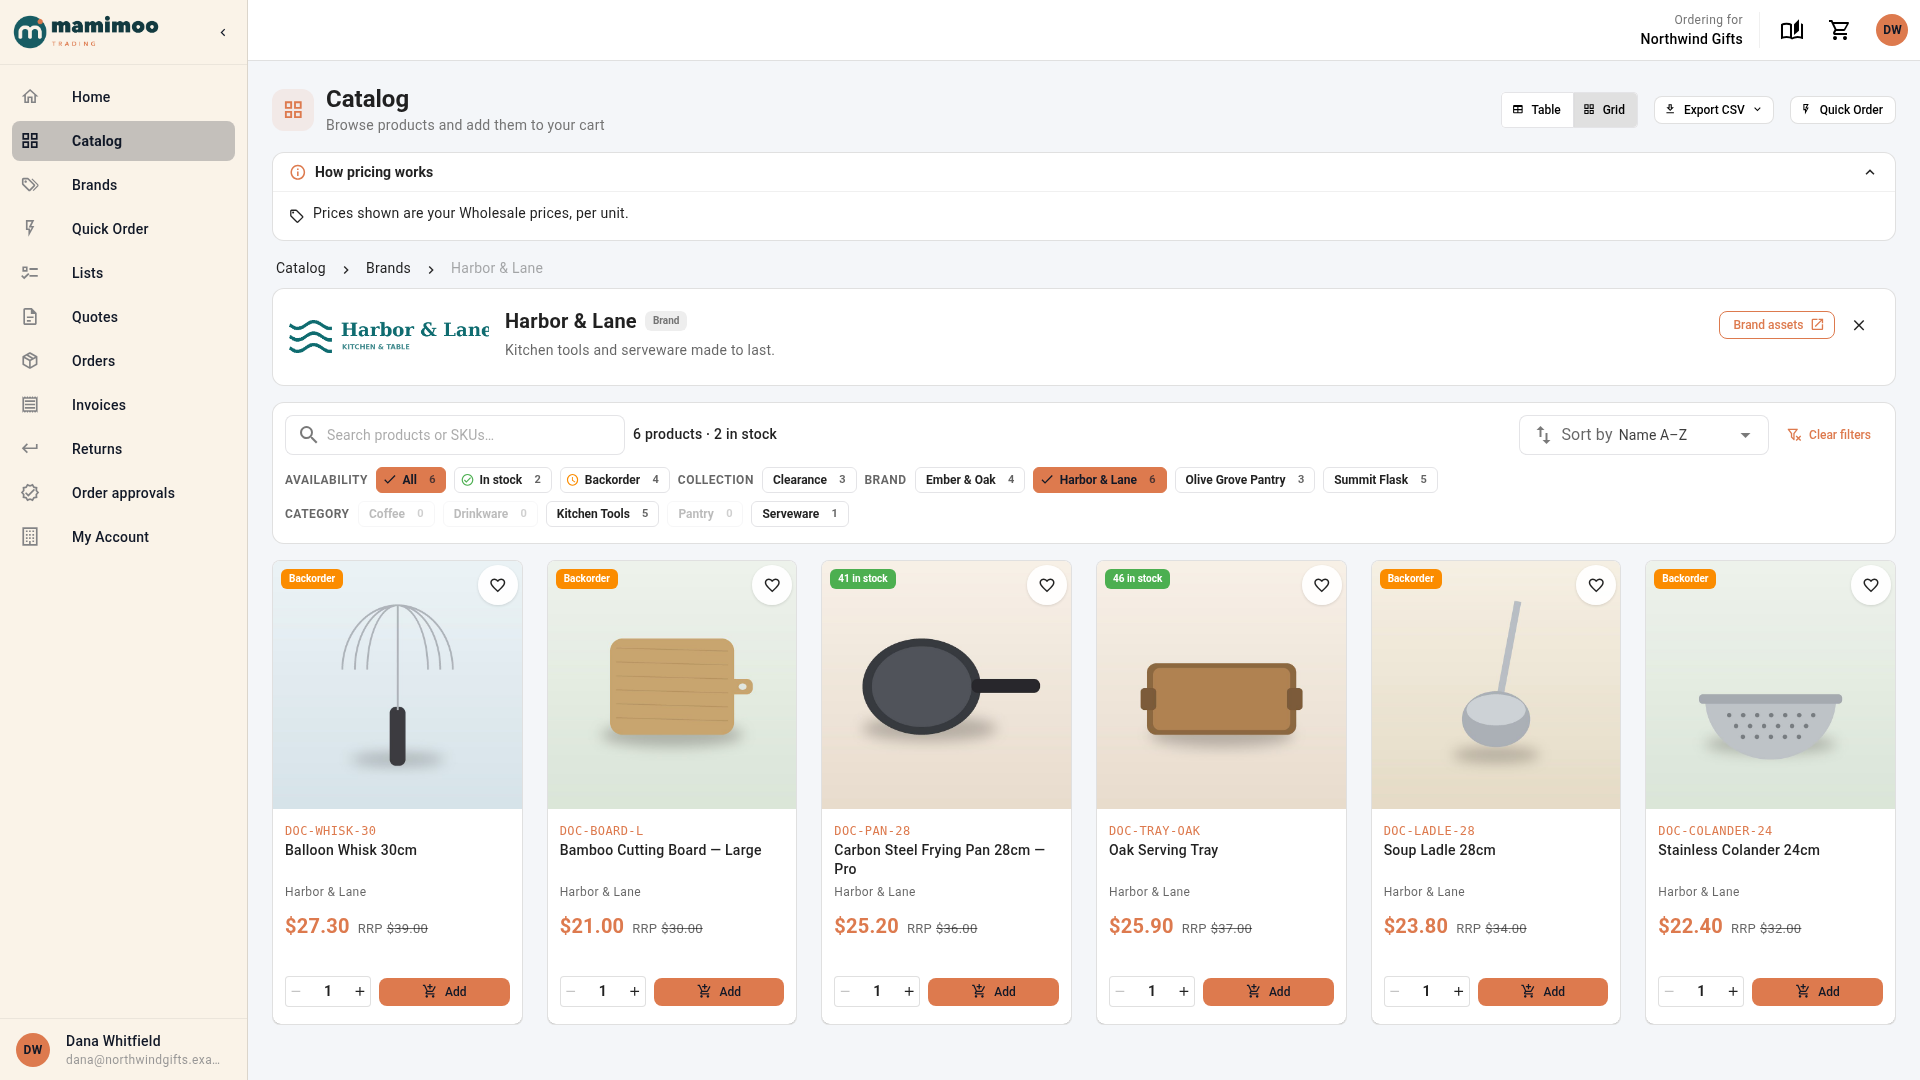
Clicking a brand, here or from a product card, opens the catalog for that brand. The logo, description and Brand assets button sit at the top.
Collections and category pages
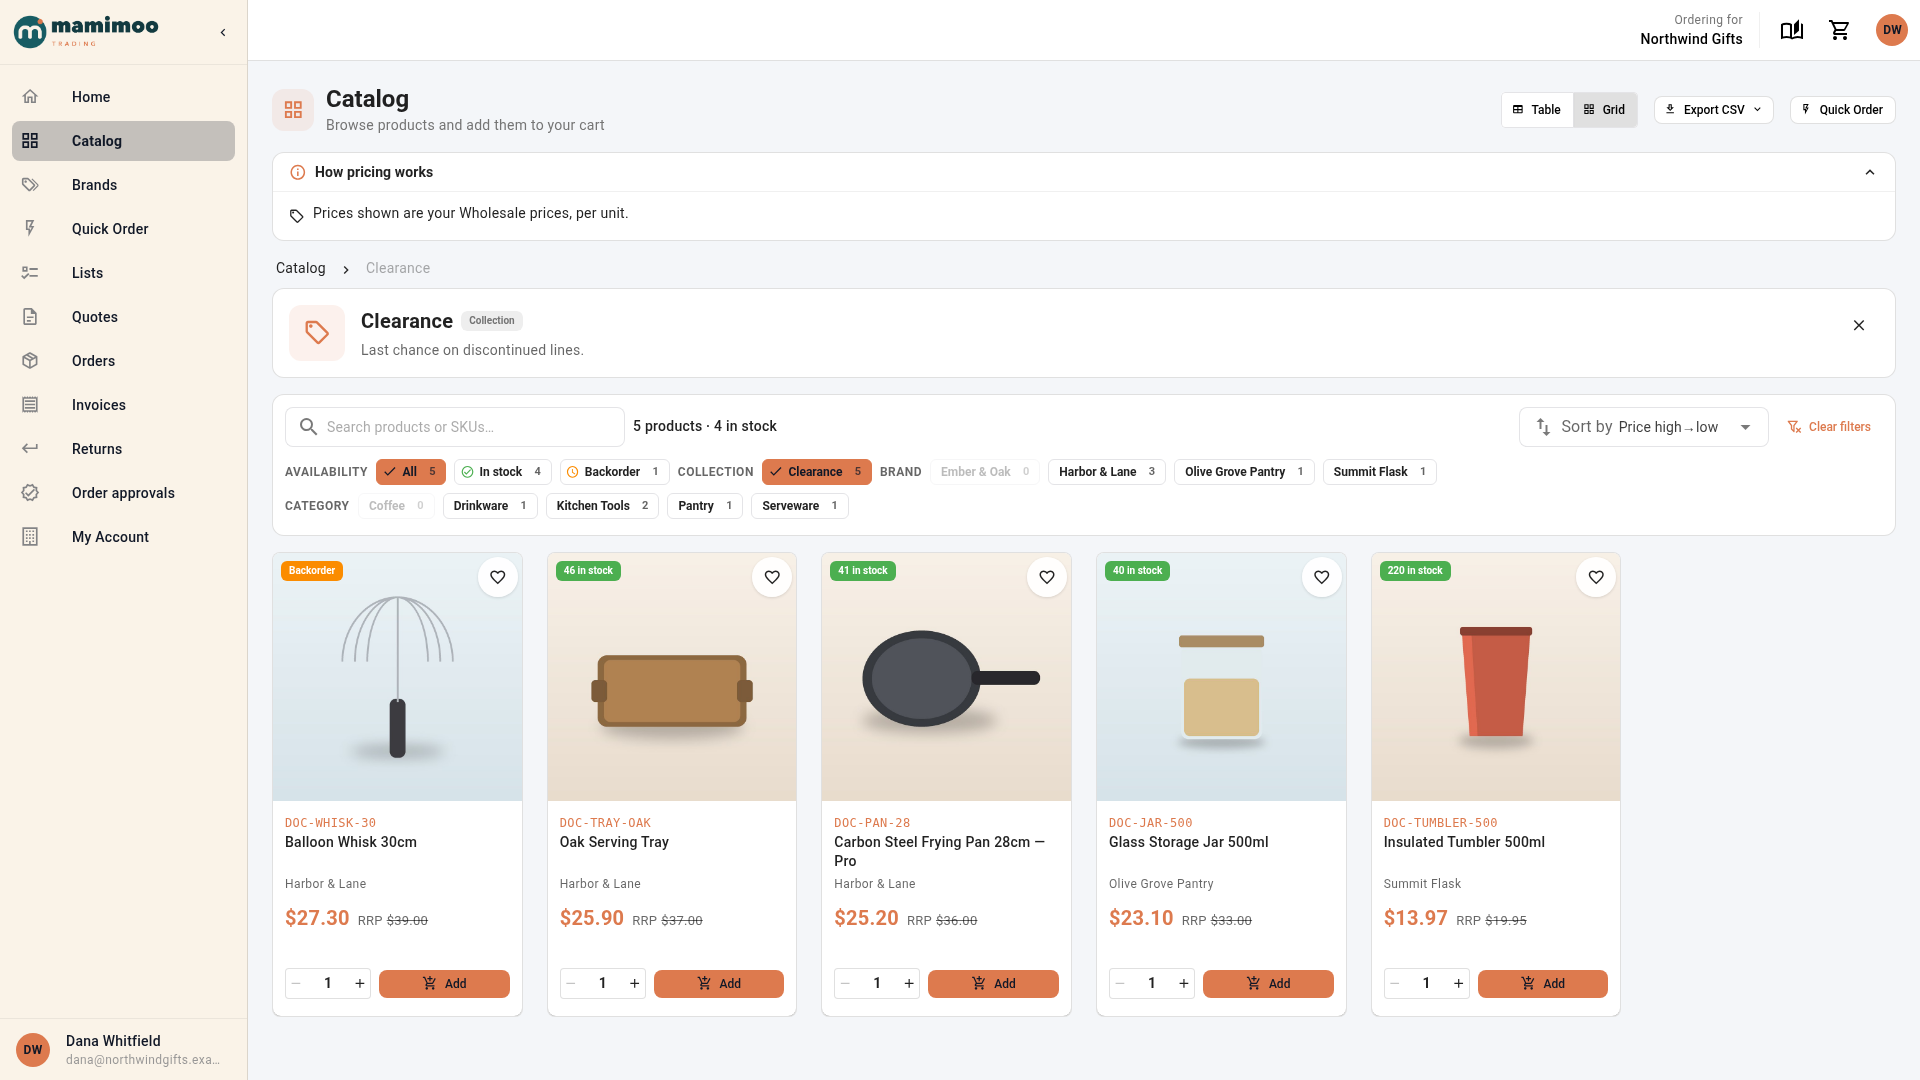
Published collections appear in the catalog filters under Collection. Choosing one opens the collection's page, with its title and description at the top, in its default sort.
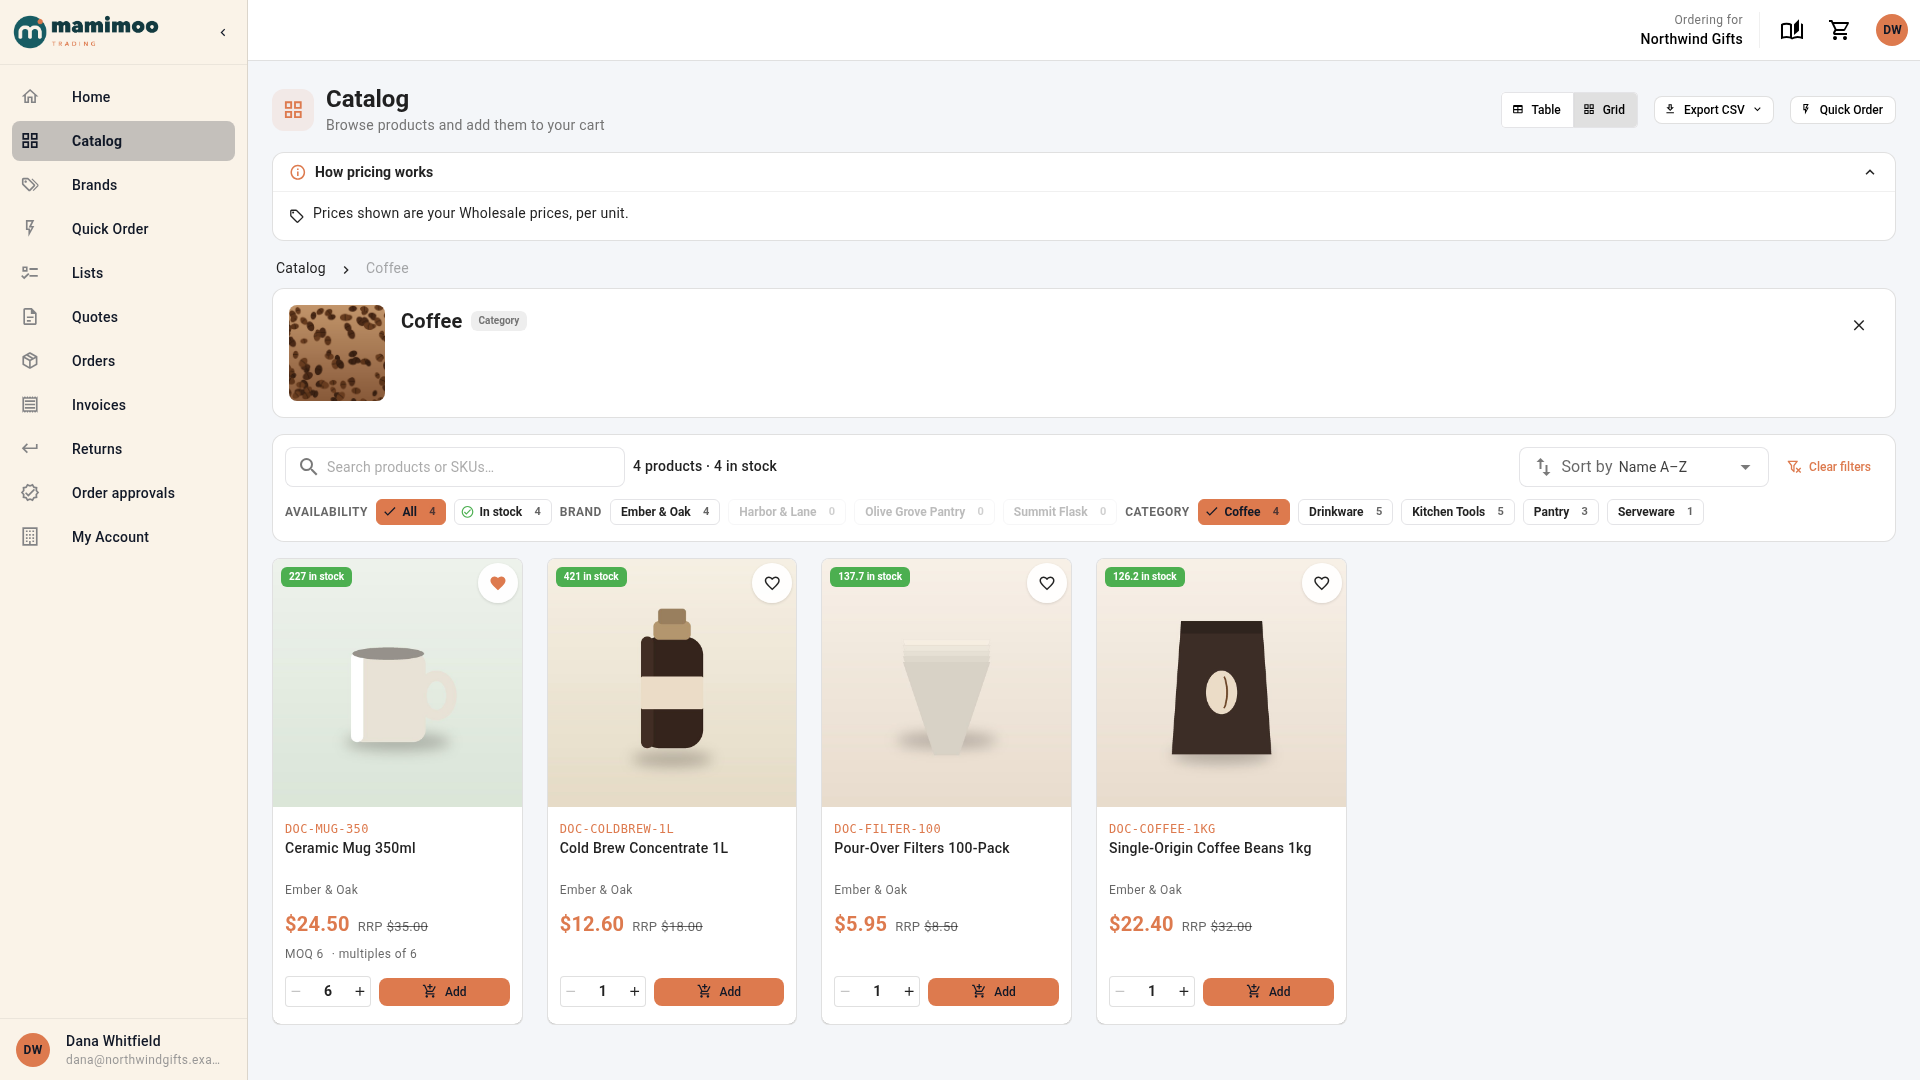
Choosing a single category opens it the same way, with its image at the top.
Each of these pages has its own address, so you can link to a brand, a category or a collection from an announcement or an email.
Next steps
- Set up your portal Home page to announce a new collection.
- Brand your customer portal with your own logo and colours.
- Saved lists and reorders covers the lists buyers keep next to their wishlist.
Video transcript
To give a brand its own look on your portal, start from Brands, under PIM in the sidebar. Search for the brand you want to change, by name. When it shows up in the list, click the pencil icon on the brand's row. Its edit dialog opens, with the brand's details at the top. The Portal section sets what your portal buyers see for this brand. Drop the brand's logo on the box, or click browse to choose the file. It goes live as soon as it uploads. Next, paste a link to the brand's marketing material, such as images, spec sheets and point-of-sale files. Then write a short description for buyers. It sits at the top of the brand's page in the portal, under the logo. Click Update to save your changes. The new logo now shows beside the brand's name in the list. Categories get an image the same way. They're in Settings, under Products. Click a category's name to edit it, and then drop in an image. The image shows at the top of that category's page in the portal. Click Update to close the dialog. The rest is set on the portal itself, under CRM, Customers, on the Portal tab. This is its Appearance page, which sets how the portal looks to buyers. Scroll down to the Catalog display card, near the bottom of the page. Under Was price, click the Pricing tier box, and pick the tier your buyers should compare against. Then give it a short label that buyers will recognise, like RRP. Buyers see it struck through when it's higher than their own price. Below it, Collections turns a product tag into a page that buyers can browse, with its own link. Click Add collection, and then choose the product tag you want to publish. Start typing to find the tag, and pick it from the list. Type the title buyers will see at the top of the collection. Then choose a default sort, so the collection always opens with the highest prices first. Add a description if you like, a line or two about what's in the collection. Buyers read it at the top of the collection's page. When everything looks right, scroll back up to the top of the page, and click Save. Your collection and the was-price go live for buyers straight away. Now a buyer signs in and opens the catalog. Each card shows their price, with the RRP struck through beside their price. A product shows no was-price when the RRP isn't higher, or is in another currency. Buyers can sort the whole catalog from the Sort menu. Sorting by price, lowest first, uses their own price, across every page of the catalog. Newest puts the products you added most recently at the top of the list. Brands, in the portal menu, opens a page with every brand in the buyer's catalog. They're listed A to Z, with a letter bar to jump. Brands without a logo show their initials. Click a brand's tile to open the catalog for just that brand. The catalog opens, filtered to that one brand, with its logo and your description at the top. Brand assets opens your link in a new tab, so buyers always find the latest material. Back on the full catalog, your published collections appear as a filter. Choose a collection to see only its products, in the default sort you chose. This one opens with the highest prices first, and its title and description at the top. Choosing a single category works the same way. Its page opens with the image you added at the top. Tap the heart on any card to save it to the account's wishlist. On the Lists page, the wishlist is always first, ready to add to the cart.