Set up brand reporting
Set up reporting once per brand. You choose the channels the report covers, when it's built, whether it waits for your review, and who receives it. SKU.io then picks the brand's core products and starts building reports on schedule.
Before you begin
- You need the Brand Reports permissions Index and Manage. To let a brand's reports send themselves without review you also need Send. See Roles and permissions reference.
- The brand must exist and have products assigned to it. See Manage brands.
- The products need sales on the channels you want to report on. A channel the brand hasn't sold on can still be added by hand.
Open the brand's reporting settings
-
Go to Insights → Reports, then click Brand Reports.
-
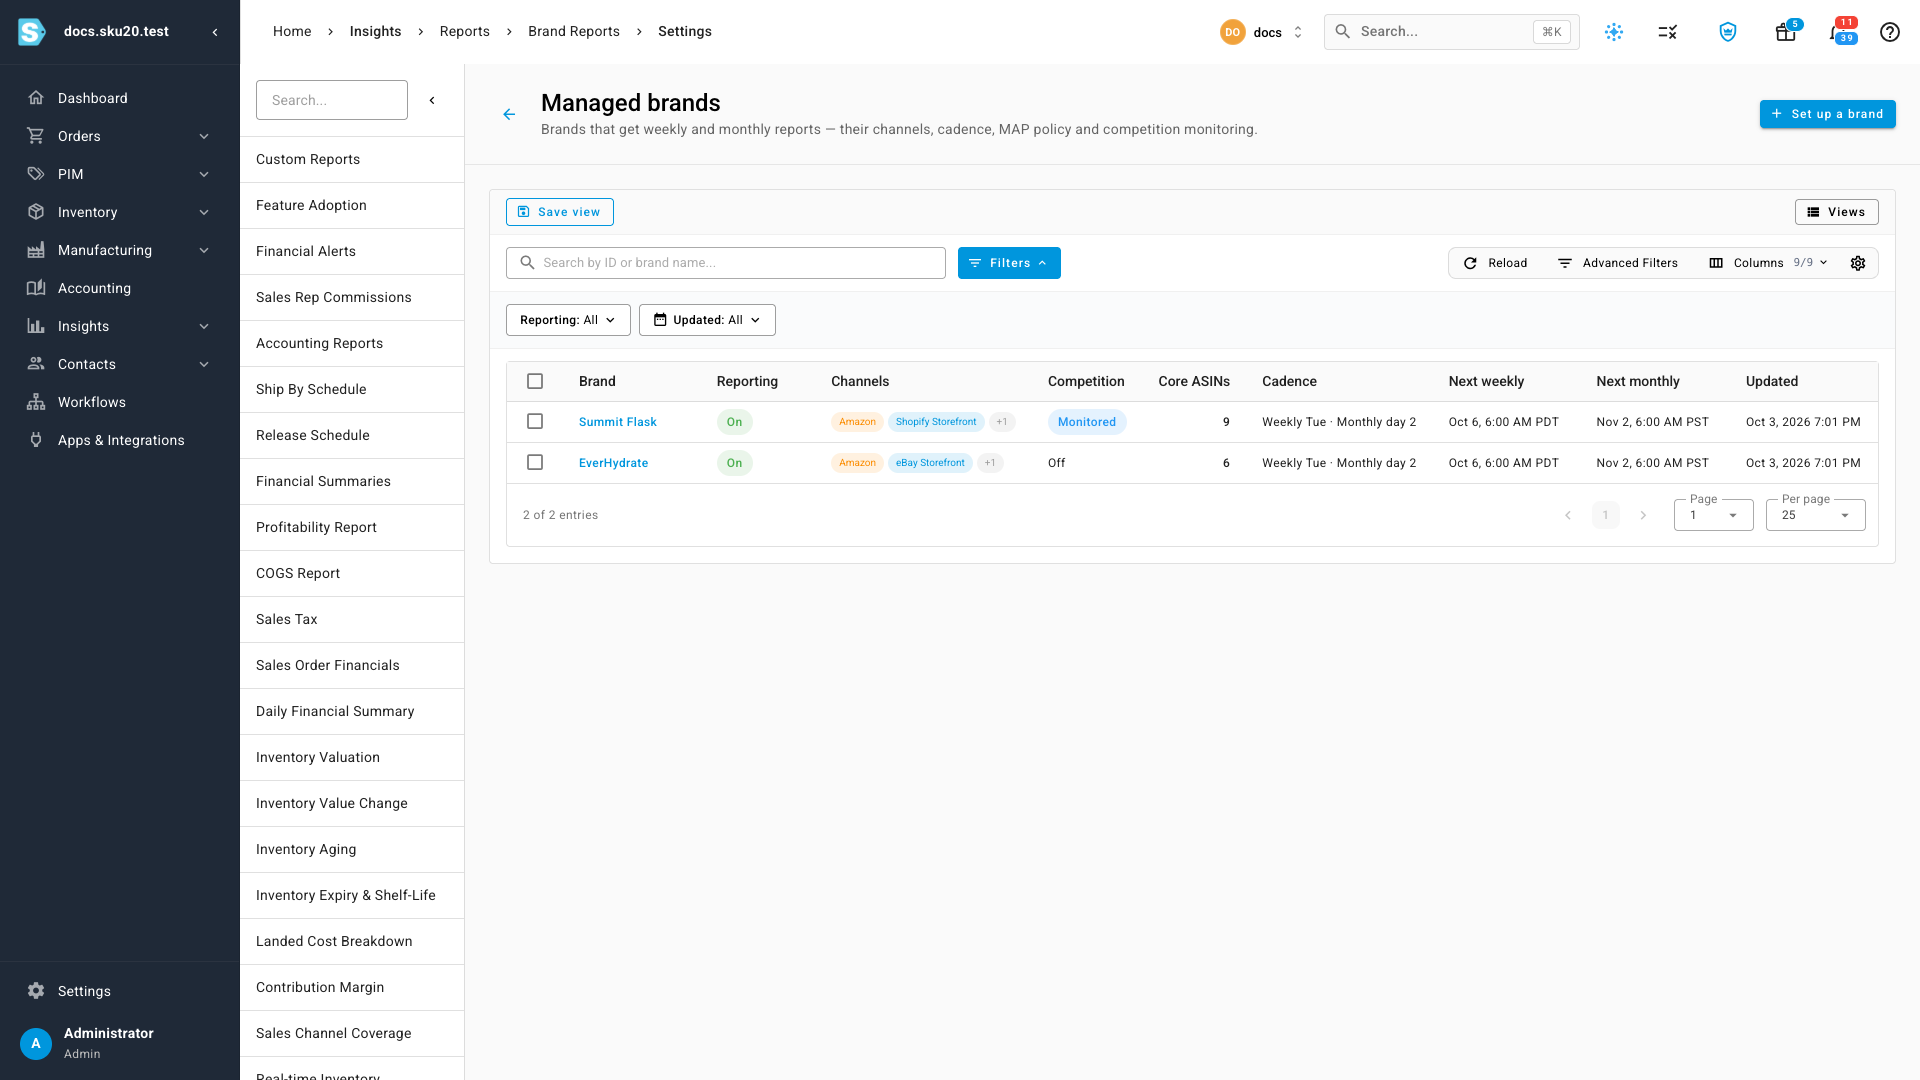
Click Managed brands. The list shows every brand you report on, with its channels, whether competition is monitored, how many core ASINs it has, its cadence, and its next weekly and monthly runs.
-
Click Set up a brand.
-
Search for the brand, select it, and click Continue.
The brand's reporting settings open with reporting still off. Nothing is saved until you click Save.
You can also get here from the brand itself: open it under PIM → Brands and click Brand reporting.
Turn reporting on and set the schedule
-
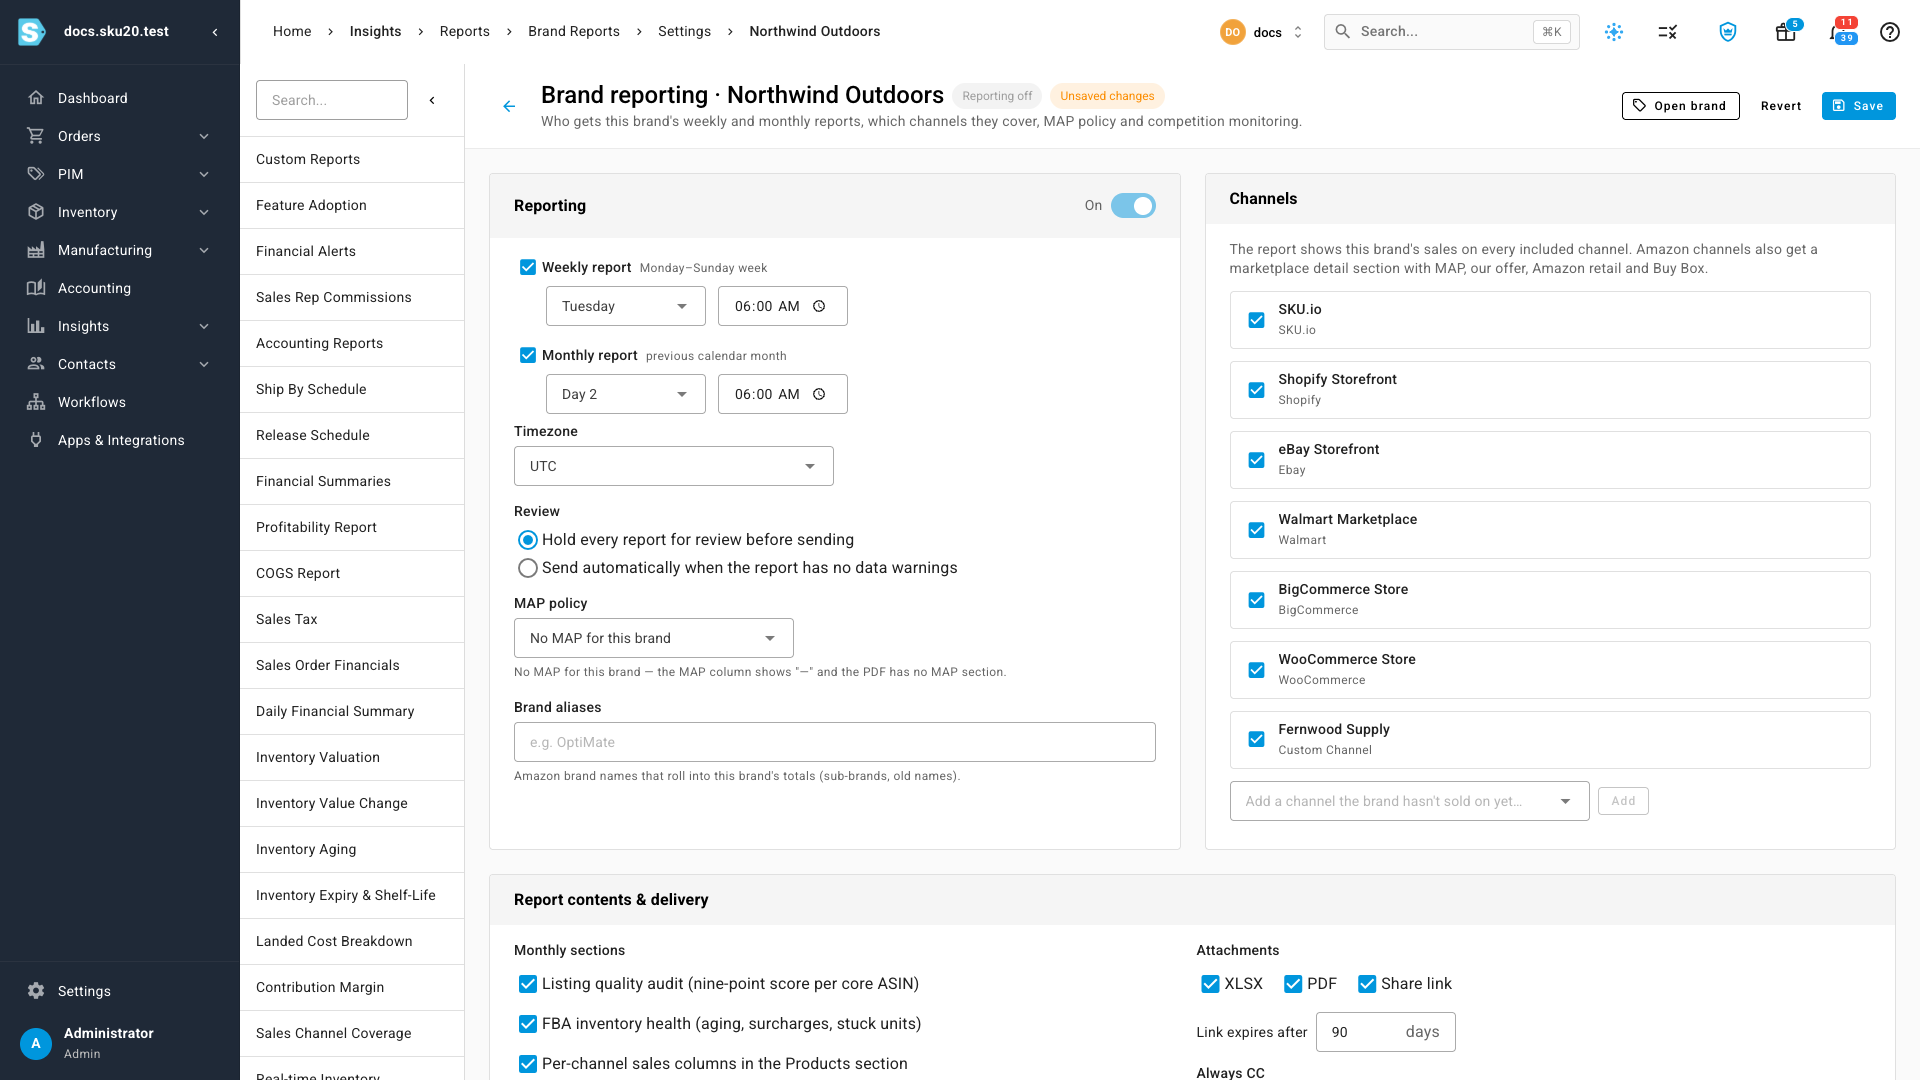
In the Reporting card, turn the switch On.
-
Under Weekly report, keep the box ticked and choose the weekday and time the report is built. Each weekly report covers Monday to Sunday.
-
Under Monthly report, keep the box ticked and choose the day of the month (1 to 28) and the time. Each monthly report covers the previous calendar month.
Untick either box if the brand only wants one of the two. A brand needs at least one.
-
Choose the Timezone the schedule and the weeks and months follow.
If reporting was off or a scheduled run was missed, SKU.io builds only the most recent complete week or month when it catches up, not every period in between. To build an earlier period, use Generate now; see Work the brand reports list.
-
Under Review, choose what happens when a report is built:
- Hold every report for review before sending keeps each report In review until you approve it.
- Send automatically when the report has no data warnings sends it at the scheduled time without waiting for you. A report with a warning, such as stale offer data, still waits for review.
Choose the channels
The Channels card lists every channel the brand sold on in the past year, already ticked.
- Untick any channel you don't want in the brand's report.
- To add a channel the brand hasn't sold on yet, choose it under Add a channel the brand hasn't sold on yet and click Add. Its column shows that the brand isn't listed there, which is useful when the brand asks why it isn't on that channel.
Amazon channels also get their own marketplace section in the report. Each Amazon channel has a Competition monitoring switch; see Turn on competition monitoring.
Set the MAP policy
Under MAP policy, choose No MAP for this brand, or choose the pricing tier that holds the brand's MAP prices and a tolerance. The details are in Set MAP prices.
Tune the sales-drop alert
Under Sales-drop alert, set how far a week's core sales must fall before SKU.io raises a Brand Sales Drop alert, and the smallest prior week worth comparing. The defaults are a 40% drop and 200 in your currency. Weeks below that minimum are ignored, so one missed sale on a small product doesn't raise an alert.
Name aliases
If the brand's Amazon listings use another name, such as a sub-brand or an old name, type it under Brand aliases and press Enter. Listings with that brand name then count towards this brand's totals.
Choose what the report includes
In the Report contents & delivery card:
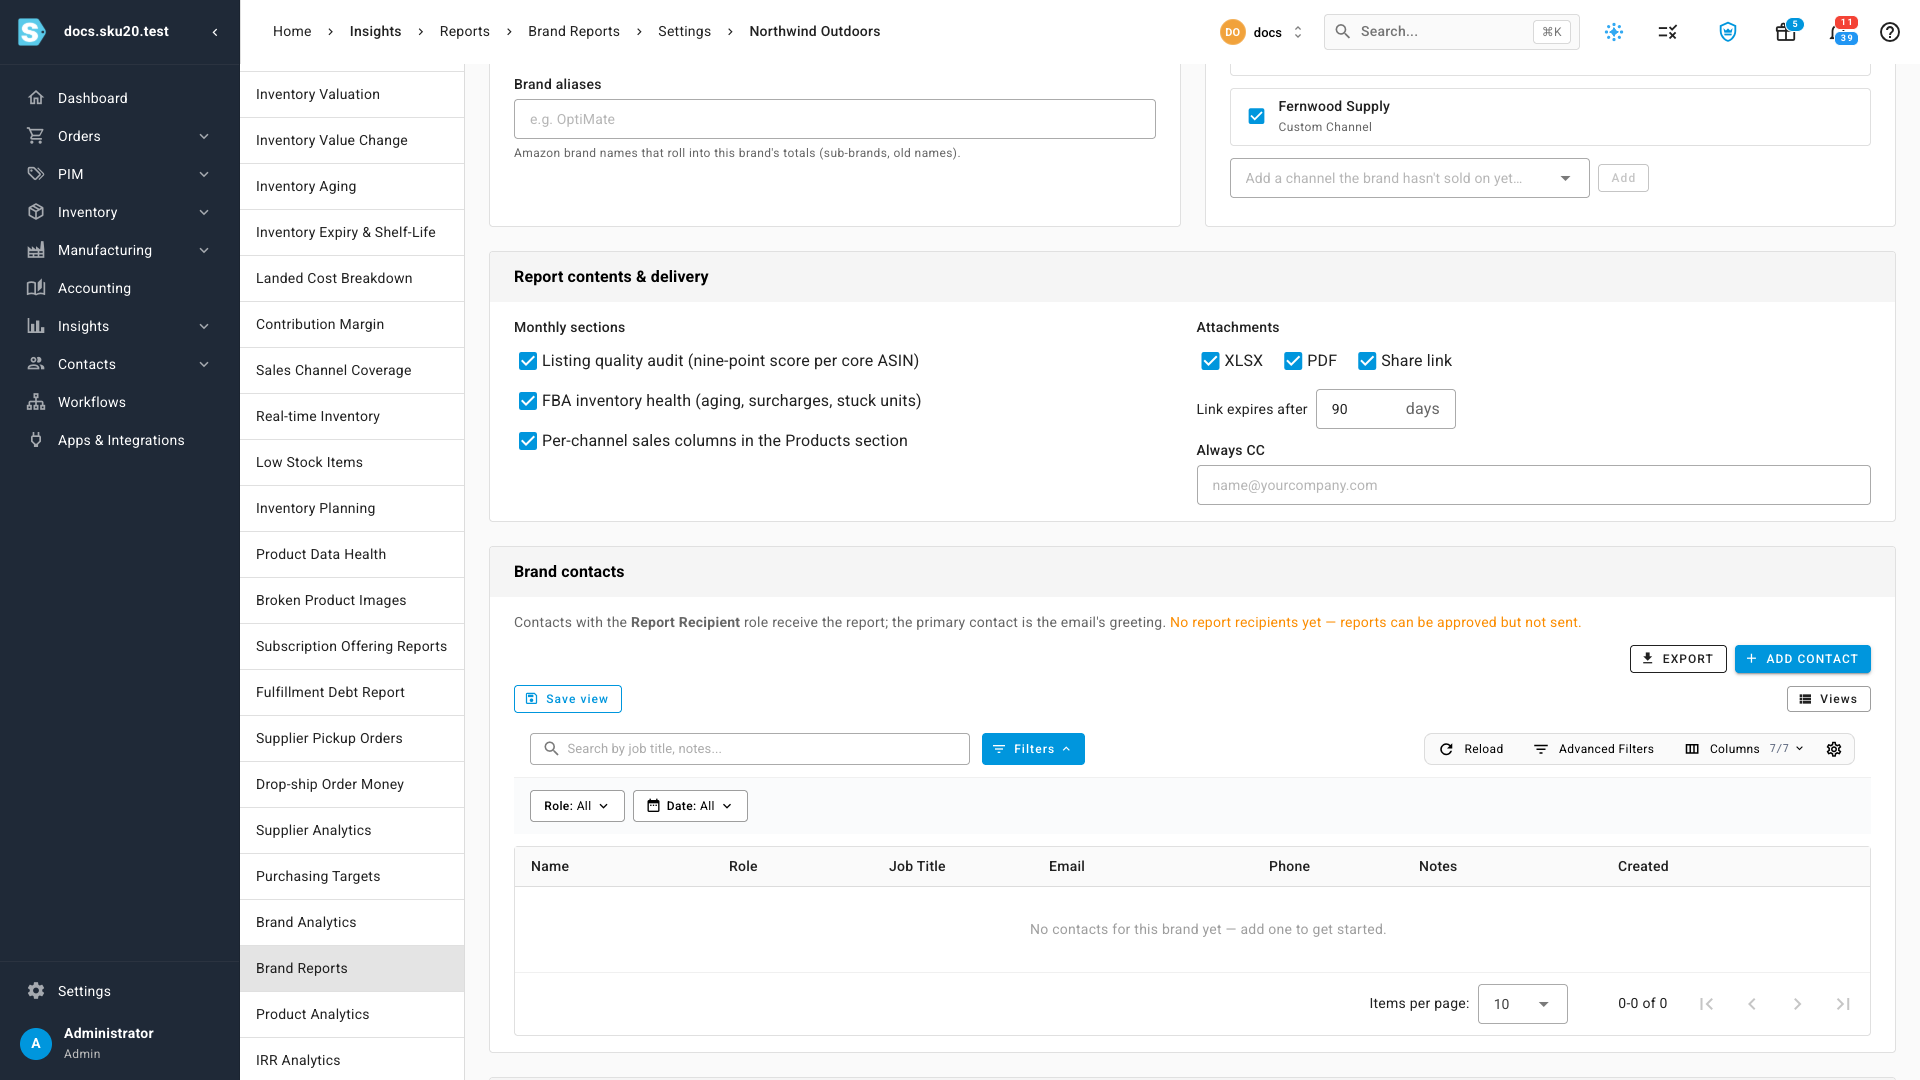
- Under Monthly sections, choose whether the monthly report includes the Listing quality audit, FBA inventory health, and Per-channel sales columns in the Products section.
- Under Attachments, choose what goes with the email: the XLSX spreadsheet, the PDF, and a Share link.
- Set how many days the share link works under Link expires after.
- Under Always CC, add any email address that should be copied on every report, such as your own team's.
Save
Click Save. The header changes to Reporting on, and the next weekly and monthly run times appear under the title.
SKU.io then picks the brand's core products from its recent sales in the background. To review or change them, see Choose a brand's core products.
If you leave the page with unsaved changes, SKU.io asks you to confirm first. Revert throws away any changes you haven't saved.
Add the report recipients
Reports go to the brand's contacts who have the Report Recipient role. A brand without one can still have its reports approved, but they can't be sent.
- Scroll to Brand contacts on the settings page, or open the brand under PIM → Brands and select the Contacts tab.
- Click Add contact.
- Enter the contact's name and email, set Role to Report Recipient, and save.
- To choose who the email greets, star the brand's primary contact. The primary contact's first name opens every report email.
Turn reporting on or off for several brands
On the Managed brands list, tick the brands, then choose Turn reporting on or Turn reporting off from the bulk actions. A brand that can't be turned on, for example because it has no report channel, stays off and the reason is shown.
Turning reporting off for a brand cancels any report scheduled to be sent. Those reports stay approved, so you can still send one by hand. Archiving a brand turns its reporting off too.
Next steps
Video transcript
Reporting starts from Brand Reports, under Insights. This page lists the reports themselves, newest first. To add a brand, click Managed brands. It shows every brand that already gets reports, with its channels. Click Set up a brand, at the top right of the list. A dialog asks which brand you want to set up. Type a few letters of its name, then pick the brand from the matching list. When it's the right one, click Continue to open its settings. The settings page opens, with reporting still off. Nothing changes until you save, so you can look around first. Turn on reporting. Pick a day and a time for the weekly and monthly runs. Then choose whether each new report waits for your review before it goes out, or sends itself when nothing needs checking. Channels lists everywhere these products sold in the past year. Untick any channel you'd rather leave out. If there's a minimum advertised price, also choose a MAP policy. Click Save, at the top of the page, to keep the settings. Reporting is now on, and the next run times appear under the title. In the background, SKU.io picks the core products from recent sales. Last, add the brand's contacts, and give each one the Report recipient role.