Register an OAuth application
A personal access token is a credential for you. An OAuth application is a credential for software — it lets an app send your users to SKU.io, ask them to approve a specific list of permissions, and get its own token back when they agree. Nobody has to email a secret around, and any user can withdraw access later without breaking anyone else.
Register one when you're building an integration, hooking up an automation platform, or handing a connector to an outside developer. If you only need a credential for a script you run yourself, create a personal access token instead — it's far less work.
Before you begin
- This page is for administrators. You need to be a power user with permission to manage OAuth applications; if Settings → Developer → OAuth Applications isn't in your menu, you don't have it.
- Have the developer's redirect URI to hand — the HTTPS address SKU.io sends the user back to after they approve. You can't finish the form without at least one, and you can add more later.
- The Client Secret is shown once, on the screen right after you register. Have somewhere safe to put it.
- Registering the application does not grant it anything. It can only act once a user completes the authorization flow and approves the scopes it asks for.
- The screenshots below come from a demonstration account with sample applications. Your own names, URLs, and client IDs will differ.
Steps
1. Open the OAuth Applications page
Go to Settings → Developer → OAuth Applications.
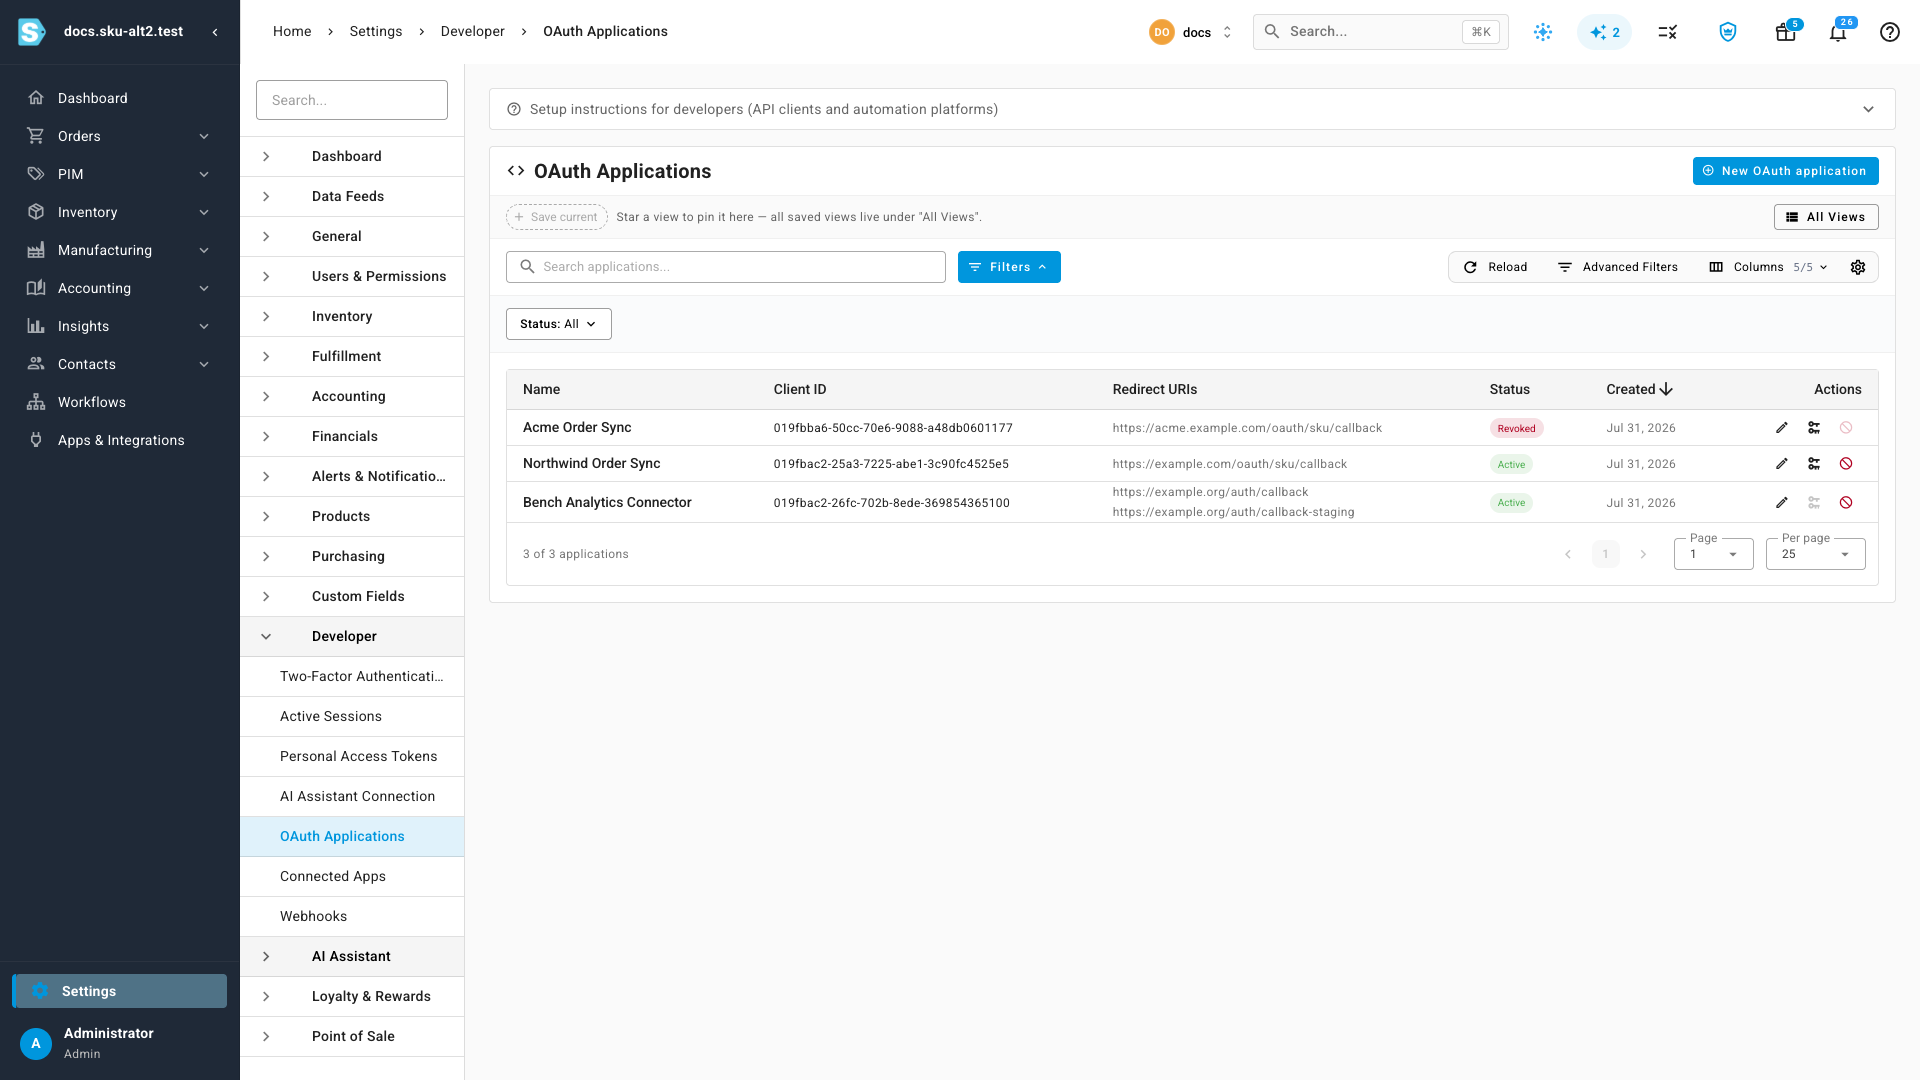
Every application registered on the account is listed here, active and revoked alike.
2. Read the setup instructions
Expand Setup instructions for developers (API clients and automation platforms) at the top of the page. This is the panel to send the developer to — it carries the two endpoint URLs their app needs.
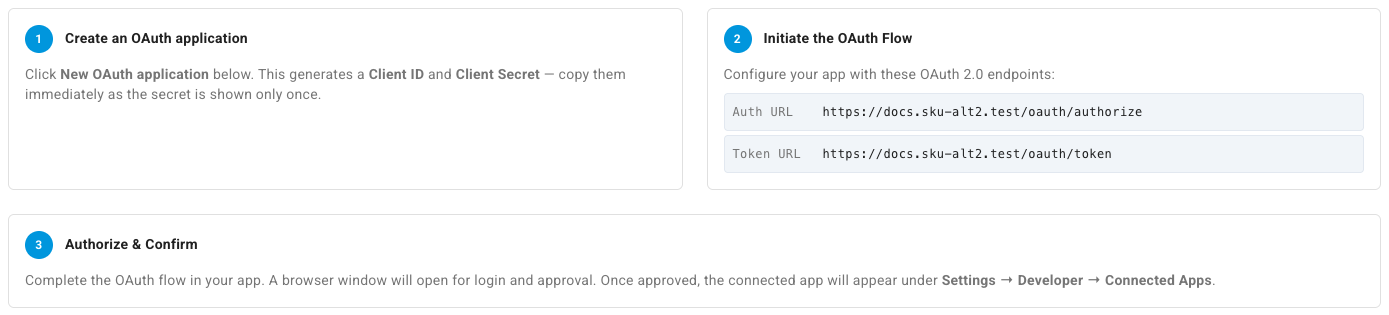
| Endpoint | Purpose |
|---|---|
Auth URL — /oauth/authorize | Where the app sends the user to sign in and approve |
Token URL — /oauth/token | Where the app exchanges the returned code for an access token |
Both are shown as full URLs for your account, so they can be copied straight into a client's configuration.
Below the steps, two worked examples fill in the fields the common tools ask for — Postman, for testing the flow yourself, and a generic automation platform, for handing to a no-code connector.
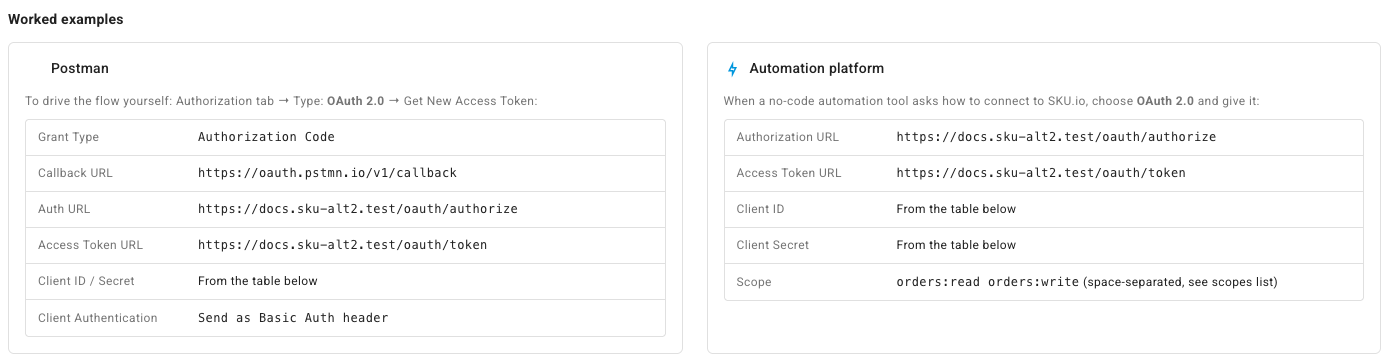
Under those sits the full Available Scopes table. Send it to the developer along with the credentials — scopes are space-separated in an OAuth request, and an app should only ask for the ones it genuinely needs. See the API scopes reference.
3. Start a new application
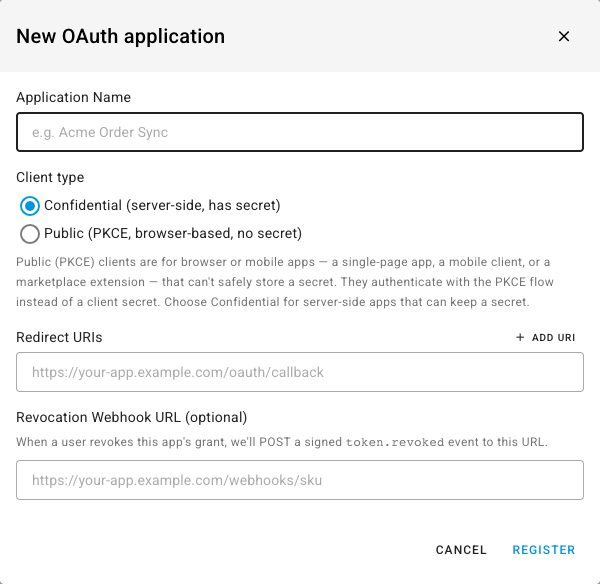
Click New OAuth application.

4. Name the application
Type a name into Application Name — between 3 and 100 characters.
This is the name your users read on the consent screen when the app asks for access, and the name it appears under in their Connected Apps list. Use what the app is actually called, not an internal codename: "Acme Order Sync" tells a user what they're approving; "integration-v2" doesn't.
5. Choose the client type
Confidential and Public decide how the app proves its identity.
| Type | Choose it when | How it authenticates |
|---|---|---|
| Confidential (server-side, has secret) | The app runs on a server you or the developer control — a backend service, a scheduled sync, a hosted connector | A Client Secret it keeps private |
| Public (PKCE, browser-based, no secret) | The app runs where its code is visible — a single-page app, a mobile app, a marketplace extension | The PKCE flow, with no secret at all |
The rule is whether the app can keep a secret. Anything running in a browser or shipped to a device can't — its code can be read — so those use Public and PKCE. When in doubt, ask the developer where the token exchange happens: on their server, choose Confidential.
This choice is set at registration and doesn't appear when you edit the application later.
6. Add the redirect URIs
Enter the address SKU.io should return the user to after they approve, then use + Add URI if the app needs more than one — typically a production callback and a staging one.
Each must be a valid HTTPS URL, and at least one is required. Exact matching is the point of the field: it's what stops someone pointing your users' approval at a different destination, so it has to be the app's real callback, not a homepage.
7. Add a revocation webhook URL (optional)
If the developer wants to know the moment a user withdraws access, enter their endpoint under Revocation Webhook URL.
When a user revokes the app's grant, SKU.io POSTs a signed token.revoked event
to that address, letting the app clean up rather than discovering the problem
through failing API calls. Leave it blank if the app doesn't need it.
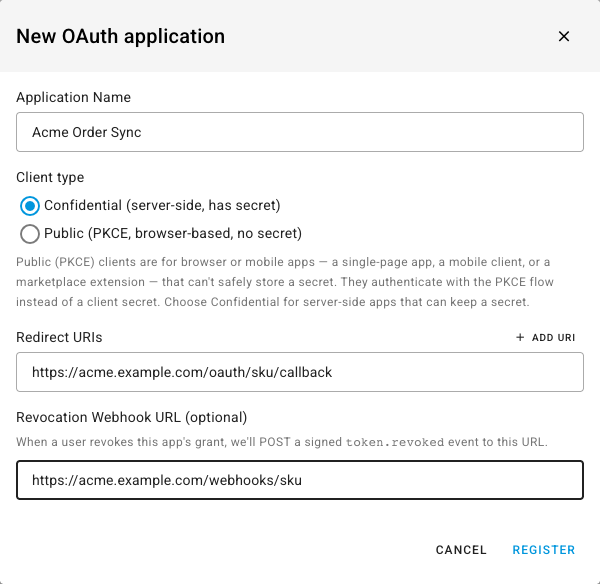
Supplying a URL here is also what makes the webhook signing secret in the next step exist. Add one later and you'll need to rotate the secret to see it — see Manage OAuth applications.
8. Register it and copy the credentials
Click Register. The credentials appear once.
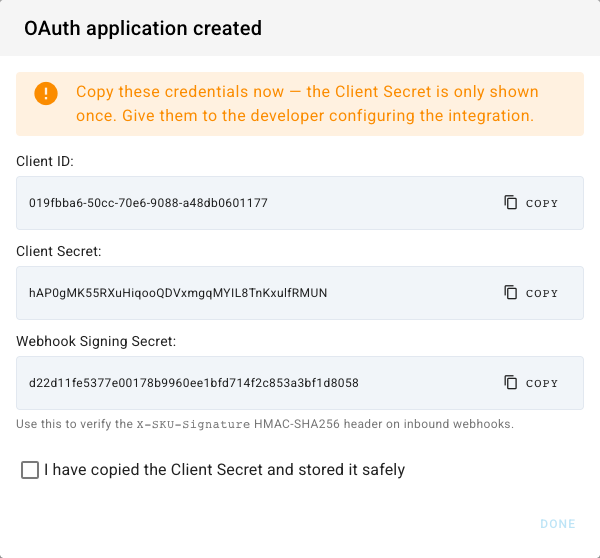
| Credential | What it's for |
|---|---|
| Client ID | Identifies the application. Not secret — it appears in the authorization URL |
| Client Secret | Proves the app is genuinely that application when it exchanges a code for a token. Shown once. Confidential clients only |
| Webhook Signing Secret | Verifies the X-SKU-Signature HMAC-SHA256 header on the token.revoked webhook, so the app knows the notification really came from SKU.io. Only shown when you set a revocation webhook URL |
Copy all of them into your secret store, then tick I have copied the Client Secret and stored it safely to enable Done. The Client Secret cannot be shown again — losing it means rotating it, which breaks the app until the new value is installed.
Send the credentials to the developer over something private. They are enough, combined with a user's approval, to read and write that user's data.
What happens next
Registering the application is your half. The developer does the rest:
- Their app sends a user to the Auth URL with the Client ID, the redirect URI, and the scopes it wants.
- The user signs in and sees a consent screen naming the application and listing exactly those scopes.
- On approval, SKU.io redirects back to the redirect URI with a code, which the app exchanges at the Token URL for an access token.
From then on the app calls the API with that token, limited to the scopes the user approved. The user sees it under Settings → Developer → Connected Apps, along with everything it has been doing — see Review connected apps.
An app can also create webhook subscriptions during the flow if the user granted
it webhooks:manage. Those show up on the Webhooks page with their
Source marked as coming from a connected app.
Troubleshooting
| What you see | Likely cause |
|---|---|
| Give the application a name so people recognise it on the consent screen. | The name field is empty |
| Add at least one redirect URI. | No redirect URI was entered |
| A redirect URI cannot be blank — remove the empty row or fill it in. | An extra URI row was added and left empty. Clear it or fill it |
| Each redirect URI must be a valid HTTPS URL. | A URI is malformed or uses http://. HTTPS is required, including in development |
| The revocation webhook URL must be a valid HTTPS URL. | Same rule for the optional webhook field |
| The developer reports a redirect mismatch | The URI their app sends must match a registered one exactly — protocol, host, path, and trailing slash included |
Next steps
- Manage OAuth applications — edit, rotate the signing secret, and revoke.
- Review connected apps — see which apps users have approved and what they're doing.
- API scopes reference — the scopes an application can ask for.
- Developer settings overview — how an OAuth application differs from a personal access token.