Apply the ecommerce standard chart of accounts
A general-purpose chart of accounts doesn't fit how an online seller makes money. Shipping you charge lands in Sales, marketplace fees pile into one line, and payout lines with no mapping fall back to an account you have to clean up at month end. The ecommerce standard is a short chart built for selling on marketplaces: shipping income, sales discounts, marketplace reimbursements, separate accounts for referral, fulfillment, storage and other marketplace fees, merchant processing fees, advertising, and a clearing account for each channel.
New accounts get the ecommerce standard when they set up accounting. If you're already set up, Apply ecommerce standard compares your chart with it, shows you exactly what's missing, and adds only the rows you tick.
Applying the standard never remaps, renames or deletes anything you've already set. A mapping that already points at an account keeps that account, even when it differs from the standard. Nothing is written in a locked period, and mapping changes apply from the date the preview shows, so earlier entries and payouts keep their accounts.
Before you begin
- You need the Accounting Manage Settings permission (
accounting.manage_settings) to apply the standard. Anyone who can see Accounting can open the preview. - If you connect Xero or QuickBooks Online, connect it first. The preview can then create each new account there as well.
Open the preview
-
Click Accounting in the left sidebar.
-
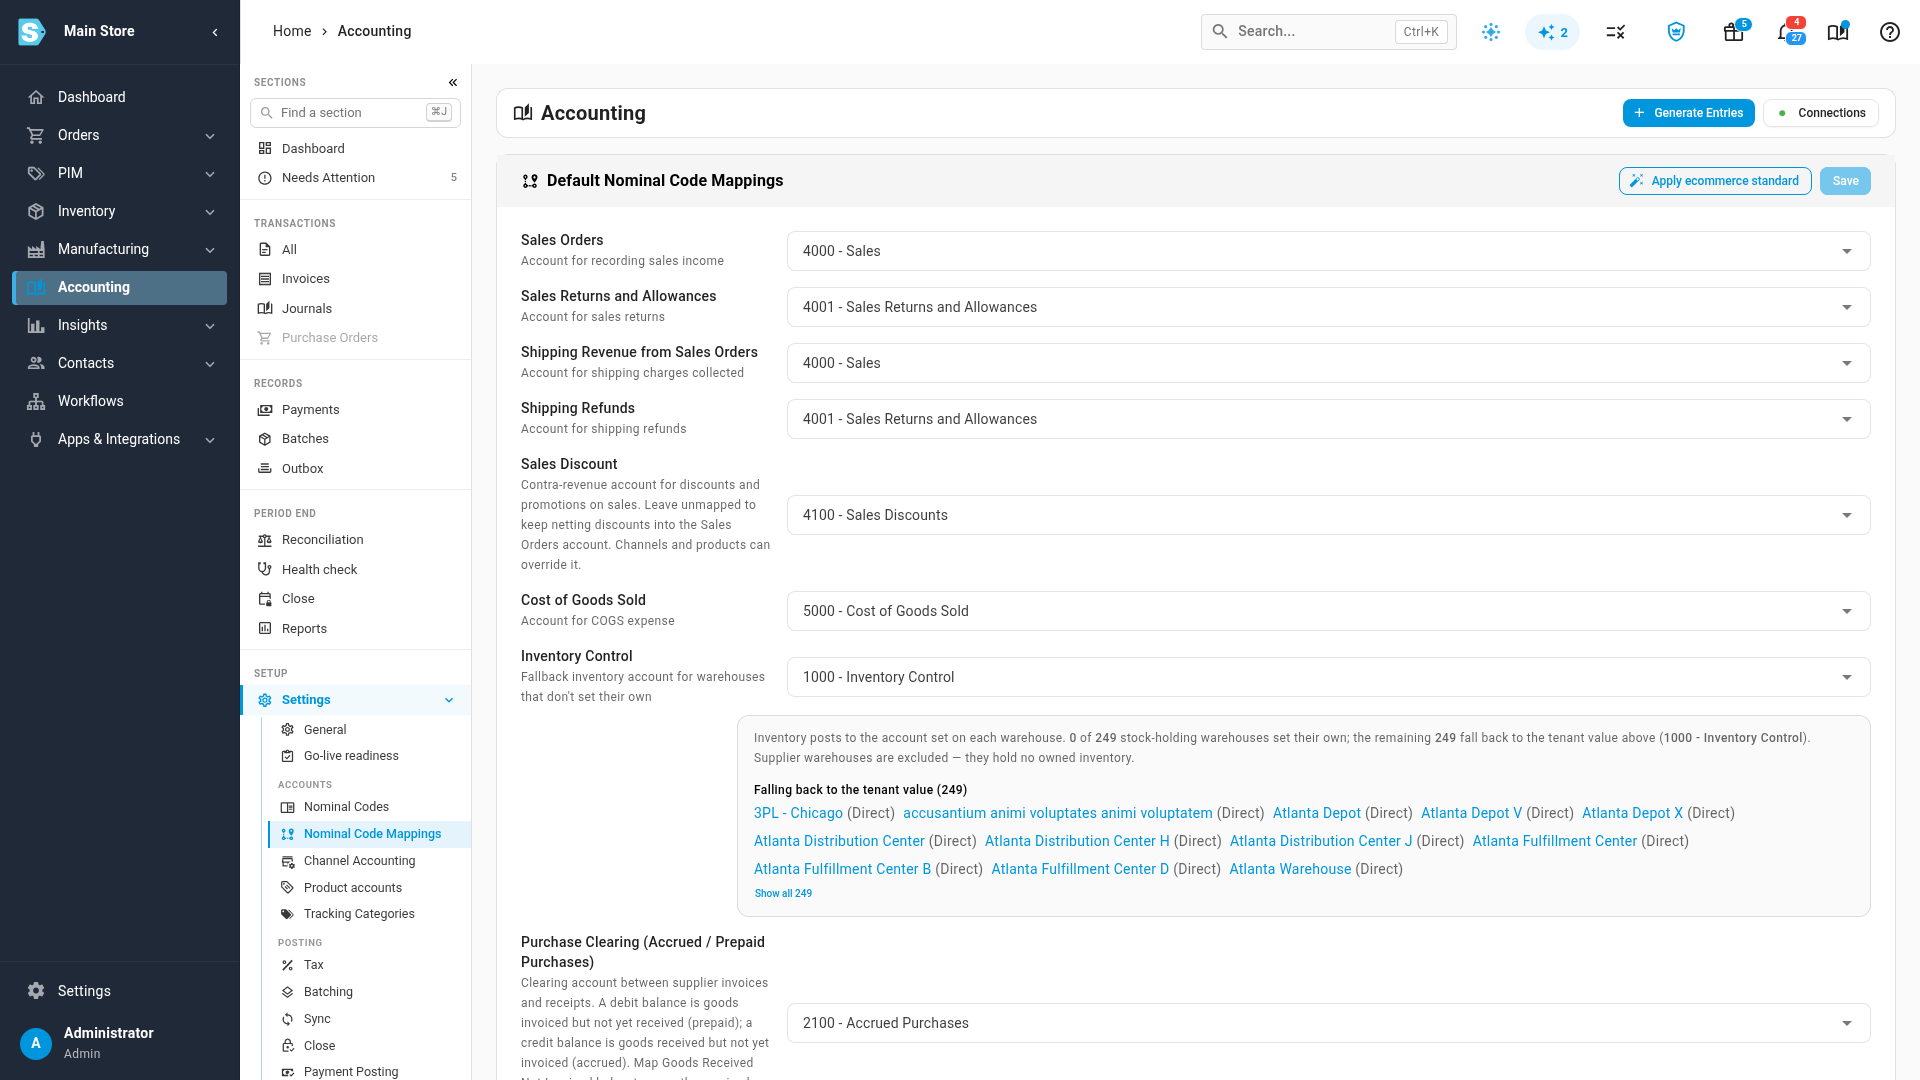
Click Settings in the section list, then, under Accounts, click Nominal Code Mappings.
-
Click Apply ecommerce standard at the top of the panel.
SKU.io compares your chart and mappings with the standard and opens a preview. Nothing changes until you apply it.
Review what it would add
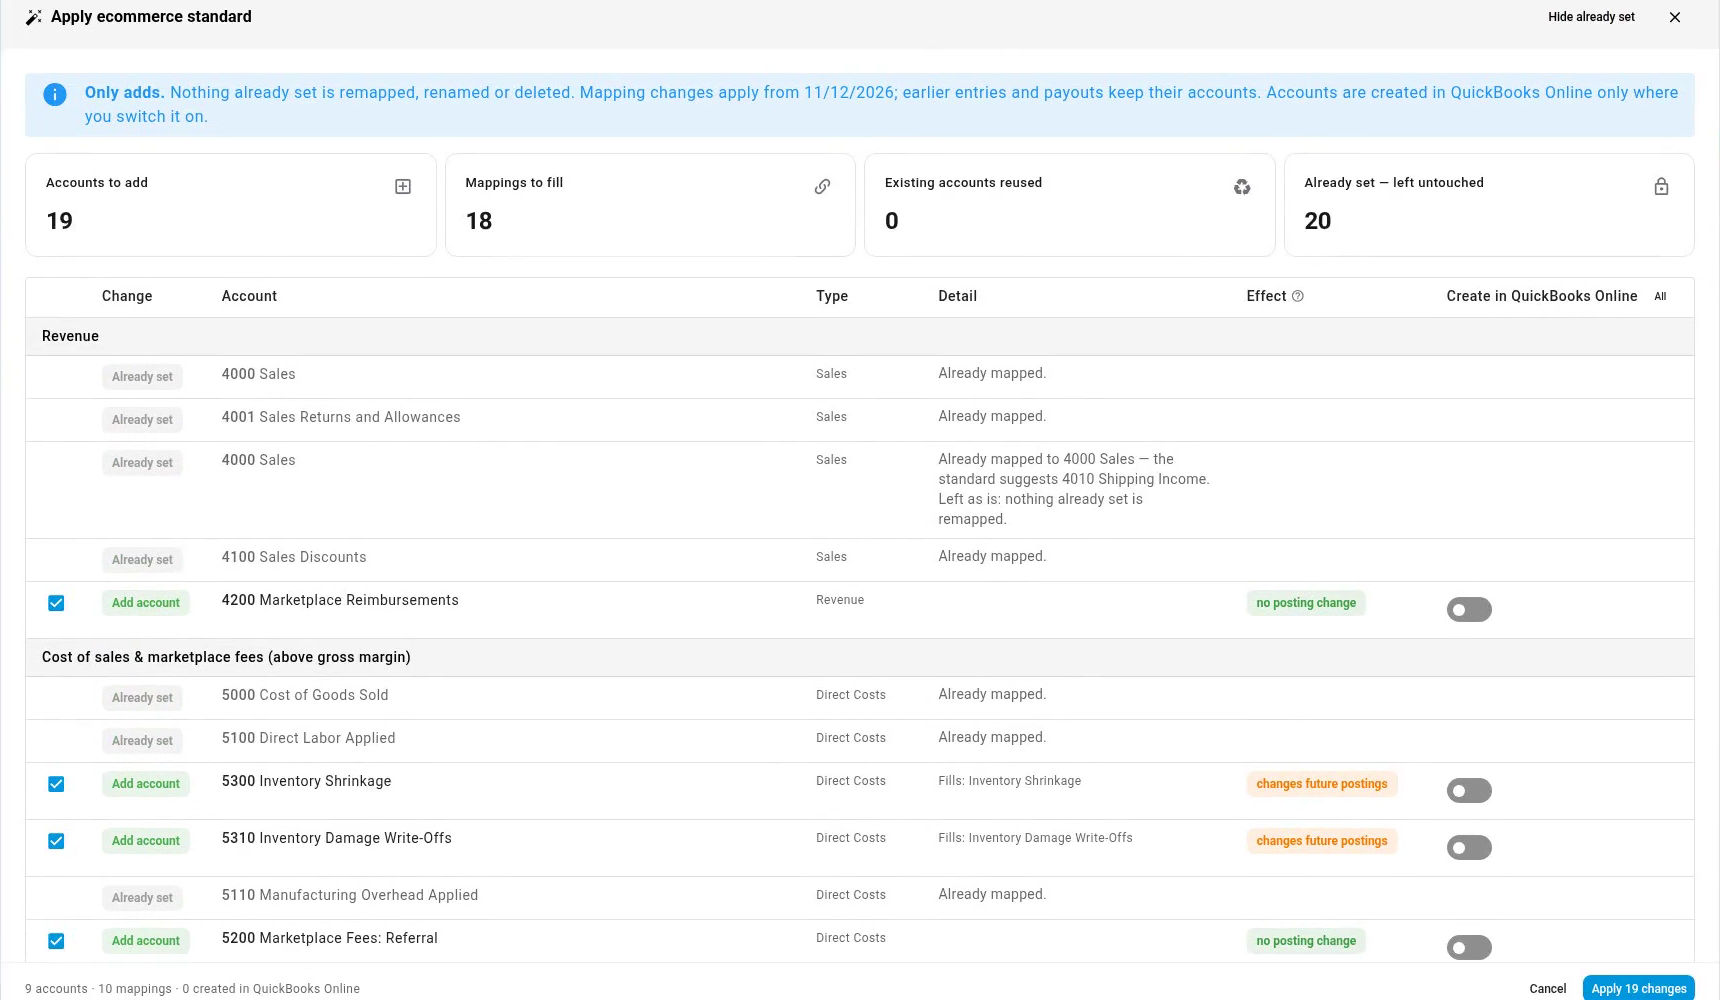
The banner at the top repeats the rules above, and four cards count the changes:
| Card | What it counts |
|---|---|
| Accounts to add | Standard accounts you don't have yet. |
| Mappings to fill | Empty mappings the standard would point at an account. |
| Existing accounts reused | Accounts you already have under the standard's name, used instead of creating a duplicate. |
| Already set — left untouched | Settings that already point at an account. These are never changed. |
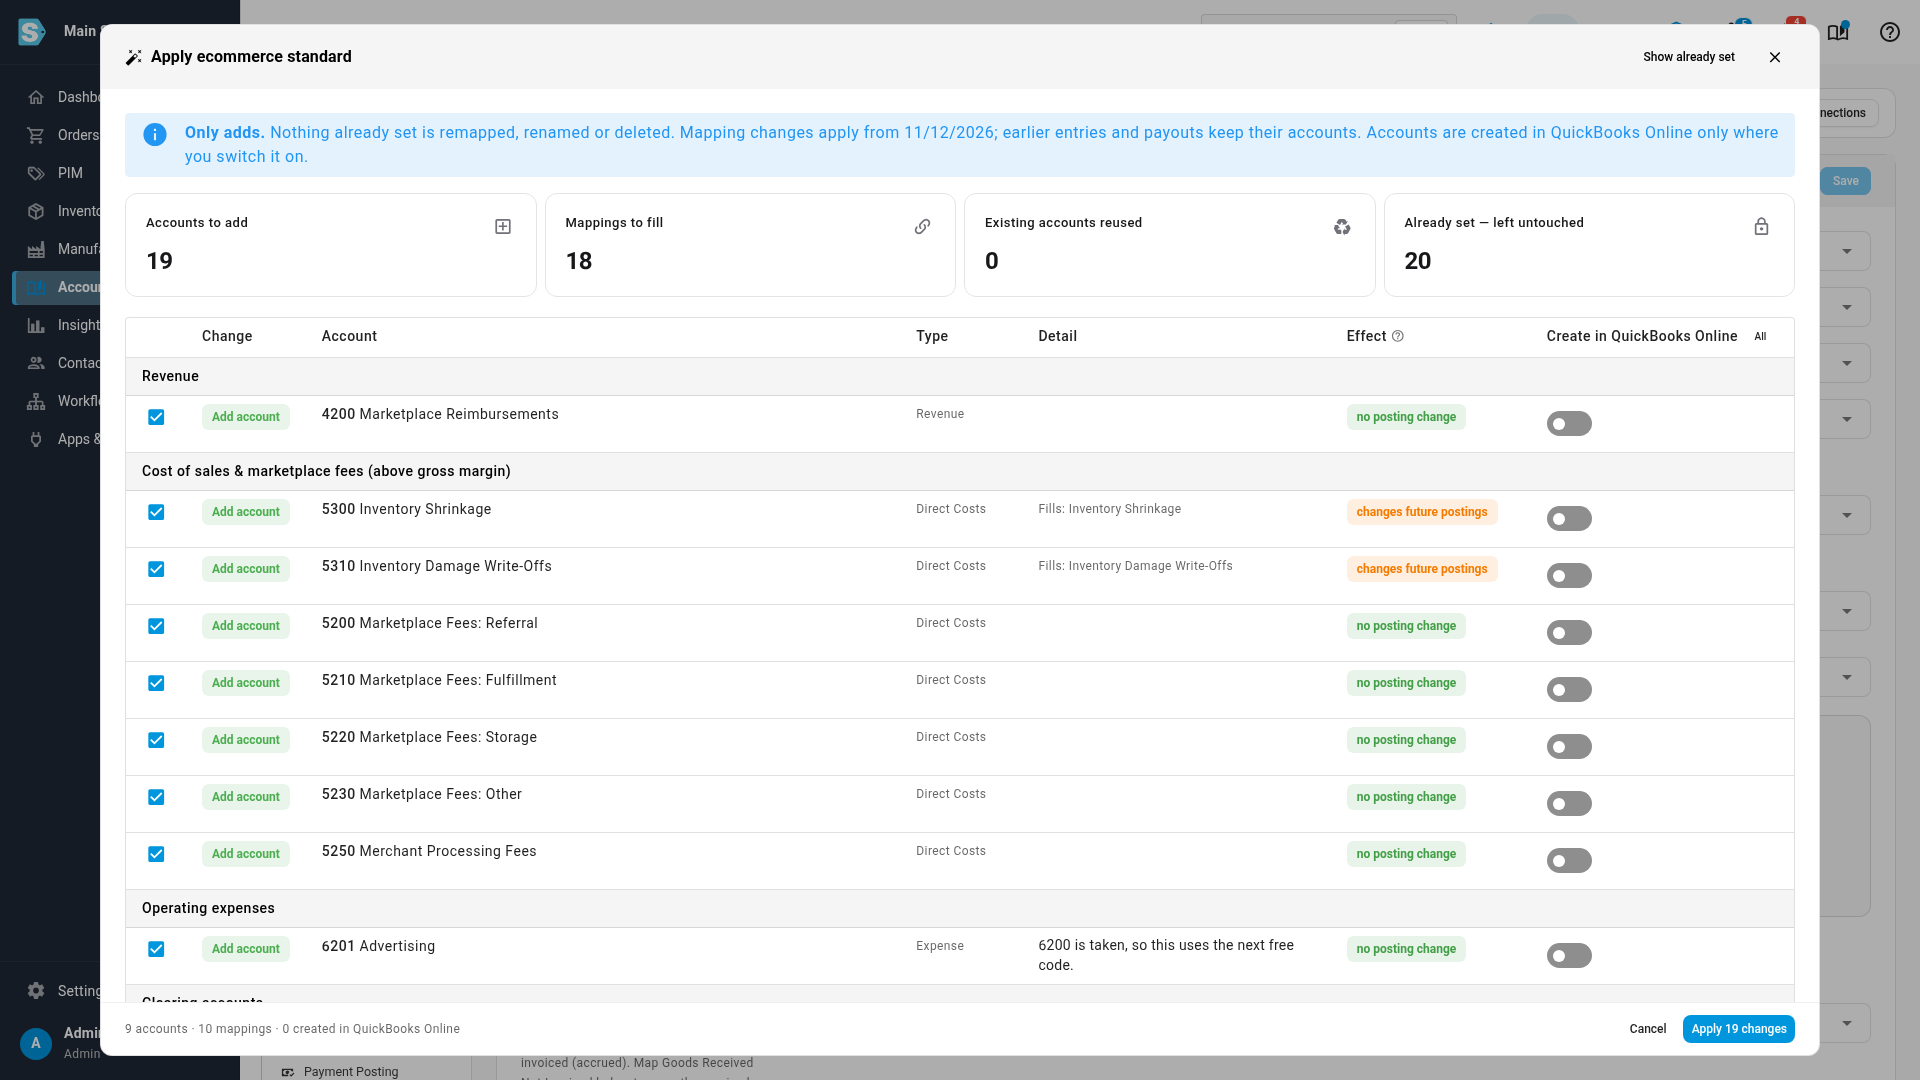
Below the cards, each row is one change, grouped by where it lands on your statements: Revenue, Cost of sales & marketplace fees (above gross margin), Operating expenses, Balance sheet, Clearing accounts, Purchasing, Payout mappings and Optional roles. Marketplace and processing fees are cost of sales, so your gross margin is what you keep after selling on each channel. Advertising stays an operating expense.
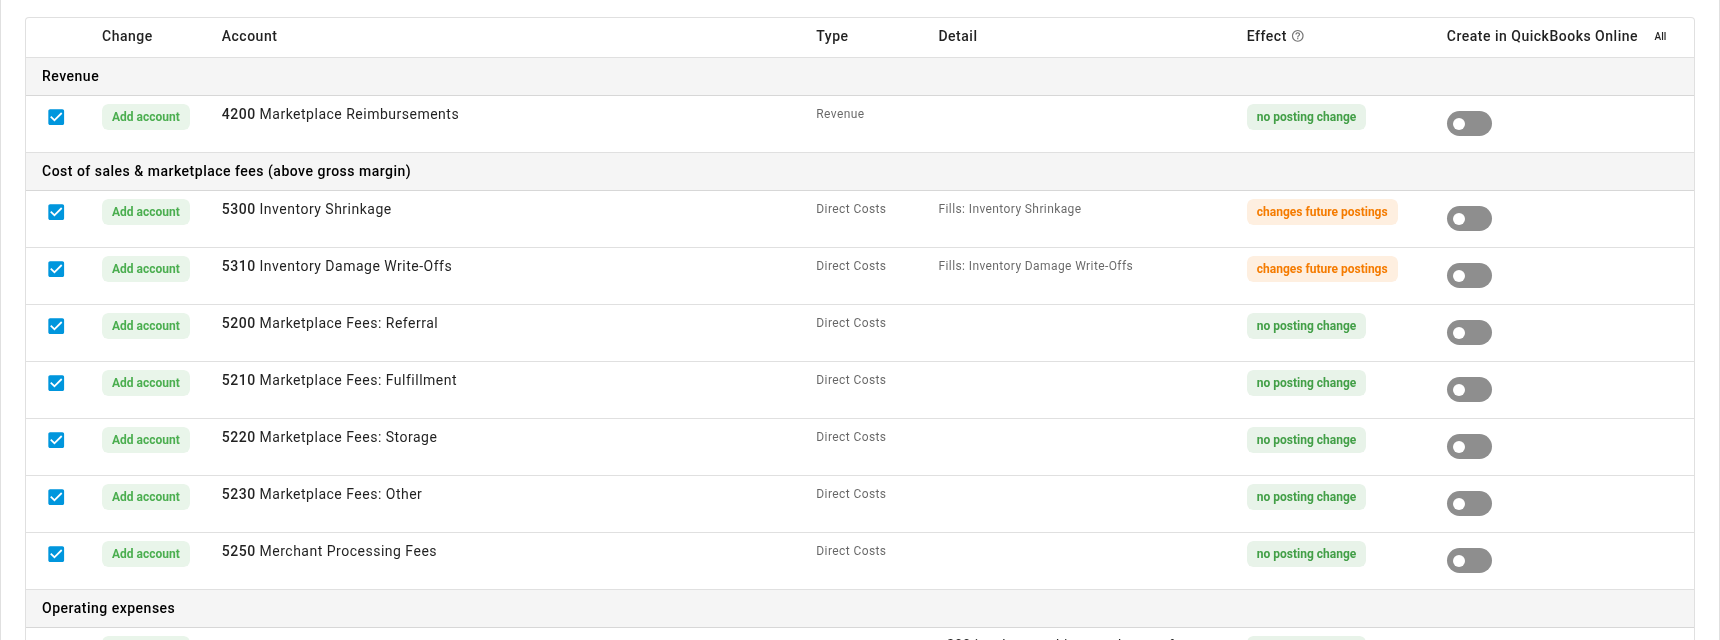
The Change column says what the row does:
| Change | Meaning |
|---|---|
| Add account | Creates the standard account. If its number is already taken, it uses the next free number, and the row says so. |
| Use existing | You already have a matching account. The row fills its empty mappings with it. |
| Possible match | You have an account with a similar name. Pick it from the list under the row to use it, or leave Create selected to add the standard account. SKU.io never picks a match for you. |
| Fill mapping | Points an empty payout mapping at a standard account. |
| Already set | Nothing to do. Shown only when you click Show already set. |
The Effect column says what ticking the row does to your books:
- no posting change: the account becomes available, and nothing posts to it until you use it.
- changes future postings: entries that post to another account today (or can't post at all) will post to this one from the date in the banner. Earlier entries keep their accounts.
Rows that start unticked
Most rows start ticked. A few start unticked on purpose, so you decide on them yourself:
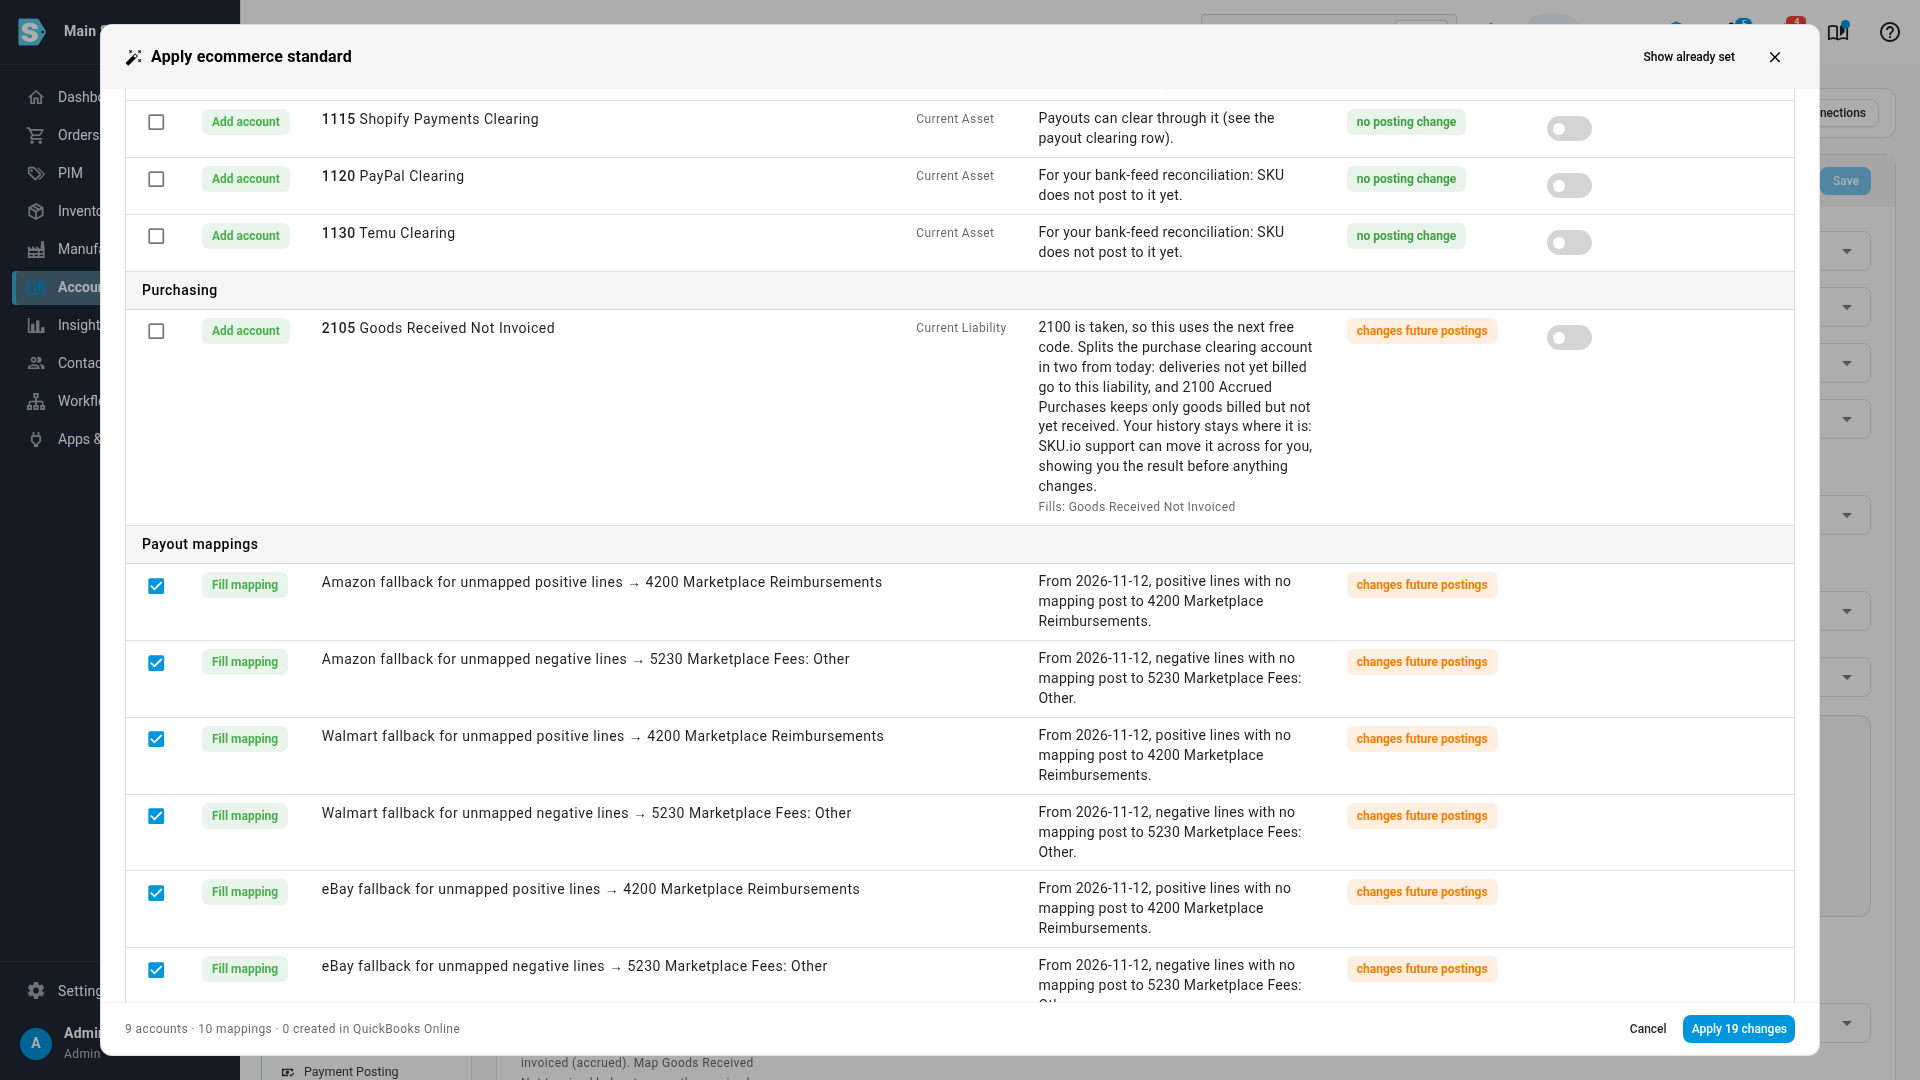
- Goods Received Not Invoiced (under Purchasing) splits your purchase clearing account in two from today: deliveries not yet billed go to this liability, and the existing account keeps only goods billed but not yet received. Your history stays where it is. SKU.io support can move it across for you, showing you the result before anything changes.
- Clearing accounts for each connected channel. For channels whose payouts can clear through their own account (eBay and Shopify), the matching payout clearing row under Payout mappings is unticked too. For the others, the account is only there for your bank-feed reconciliation: SKU.io doesn't post to it yet.
- Optional roles, which are only used once you switch on the feature they belong to.
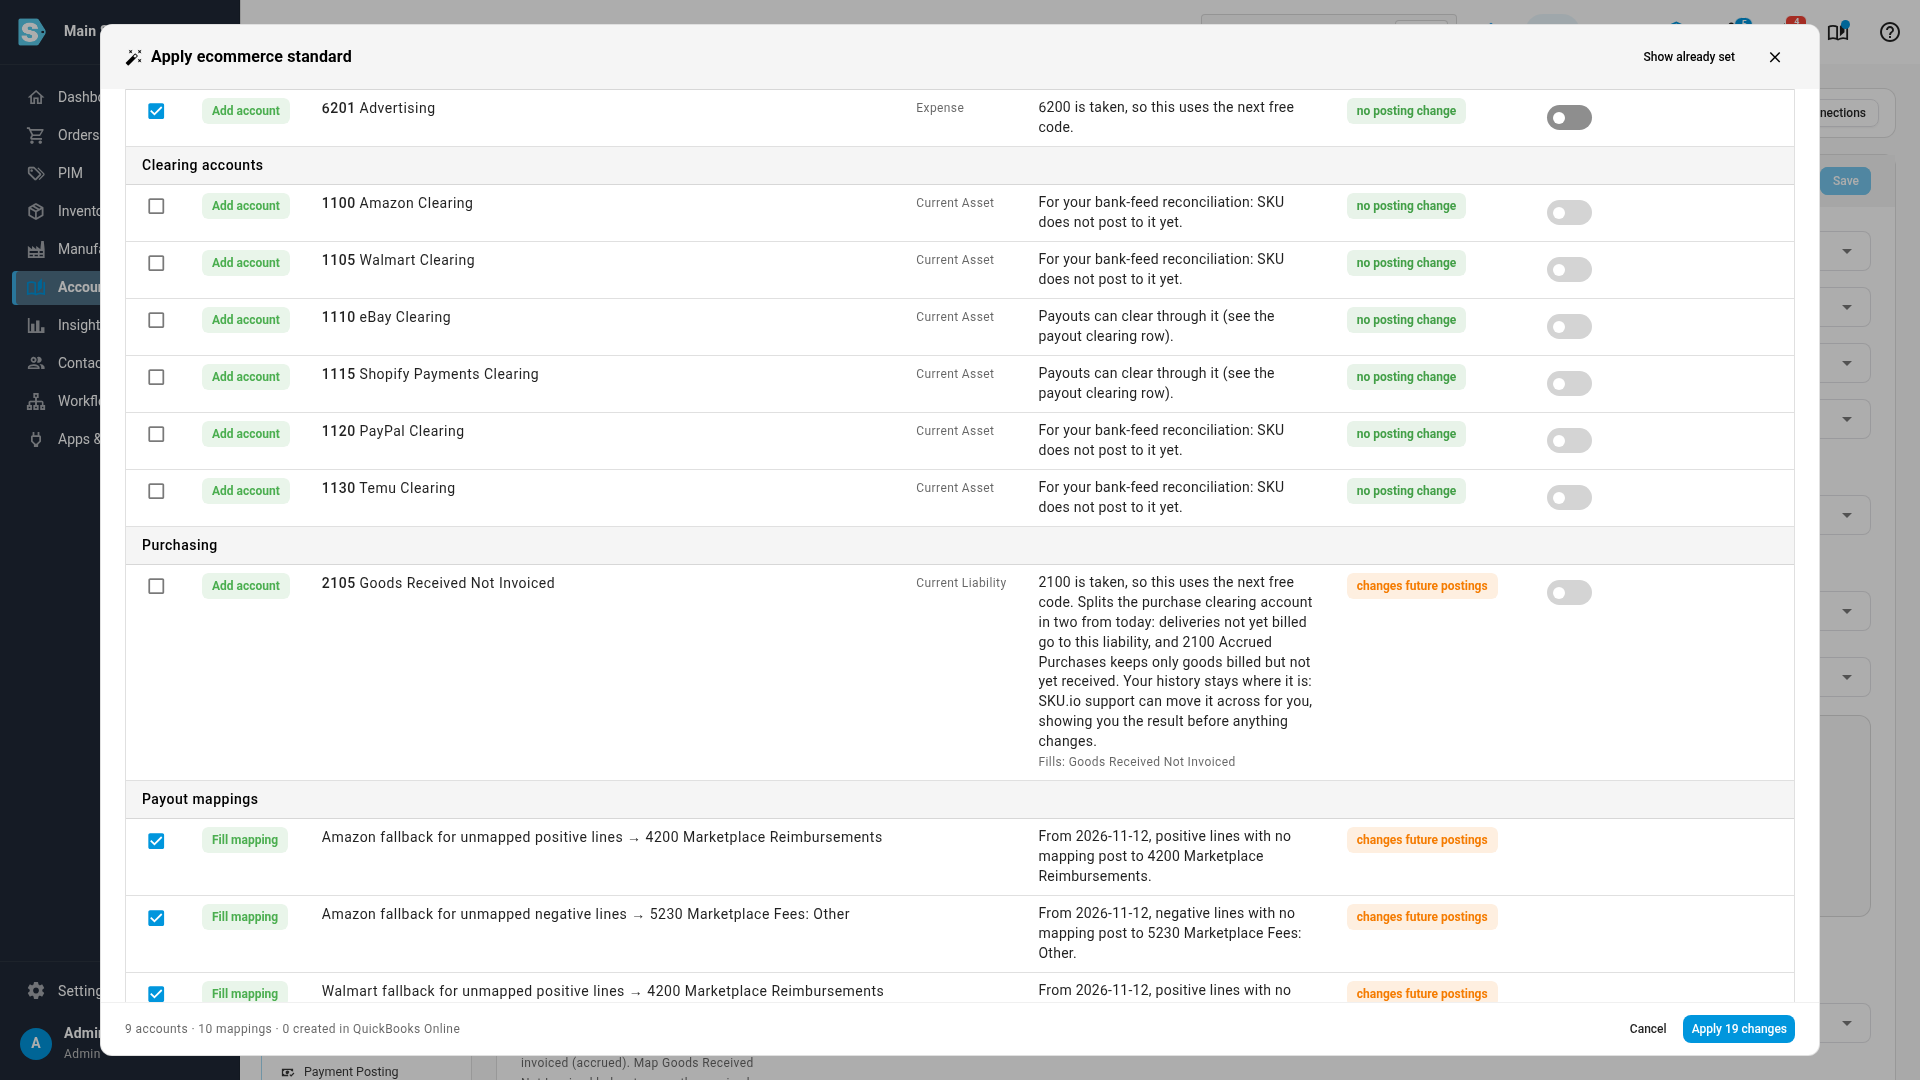
A payout row needs the account it posts to. If that account is one the standard would add, tick the account's row first; until then the payout row can't be ticked, and its tooltip tells you which account it's waiting for.
Payout mappings
For each connected channel, the standard fills the payout fallbacks that are still empty: payout lines with no mapping post to Marketplace Reimbursements when they're money in, and to Marketplace Fees: Other when they're money out, so they're easy to find and reclassify. Fee types SKU.io recognizes are mapped to the matching fee account. Fee types it doesn't recognize, and anything you've already mapped, are left alone.
What it leaves alone
Click Show already set at the top of the preview to see every setting the standard won't touch. When one of yours points at a different account than the standard suggests, the row says so and is Left as is. Click Hide already set to go back to the changes.
Create the accounts in Xero or QuickBooks Online
When Xero or QuickBooks Online is connected, the last column, Create in Xero or Create in QuickBooks Online, creates each new account there as well. Switch it on for the accounts you want to sync, or click All. An account you leave off still exists in SKU.io, and the warning below the table reminds you that its entries can't sync until a matching account exists in your books and is linked.
If creating an account there fails, the account still exists in SKU.io, and the result says which one failed and why.
Apply your changes
-
Tick the rows you want. The footer counts the accounts and mappings you've picked.
-
Click Apply in the bottom corner. The button shows how many changes you picked.
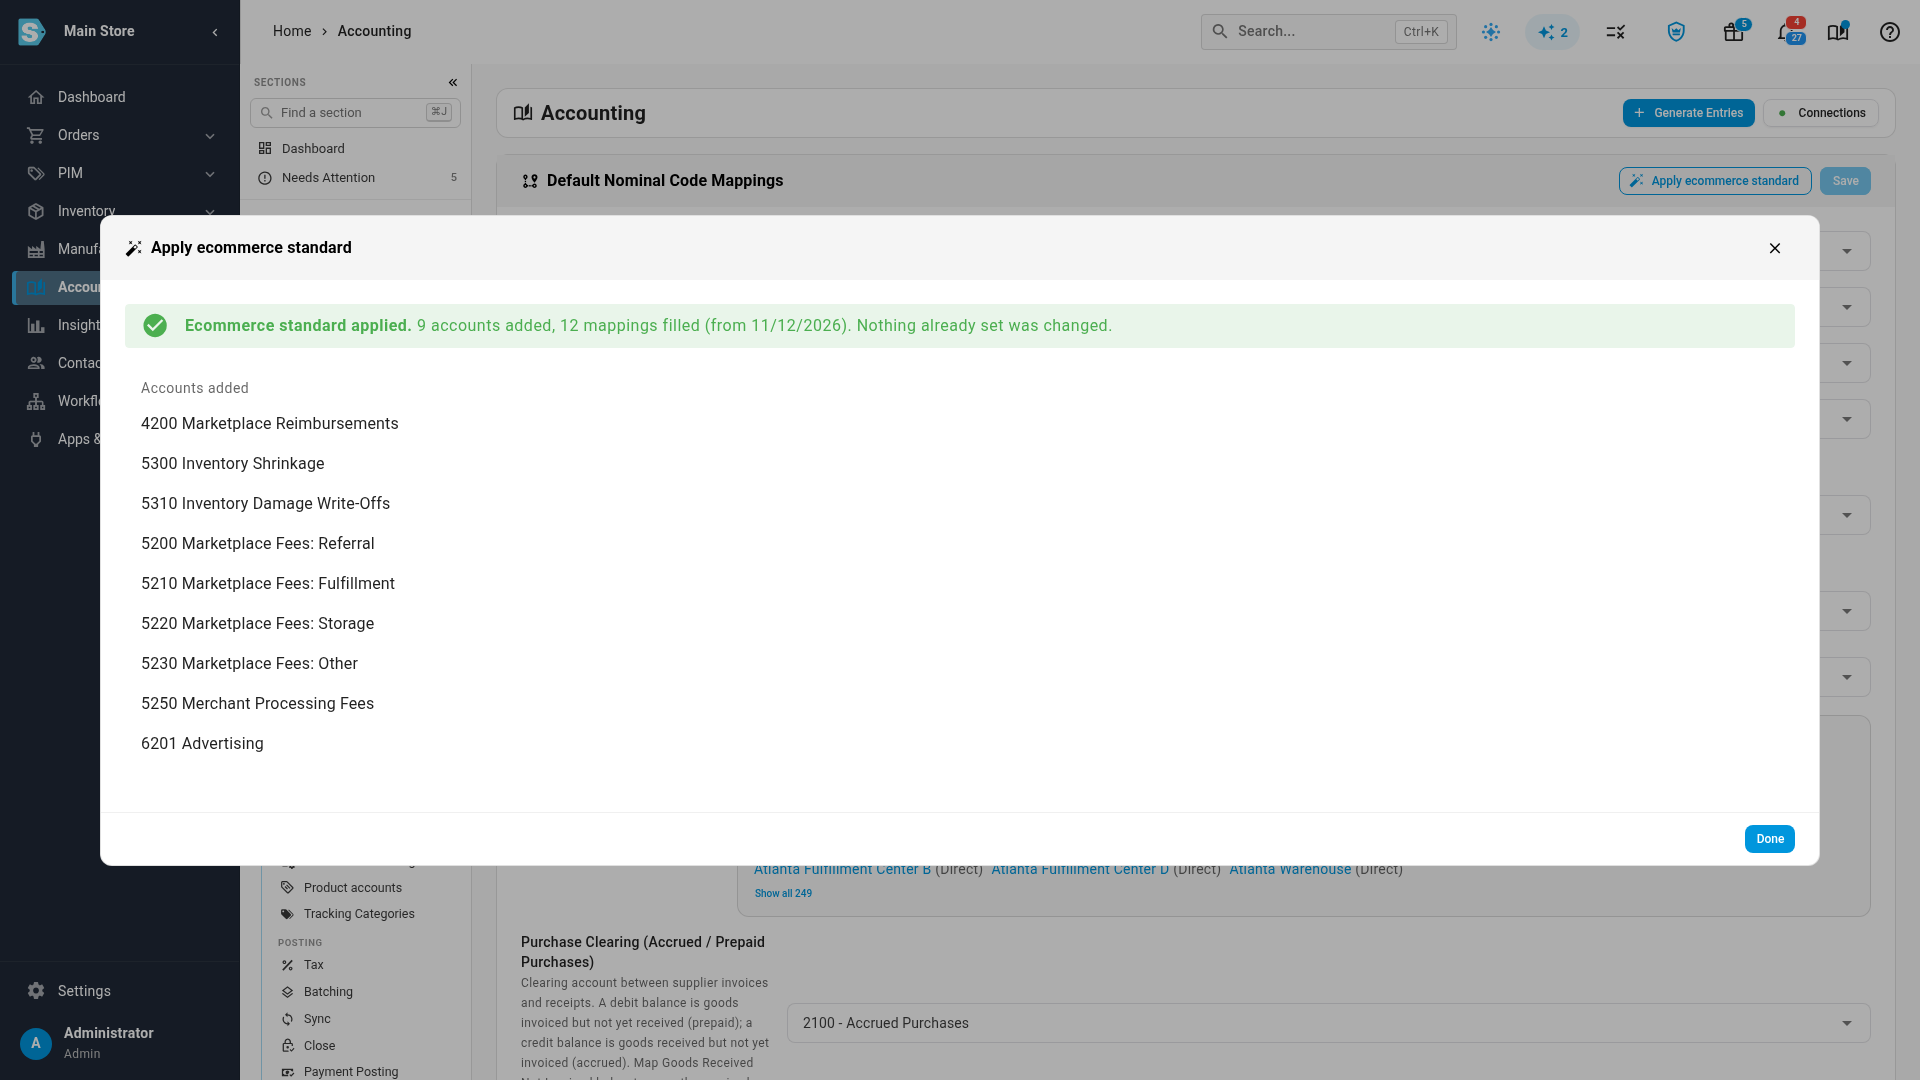
A message confirms how many accounts were added and how many mappings were filled, and from which date. Each new account is listed, so you can open it straight away.
-
Click Done.
If someone changed a mapping or added an account after you opened the preview, nothing is applied, and the preview asks you to refresh it. Click Refresh preview and tick your rows again.
When your chart already has everything, the preview says You already have everything in the ecommerce standard and there's nothing to apply.
Next steps
- Tag entries by channel with tracking categories to report by channel without a longer chart.
- Send inventory losses to their own accounts to see how the shrinkage and damage accounts are used.
- Chart of accounts reference for what posts to each account.
Video transcript
A general chart of accounts doesn't fit how an online seller makes money. The ecommerce standard adds the accounts and mappings a marketplace seller needs, and leaves everything you've set alone. To apply it, open Accounting from the left sidebar. Click Settings in the section list. When its list opens, look under Accounts and click Nominal Code Mappings. At the top of the panel, click Apply ecommerce standard. SKU.io compares your chart and mappings with the standard, and shows you a preview. Nothing changes until you click Apply. The blue banner sums up the rules. It only adds, so nothing already set is remapped, renamed or deleted. Mapping changes apply from the date shown, and earlier entries keep their accounts. The cards count the accounts to add, the mappings to fill, and the settings left untouched. Each row is one change, grouped by where it lands on your statements. Marketplace and processing fees sit in cost of sales, above gross margin. What a ticked row does to your books is in the Effect column. No posting change means the account simply becomes available. Changes future postings means entries that land elsewhere today move to this account from the date shown. A few rows start unticked on purpose, so scroll down to see them. Under Purchasing, Goods Received Not Invoiced changes how your purchases post, so that choice is yours. Clearing accounts are for your bank-feed reconciliation, so their checkboxes start empty. Under Payout mappings, the standard fills each channel's fallback for payout lines with no mapping. Money in goes to Marketplace Reimbursements. Money out goes to Marketplace Fees: Other, so it's easy to find and reclassify. To see what the standard leaves alone, click Show already set, at the top of the preview. Rows marked Already set keep the account you chose, even when it differs from the standard. Then click Hide already set, and only the changes are listed again. If you connect Xero or QuickBooks Online, the last column also creates each new account in your accounting software. Switch it on for the accounts you want to sync. Leave it off, and the warning below the table reminds you to link those accounts before their entries can sync. When the ticks look right, click Apply in the bottom corner. The button counts the changes you picked. A message confirms how many accounts were added and mappings filled, and from which date. Each new account is listed, with a link to its account page. Click Done to close the preview. Your new accounts are ready on Nominal Code Mappings, and nothing you set before has moved.