Set up the customer repair portal
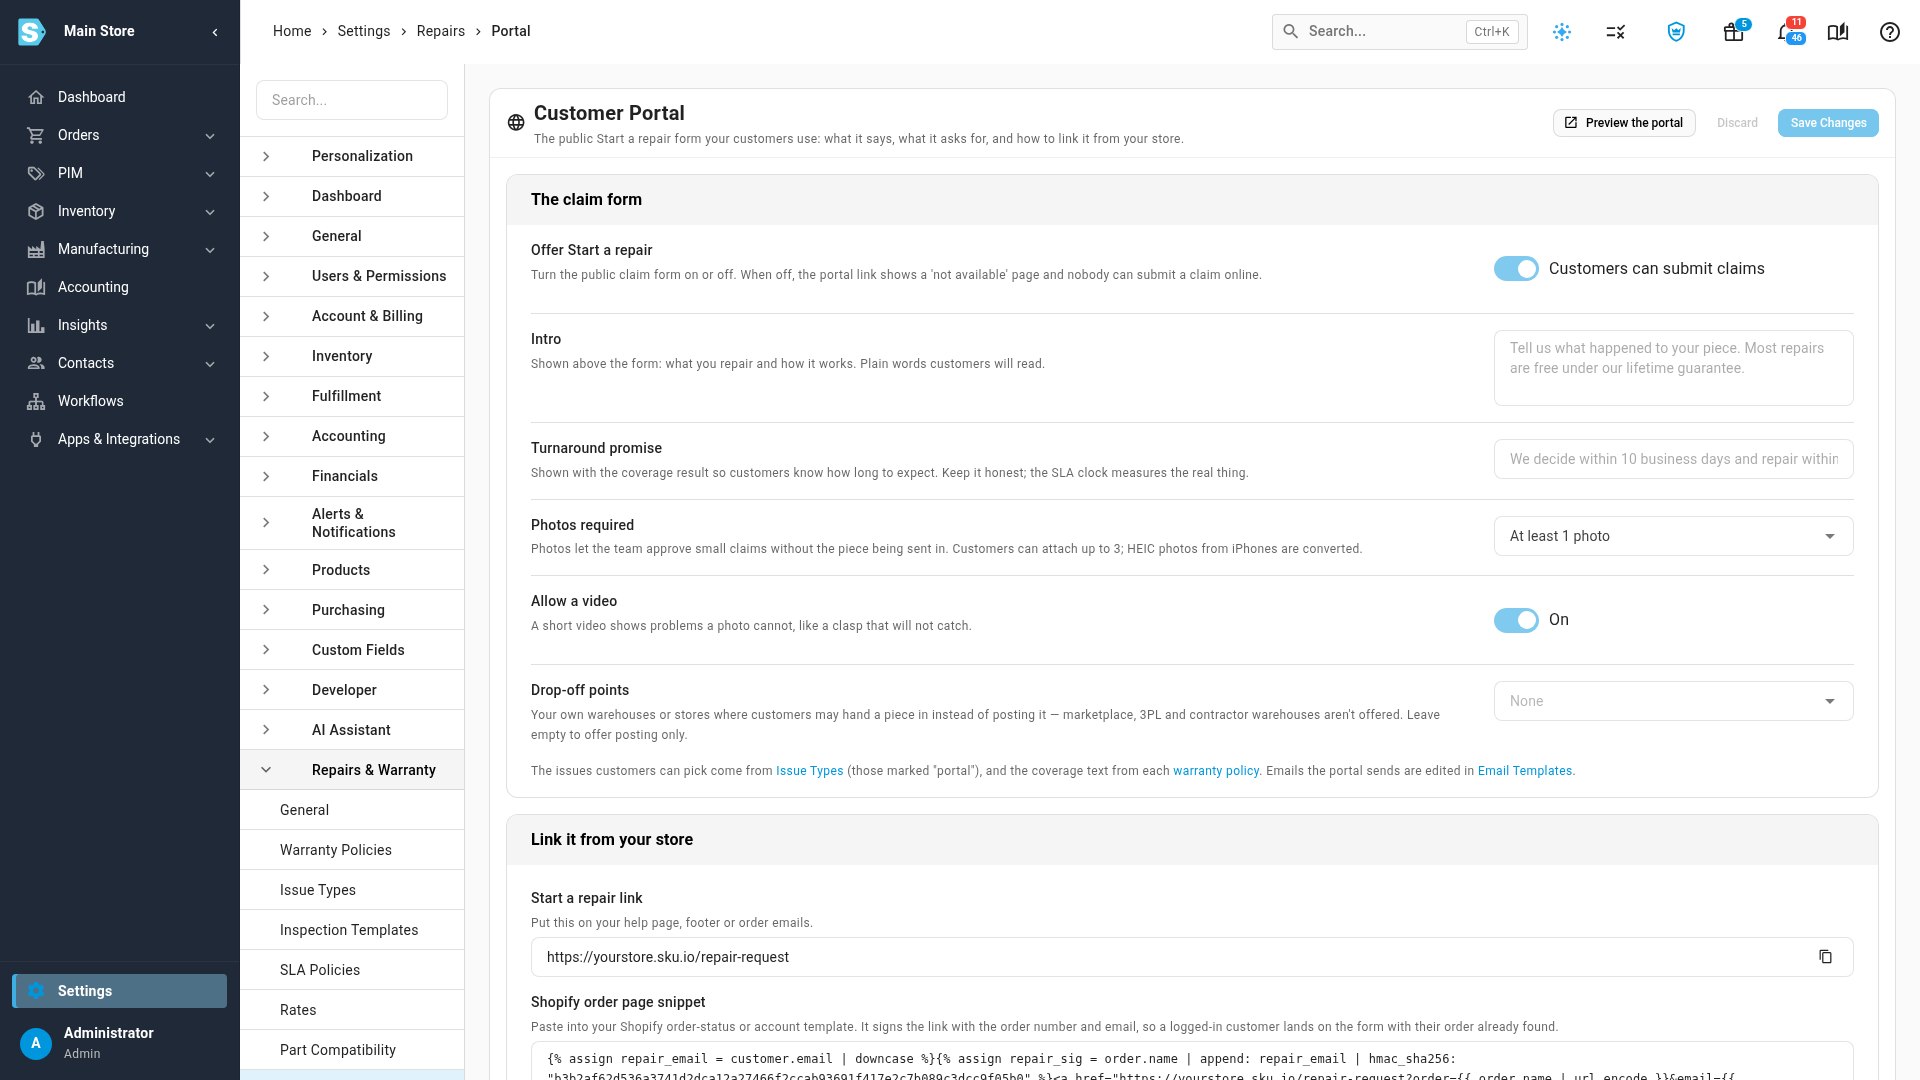
Settings → Repairs & Warranty → Customer Portal controls the public Start a repair form — the page your customers use to file a claim themselves, without emailing or calling you first. This guide turns it on, writes what it says, decides what you need from a customer before you'll look at their claim, and gets the link onto your own site.
Before you begin
- You need the Manage repair settings permission to change anything on this page. Without it, every field is visible but disabled, and you won't see the store embed link or snippet at all.
- Decide which issue types customers should be able to pick. Only the ones marked "portal" on Build issue types and inspection checklists appear on the form.
- Set up your warranty policies first — their coverage text is what a customer reads as they fill out the form.
Turn on and write the claim form
- Go to Settings → Repairs & Warranty → Customer Portal.
- Turn on Offer Start a repair. Its label switches between Customers can submit claims and Off — while off, the public page reads "Repair requests aren't open online. Please contact us by email and we'll help you with your piece." and nobody can submit a claim online.
- Write an Intro — shown above the form, in plain words about what you repair and how it works (placeholder: "Tell us what happened to your piece. Most repairs are free under our lifetime guarantee.").
- Write a Turnaround promise — shown alongside the coverage result, so customers know roughly how long to expect. Keep it honest: the real SLA clock measures the actual turnaround, independently of what you promise here.
- Click Save Changes. It stays disabled until something has changed, and for anyone without the Manage repair settings permission its tooltip reads "You need the Manage repair settings permission to change the portal."
Decide what you need from a customer
Still on the same page:
- Photos required — No photo needed, At least 1 photo, At least 2 photos, or 3 photos. Photos let you approve small claims without the piece being mailed in first; HEIC photos from iPhones are converted automatically. A customer can attach up to 3 photos regardless of the minimum you set.
- Allow a video — on lets a customer attach a short video too, useful for a problem a photo can't show, like a clasp that won't catch.
- Drop-off points — pick the warehouses or stores where a customer may hand a piece in instead of posting it. Only your own warehouses and stores are offered — marketplace, 3PL and contractor warehouses aren't, since a customer can't walk in there. Leave it empty to offer posting only.
Click Save Changes again to apply these.
A caption under the card points at where the rest of the form's content comes from: issue types marked "portal", each warranty policy's own coverage text, and the emails the portal sends — edited in Email Templates.
Link it from your store
The Link it from your store card is visible only with the Manage repair settings permission:
- Copy the Start a repair link — put it on your help page, footer, or order emails.
- Copy the Shopify order page snippet and paste it into your Shopify order-status or account template. It signs the link with the order number and email, so a logged-in customer lands on the form with their order already found.
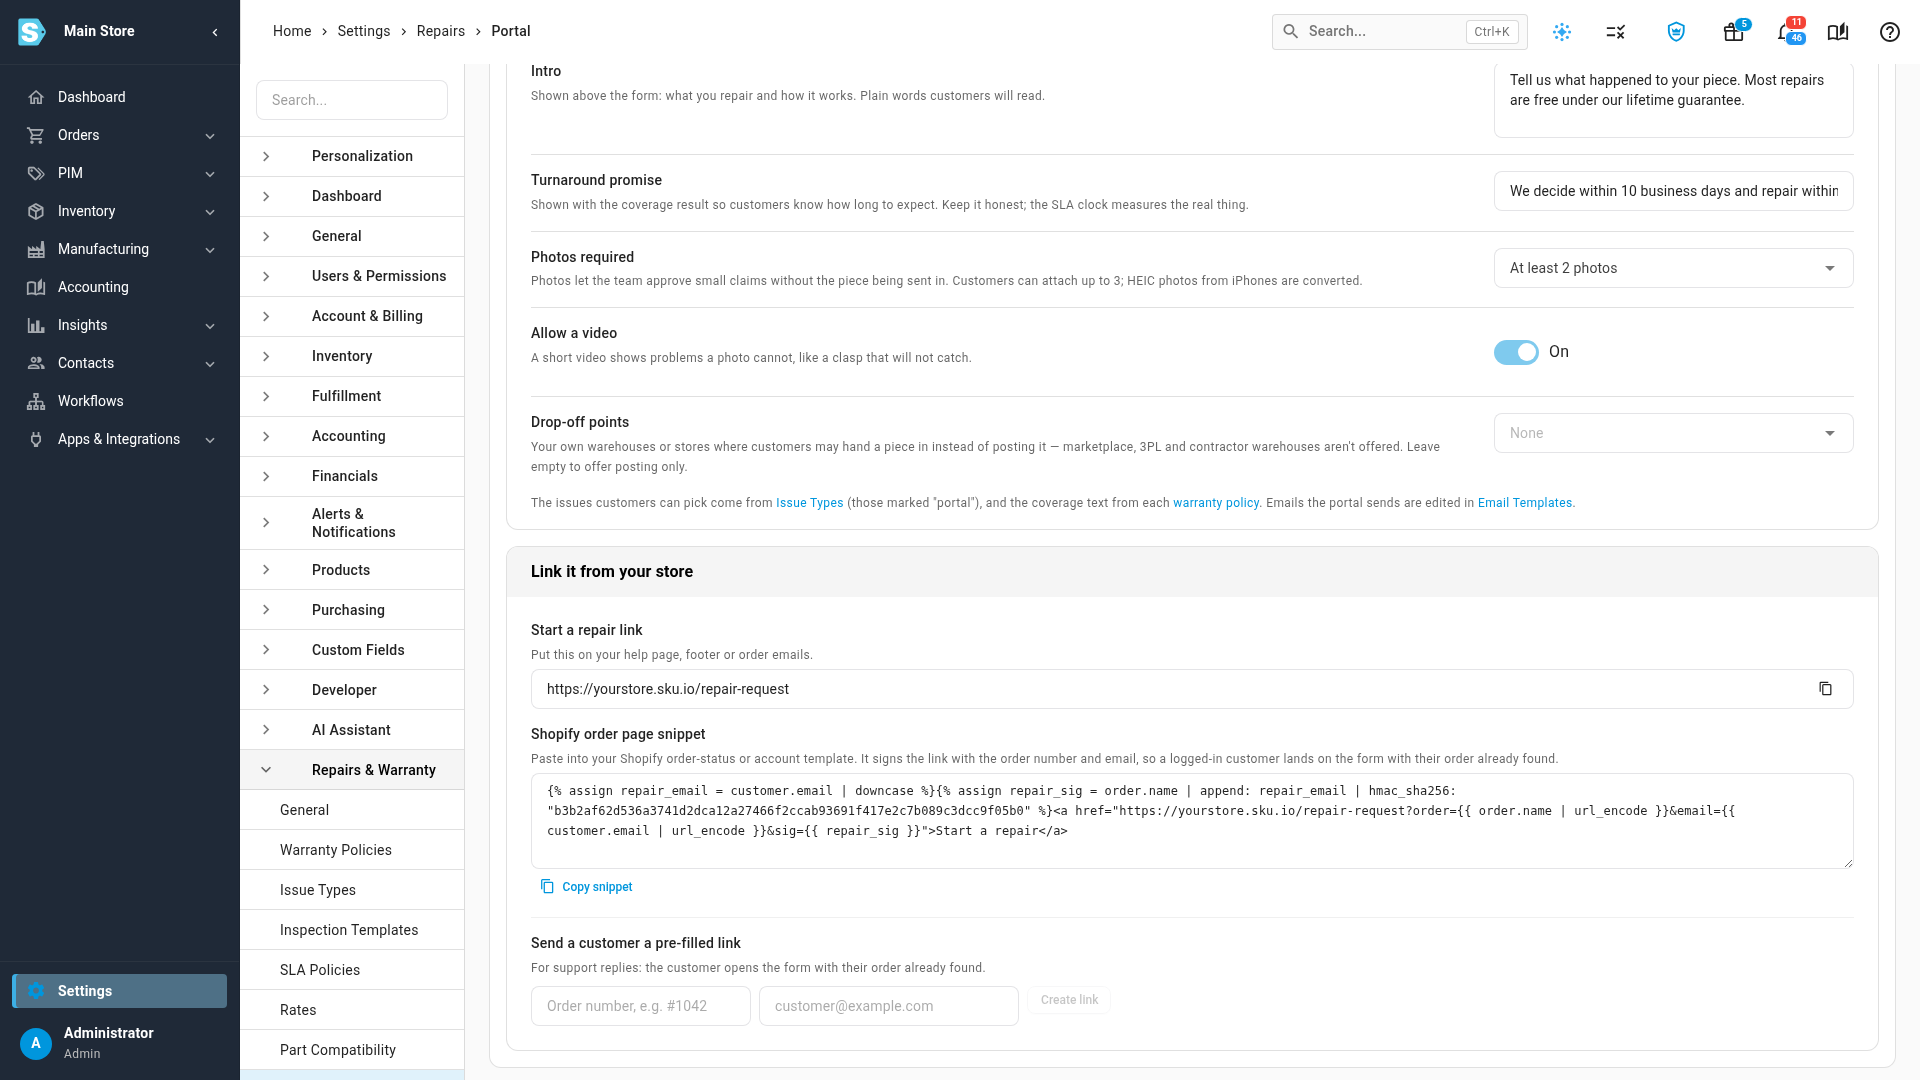
Click Preview the portal, at the top of the page, to open the live form in a new tab and see exactly what a customer sees.
Send one customer a pre-filled link
Under Send a customer a pre-filled link — handy for a support reply:
- Enter the customer's order number and email.
- Click Create link. It stays disabled until both fields are filled in, and the tooltip names exactly what's missing — "Enter the order number." or "Enter the customer's email address."
- Copy the link it returns and send it to the customer. The form opens with their order already found, ready for them to pick pieces and continue.
Next steps
- Request a repair from the public claim form — see the form your customers actually fill out.
- Connect a returns or warranty app — take in claims from a help desk or another tool too.
- Build issue types and inspection checklists — choose which issues show up on the portal.
- Set up warranty policies — write the coverage text customers see as they fill out the form.
- Customize your email templates — edit the wording of every email the portal sends.
Video transcript
The customer portal is a public repair form for your customers. To set it up, open Settings, at the bottom of the left-hand menu. Click the Repairs and Warranty card to list its pages. Then scroll down, and click Customer Portal to open the portal's settings. Everything the form says and asks for lives on this one page. Offer Start a repair turns the public form on or off for every customer. Leave it on, so shoppers can file claims on your website. In the Intro box, describe your repair service and its process in plain words. This text appears above the form. Then write a Turnaround promise, the time to a decision and a repair. Next, decide what a customer must send before you look at a claim. Start with Photos required, the minimum number of photos per request. Open the list, and choose the count that fits your repair service. Photos let you approve small claims without the piece in hand. Allow a video lets customers add a short clip for a hidden fault. Drop-off points lists only your own warehouses and stores, for in-person drop-offs. Leave it empty to offer posting only, so every piece arrives by mail. Click Save Changes, at the top right of the page. A green message then confirms the saved portal settings. Scroll down to the Link it from your store card. Copy the Start a repair link for your help page or footer. Paste the Shopify order page snippet into your order-status template. It signs the link, so a logged-in customer lands on their own order. For a support reply, you can send one customer a pre-filled link. Type the order number into the first box on the left. Then type the buyer's email address into the second box of the row. Click Create link to build a signed link for that order. A new address then appears under the boxes. Copy the new link, and paste it into your support reply.