Connect a returns or warranty app
Settings → Repairs & Warranty → Claim Sources (the breadcrumb reads Home > Settings > Repairs > Claim Sources) takes in claims from places besides your own portal: a help desk, a form tool, a returns/warranty app, or your own system through the API. However a claim arrives, it becomes a repair in Requested, ready for triage — and sending the same claim twice updates that repair instead of creating a second one.
Before you begin
- You need the Manage repair settings permission to open this page at all — without it you'll see "You need the Manage repair settings permission to connect claim sources." and nothing else.
- Set up your issue types and warehouses first if you plan to map the app's own reasons and locations onto them.
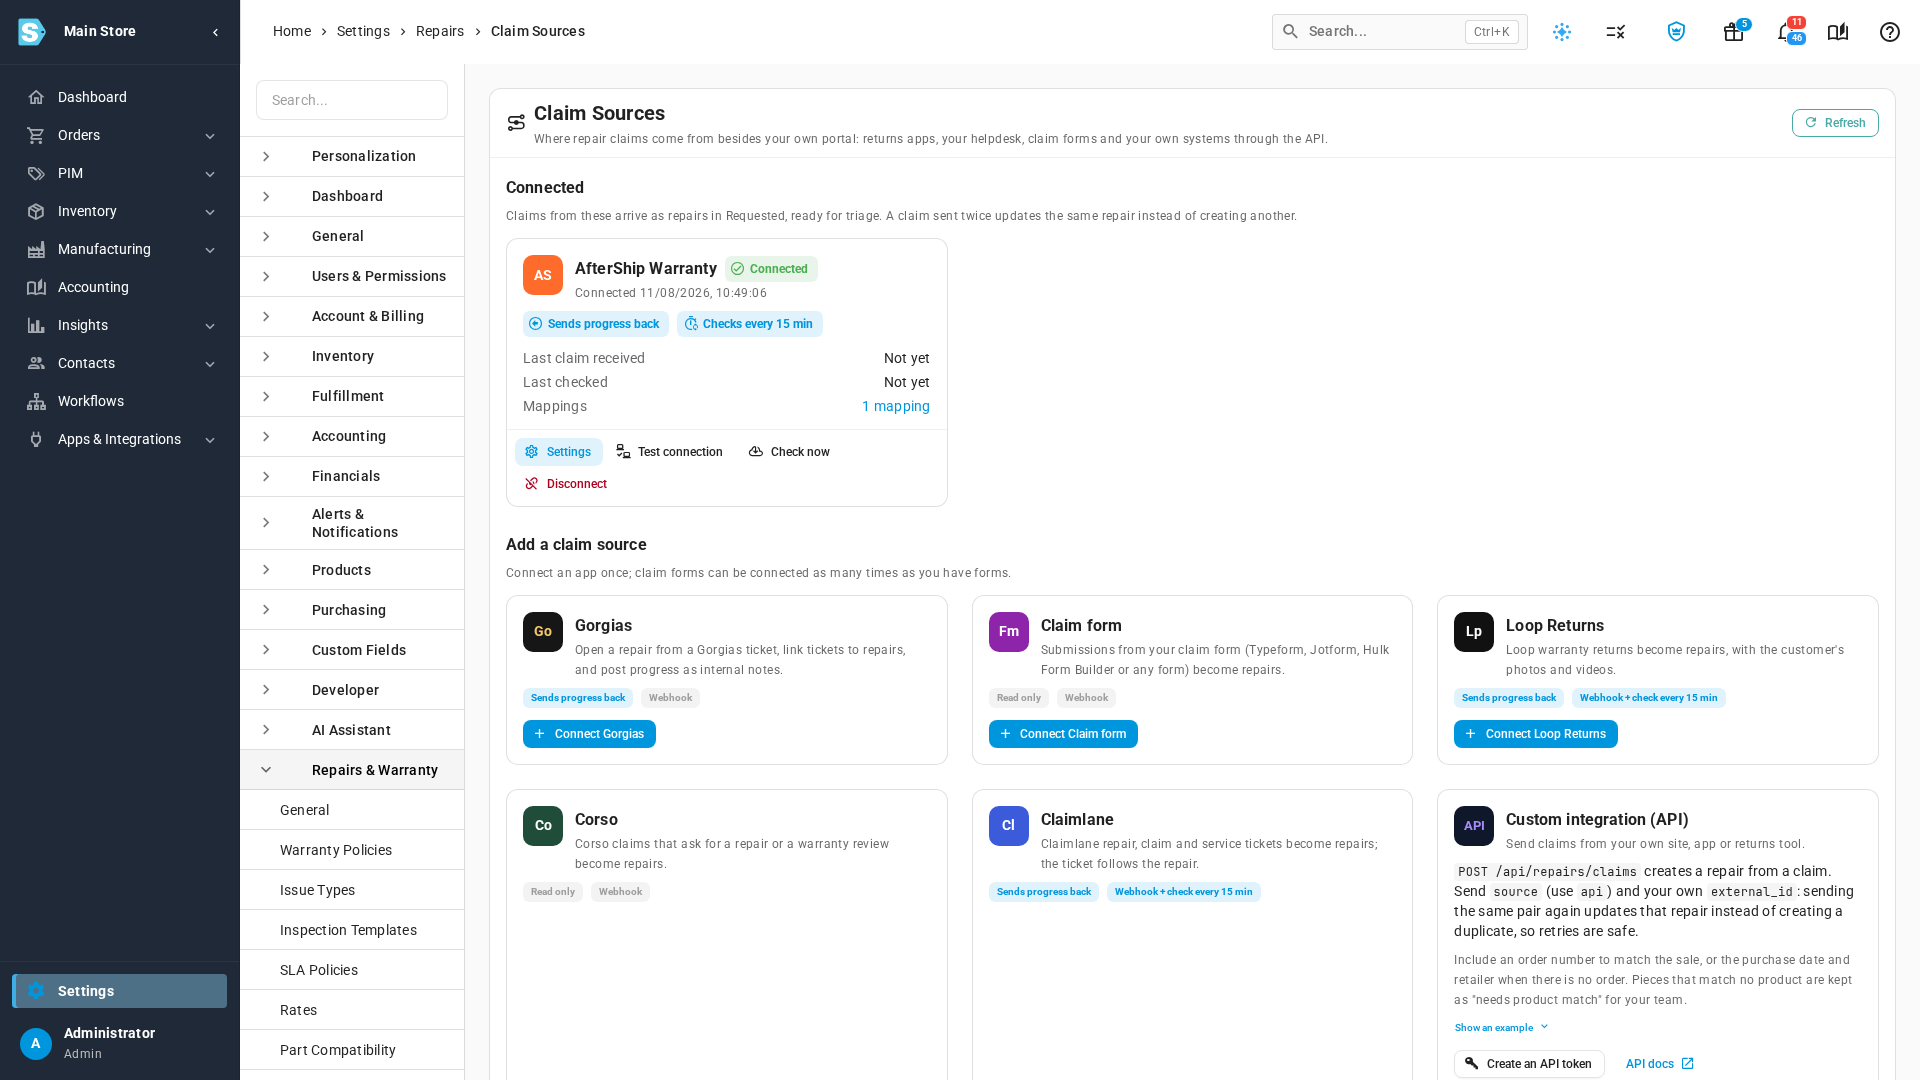
Add a claim source
- Go to Settings → Repairs & Warranty → Claim Sources.
- Under Add a claim source, click Connect on the app you use — Gorgias, a Claim form (Typeform, Jotform, Hulk Form Builder, or any other form tool), Loop Returns, AfterShip Warranty, Corso, or Claimlane — or scroll to Custom integration (API) to send claims from your own system instead. These same apps are also listed on the main Integrations page, where Connect opens this same drawer.
- Nothing connected yet? Two quick-start buttons — Connect Gorgias and Connect {claim form} — cover where most jewelry brands start.
A claim form can be connected more than once, with Add another form — one connection per form you run.
Each app differs in what it can do once connected:
| App | Sends your progress back? | Checks for missed claims? |
|---|---|---|
| Gorgias | Posts every status, stage, outcome, and tracking change as an internal note on each linked ticket — never shown to the customer. | No. Gorgias sends a claim only when an agent runs a macro or HTTP integration, so there's nothing to check for. |
| Claim form | No — a form only sends submissions; customers follow their repair on the status page instead. | No — the form posts each submission as it happens. |
| Loop Returns | Adds the repair's progress as notes on the Loop return, and closes it (no refund, no restock) when you close the repair. | Yes, every 15 minutes. |
| AfterShip Warranty | Approves, receives, rejects, or resolves the claim to match the repair, and attaches your return label's tracking. | Yes, every 15 minutes — though AfterShip only lists claims by creation date, so this catches new claims, not edited ones. |
| Corso | No — Corso's API is read-only for claims; the repair's status lives in SKU.io and on the customer's own status page. | No — Corso can't list claims by date, so claims arrive by webhook only (Corso retries a failed delivery 5 times over 24 hours). |
| Claimlane | Moves the claim status to match the repair (set in Mappings), adds an internal note, and messages the consumer with return tracking. | Yes, every 15 minutes. |
Custom integration (API)
Send claims from your own site, app, or returns tool through the API instead, tagging each one with your own reference so sending the same claim again updates that repair rather than creating a duplicate — safe to retry. Include an order number, a Shopify or Amazon order reference, or your own order number to match the sale, or a purchase date and retailer when there's no order on file; a piece that matches no product is kept as needs product match for your team. When there's no order to match but you did send a purchase date, source, or retailer, that piece is registered automatically as a pending warranty registration, so someone on your team still has a purchase to verify it against. Any photo or receipt links you send are downloaded onto the repair in the background, after the claim is created.
Identify each claimed piece with whichever of these you have — a SKU.io product ID, a SKU, a barcode, the channel's own listing ID, or the product's exact name — and SKU.io tries them in that order, using the first one that finds a match. Nothing is invented: a piece that matches none of them becomes needs product match, carrying the text you sent, instead of guessing.
Click Show an example to see a sample request right on the card, and API docs to open the full reference at developer.sku.io. Click Create an API token, which needs the repairs:write scope — see Create a personal access token and the API scopes reference.
A connected app's claims arrive this same way, by webhook, the moment the app sends them — Check for missed claims (below) is only a backstop for a webhook that failed to arrive, not the main path.
Connect an app
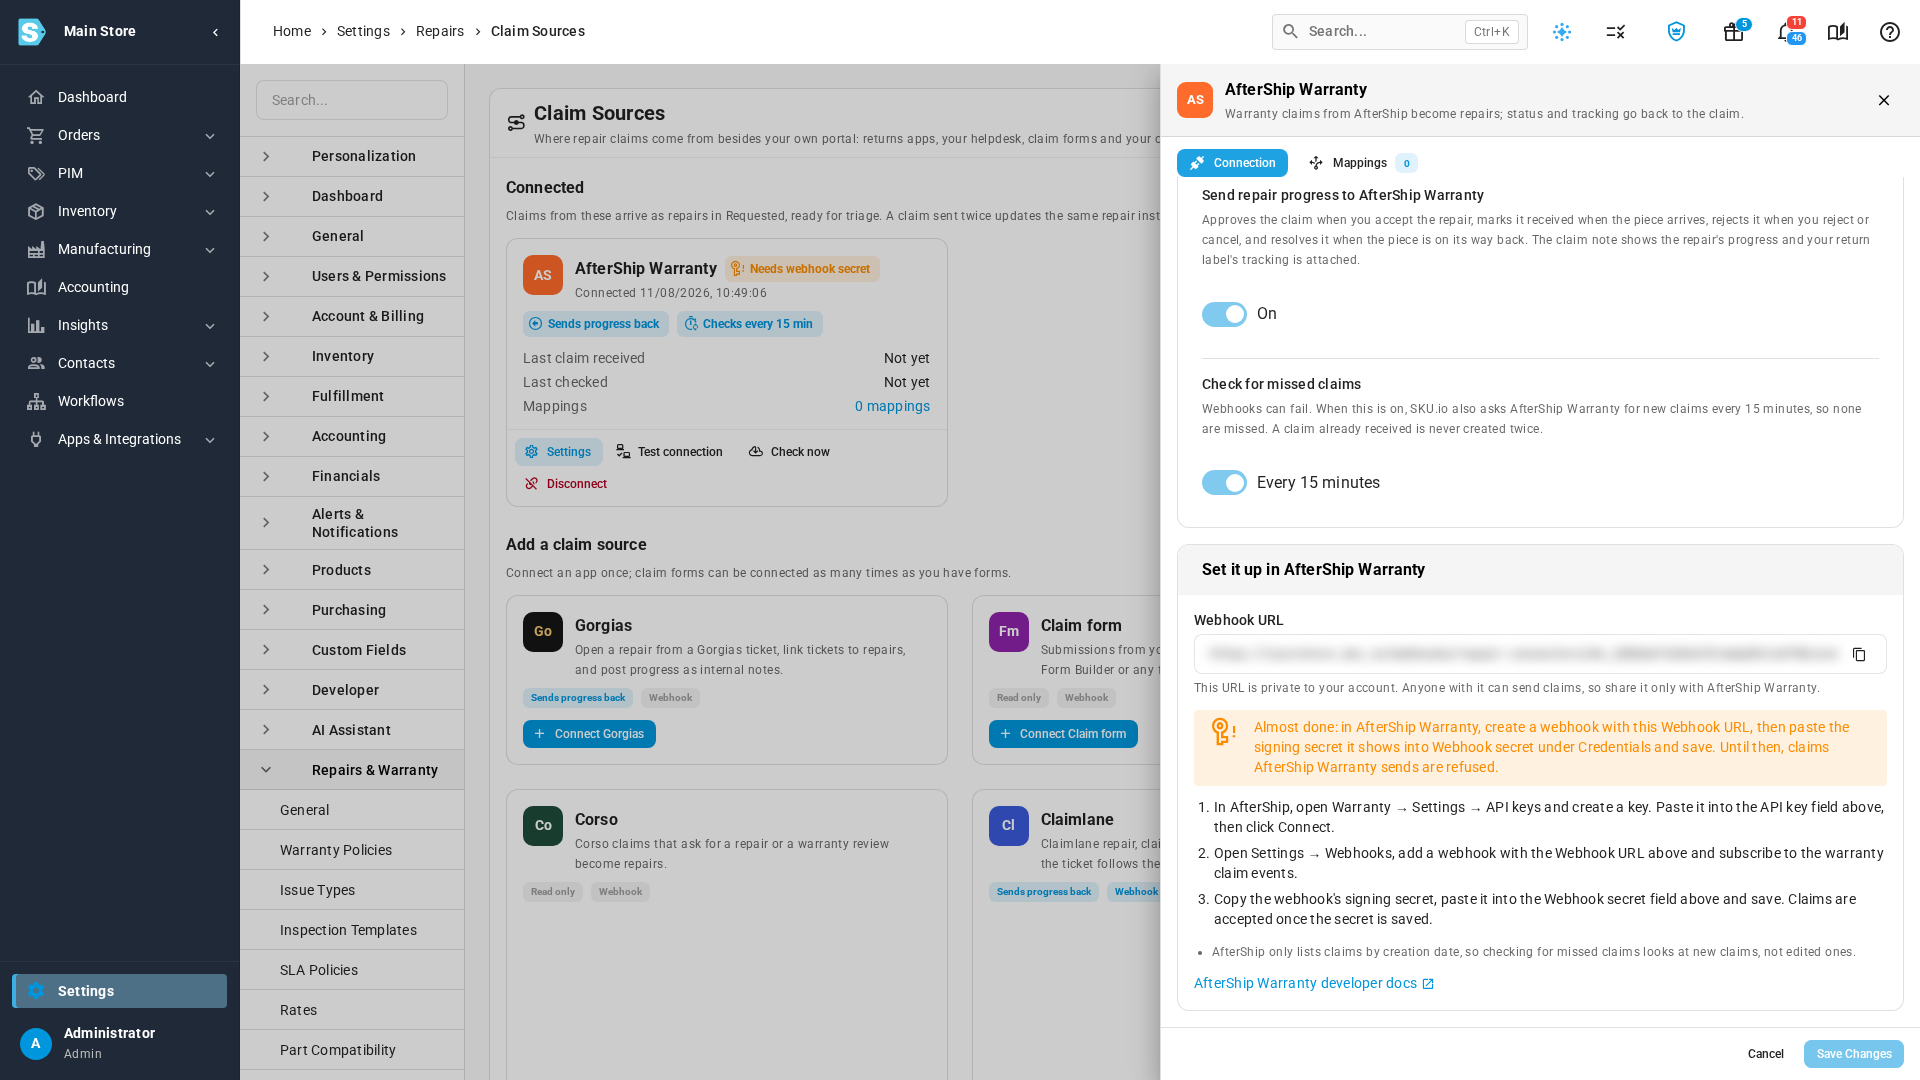
- Click Connect (or Settings on an app you've already connected). The drawer opens with a Connection tab, a Form fields tab for a claim form, and a Mappings tab once the app is connected.
- For a claim form, pick Which form tool? first — Typeform, Jotform, Hulk Form Builder, or Other form. Each one's own setup steps appear below once chosen.
- Give the connection a Name — it's shown on every repair that comes from it.
- Enter each required credential the app asks for, such as an API key (Corso asks for a client ID, client secret, and API audience instead). A secret field is masked; click its eye icon to check it, and a saved value shows a Saved chip — leave it blank to keep what's already stored.
- Where the app supports it, turn Send repair progress to {app} and Check for missed claims on or off. Either switch is replaced with a chip explaining why it's unavailable when the app can't do it.
- Click Connect. It stays disabled until every required credential is filled in — the tooltip names exactly which ones. The drawer stays open on the new connection, its button becomes Save Changes, and the Mappings tab is ready to open.
- Copy the Webhook URL from Set it up in {app} and follow its numbered setup steps — each app's own, down to the exact header or body it expects. The URL only appears once you've connected; before that the section reads "Connect first: your private webhook URL appears here." This URL is private: anyone who has it can send claims, so share it only with that one app.
Finish with the app's webhook secret (AfterShip Warranty, Loop, and Corso)
AfterShip Warranty, Loop Returns, and Corso create the webhook's signing secret themselves, and only once you've added a webhook with SKU.io's Webhook URL. So for these three, you connect first and add the secret afterwards — Webhook secret isn't required to click Connect.
Right after you connect, an orange banner appears in the Set it up in {app} card, directly under the Webhook URL: "Almost done: in {app}, create a webhook with this Webhook URL, then paste the signing secret it shows into Webhook secret under Credentials and save. Until then, claims {app} sends are refused." The app's card on Claim Sources shows a Needs webhook secret chip until then.
- In the app, create the webhook with the Webhook URL, as its setup steps describe.
- Copy the signing secret the app shows, and paste it into Webhook secret.
- Click Save Changes. A confirmation names the connection — for example "The claim source 'AfterShip Warranty' updated successfully" — the banner goes away, the card's chip changes to Connected, and claims the app sends are accepted from now on.
For Gorgias and a claim form, you choose the Webhook secret yourself before connecting (Claimlane calls it the Webhook API key) — type one in, or click Generate one — and enter the same value in the app.
A claim form's own tab
On a Claim form connection, the Form fields tab matches your form's field keys, refs, or question titles to SKU.io's own fields — customer email, order number, piece, SKU, quantity, service requested, issue, description, return address, photos, and more. Leave a row blank and SKU.io guesses from common names instead, shown greyed as a placeholder; list more than one key and the first one with a value wins.
Below it, Defaults for every submission sets the receiving warehouse, where it was bought, and how the piece arrives, used whenever the form itself doesn't say.
Map reasons, locations, and statuses
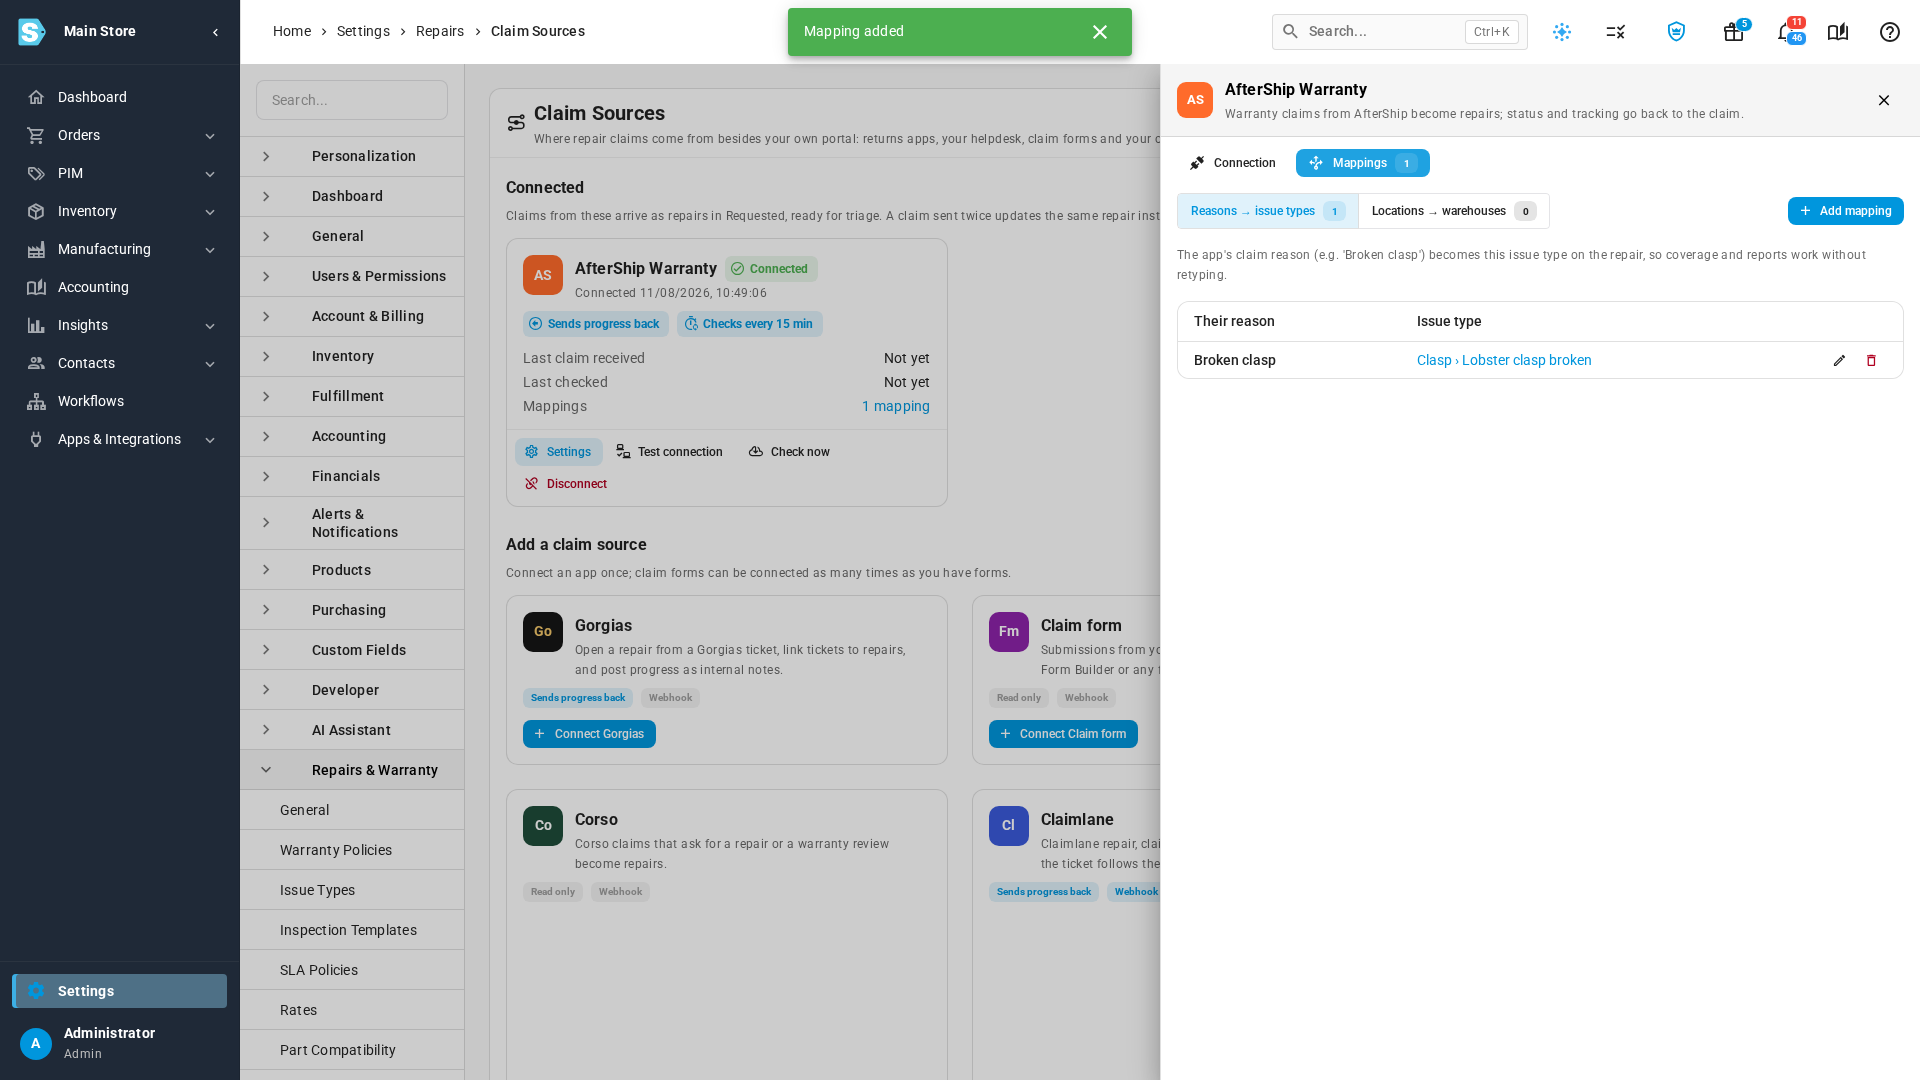
Once an app is connected, open its Mappings tab:
- Reasons → issue types — the app's own reason text, for example "Broken clasp," becomes this issue type on the repair. Matching ignores upper and lower case. An unmapped reason is kept as the unit's description instead, and the bench picks the issue type at diagnosis.
- Locations → warehouses — the app's return location or destination decides which warehouse receives the piece. Unmapped claims go to your default repair warehouse.
- Statuses → their status (Claimlane only) — when the repair reaches the status or stage you choose, Claimlane's claim status updates to the value you enter. Without a mapping, the ticket's status in Claimlane doesn't change, but notes still post.
Click Add mapping, type the app's own value exactly as it sends it, pick the SKU.io target, and click Add. Delete removes a mapping without touching repairs it already created.
Test, check, and disconnect
On a connected app's card:
- Settings reopens the drawer.
- Test connection confirms your credentials are valid. It's disabled, with a tooltip, for a claim form — "A form sends submissions to SKU.io, so there is nothing to test from here. Send a test submission from your form instead."
- Check now asks the app for new claims right away, instead of waiting for the next automatic check. It's disabled, with a tooltip, for a webhook-only app. Check now doesn't appear in the job tray — the only confirmation it ran is a toast, the card's Last checked time updating after you refresh the page, and any new claims showing up in the Repairs list.
- Disconnect is confirmed with a warning: new claims stop arriving, progress stops being sent back, repairs already created are kept, and the webhook URL stops working — reconnecting issues a new one.
The Checks every 15 min / Checking off / Webhook only chip on each card shows whether the automatic check is on, off, or not offered at all; turning it off only stops the automatic schedule — Check now still works regardless.
Next steps
- Set up the customer repair portal — your own claim source, the public claim form.
- Find and manage repairs — where a connected app's claims show up to triage.
- Build issue types and inspection checklists — the issue types a reason mapping points to.
- Create a personal access token — mint the token the API needs.
- API scopes reference — what
repairs:writeand other scopes unlock.
Video transcript
Claim Sources takes in repair claims from apps besides your own portal. To set one up, open Settings, at the bottom of the left-hand menu. Next, click the Repairs and Warranty card to list all of its pages. Then click Claim Sources to open the page for every outside claim source. Connected apps come first, followed by the cards of every available app. Pick the app you use, and click the Connect button on its card. Type a name, which labels every repair from this connection. Paste the API key from that app's developer or API settings. Click Connect to save it, and the drawer scrolls down to its setup steps. Your private URL appears under that heading, ready to copy. In that app, create a webhook with this URL. Share it only with that app, since anyone holding it can send claims. An orange banner right below the URL names the last step, the webhook secret. Then copy the signing secret from that app's settings. Paste it into the Webhook secret field below the API key. Click Save Changes to finish the connection. Now the chip reads Connected. Once the app is connected, open its Mappings tab. Reasons turn the app's own claim reasons into your issue types. Locations send each repair to the right receiving warehouse. Click Add mapping, and a blank mapping form opens. Type the app's own reason into the first field, word for word. Then click the Issue type box, and choose the matching type from its list. Click Add, and the new mapping appears as a row in the table. Close the drawer to get back to the app's card, now under Connected. Test connection verifies your saved credentials against the app. Check now fetches new claims without waiting for the schedule. Disconnect halts the feed, but never removes existing repairs. Here, click Cancel to keep the connection and its incoming claims.