Request a repair from the public claim form
This page walks through the public Start a repair form the way your customers see it, with no account or login needed. Share it with a customer who asks how to file a claim, or read it to see exactly what they'll experience. To turn the form on and write its copy, see Set up the customer repair portal.
The form is a four-step wizard — Purchase, Pieces, What's wrong, Details — with a step tracker at the top, and it checks warranty coverage live as you fill it in. If a brand hasn't turned the form on, it shows "Repair requests aren't open online" and nothing else.
If you arrived here from a link a brand gave you — on their site, in an order email, or from a support reply — your order is often already found for you, and you can skip straight to Step 2. An old or broken link behaves like a failed manual lookup, with the same generic "couldn't find a purchase" message.
Before you begin
- Have your order number and the email you ordered with, or an Amazon order ID, or a warranty registration number and the email you registered with.
- If the piece was bought somewhere other than the brand's own site, have a photo or PDF of the receipt ready — it's the only proof of purchase for a purchase made elsewhere.
- A clear photo of the problem; a short video too, where the brand allows it.
Step 1: Where did you buy it?
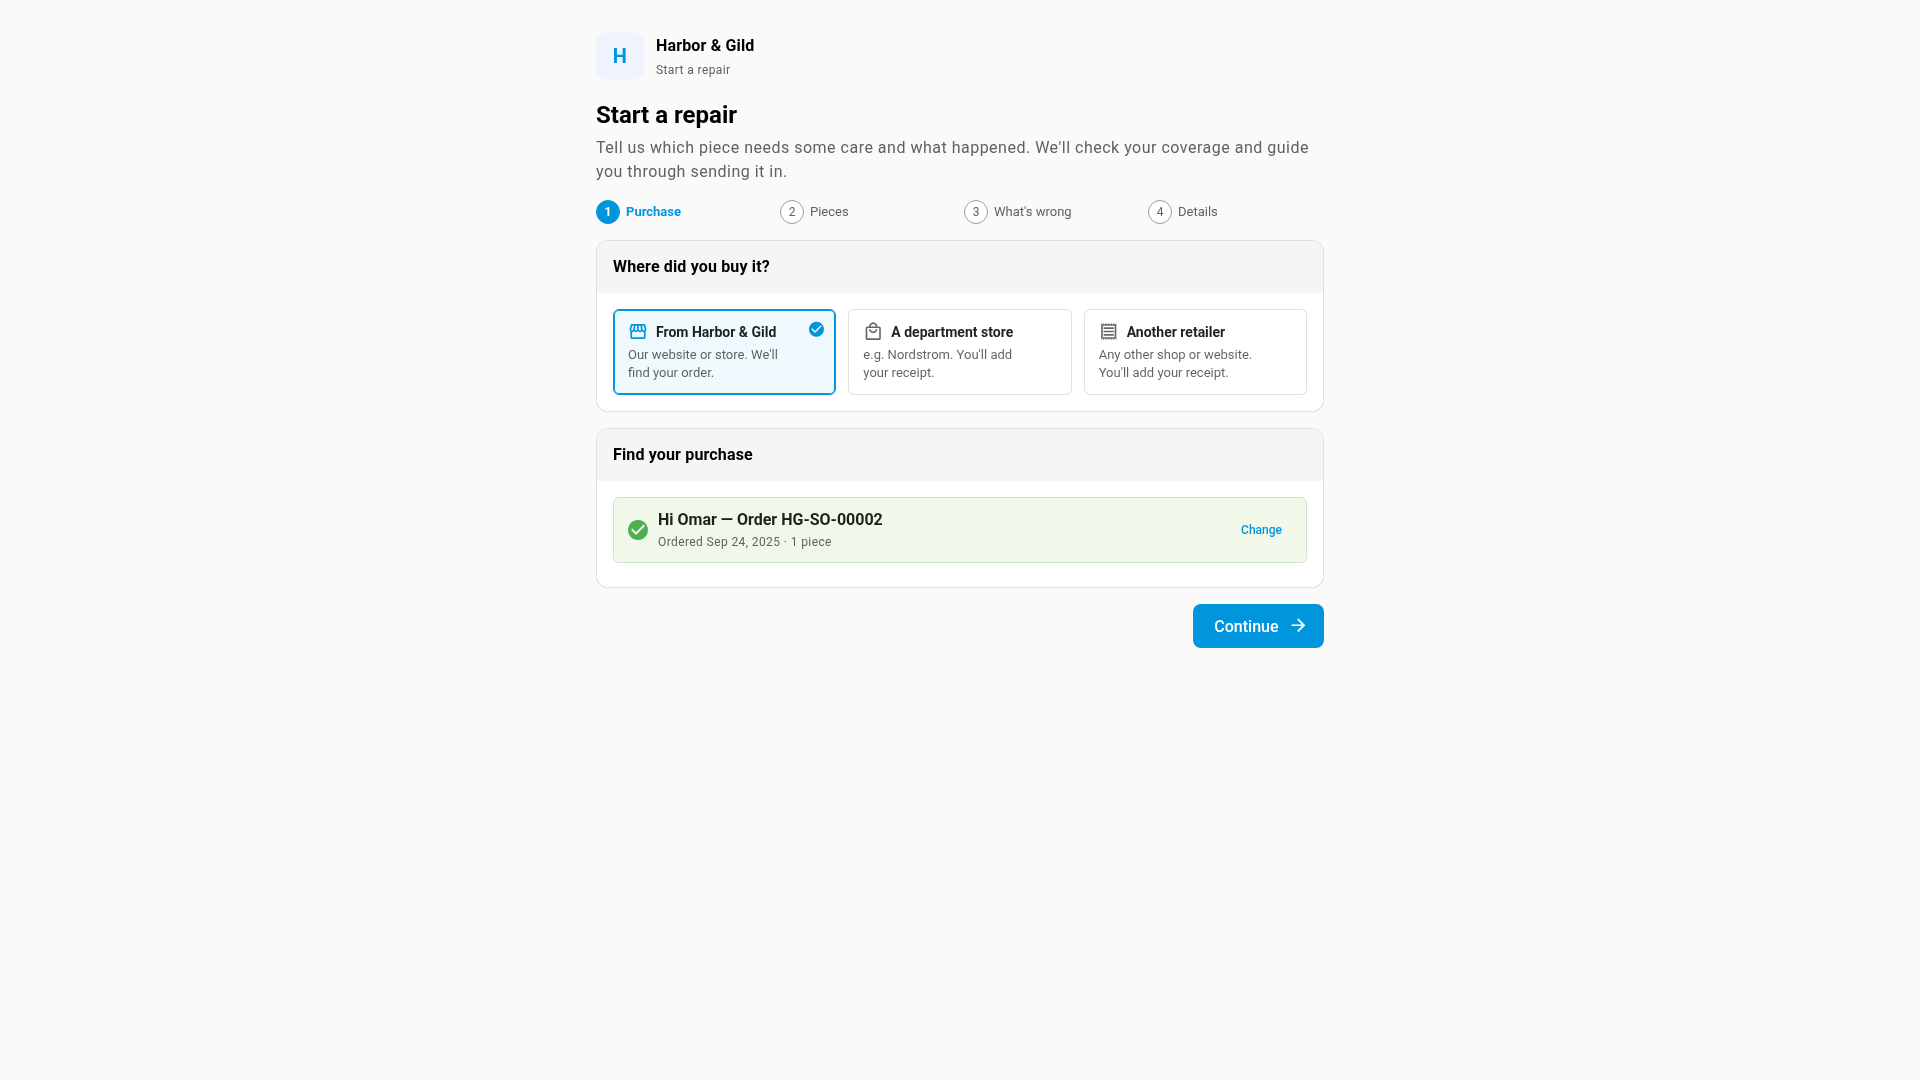
Pick one of three cards: From {brand} (for example From Harbor & Gild), A department store, or Another retailer.
From the brand's own site
- Choose how to find the purchase: Order number, Amazon order, or Registration.
- For an order, enter the order number and the email you ordered with. For an Amazon order, enter only the Amazon order ID — Amazon doesn't share an order's email, so there's nothing to match against yet. For a registration, enter the registration number and the email you registered with.
- Click Find my purchase. A green card confirms the match, with a bold heading such as Hi Omar — Order HG-SO-00002 and the purchase details under it, for example "Ordered Sep 24, 2025 · 1 piece".
Any failed lookup shows the same message, whichever detail was wrong: "We couldn't find a purchase matching those details. Check the details and try again." Found the right purchase and want to start over? Click Change.
Can't find your order at all? Register a piece instead links to the separate warranty registration form.
A department store or another retailer
- Enter Which store? or Which retailer? and, if you know it, the purchase date (it can't be in the future).
- Click Add receipt and attach a photo or PDF — it's how the brand confirms when and where you bought your piece.
Step 2: Choose your pieces
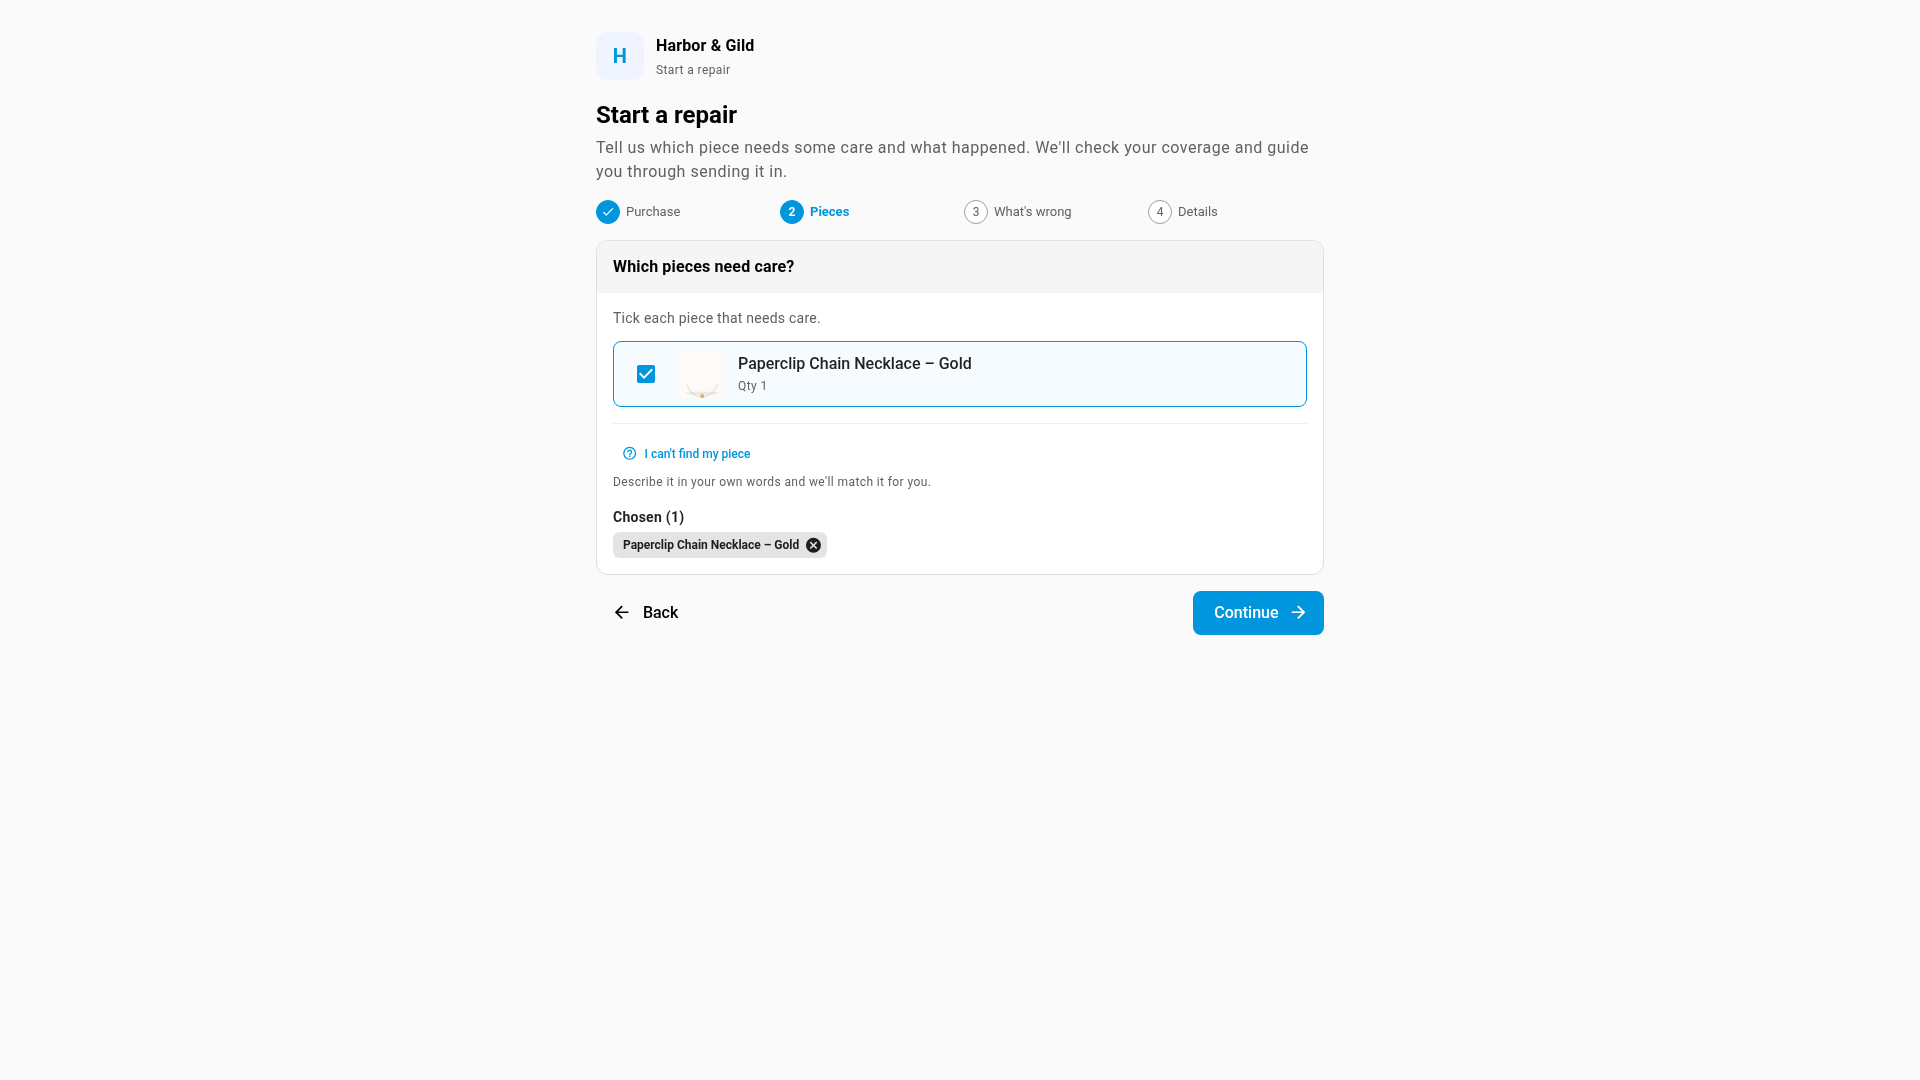
- Found an order or registration — each piece on it is listed with its checkbox, photo, name, and quantity side by side. Tick every piece that needs care; an order with a single piece arrives with it already ticked. A piece from a set shows "Set of N pieces".
- No order found — search by name (for example "Paperclip Chain Necklace") and click Add on every result that matches.
- Either way, click I can't find my piece to add a free-text item — describe it in your own words and the brand's team matches it to a real product later.
Chosen pieces show as removable chips under Chosen (N).
Step 3: Tell us what's wrong
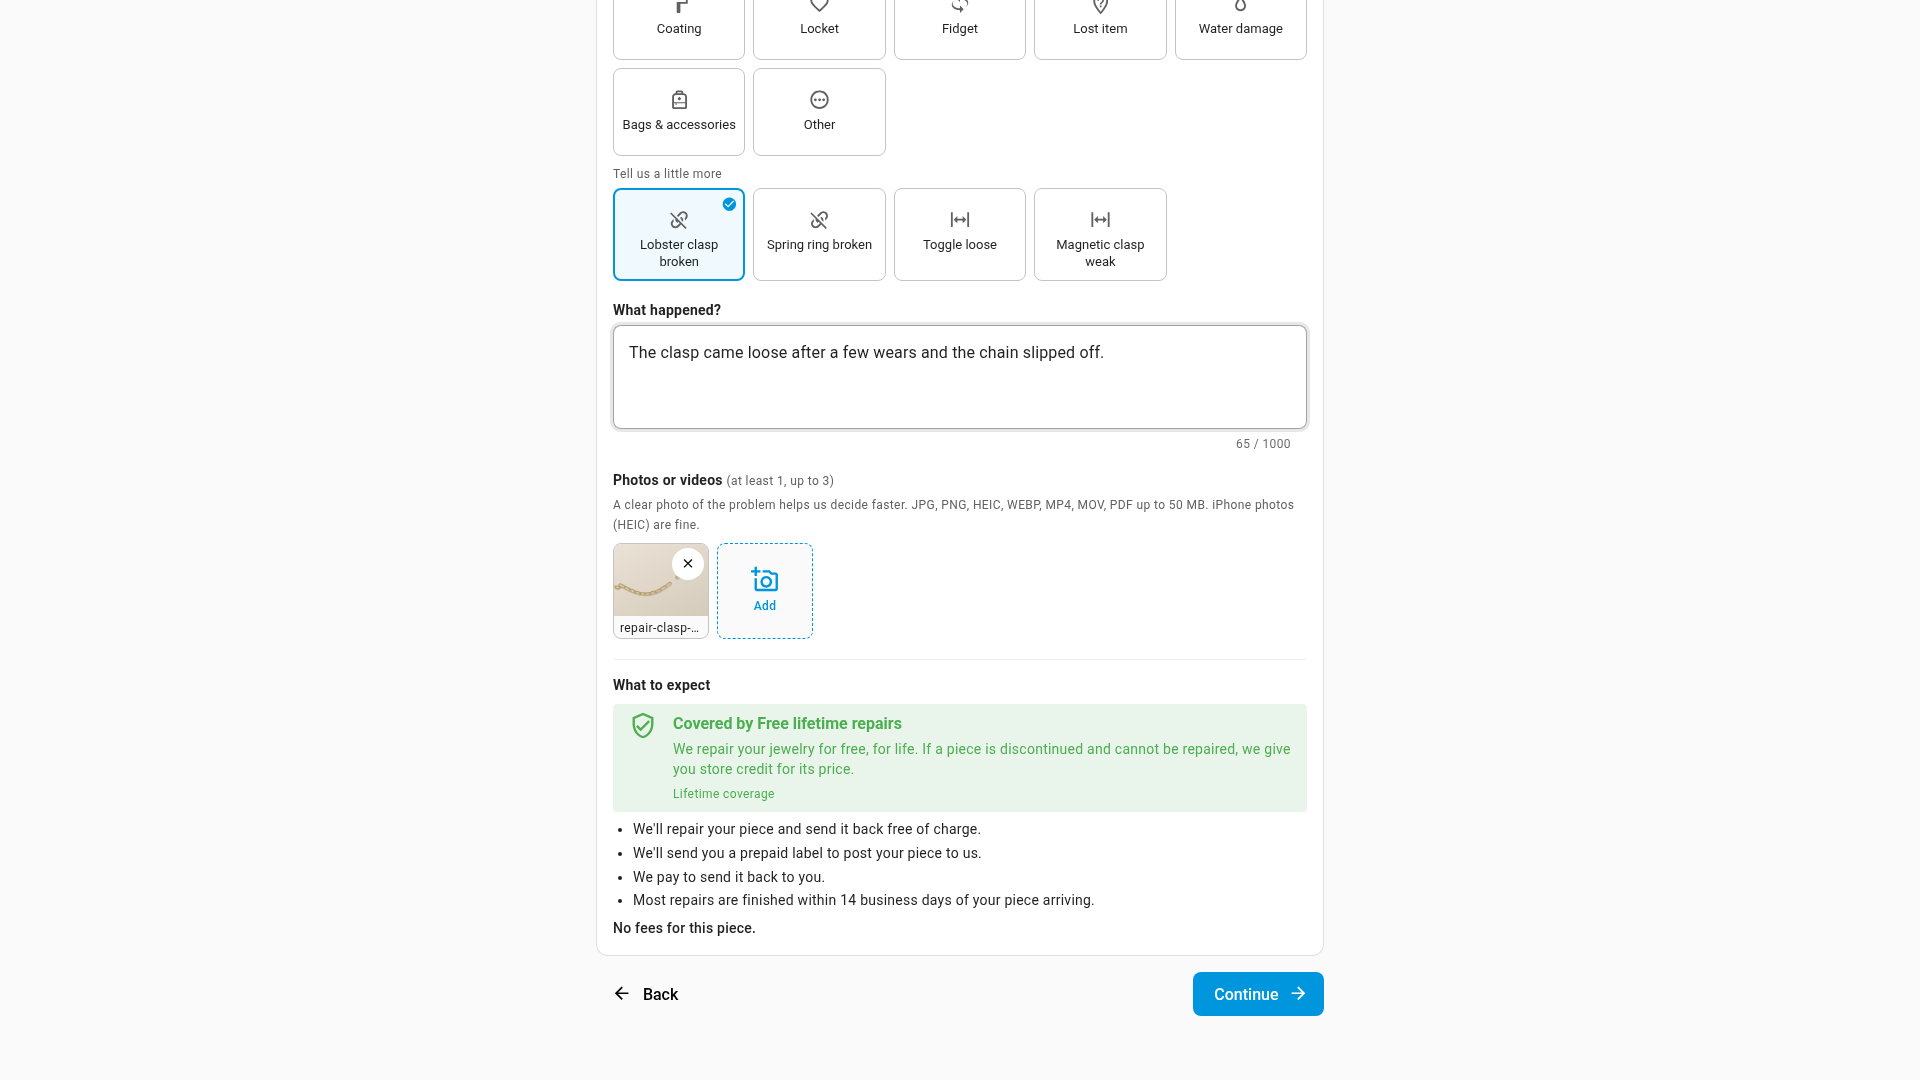
Each chosen piece gets its own card:
- If the piece is a set, tick which piece of the set needs care — leave the others unticked. Skipping this on a set shows "Pick the piece of the set that needs care."
- If you chose more than one of the same piece, set how many need care.
- Choose what you'd like done: Repair or replace (something broke, came loose, or fell off) or Replate (the finish has faded, tarnished, or worn through).
- Pick what's wrong — the picker can drill down a level or two, for example Clasp then Lobster clasp broken. Each tile carries its own icon (a clasp, a chain link, a gem for a stone, a shimmer for plating), so the right one is quick to spot.
- Describe what happened, up to 1,000 characters.
- Add photos — and video, where the brand allows it — up to 3 per piece. The brand sets a minimum; HEIC photos from iPhones are accepted.
Each card's What to expect box shows a live result, and it updates as you change what you'd like done or what's wrong: whether the piece is covered, the coverage wording, any fees you'll pay, and what happens next. A discontinued product adds a note about store credit instead of a repair.
Step 4: Your details and getting your piece to us
-
Enter your full name. If you found your purchase by order number or registration, Email and Confirm email are already filled in with the email you looked it up with — change them if you'd rather hear back somewhere else. Otherwise, enter your email and re-type it in Confirm email (it can't be pasted, and the two must match). Phone is optional.
Found your purchase by Amazon order ID? A note explains that the name and email you enter here — not anything from Amazon — identify your request, so use the ones on your Amazon account.
-
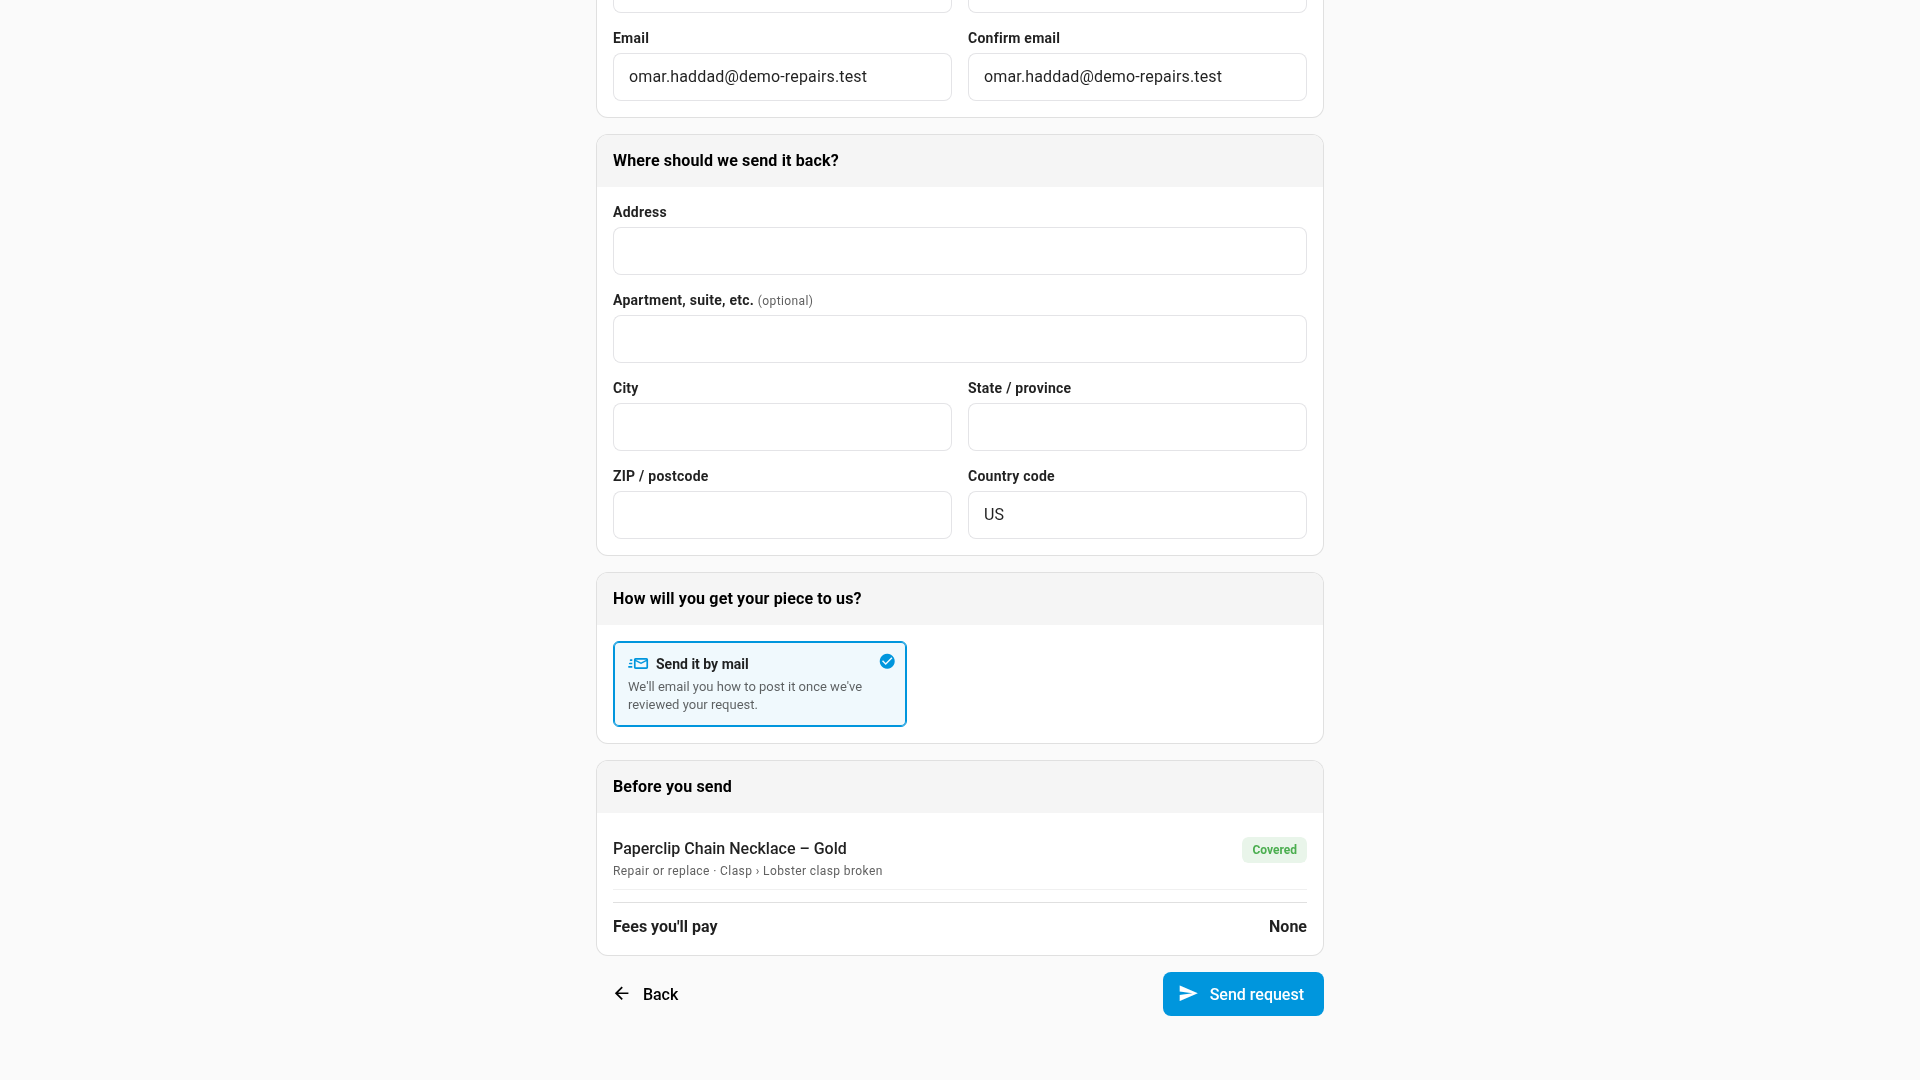
Enter your return address — it always starts empty, even when your order was found, so your address never shows to anyone who knows your order number. Fill in the street, apartment (optional), city, state, ZIP, and a 2-letter country code.
-
Say how your piece will reach the brand: Send it by mail (a label follows by email once your request is reviewed) or, where the brand offers it, Drop it off at a listed location. If every piece you chose turns out not to need a return, this section is replaced by a banner telling you to keep the piece — mixing one no-return piece with one that must come back still asks you to ship or drop off all of them.
-
Review Before you send: every piece with its service, issue, and coverage chip, the running Fees you'll pay total, and, for anything not yet covered, a promise that a quote comes first and nothing is charged without your OK.
-
Click Send request.
After you submit
You land on a confirmation screen with your repair number (for example RO-2026-00412) and one of three messages:
- "No need to send it back — keep your piece until we confirm." — every piece you chose needs no return.
- "Your piece is covered, so you can go ahead and send it in. We've emailed you the details." — the brand accepts in-warranty claims automatically when nothing about the claim looks unusual.
- "We'll review your request and email you with the next step." — everything else.
Follow your repair opens your status page, and the brand emails you the same link.
Every failed lookup shows the same generic message on purpose, so a bad guess at an order number or email never confirms which part was wrong. An invisible field also catches bots, and a submitted photo is checked against other claims' photos for an unusual match. None of this shows to the customer.
Next steps
- Set up the customer repair portal — the settings behind every piece of copy on this form.
- Find and manage repairs — where a submitted claim shows up for your team.
- How warranty coverage is decided — what drives the coverage result a customer sees here.
- Manage warranty registrations — where "Register a piece instead" leads, and how your team verifies it.
- Repair, unit, quote, registration & SLA status reference — what happens to a repair after it's accepted.
Video transcript
The public repair form works without an account or a login. First, pick where you bought the piece, here the brand's own store. Then choose how to find it, such as by Order number. Click the box below, and type the code from your confirmation. Next, click the email field, and type the address you used at checkout. Click Find my purchase to start the search. A green card greets you by name and confirms the order. Click Continue, and the next step lists every piece on that order. Each row shows a checkbox, an image, the name, and the quantity. A single item arrives with its box already checked. With several, tick each piece that needs care. Click Continue again, and each chosen piece gets its own card. Choose what you'd like done, such as Repair or replace. Then pick what's wrong from tiles with their own icons, such as the Clasp. A second row narrows it down to the exact fault. Scroll down to the What happened box. Click inside it, and describe the damage in your own words. Then add a clear photo, so the team can see the problem. The What to expect box shows whether the piece is covered. It also lists any fees and the steps that follow. Click Continue once more, and the last step asks for your details. Email and Confirm email are already filled from the lookup. Then add your full name, and below it, the street address for the return trip. Scroll down to the summary, where Fees you'll pay gives the total. When everything looks right, click Send request to finish your claim.