Record landed cost bills
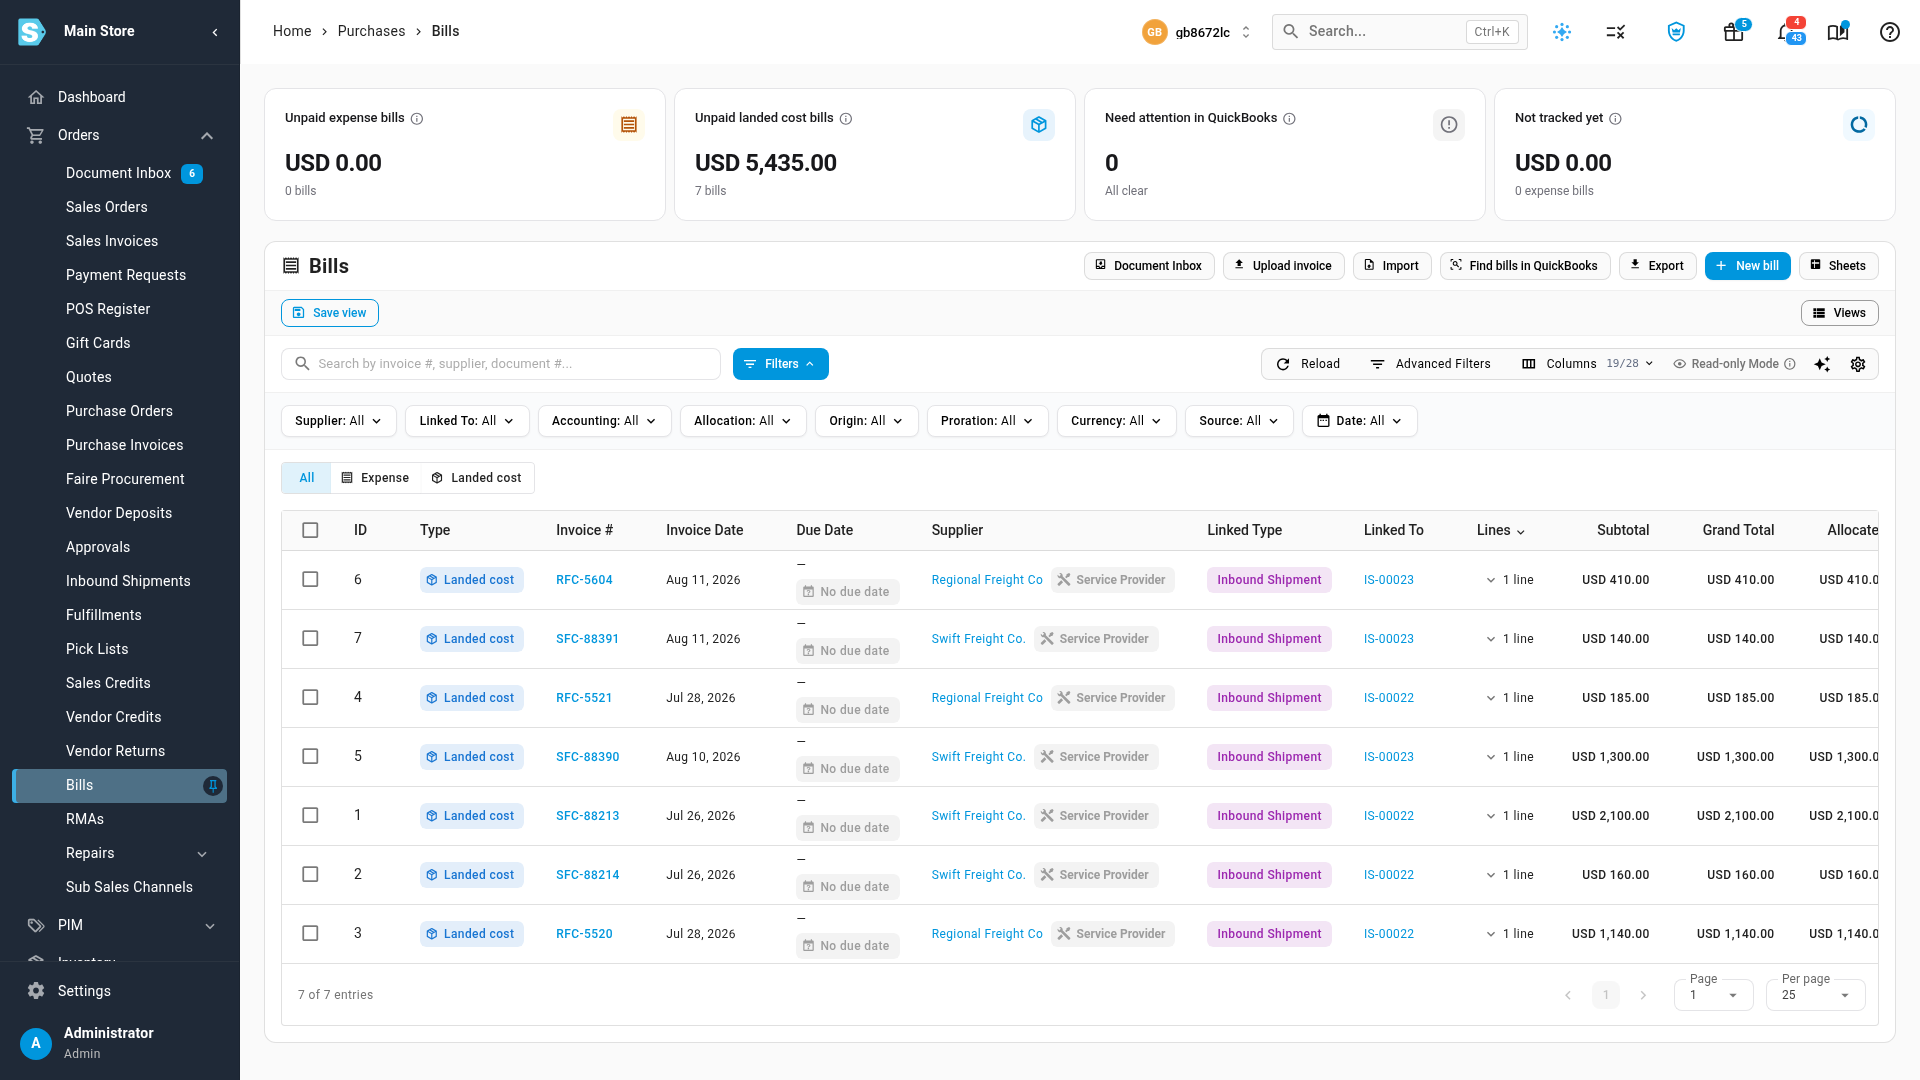
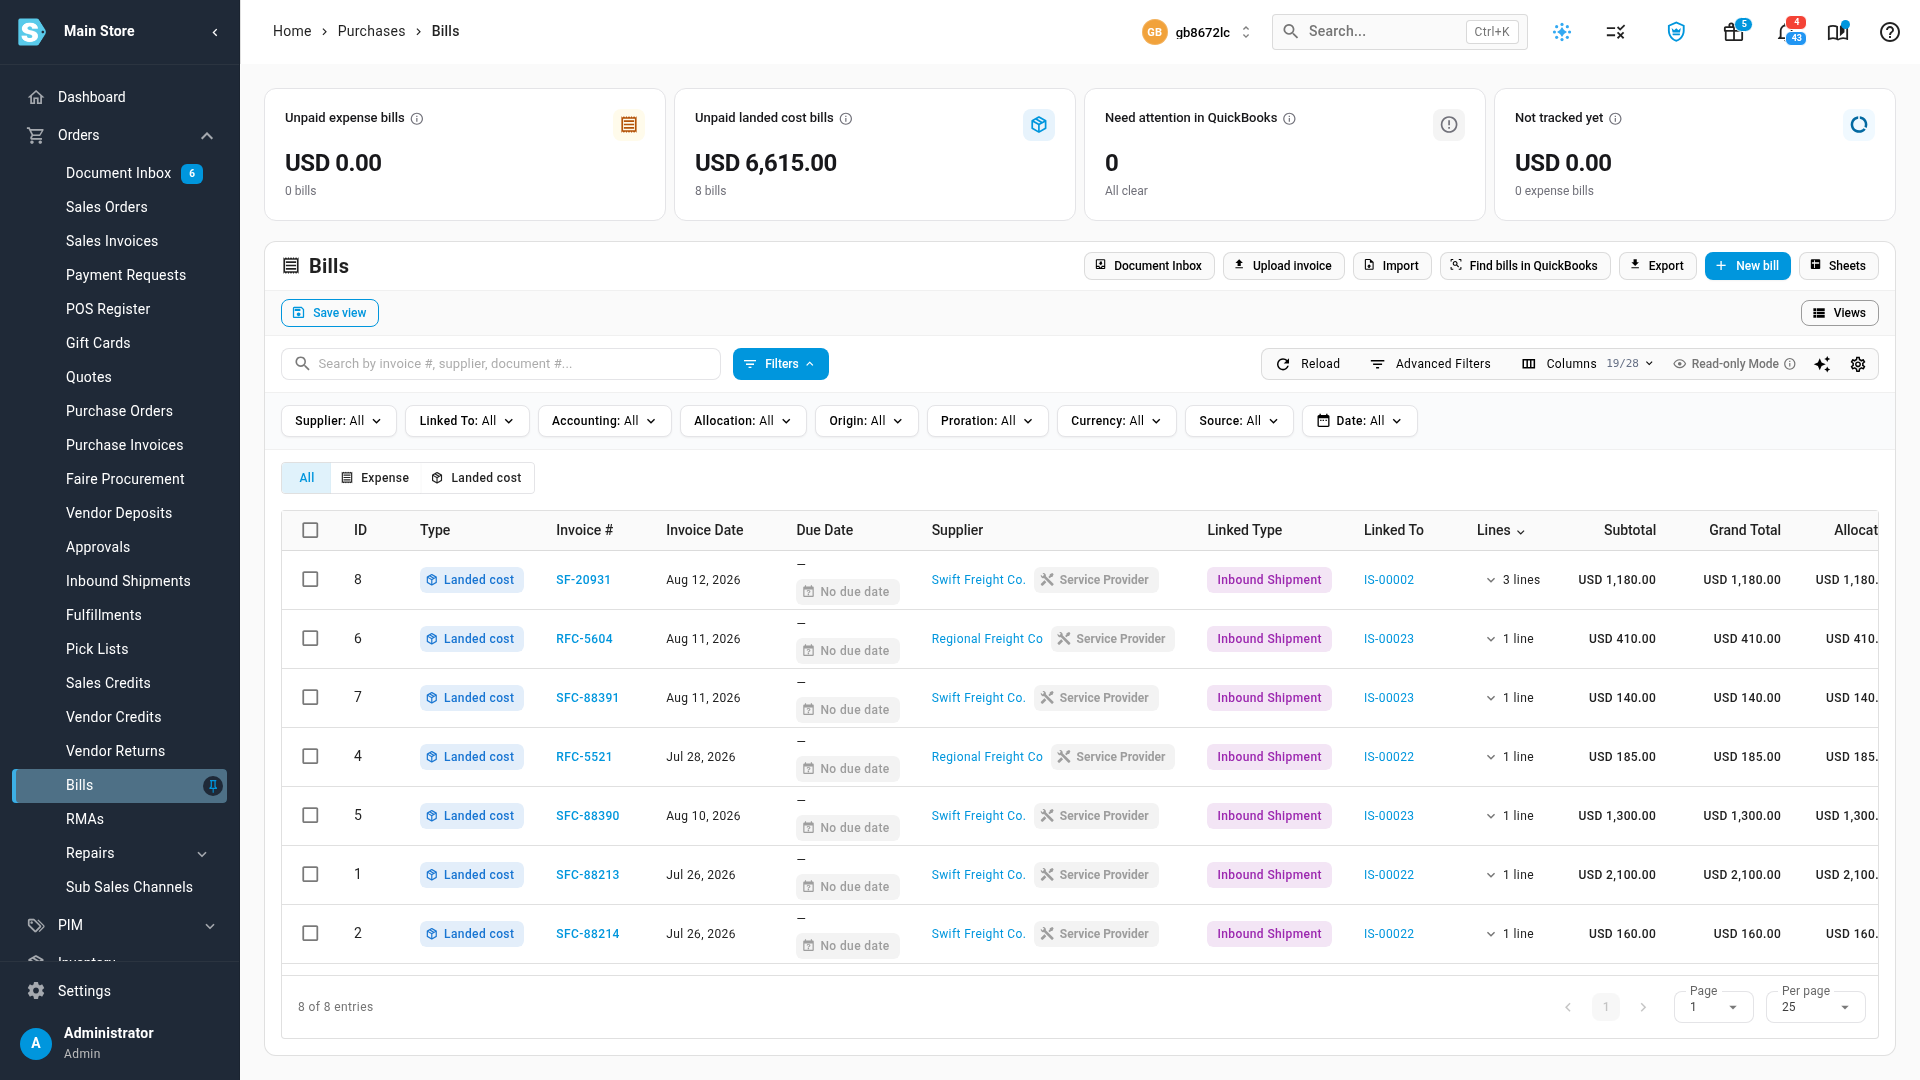
Landed cost bills are the invoices behind your landed costs: the freight, customs, and brokerage charges from service providers that belong on your inventory's cost, not in overhead. Orders → Bills lists them alongside expense bills: the Type column marks each one Landed cost, the Landed cost toggle shows only these, and the Allocated and Unallocated columns show how much of each has reached your stock.
A bill is always allocated to something: an inbound shipment, a purchase order, or a warehouse transfer. The allocation spreads the bill across that record's lines, so the cost lands on the units it paid to bring in.
Before you begin
- The company that bills you must be a service provider (a supplier set up as a freight forwarder, customs broker, or similar), not the supplier of the goods. Freight that a goods supplier charges belongs on the purchase order as a cost line instead. See Create and edit a supplier.
- The shipment, purchase order, or transfer the bill covers must already exist.
- Uploading an invoice needs permission to create purchase orders.
- For SKU.io to read invoices for you, set up Document OCR Settings (the button at the top of the Document Inbox, under Orders → Document Inbox). See How the Document Inbox works.
Upload an invoice and turn it into a bill
-
Go to Orders → Bills.
-
Bring the invoice in. Either open the purchase order, inbound shipment, or warehouse transfer it's for and click Upload Invoice (OCR) in its landed costs, or let your forwarder email it to your inbox address. SKU.io reads the invoice and holds it for review. (Upload invoice on the Bills list is for expense bills; it points you back to the purchase order for freight and duty.)
-
Every invoice waits in the Document Inbox until you apply it. To pick one up later, click Document Inbox on the Bills page (or go to Orders → Document Inbox), find the Landed Cost Invoice row, and click Review.
-
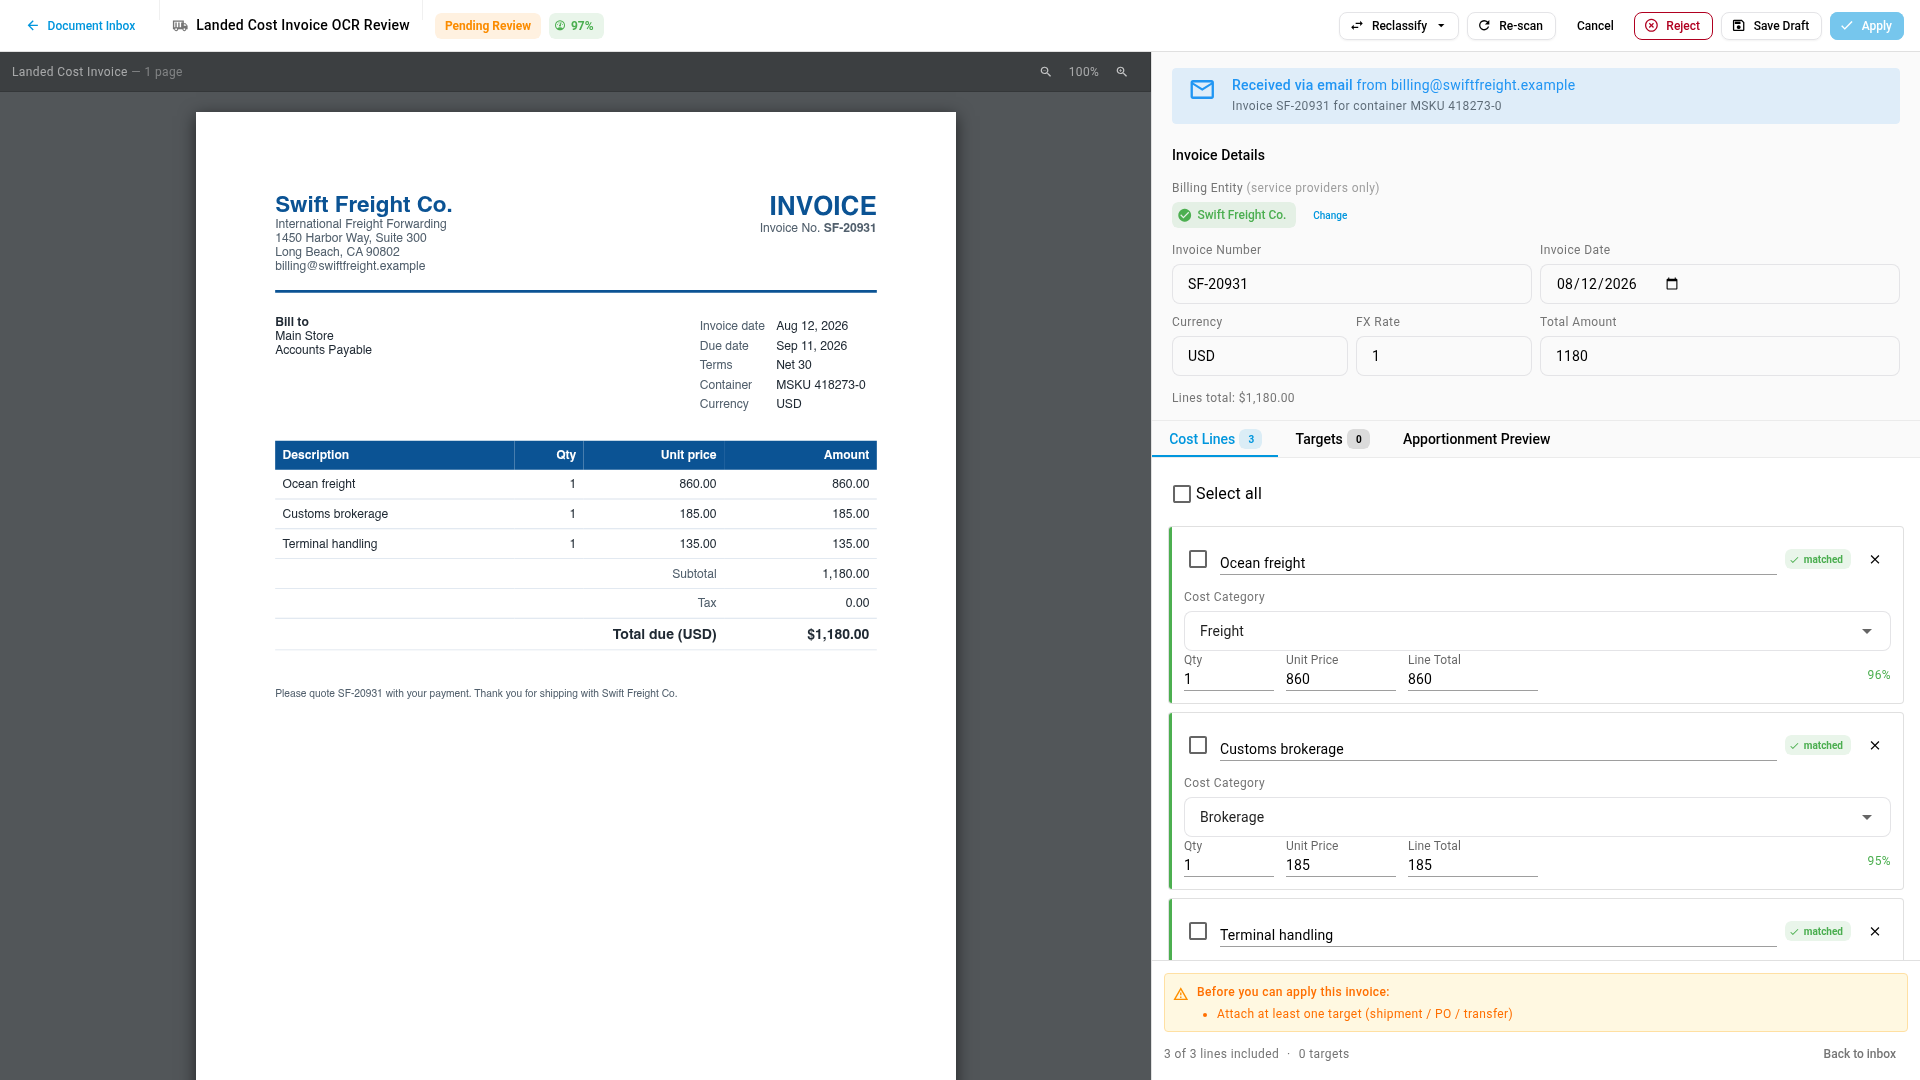
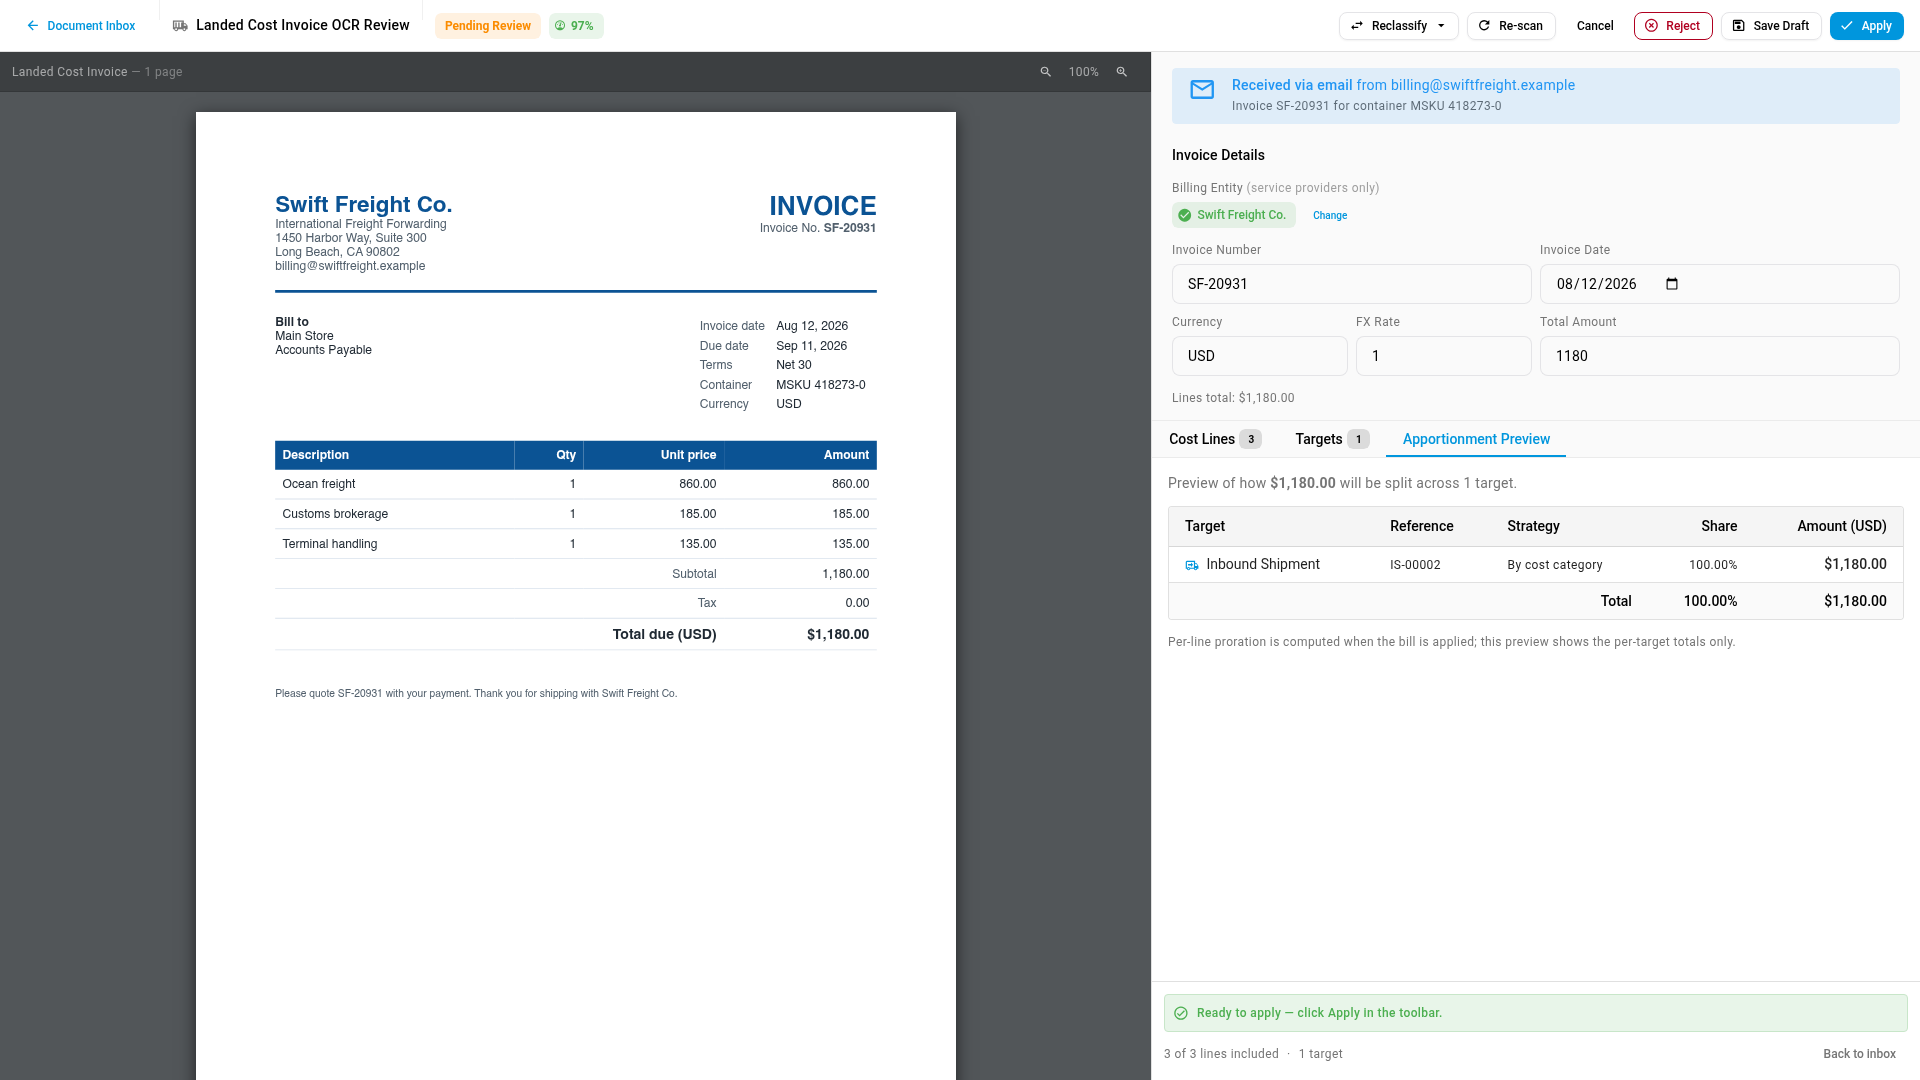
On the review screen, the invoice is on the left and what SKU.io read from it is on the right. Check the Billing Entity. It must be a service provider: if SKU.io matched the goods supplier, or found nobody, click Re-select service provider or Select Service Provider and pick the right one. You can also create one from the same search.
-
Check Invoice Number, Invoice Date, Currency, FX Rate, and Total Amount against the document, and correct anything that was misread.
-
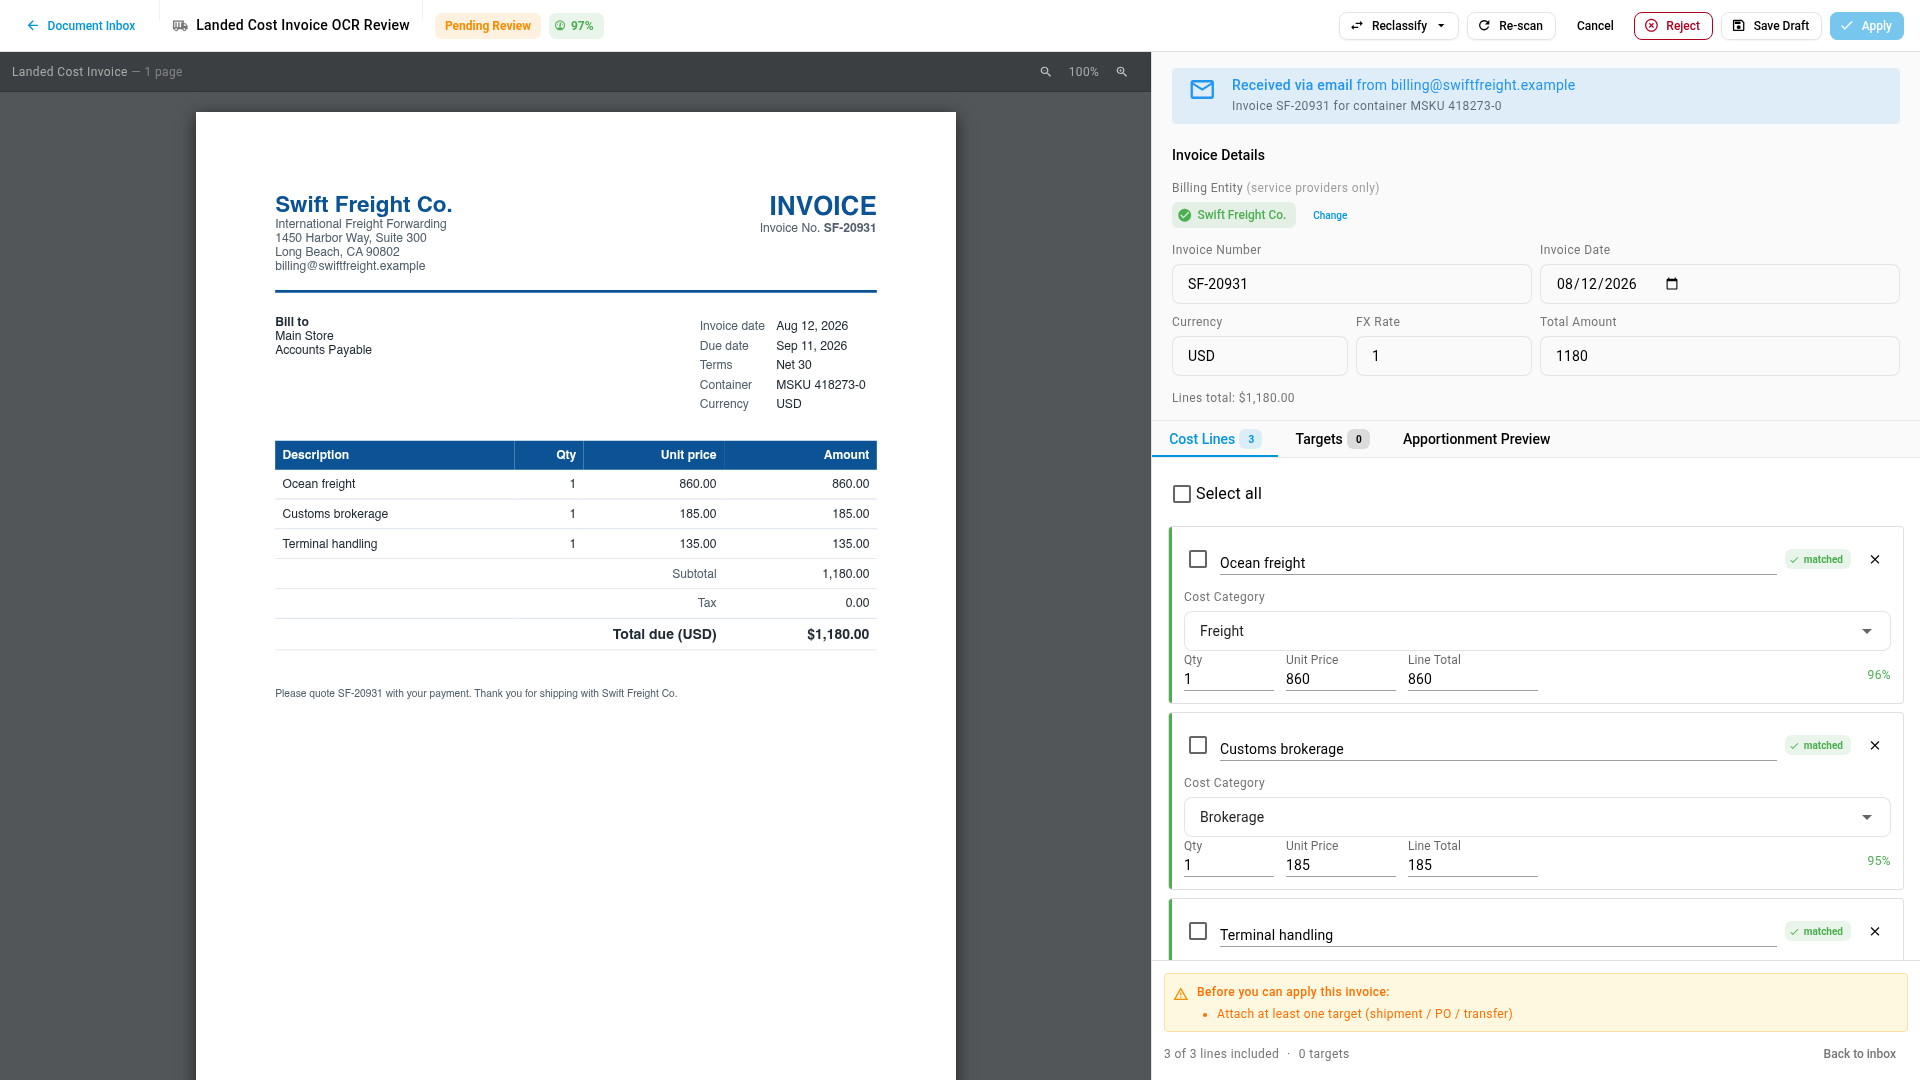
On the Cost Lines tab, check each charge. SKU.io matches every line to a Cost Category (such as Freight, Brokerage, or Handling), and marks it matched or unmatched. Pick a category for any unmatched line, and correct any that's wrong. To set the same category on several lines, tick them and choose it once. Click Add line for a charge that wasn't read, or the cross on a line to leave it out.
-
Make sure Lines total equals the invoice total. A Mismatch flag means a line is missing or misread. Optionally tick Remember these descriptions → cost category mappings for future imports from this supplier, so the same wording is matched automatically next time.
-
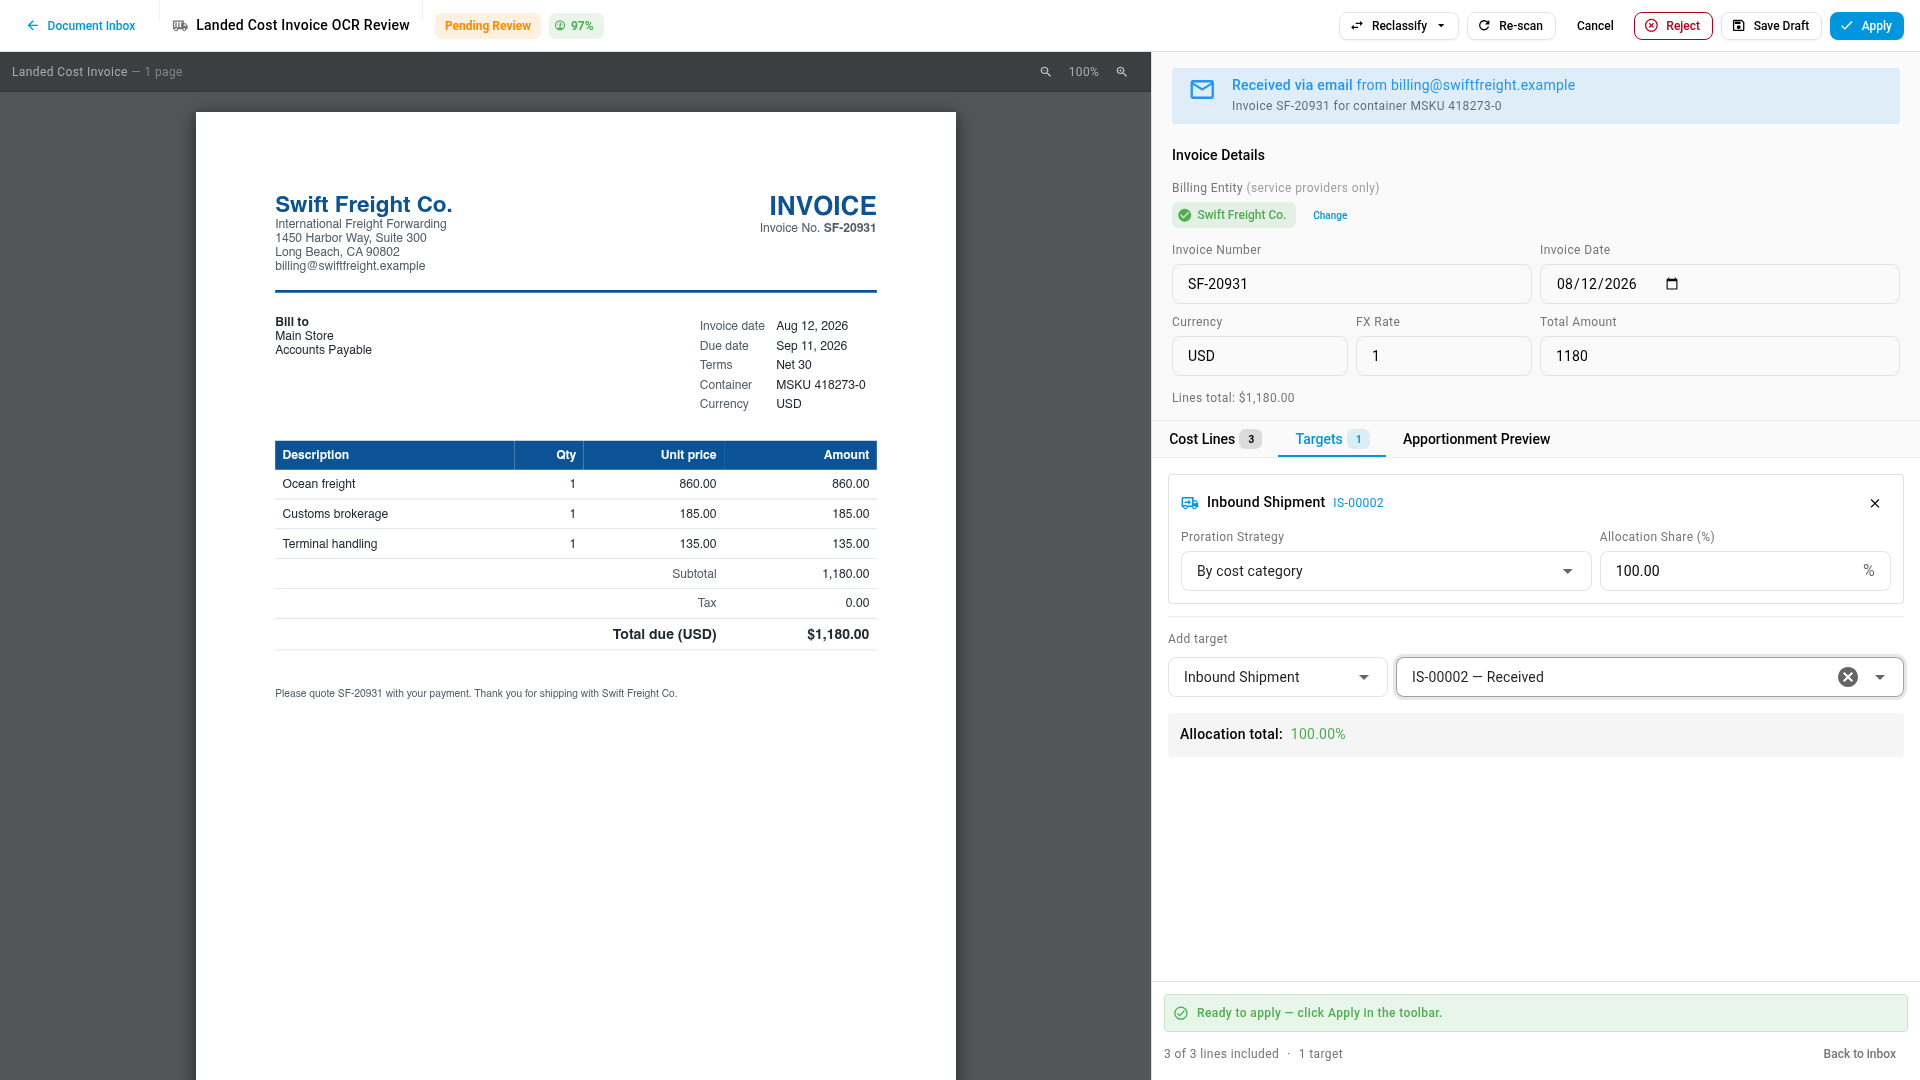
Open the Targets tab and attach what the bill covers. Under Add target, leave the type on Inbound Shipment or choose Purchase Order or Warehouse Transfer, then search for its number and pick it.
-
For each target, check the Proration Strategy, which decides how the cost spreads across that record's lines, and its Allocation Share.
- The strategy starts on By cost category (recommended): each cost line splits the way its cost category's Allocate by says (see How each line is split). Lines with no category split by cost.
- To split the whole bill one way instead, pick Cost Based, Weight Based, Volume Based, Quantity Based, Equal per Line, Revenue Based, or Manual.
- With one target the share is 100%. With several, the shares must add up to 100%: Allocation total shows the sum, and Distribute evenly splits it equally.
-
Open Apportionment Preview to see how much of the bill lands on each target.
-
Click Apply. The button stays disabled until the checklist at the bottom of the screen reads "Ready to apply". SKU.io creates one bill per target, allocates it, and opens the target. For an inbound shipment, that's its Landed Costs tab, where Per-Line Allocation Preview shows the Uplift / Unit each line now carries.
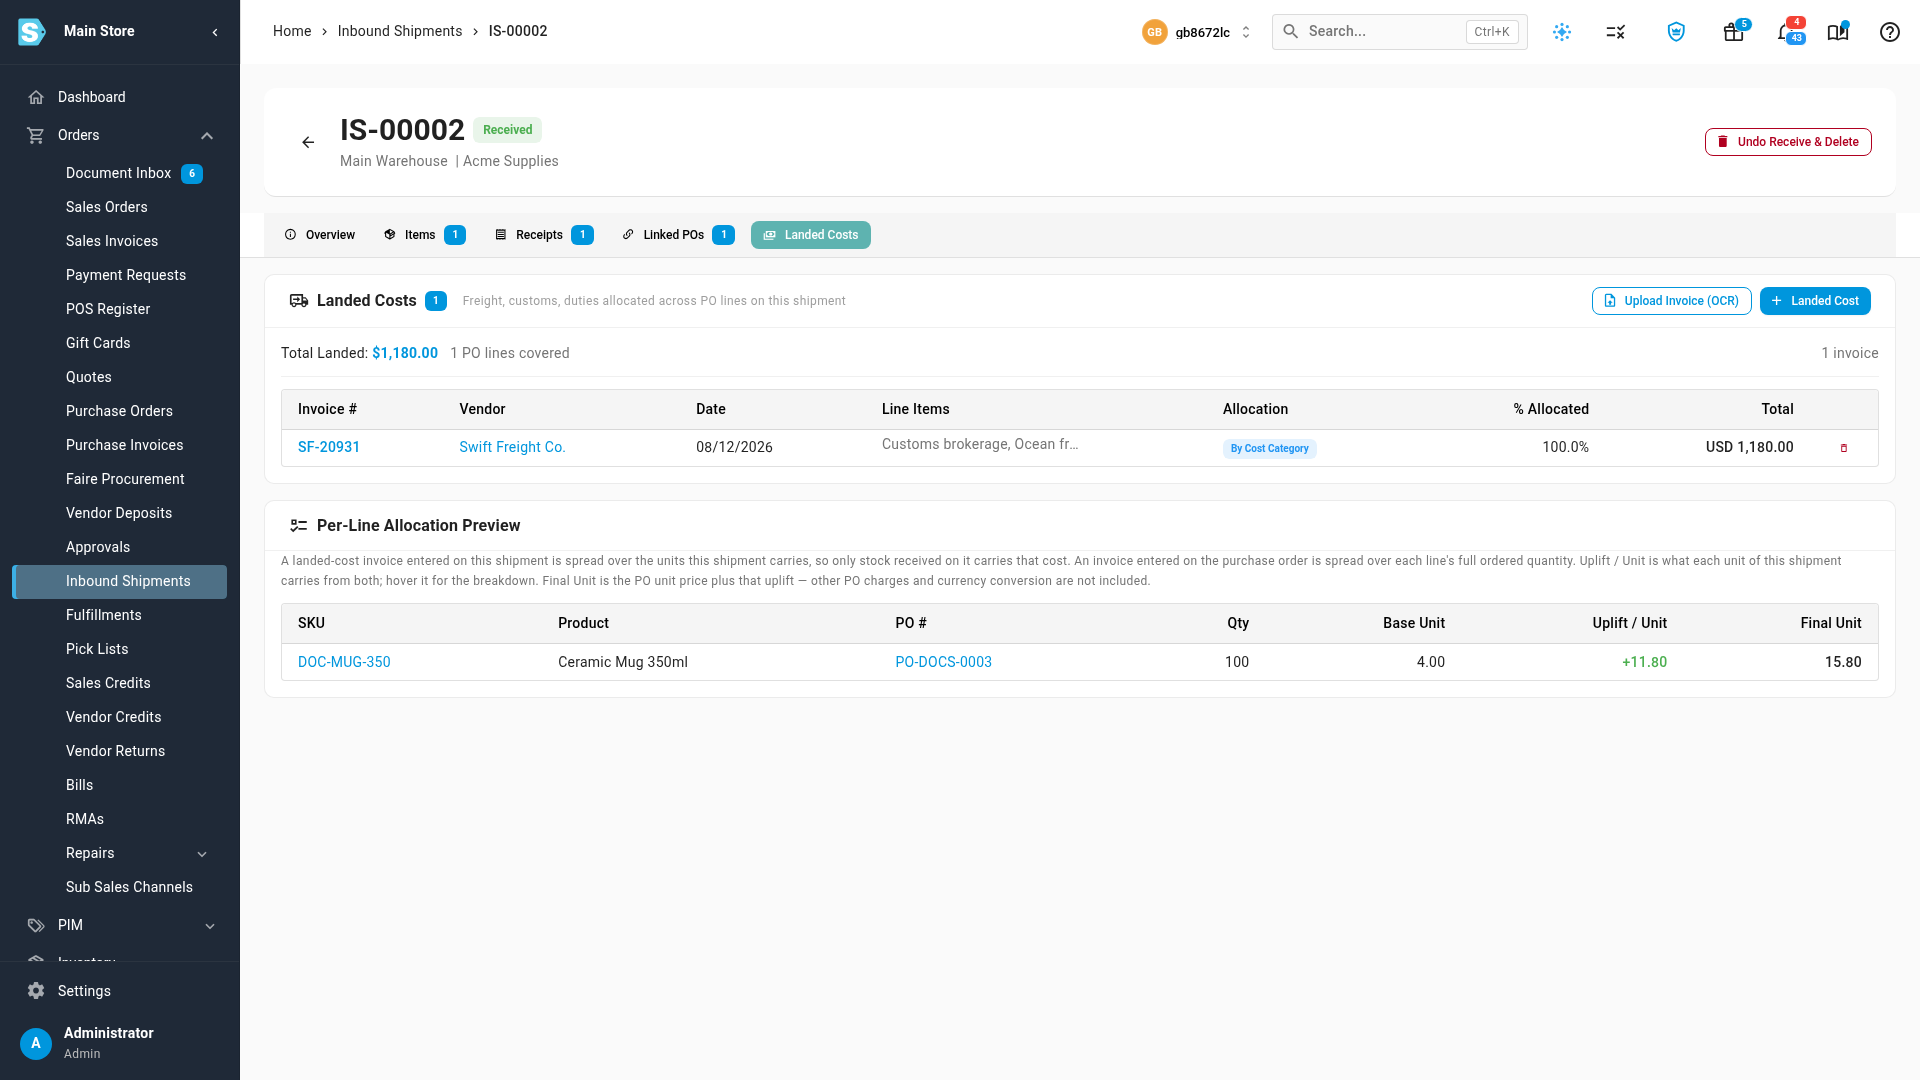
The new bill now appears under Orders → Bills, allocated. If you need to stop partway, click Save Draft to keep your edits, or Reject to turn the invoice down. If the document isn't a landed cost invoice at all, use Reclassify to move it to the right type.
How each line is split
A bill's charges rarely all share one fair split. Ocean freight follows how much space each product takes; brokerage and filing fees follow value. So a bill that splits By cost category groups its lines by method and splits each group on its own.
Each cost category has an Allocate by setting, under Settings → Financials → Cost Categories:
| Allocate by | Use it for |
|---|---|
| By cost | Brokerage, filing and handling fees, insurance, or when you're unsure. Works for every product. New categories start here. |
| By volume | Ocean freight. Containers are billed by the cubic metre, so bulky items should carry more. |
| By weight | Air, parcel and truck freight. Carriers bill by the kilogram. |
| By quantity | The same amount on every unit, such as per-unit labelling. |
| Equally across lines | Each product line gets the same amount, whatever its quantity. |
| By estimated duty | Your duty category. Shares the duty by each product's duty rate, so a 0% item never absorbs a 25% item's duty. Falls back to cost when no rate is set. |
| By customs entry | Your duty category, once a customs entry is linked. Uses the duty actually filed on the entry for each product line; any part no purchase order line covers splits by cost. |
Weight and volume splits use each product's weight and dimensions, estimated ones included, so they're only as good as those numbers. If none of a group's products has a weight (or dimensions), that group splits by cost instead, and How this bill is split says so. On a warehouse transfer, By estimated duty and By customs entry split by cost.
Your duty category starts without a choice of its own: it splits By customs entry when a fully matched customs entry is linked, and By estimated duty otherwise.
To change a category, see Choose how a category's bill lines split. The change applies to bills you create or save from then on. Bills you've already saved keep their split.
See how a bill was split
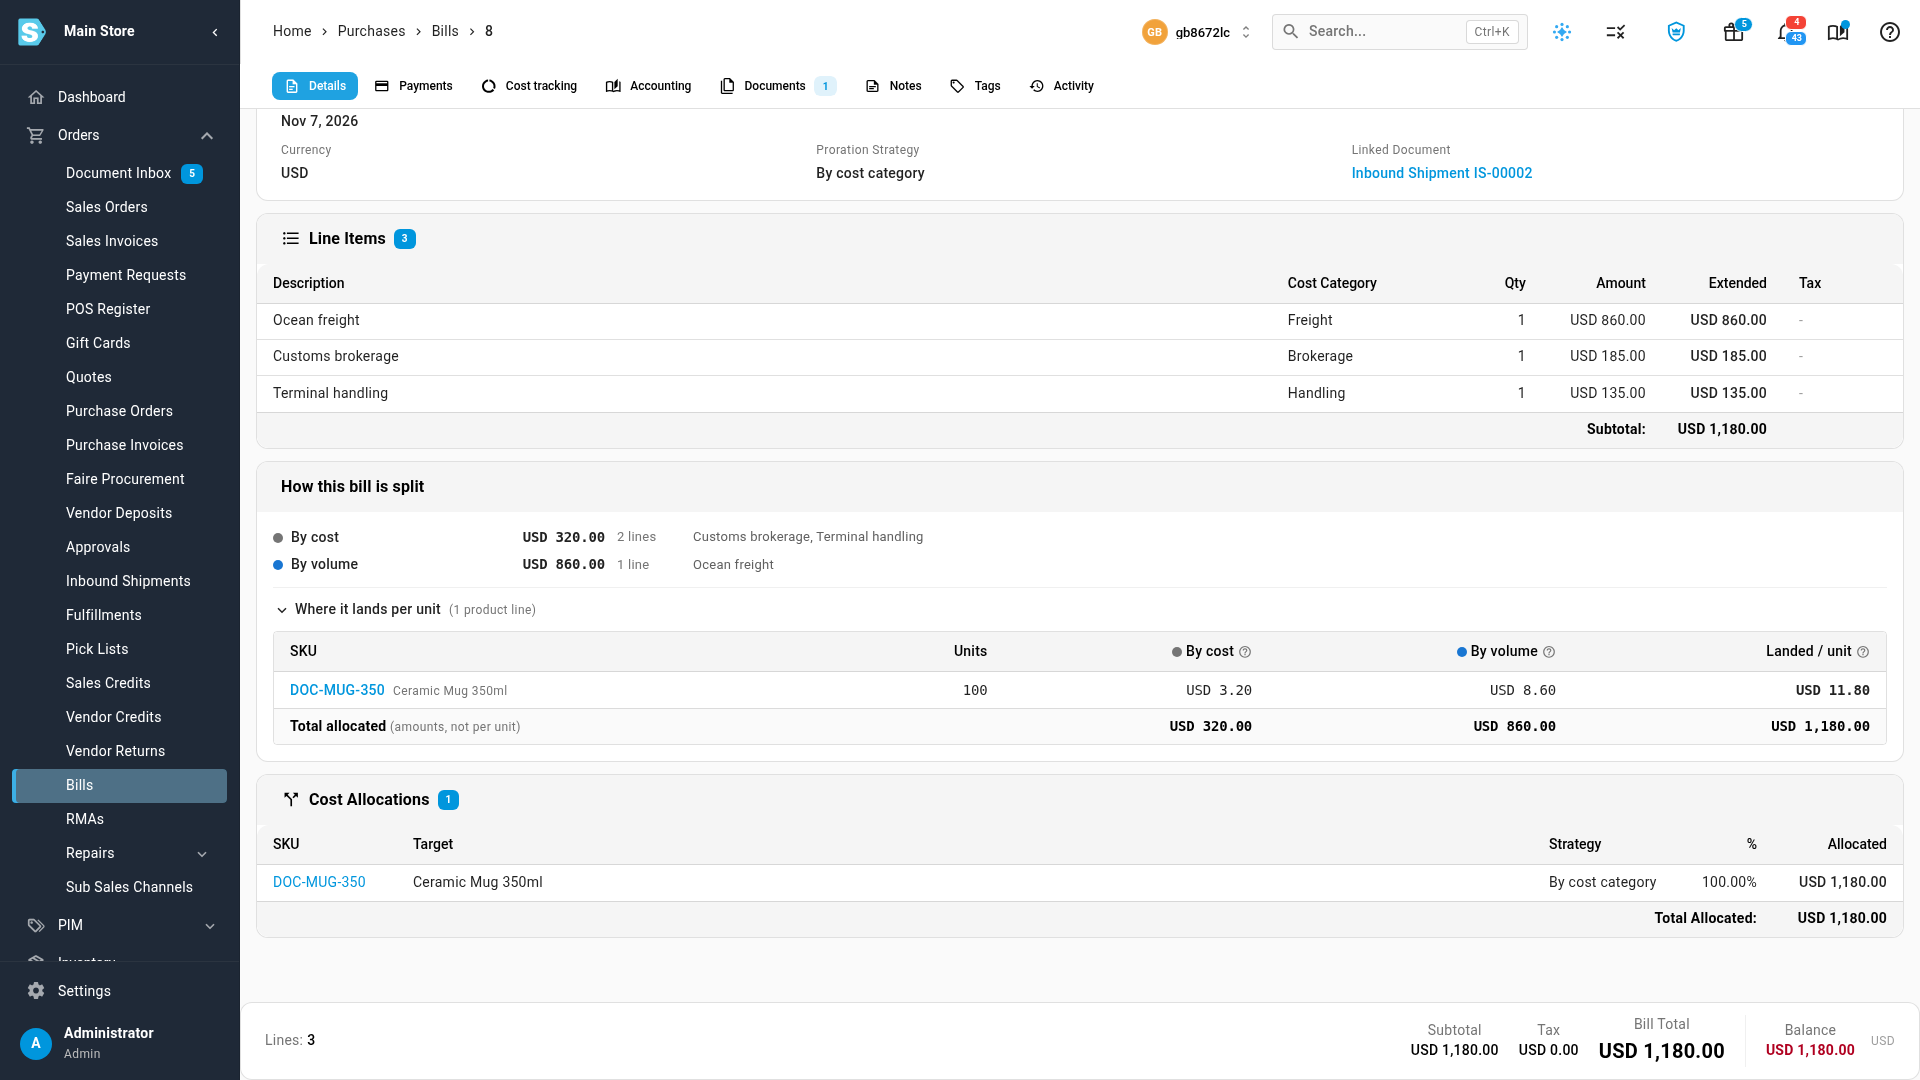
Open the bill from Orders → Bills. How this bill is split shows one row for each method the bill used, with the amount it spread and the lines in it. Open Where it lands per unit to see, for each product, what each method added per unit and its Landed / unit total.
Change one line on one bill
In the Add Landed Cost Invoice editor, the Allocate by column shows how each line will split and where that comes from: its category, or this bill when you've picked a method for that line only. Click it to choose a different method for this bill without changing the category.
The editor also checks your products' weights and dimensions as you work:
- When splitting a charge by weight or volume would move cost between products by a meaningful amount, and most units have real (vendor or measured) data, a suggestion explains how much would move. Click Use volume for these lines (or weight) to switch those lines on this bill, or Always use volume for Freight to change the category. Show the per-unit difference lists the products the change affects. Not now dismisses it.
- When too many units only have estimated or missing weights and dimensions, the editor keeps the cost split and says so. Click Which products? to see which products need real measurements.
Enter a bill without uploading an invoice
You can also type a bill in directly from the record it belongs to. On an inbound shipment, open the Landed Costs tab and click Landed Cost; on a purchase order, use the Landed Costs section. Both open the Add Landed Cost Invoice editor, where you pick the service provider, enter the invoice details and lines, and click Save Invoice. Proration Method starts on By cost category, so each line splits by its category's Allocate by (see How each line is split). The full walkthrough is in Add landed costs.
A customs broker's duty bill for an inbound shipment is best entered with Enter duty bill on the shipment and split By estimated duty, which shares it out by each line's booked duty estimate. See Capitalise estimated duty and reconcile the broker bill.
Lines categorised as customs duty
However a bill reaches SKU.io (typed in, imported, read from the Document Inbox, or synced from your accounting software), a new line with no cost category whose description reads as customs duty goes into your customs duty category automatically. It matches the words duty, duties, customs duty, tariff and tariffs, the fee codes MPF and HMF, and that category's own keyword aliases. Duty free never matches, and a category someone chose is never changed.
When you open the bill, those lines show an Auto chip under Cost Category. Hover over it to see Set from the line description. Change it if this isn't customs duty. If the line isn't duty, pick the right category and save. The chip goes once anyone sets the category.

Import many bills at once
To bring in a forwarder's statement or months of bills from another system, click Import on the Bills page and upload a spreadsheet. See Import landed cost bills.
Keep the list clean
The Unallocated tile is your to-do list: billed cost that hasn't reached your inventory yet. Filter the list by Allocation to find those bills, and by Supplier, Linked To, Proration, Currency, Source (OCR or Manual), or Date to narrow it further.
Next steps
- Import landed cost bills: create and update many bills, their manual allocations, and their payments at once from a spreadsheet.
- Add landed costs: enter a landed cost on a purchase order, and how each proration method splits it.
- Review inbox documents: work through everything waiting in the Document Inbox.
- Manage cost categories: the categories and keyword aliases invoice lines are matched to.
- Track a supplier's payables: landed cost bills in the service provider's position.
- Read the Landed Cost Breakdown report: what the goods you sold really cost, per landed cost category.
Video transcript
Landed cost bills are freight, customs, and brokerage invoices that belong on your inventory's cost. To find them, open Orders in the sidebar, and then choose Bills. The Type column marks each one as a landed cost, and a card at the top totals the unpaid ones. The Allocated and Unallocated columns show how much of each bill has reached your stock. A freight invoice reaches SKU.io in one of two ways. Upload it from the purchase order, shipment, or transfer it's for, with Upload Invoice. Or have your forwarder email it to you, and it arrives in the Document Inbox. Either way, SKU.io reads the invoice and holds it for your review. Every invoice waits in the Document Inbox until you apply it, so click Document Inbox. Here's a freight invoice that a forwarder emailed. Click Review to open the invoice. The review screen loads the invoice itself, so you can check every detail against the original. The invoice is on the left, and the details read from it are on the right. The billing entity must be a service provider, like a freight forwarder or customs broker. Then check the invoice number, the date, and the total amount. Under Cost Lines, each charge is matched to a cost category, like Freight or Brokerage. Pick a different category if one is wrong. Lines total should equal the invoice total. Next, select the Targets tab, and add the record this cost is for, such as a shipment. Leave the type on Inbound Shipment, or choose a purchase order or a warehouse transfer. Then type the shipment's number into the search box. Pick it from the list that appears, and the shipment is attached to the bill as its target. This shipment now takes the whole bill, so its allocation share is one hundred percent. The proration strategy is By cost category, so each line splits the way its category says. Here, the ocean freight splits by volume, and the other charges split by cost. Select Apportionment Preview to see how much of the bill lands on each target. Here, all one thousand one hundred and eighty dollars goes to the one shipment. Everything checks out, so the invoice is ready to apply. Click Apply, in the top right corner of the screen. The bill is created, and the shipment's Landed Costs tab opens. Here's the new bill in the list. Per-Line Allocation Preview shows the extra cost each unit now carries. To see it with your other bills, open Orders, and then choose Bills. The new bill is in the list, fully allocated, so nothing is left unallocated. Click the bill's number to open it, and see how the bill was split. Further down, the card How this bill is split has one row for each way its lines were spread. The ocean freight line went by volume, because its category says so. The brokerage and the terminal handling lines went by cost, the safe choice for fees. Each cost category decides how its lines split. To change one, open Settings from the sidebar. Then open the Financials group, and choose Cost Categories from the settings it lists. The Allocate by column shows the choice each category makes for its lines, and the note above the table explains each choice. Freight is set to by volume, because containers are billed by the cubic metre. New categories split by cost, which works for every product.