Enter an expense bill
An expense bill is a supplier cost with no purchase order behind it: rent, software, a 3PL's storage and pick fees, payroll services. You enter it on Orders → Bills, either by typing it in or by uploading the supplier's invoice and letting SKU.io read it. Before you save, the What this does to your books panel shows the exact entry the bill will post.
Freight, duty, and brokerage for a purchase order are different: they belong on your inventory's cost, so enter them as landed cost bills instead.
Before you begin
- The supplier must exist as a service supplier (a landlord, software vendor, 3PL, and so on). A bill from a goods supplier is refused with "Supplier sells you stock. Add this charge to its purchase order as a cost line." See Create and edit a supplier.
- You need the Bills → Create permission (
bills.create). Roles that could create purchase orders have it. - To upload an invoice, invoice reading (OCR) must be turned on for your account. Without it you can still upload the file: it's attached to the bill and you type the details in.
Steps
-
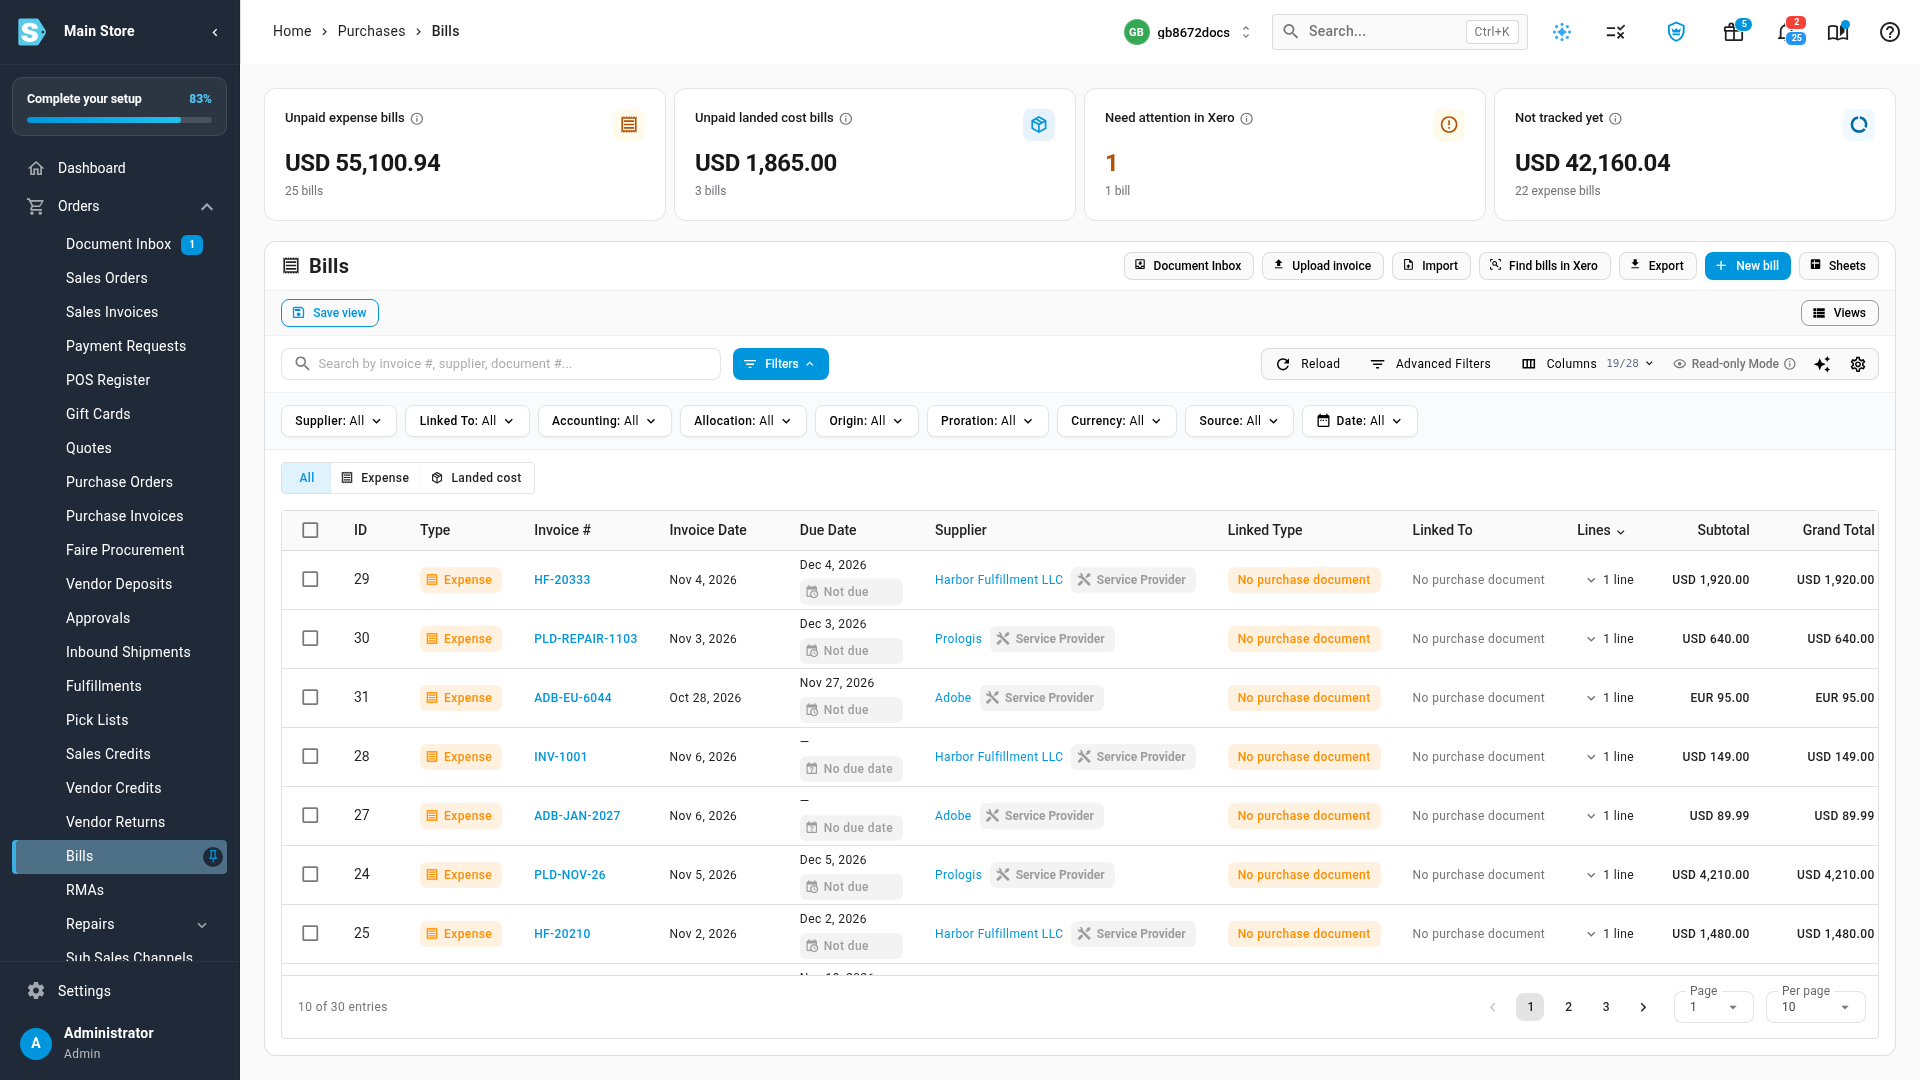
Go to Orders → Bills. The Type column shows Expense or Landed cost for each bill, and the cards across the top split unpaid expense bills from unpaid landed cost bills.
-
Click New bill.
-
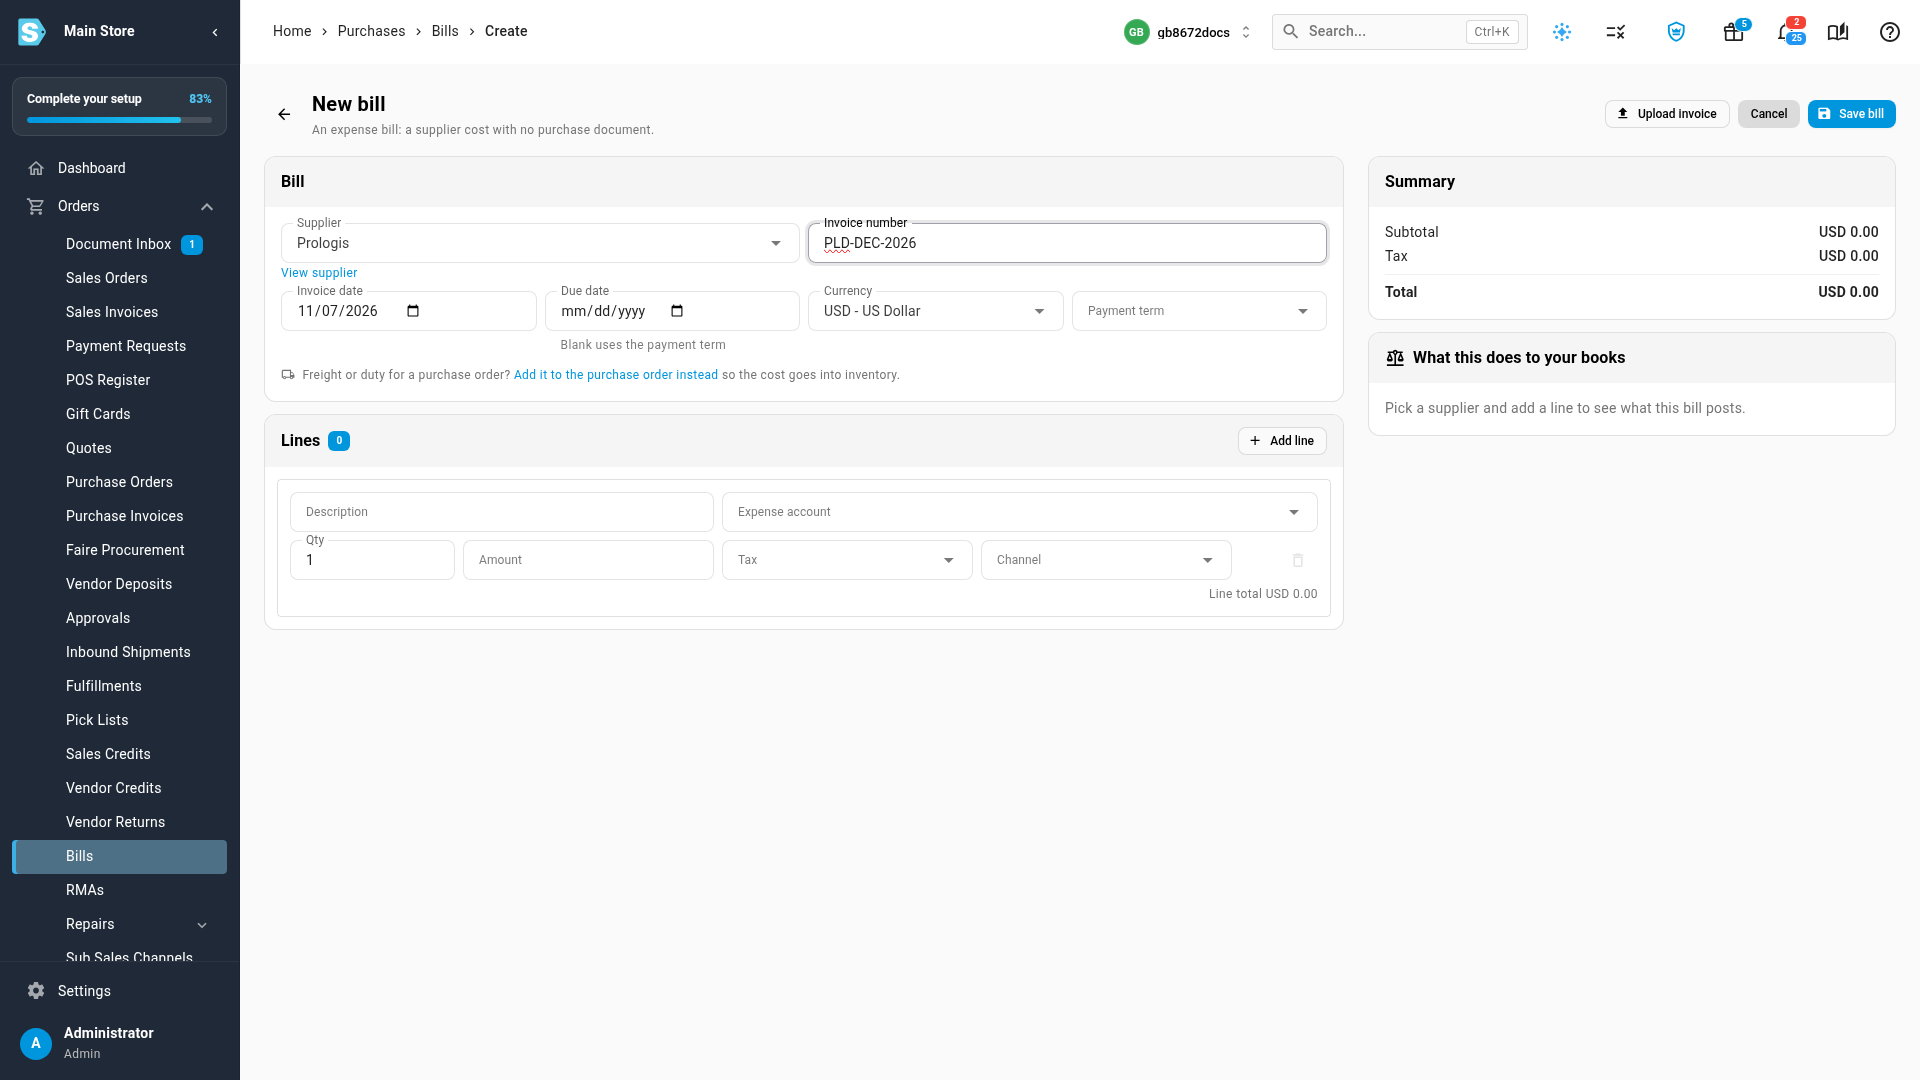
In Supplier, pick the service supplier who sent the invoice. Only service suppliers are listed.
-
Type the Invoice number from the supplier's invoice. Check the Invoice date, and set a Due date, Currency, or Payment term if you need to. A blank due date is worked out from the payment term.
-
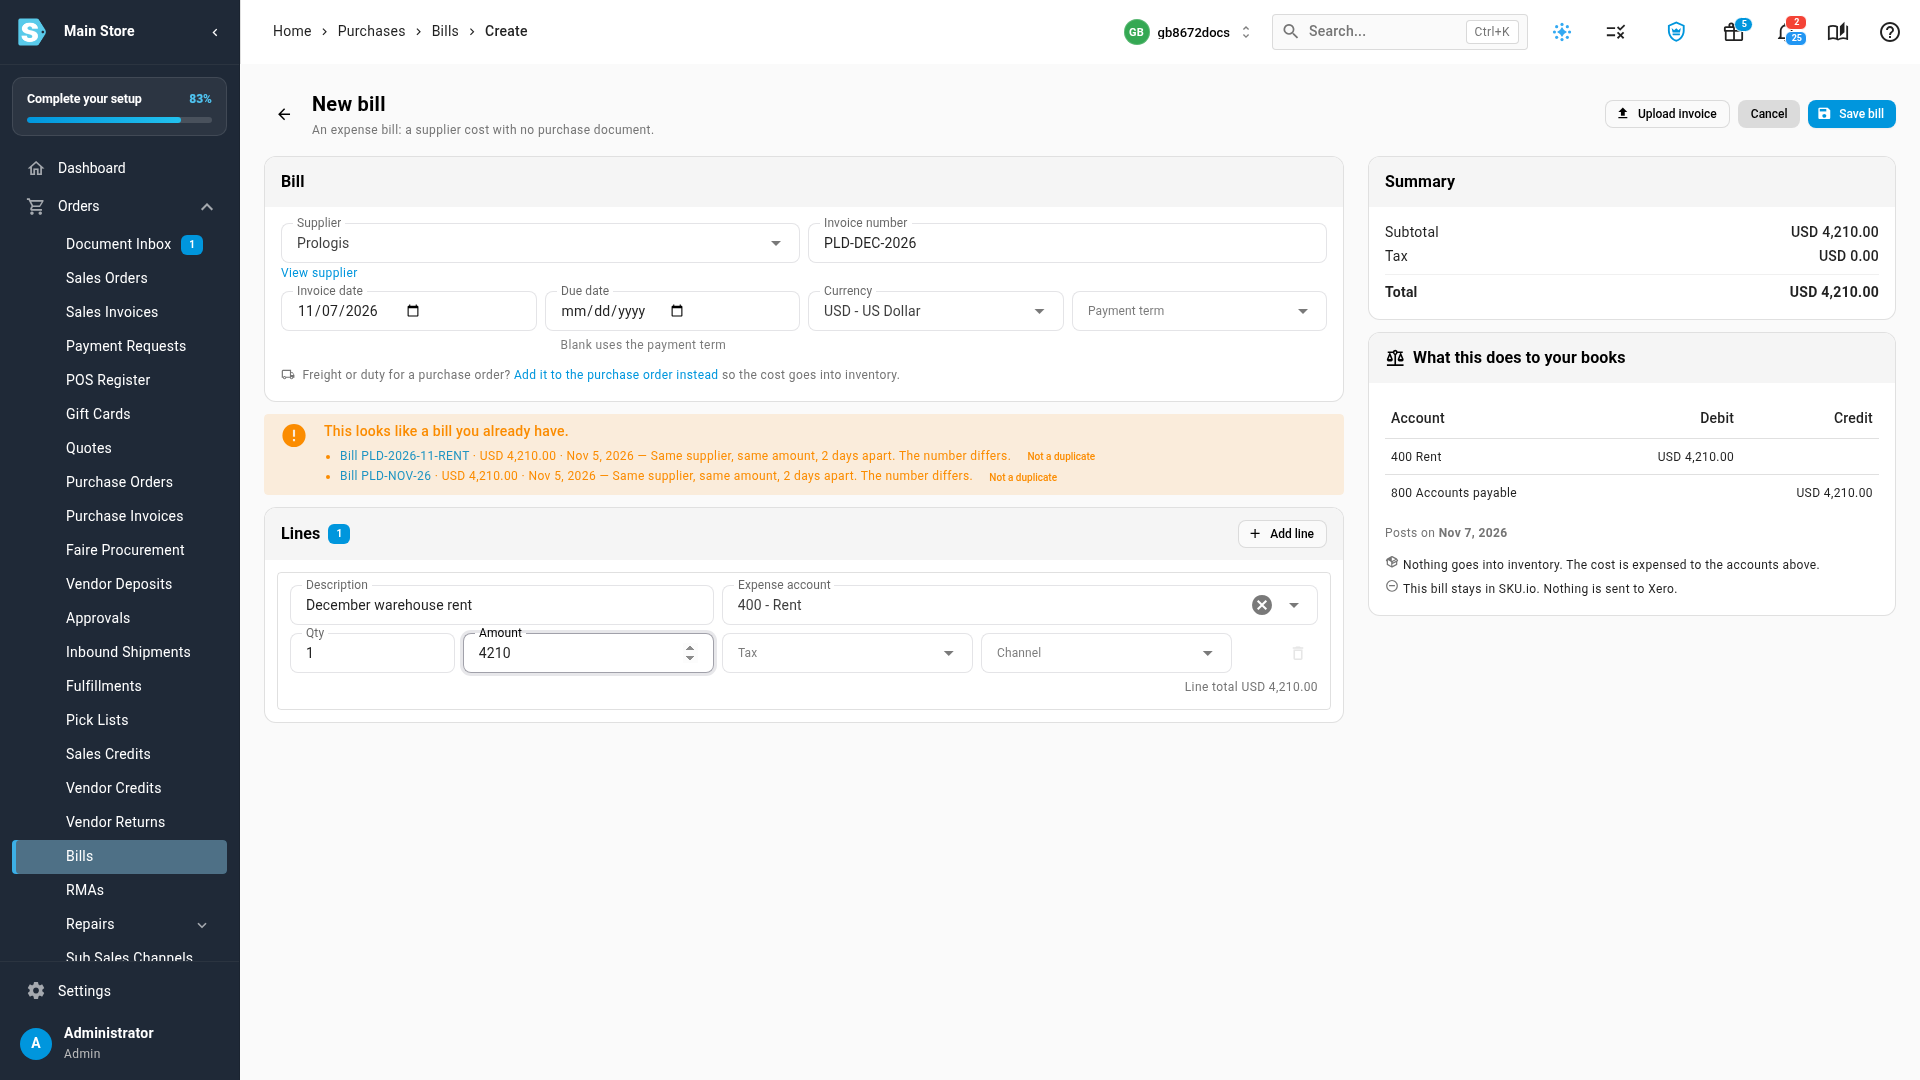
Under Lines, type a Description for the charge.
-
In Expense account, choose the account the cost belongs to. Every line needs one. Inventory, goods-received, and accounts payable accounts are refused, because an expense bill never adds to stock. Prepaid and fixed asset accounts are allowed.
-
Enter the Amount, and the Qty if there's more than one. Add a Tax rate or a Channel if the line needs one. Click Add line for each further charge.
-
Read What this does to your books on the right. It lists every debit and credit the bill will post, the date it posts on, and whether it's sent to Xero or QuickBooks.
-
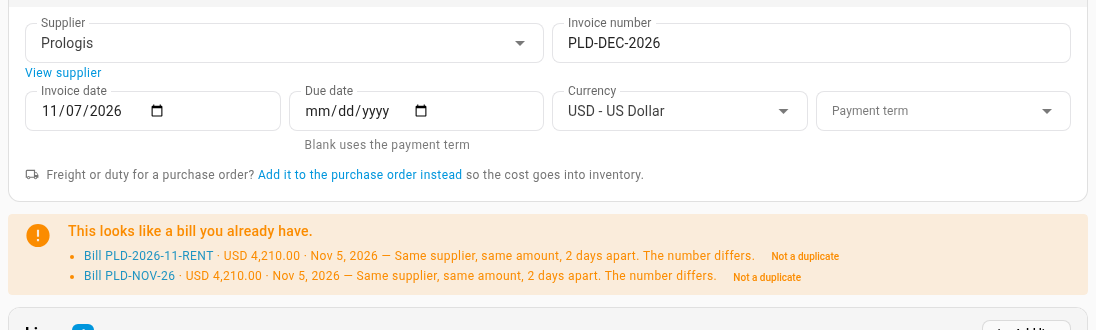
If SKU.io warns that the bill looks like one you already have, check the match (see Duplicate checks). Click Not a duplicate when it's a different bill.
-
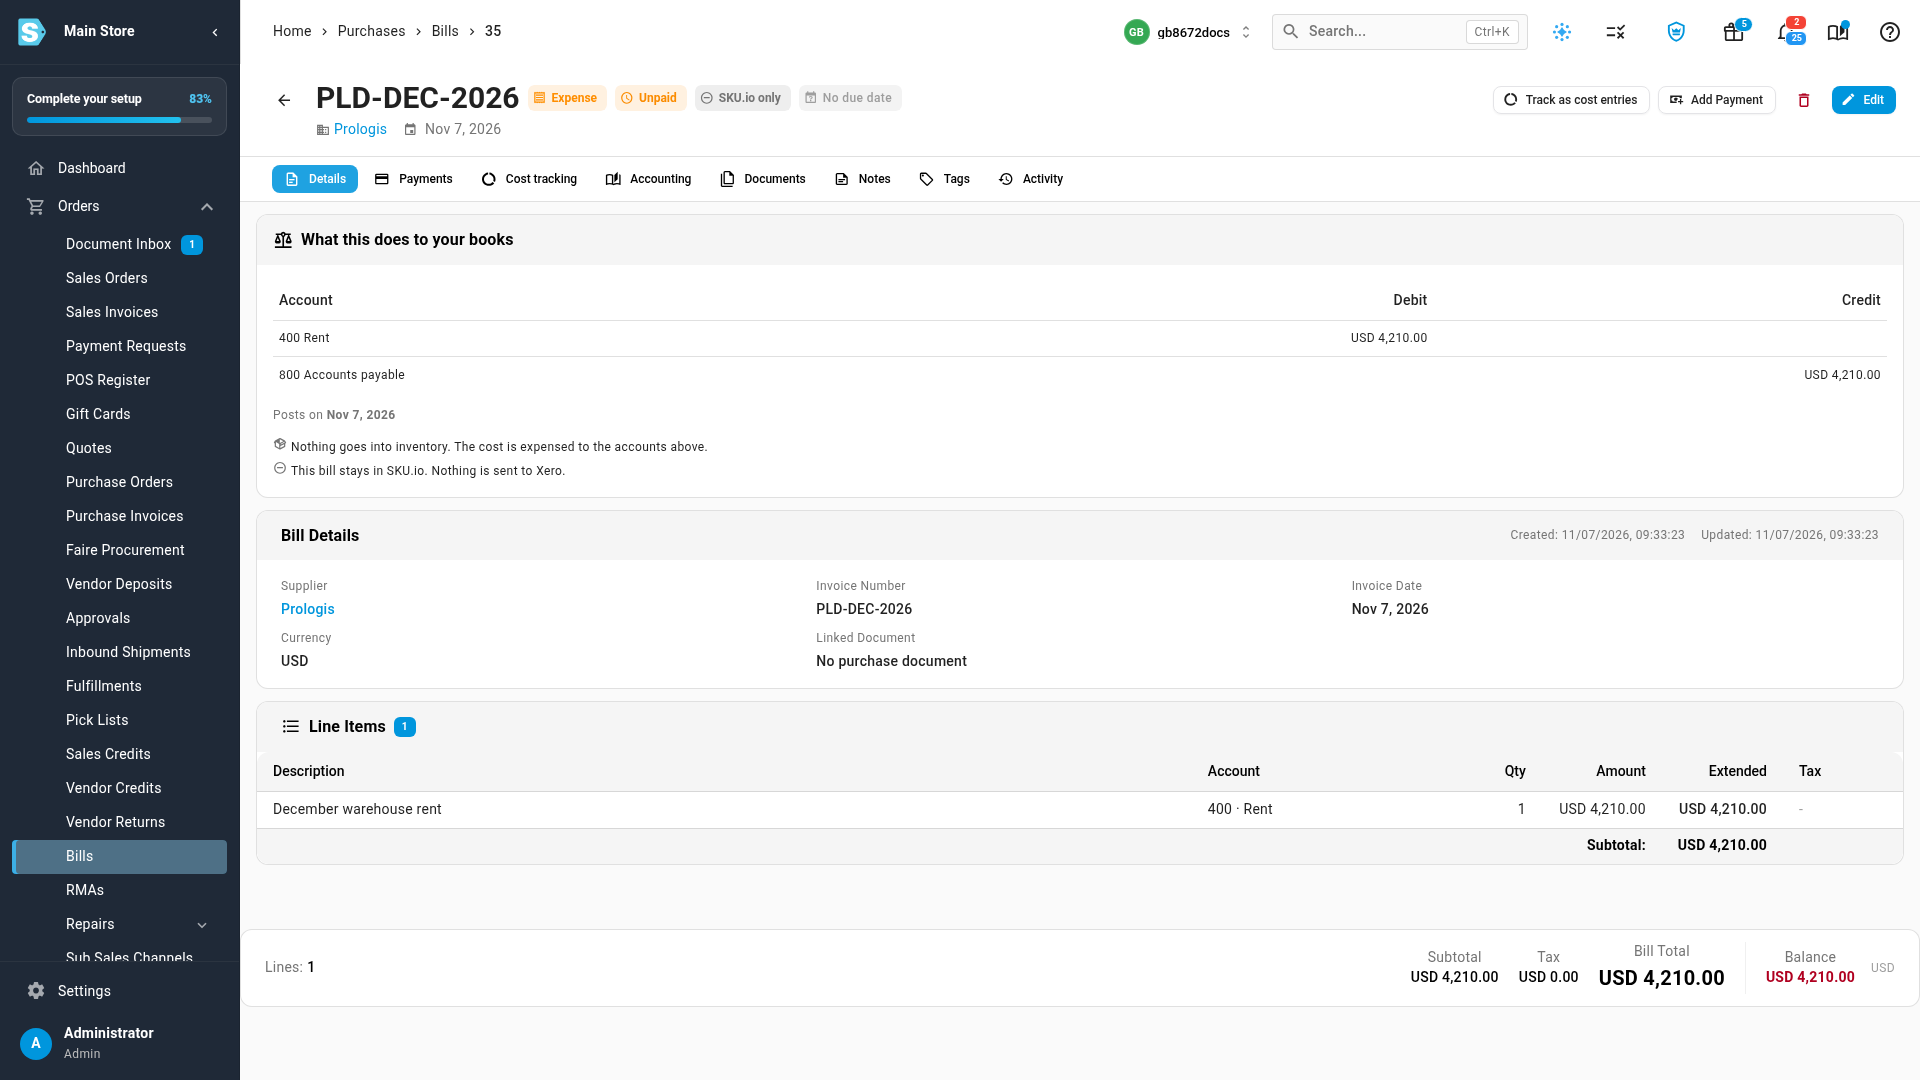
Click Save bill. The bill opens with its type, payment status, and accounting status at the top, and the same books panel on its Details tab.
Enter a bill by uploading the invoice
-
On Orders → Bills, click Upload invoice. (On a New bill you've started, the same button reads the invoice into the fields you haven't filled in yet.)
-
Drop in the invoice, or click to choose it. PDF, PNG, and JPG files up to 20 MB work.
-
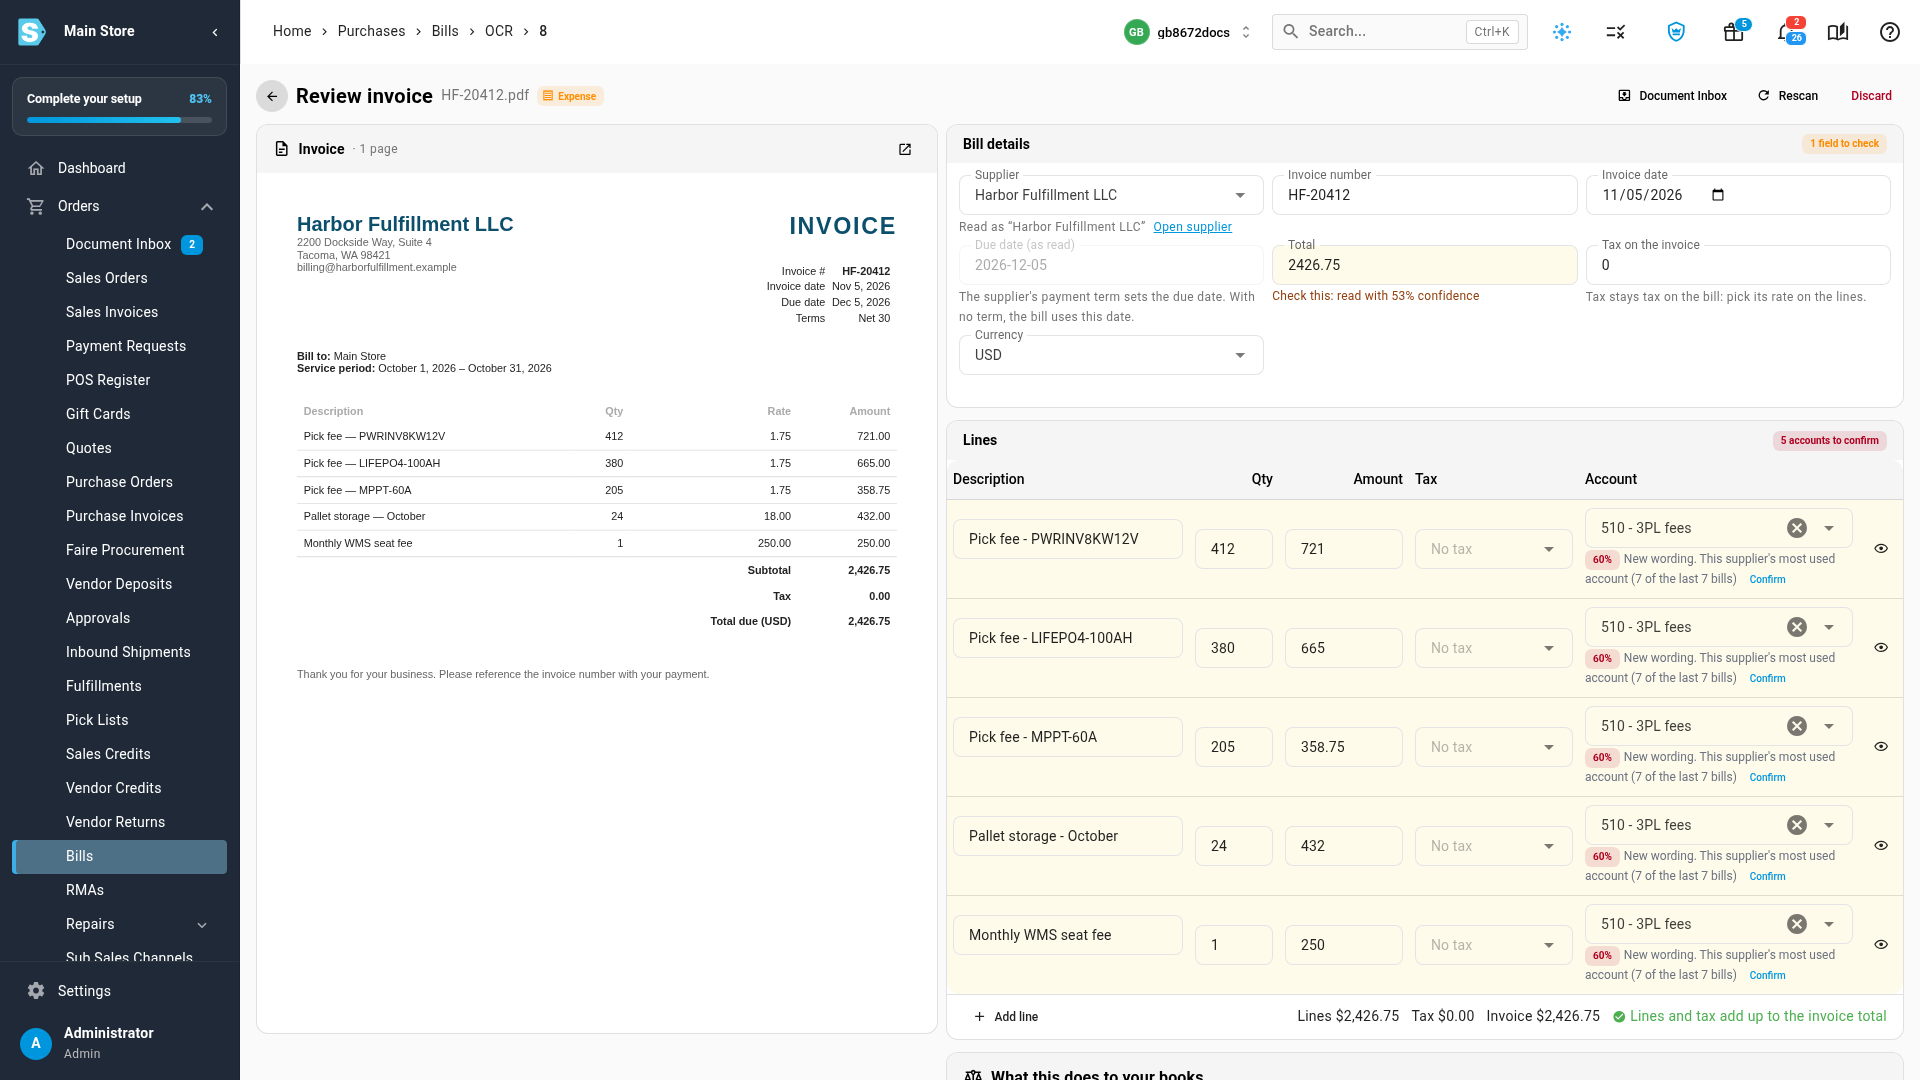
SKU.io reads the invoice and opens Review invoice, with the invoice on the left and what was read on the right. You can leave the page while it reads; the invoice waits in the Document Inbox.
-
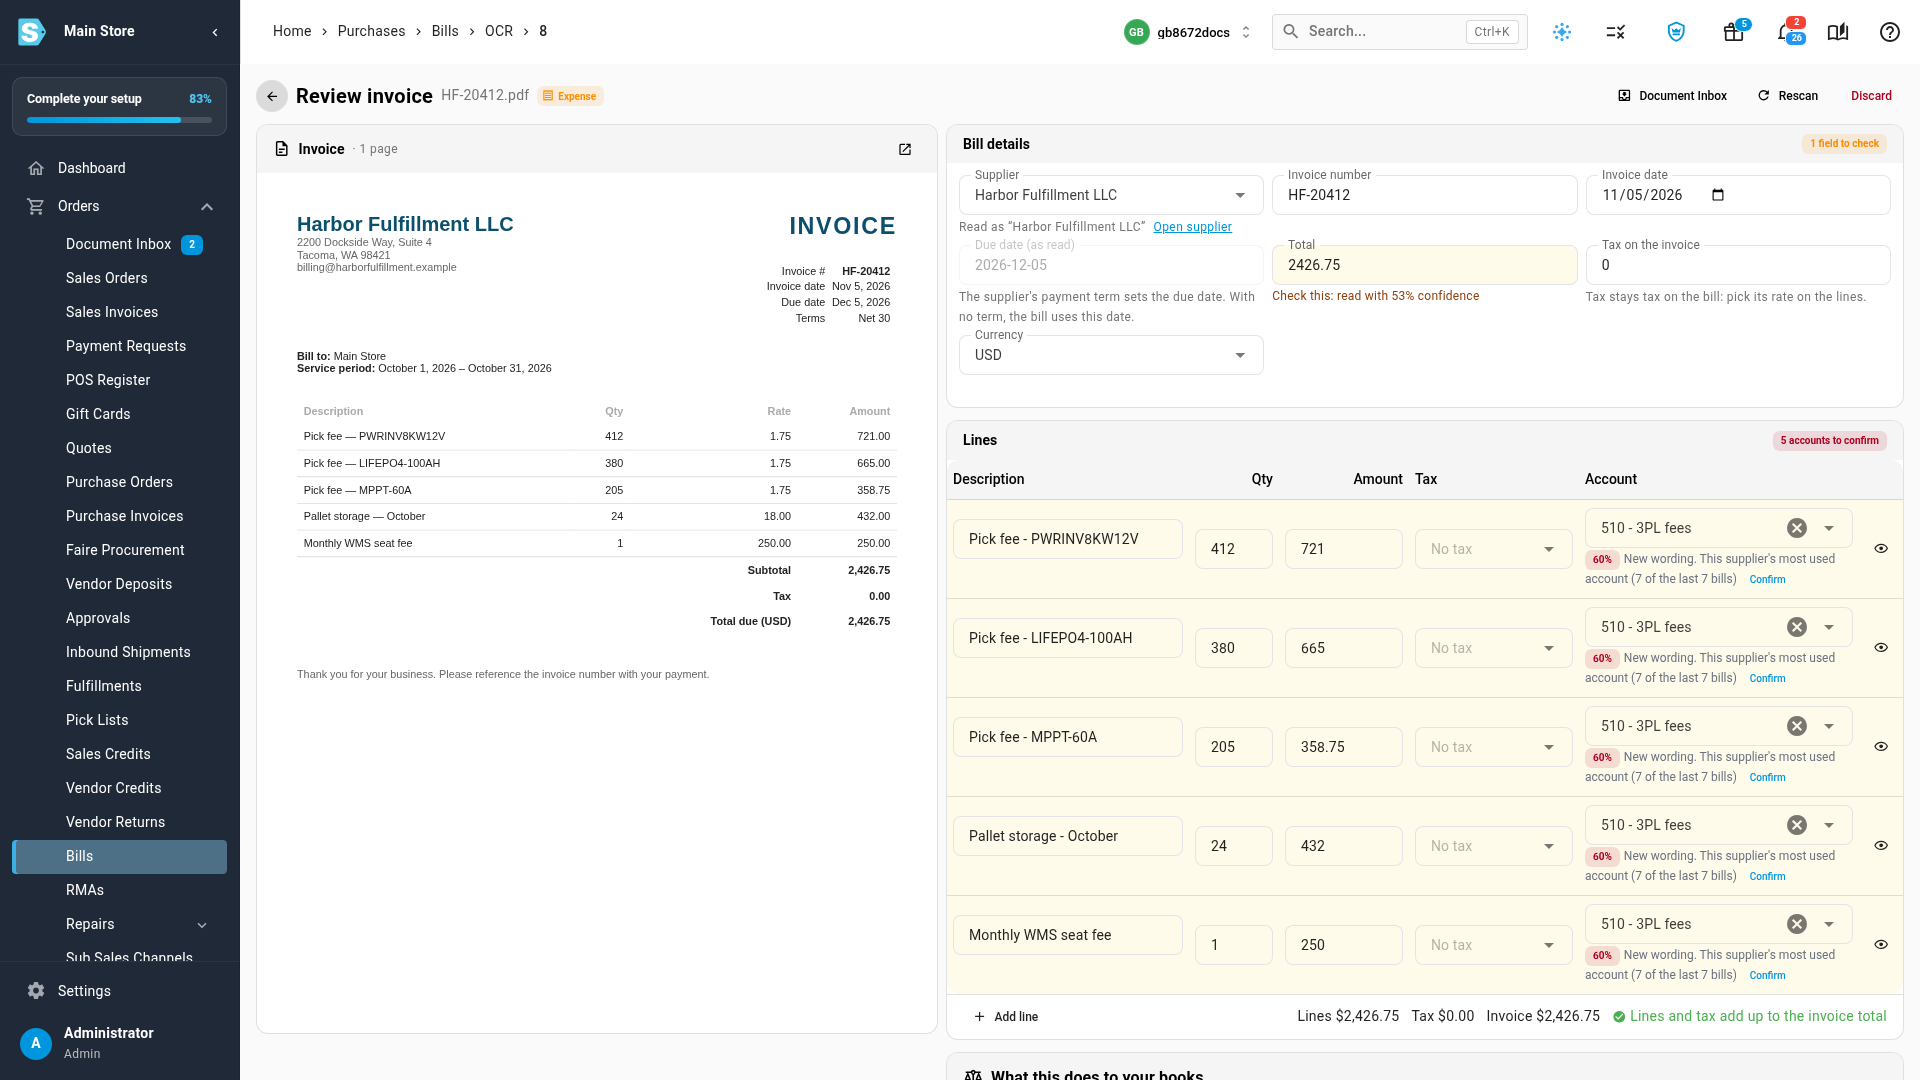
Check the bill details. A field read with low confidence is highlighted and marked Check this, with its score underneath.
-
Check the lines. Each line gets a suggested Account, with the reason it was picked: a rule for this supplier, the account this supplier's past bills used, or the cost category's default. Click Confirm on each suggestion you agree with, or pick another account.
-
When the lines and tax add up to the invoice total, click Create bill. If they don't, the review shows the difference and Create bill stays off until you fix it.
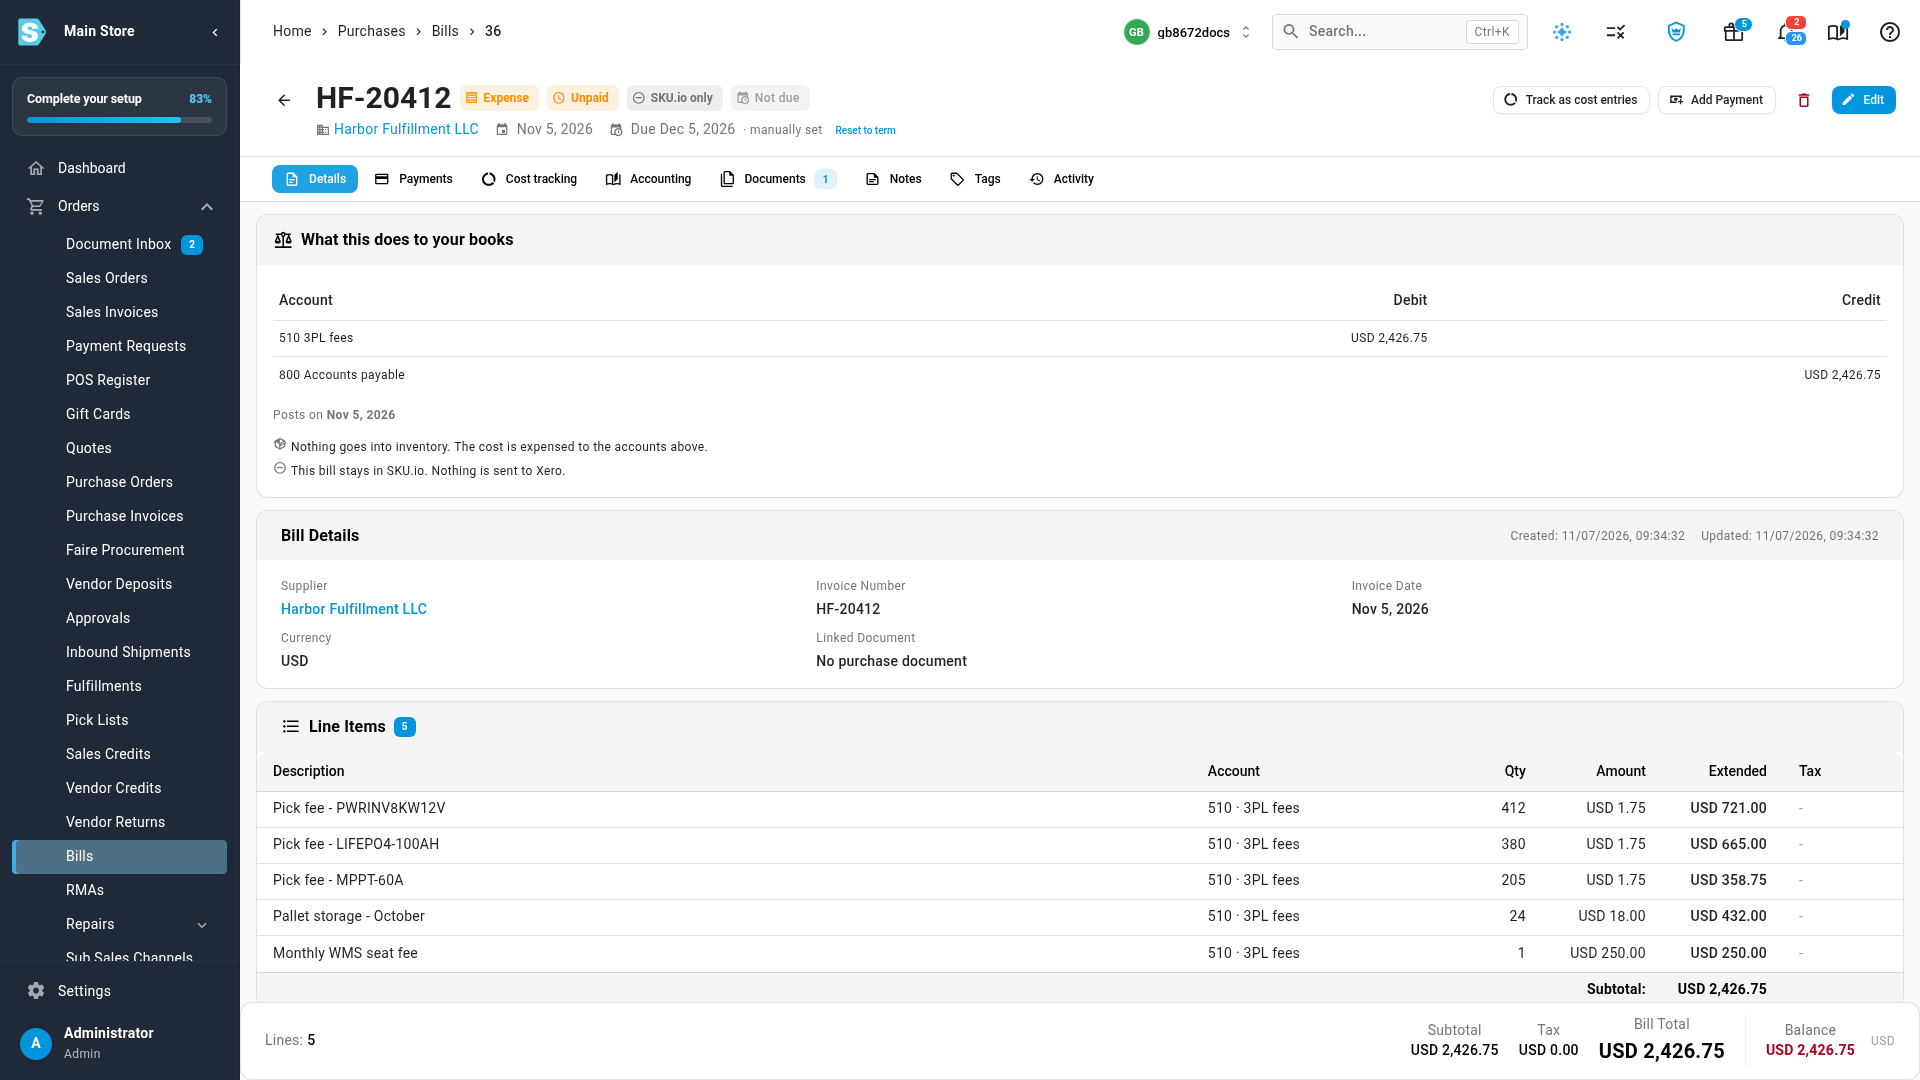
The invoice file stays attached to the bill, on its Documents tab. If reading fails, click Rescan, or enter the bill by hand with the file already attached. If the invoice is really for a purchase order's freight or duty, click Link to a PO instead.
Duplicate checks
SKU.io checks every bill, however it arrives, against your other bills and purchase invoices.
| What it finds | What you see | What you can do |
|---|---|---|
| The same file uploaded before | "You already uploaded this file" | Open the bill that has it. The file isn't added twice. |
| A bill from the same supplier with exactly the same invoice number | "This supplier already has a bill with exactly this number." | Open that bill, or change the number. You can't save a second one. |
A bill from the same supplier whose number matches once spaces, punctuation, and leading zeros are ignored (INV-0123 and INV 123) | "This supplier already has a bill with this number." | Check I've checked, save anyway to save it. |
| A bill from the same supplier for the same amount, a few days apart | "This looks like a bill you already have." | Save it anyway, or click Not a duplicate so that pair is never flagged again. |
Invoice numbers are unique per supplier: two suppliers can both send you INV-1001.
Monthly bills for the same amount, a month apart, aren't flagged.
When bills sync to your accounting system, one more check runs before a bill is sent. A bill that matches one already there is held as Possible duplicate instead of being created twice. See Choose how expense bills sync.
What the books panel tells you
- The entry. Each line's expense account is debited and accounts payable is credited, with tax on its own line.
- Posts on. Usually the invoice date. If that date is in a locked accounting period, the bill keeps its invoice date but posts on the first open day, and the panel and an alert say so before you save.
- Inventory. "Nothing goes into inventory." An expense bill never changes stock or product cost.
- Sync. Whether the bill is sent to Xero or QuickBooks, stays in SKU.io, or is held, following your bill sync settings.
Rules for expense bills
- A bill's type can't change after it's saved. To move an expense onto a purchase order, delete the bill and enter the charge on the purchase order.
- Expense bills aren't allocated to purchase lines. To spread their cost over products for profitability, track them as cost entries.
- You pay an expense bill the same way as any bill, with Add Payment, and bill payment approval policies apply.
Next steps
- Track an expense bill as cost entries: put the cost into product profitability, with AI help.
- Choose how expense bills sync: send bills to Xero or QuickBooks, or keep entering them there.
- Import bills: enter many bills at once from a spreadsheet.
Video transcript
An expense bill is a supplier cost with no purchase order, like rent, software, or a warehouse fee. To enter one, open Orders in the sidebar, and then choose Bills. The Type column shows whether each bill is an expense or a landed cost. Click New bill, and the new bill page opens. In the Supplier field, pick the service supplier who sent you the invoice. Goods belong on a purchase order, so the list shows service suppliers only. Then type the invoice number exactly as it appears on the supplier's invoice. Under Lines, type a short description of the charge. Then click the Expense account field, and choose the account this cost belongs to. Inventory accounts aren't offered, because an expense bill never adds to stock. Enter the amount for the line, and the summary on the right updates as you type. What this does to your books shows the entry before you save. The expense account is debited, and accounts payable is credited. It also shows the date the bill posts on, and whether it's sent to Xero. SKU.io also checks for bills you already have. Here, two bills share this supplier and amount, two days apart, with different numbers. If the match is a different bill, click Not a duplicate, and it won't be flagged again. Then click Save bill. The bill opens with its type, payment status, and accounting status at the top. Its Details tab keeps the same books panel, so anyone can see what it posted. To enter a bill from the invoice itself, go back to Bills, and click Upload invoice. Drop in the PDF, or a photo of the invoice, on the upload area. SKU.io starts reading the invoice straight away, and shows you its progress. While it reads, you're free to leave this page, because the invoice waits in your Document Inbox. Reading a one-page invoice usually takes a few seconds, and a longer one takes a little more. When it's done, the invoice opens for review, with every line it found. The invoice sits beside what was read from it. Check any field marked Check this, and fix it if it's wrong. Each line gets a suggested account, with the reason it was picked. Click Confirm on each suggested account you agree with, or pick a different account instead. Every line needs a confirmed account before the bill can be created. When the lines add up to the invoice total, click Create bill. The bill opens, and the invoice stays attached to it on the Documents tab.