Work through a send run
A send run is the weekly checklist for everything going to FBA, AWD, WFS and FBT. It calculates from the working plan's rules, then walks you through four steps: confirm what the run covers, decide the exceptions, approve each network's send, and create every draft at once. Approvals are shared with everyone working on the run and recorded, so a second person can review the numbers before stock leaves your warehouses.
Before you begin
- You need the Send Planner → Edit permission to start a run, change its rules, resolve exceptions and approve networks. Without it, the tab shows "You can review send runs, but changing a run's rules, resolving exceptions or scheduling runs needs the Send Planner edit permission."
- Creating the drafts in step 4 needs the Send Planner → Draft permission, plus the permissions each network's drafts need. See Send Planner permissions.
- If Auto-create drafts for SKUs with no exceptions is on, starting a run also needs the Send Planner → Draft permission, because the run creates drafts as soon as it finishes. Without it, Start a send run, Recalculate run, Plan anyway and Recalculate are greyed out, and their tooltip says "Send runs auto-create drafts on this account ("Auto-create drafts for SKUs with no exceptions"), so starting one needs the Send Planner draft permission". See Schedule weekly send runs.
- Refresh any network whose stock is out of date, or the run fails. See Recalculate the plan and fix calculation problems.
Start a send run
- Go to Inventory → Send Planner and click the Send runs tab. With no run yet, it shows No active send run, and the next scheduled run time if you have a schedule.
- Click Start a send run.
"Building the send run — track progress in the job tray" confirms it. While it calculates, the page shows Building this send run… with its tracked job number, a progress bar and the numbered stages: finding products and networks, reading stock and velocity and splitting the pool, applying network capacity, and summarising. You can leave the page; the run carries on in the job tray, and the page checks for the result every few seconds.
When it's ready, the title reads Send run # and its number, with an In review chip, the time it started and was calculated, how many SKUs it covers and the warehouses it ships from.
To calculate the run again with today's stock, click Recalculate run next to the title. That starts a new run with the same changes to its rules. Once the new run is calculated, it replaces the earlier one; see When a run is replaced. While a run is still calculating, the button is turned off with "This run is still calculating". If a run can't be calculated, see If the run fails.
Open another send run
The tab opens the newest active run. When there's more than one, a picker beside the title lists them, such as "Run #4 · Oct 15", with "· calculating", "· failed", "· replaced" or "· discarded" where it applies. Pick one to open it from step 1. Each step and each network you're reviewing is part of the page address, so you can share a link to it, and refreshing keeps your place.
A run you open after it was discarded is read-only. A banner says when it was discarded and that the stock it allocated was released, with a link to open the latest active run.
When a run is replaced
Only one send run is live at a time. When a run you started or recalculated finishes calculating, it replaces every earlier ready run:
- The earlier run shows a grey Replaced chip and becomes read-only. Its buttons say "A newer run replaced this one, so it is read-only".
- Stock the earlier run allocated for lines that aren't on a draft yet is released, and the new run can use it. Stock kept for a draft, such as an AWD or manual send, stays with that draft.
- Lines the earlier run already drafted aren't drafted again. If Auto-create drafts for SKUs with no exceptions is on, the new run's banner says how many clean SKU lines it left out because the run it replaced already drafted them, or Nothing was drafted automatically when it had drafted them all.
Scheduled weekly runs replace the previous week's run the same way. In History, a replaced run is listed as Superseded.
The summary panel
Beside every step, This run will send shows the run's total units and each network's units, the units Kept for self-fulfilled orders, and the units Still short after this run, in red when above zero. The steps list above it shows each step's progress, such as "20 to decide" or "0/4 approved", with a check mark once a step is done.
Step 1: What this run covers
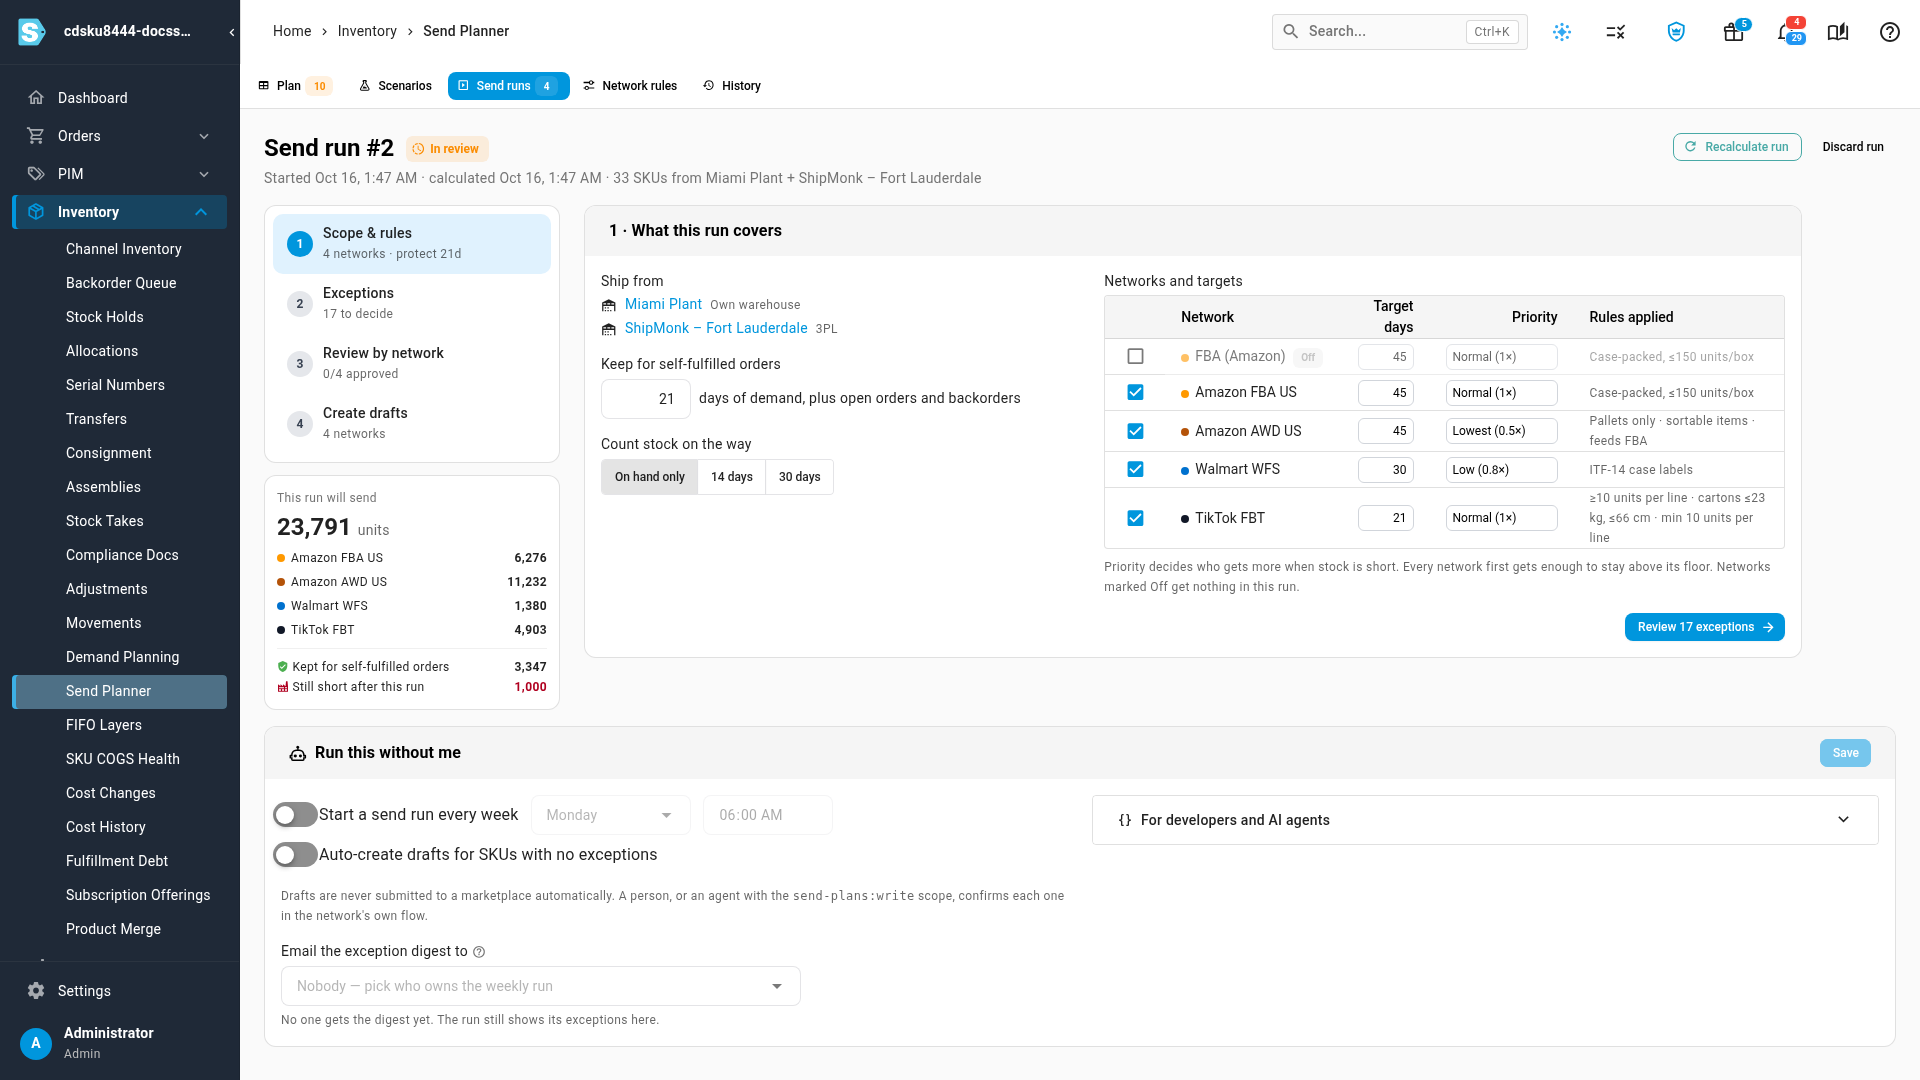
- Check Ship from: the warehouses the run sends from. Each name links to the warehouse, with its type: Own warehouse, 3PL or Supplier.
- Check Keep for self-fulfilled orders: the days of demand, plus open orders and backorders, kept at your warehouses.
- Check Count stock on the way: whether production and purchase orders due within 14 days or 30 days count as already there, or On hand only.
- In Networks and targets, untick a network to leave it out of this run, and change a network's Target days or Priority if this week needs it. Priority decides who gets more when stock is short; every network first gets enough to stay above its floor. Choose Lowest (0.5×), Low (0.8×), Normal (1×), High (1.5×) or Highest (2×); a value from your Network rules that isn't one of these shows as Custom, such as Custom (1.2×). Rules applied summarises the network's own rules, such as case packing, and the smallest send, such as "min 10 units per line". A network that is turned off is dimmed with an Off chip and gets nothing in this run.
- If you changed anything, click Recalculate run with these rules. It shows only after a change.
- Click Review N exceptions.
Changes in step 1 apply to this run only; they don't change Network rules. Recalculating creates a new run with the working plan's rules, this run's changes and your step 1 edits, and starts again from step 1. The new run replaces this one once it's calculated.
Step 2: Exceptions to decide
Step 2 lists one card for each decision the run needs, worst shortfall first. The chip at the top counts how many are open and resolved, and a note says how many SKUs have no exceptions and are ready. If there's nothing to decide, it says "No exceptions in this run. Every SKU is ready to review by network."
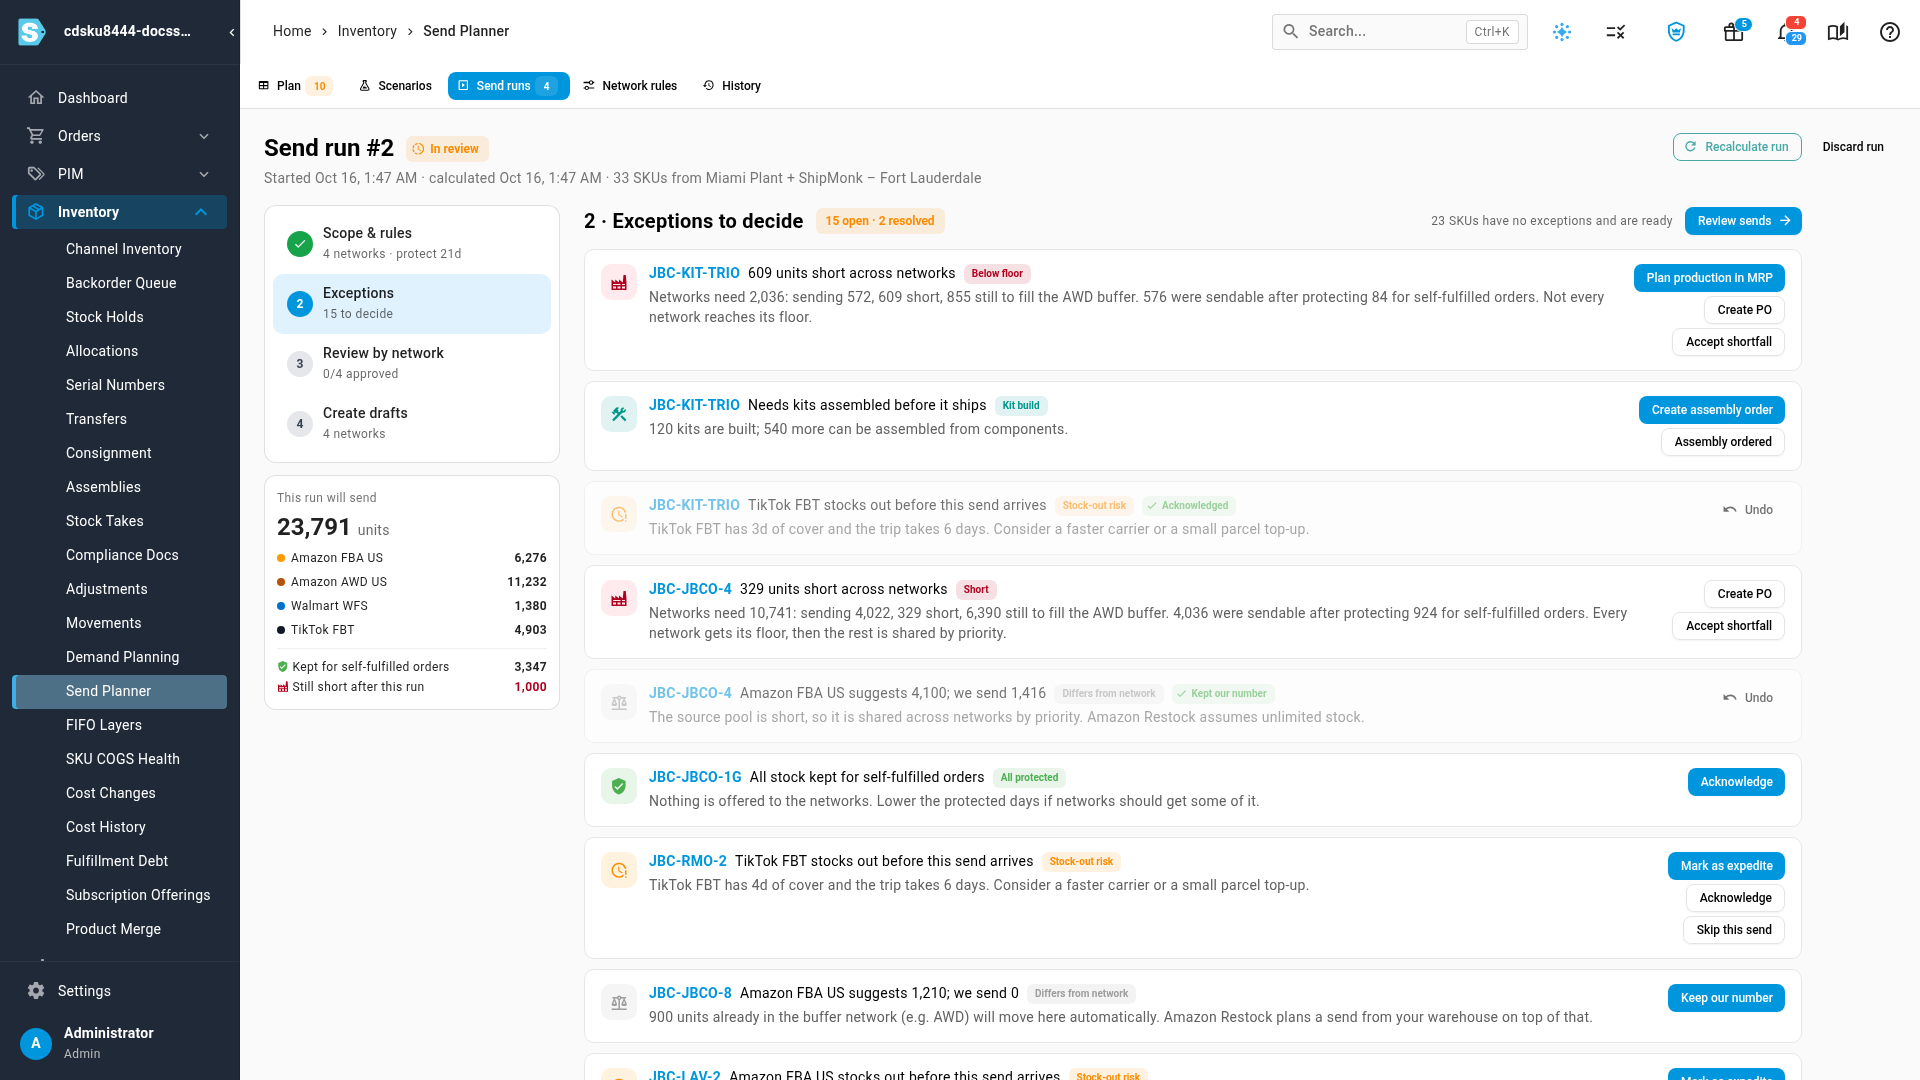
- Read each card: the SKU (linked to the product), what's wrong, a chip naming the exception, and the numbers behind it.
- Click the action that matches your decision. The card shows a green chip with the decision and an Undo button. The chip reads Shortfall accepted, Assembly ordered, Acknowledged, Expedite, Seed accepted, Accepted, Kept our number, Skipped, Kept skipped or Kept excluded, depending on the action you chose.
- When you're done, click Review sends.
You don't have to resolve every card to go on; resolving them records what was decided and by whom. Every decision is saved on the line and can be undone. Deciding needs the Send Planner → Edit permission. Links that take you elsewhere, such as Plan production in MRP or Open listing, don't.
The page loads 100 SKUs with exceptions at a time. When there are more, it says "Showing N of N SKUs with exceptions in this run." with a button to show more below the ones already loaded.
Every exception and what each action does
| Chip | The card says | Actions |
|---|---|---|
| Short | N units short across networks. The body adds up the need: "Networks need N: sending N, N short", plus how much is still to fill the AWD buffer and how much capacity limits or part cases leave behind, when there is any. It then says how much there was to send after protecting stock for self-fulfilled orders. Every network gets its floor, then the rest is shared by priority. | Plan production in MRP opens the master production schedule with the SKU and shortfall filled in; it shows only for a manufactured product or a kit. Assemble kits opens a new assembly; it shows for a kit whose components can build more. Create PO opens a new purchase order with the SKU and shortfall; it shows only if you can create purchase orders. Accept shortfall records that you'll send what there is. |
| Below floor | As Short, but not every network reaches its floor. | As Short. |
| Kit build | Needs kits assembled before it ships, with how many kits are built and how many more can be assembled from components. | Create assembly order opens a new assembly for the kit. Assembly ordered records that you did. |
| All protected | All stock kept for self-fulfilled orders. Nothing is offered to the networks. | Acknowledge. To offer some stock to the networks, lower Keep for self-fulfilled orders in step 1 and recalculate. |
| Stranded | Network: the listing is stranded. The network is excluded for this SKU until the listing is active; the stock stays at your warehouse or goes to other networks. | Open listing. Keep excluded marks the line Skipped in this run and releases any stock allocated for it. |
| Ineligible | Network: the reason the listing isn't eligible, such as an unpublished listing. | Keep skipped marks the line Skipped in this run and releases any stock allocated for it. Open listing. |
| Stock-out risk | Network stocks out before this send arrives: its days of cover against the trip's lead days. Consider a faster carrier or a small parcel top-up. | Mark as expedite, Acknowledge, Skip this send. |
| New listing | Network: new listing, seeding N units. There's no sales history yet, so the seed quantity is sent; velocity takes over once it sells. | Accept seed. Change seed opens Network rules at that network's card. Skip this send. |
| Capacity | Network: cut to fit the capacity limit, with what it needs against this SKU's share of the capacity. | Accept. Raise limit opens the capacity limits on Network rules. Skip this send. |
| Stale data | Network: planned with stale stock. The network's stock was older than the freshness limit, so its need may be wrong. Appears after Plan anyway. | Acknowledge. Refresh the network's stock, or check the quantity before sending. |
| Differs from network | Network suggests N; we send M, with the network's reason when it gives one. | Keep our number, Skip this send. |
Skip this send shows only on a line that still sends units and hasn't been drafted. Skip this send, Keep skipped and Keep excluded all take the line out of the run: it's marked Skipped, any stock allocated for it is released, and the run's totals and the network's units drop straight away. Click Undo to put the line back in the run. If the network was already approved, its approval goes stale and needs approving again.
You can't resolve a line that has already been drafted. The message says "This line has already been drafted; resolve it in the network draft instead."
Step 3: Review by network
-
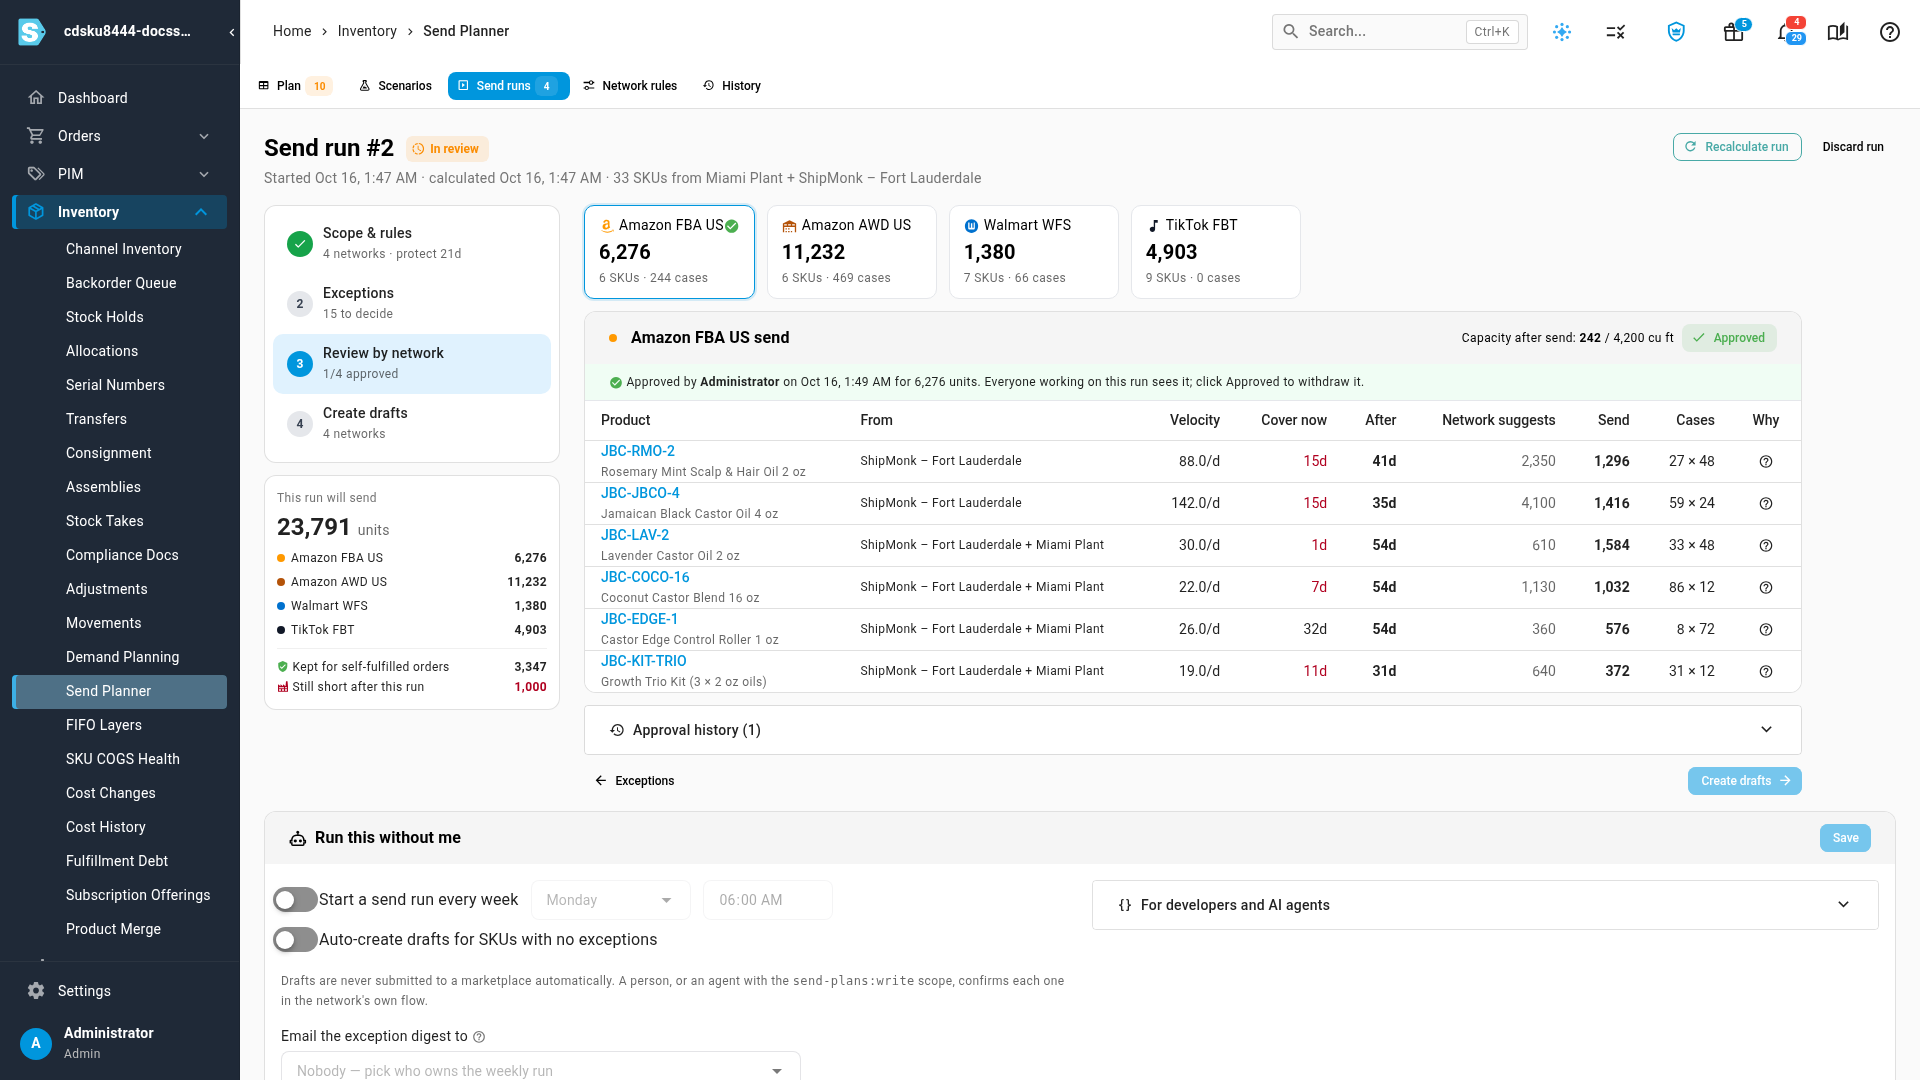
Click a network's tile. Each tile shows its units, SKUs and cases, with a check mark once approved, or a warning icon when it has changed since it was approved.
-
Review the lines in Network send:
Column What it shows Product SKU, linked to the product, and name. From The warehouses the units ship from. Velocity Daily sales used for the send, or "new" with no sales history. Cover now Days of cover at the network today, red when below the floor. After Days of cover after the send lands, or "seed" for a new listing. Network suggests The network's own suggestion. Hidden for a buffer network such as AWD. Send Units to send. A pencil marks a changed quantity. Cases Cases × case pack. Why Hover the icon (on a phone, tap Why this number) for the step-by-step calculation. When the network has a capacity limit, Capacity after send shows what it holds after the send against the limit, in cubic feet or units, such as "Capacity after send: 242 / 4,200 cu ft". If nothing needs sending, the table says every SKU is at or above the network's target. It lists up to 100 SKUs; with more, it says "Showing N of N SKUs."
-
Click Approve network send, such as Approve Amazon FBA US send or Approve AWD send. The button turns to Approved, and a note says who approved it, when, and for how many units.
-
Repeat for every network with units. Once they're all approved, the steps list shows 4/4 approved and the run's chip changes from In review to Approved.
-
Click Create drafts. It's turned off until every network with units is approved, and its tooltip counts them: "Approve each network's send to continue (N of N approved)."
An approval is for the units at that moment. If they change afterwards, for example because you skipped a line, the approval goes stale: the note says who approved how many units and what it is now, and the button reads Approve again. To withdraw an approval, click Approved. A network with nothing to send can't be approved, because there's nothing to approve.
Approve is turned off while the network's lines load ("Loading this network's lines…") and after a load error ("This network's lines could not be loaded — try again before approving"); click Try again in the table.
To change a quantity in a run, skip the line in step 2, or change the run's rules in step 1 and recalculate.
Approval history
Approval history under the table lists every approval and withdrawal, newest first: who approved or withdrew the approval of which network, for how many units, and when. If the run drafted lines automatically, because Auto-create drafts for SKUs with no exceptions is on, it also records Auto-created drafts for each network with its units and SKU lines "without approval", or the error if automatic drafting failed. See Schedule weekly send runs.
Step 4: Create drafts in each network
- Click 4 · Create drafts in each network in the steps list, or Create drafts in step 3. Until every network with units is approved, it says "Approve every network with units in step 3 first."
- Check the drafts: one row for each network and the warehouse it ships from, with its SKUs, units, cases and Opens in, the network flow where you finish it. Untick a network or a row to leave it out.
- Leave Allocate the source stock now ticked, so other orders can't take the stock before the drafts are verified.
- Click Create N shipment drafts. For each option, see Create shipment drafts.
Step 4 uses the same drafts panel as the Plan tab, so drafts already started for this run are picked up instead of created twice. The stock each draft allocates is released if the draft is deleted, or after 72 hours unused unless your account sets another time. Nothing is submitted to Amazon, Walmart or TikTok until you finish each draft in its network. See Follow up on shipment drafts.
If drafts were created automatically when the run finished, a banner at the top of the run says how many SKU lines were drafted, when, and the units per network, and that they didn't wait for the approvals in step 3.
Discard a run
- Click Discard run next to the run's title.
- Read the confirmation, Discard this send run?: the run is archived and every allocation it still has is released, so that stock is free again, including stock allocated for AWD or manual sends not yet entered in the network. Drafts already created stay in each network.
- Click Discard.
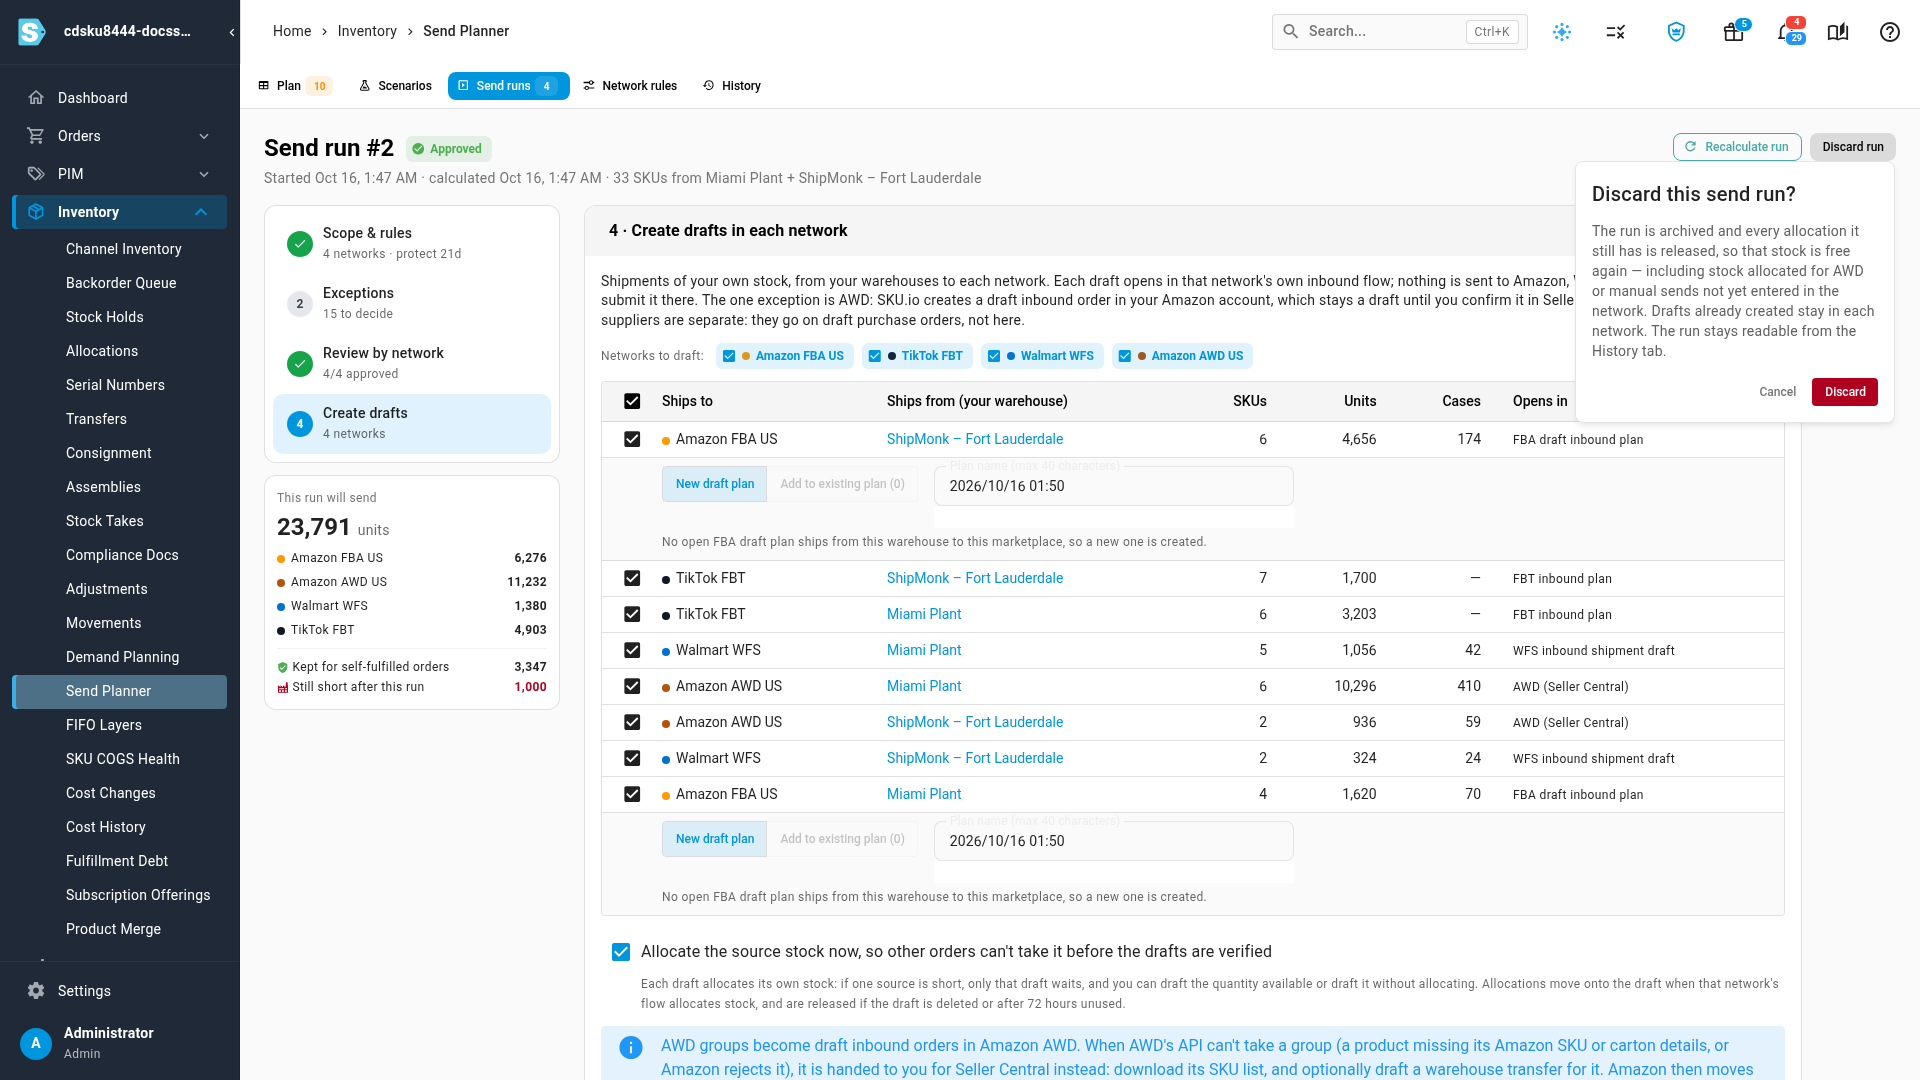
"Send run discarded and its allocated stock released" confirms it, and the tab opens the newest remaining run. The discarded run stays readable: it's under Archived in History, and you can open it there. See Archive plans and review history.
If something goes wrong
If the run fails
If the run can't be calculated, a red banner reads This run could not be calculated. with the reason. The usual reason is out-of-date stock at a network: "Network stock is out of date (network: …). Refresh it, or plan anyway."
- Click Recalculate to try again after you refresh the network's stock.
- Click Plan anyway to calculate with the out-of-date stock. The lines going to that network get a Stale data exception in step 2, because their numbers may be too high.
Both buttons need the Send Planner → Edit permission.
Next steps
Video transcript
To work through this week's sends, go to Inventory, then Send Planner. It starts on the Plan tab, which shows how much to send from your warehouses. Click the Send runs tab, where this week's run is waiting. A send run is your weekly checklist for FBA, AWD, WFS and FBT. The newest run opens first, in review. This run will send totals the units going to each network. Step one shows what this run covers. Ship from lists the source warehouses for this run. Keep for self-fulfilled orders sets how many days of demand stay at your warehouses. Count stock on the way decides whether incoming purchases and production count. In Networks and targets, untick a network to leave it out of this run. You can also change its target days or priority, just for this week. Then click Review 17 exceptions. Step two lists one card for each decision, worst shortfall first. Each names the SKU, the problem, and the supporting numbers. Click the action that matches your decision. Here, a network stocks out before this send arrives, so click Acknowledge. The card shows a green Acknowledged chip and an Undo button. On the next decision, Amazon suggests more than the run sends. Click Keep our number to keep the run's quantity. You don't have to resolve every card, but each decision is recorded. After deciding, click Review sends. Step three shows what goes to each network. Click any of the tiles above to see the lines each one gets. Check each row's source, its cover now and after, and its units. Hover the Why icon for the step-by-step calculation. When everything looks right, click the network's Approve button. It turns to Approved, with who approved it, when, and for how many units. Repeat for every network with units. Click the next network's tile, wait for its lines, then click its Approve button. Next, click the third network's tile and check its lines. When they look right, click Approve to sign off on that network. Finally, click the last network's tile, look over its lines, and Approve its send. Approvals are shared with everyone working on the run, and recorded. With every network approved, click Create drafts. Step four lists one row for each network and warehouse. Opens in names the flow where you finish each draft. Leave Allocate the source stock now ticked, so other orders can't take that stock. Then click Create 8 shipment drafts, at the bottom, to create them all at once. Nothing goes to Amazon, Walmart or TikTok until you finish it in that network. Each AWD draft waits in Seller Central for your confirmation. If you'd rather start over, click Discard run, next to the run's title. The run is archived, and every allocation it still has is released. Drafts already created stay in each network. Click Cancel to keep working on this run. That's the weekly send run: scope, exceptions, approvals, and drafts.