Compare and promote a scenario
Once your scenarios have calculated, compare them with the working plan to see what each would change: units per network, how much is still short, which lines stay under their floor, and how full each network gets against its capacity limit. When one is better, promote it. Its rules become the working rules for everyone, and the working plan recalculates with them. Its changes stay on the working plan through every later recalculation, and they win over Network rules for the same fields, until you click Tuned and then Reset to Network rules. See what a promoted scenario leaves on the working plan.
Before you begin
- At least one scenario must be Ready. See Try a what-if with a scenario.
- A ready working plan is needed to compare against. Without one, Compare says "There is no ready working plan to compare with yet."
- Promoting needs the Send Planner → Edit permission. Comparing doesn't.
Compare scenarios with the working plan
- Go to Inventory → Send Planner and click the Scenarios tab.
- In the Scenarios list, tick the box at the start of each scenario you want to compare, up to three.

- Read the Compare card under the list. Until you tick one, it says "Tick up to 3 scenarios in the list to compare them with the working plan." If you tick more than three, only the first three are compared and a note says "Comparing the first 3 selected scenarios with the working plan."
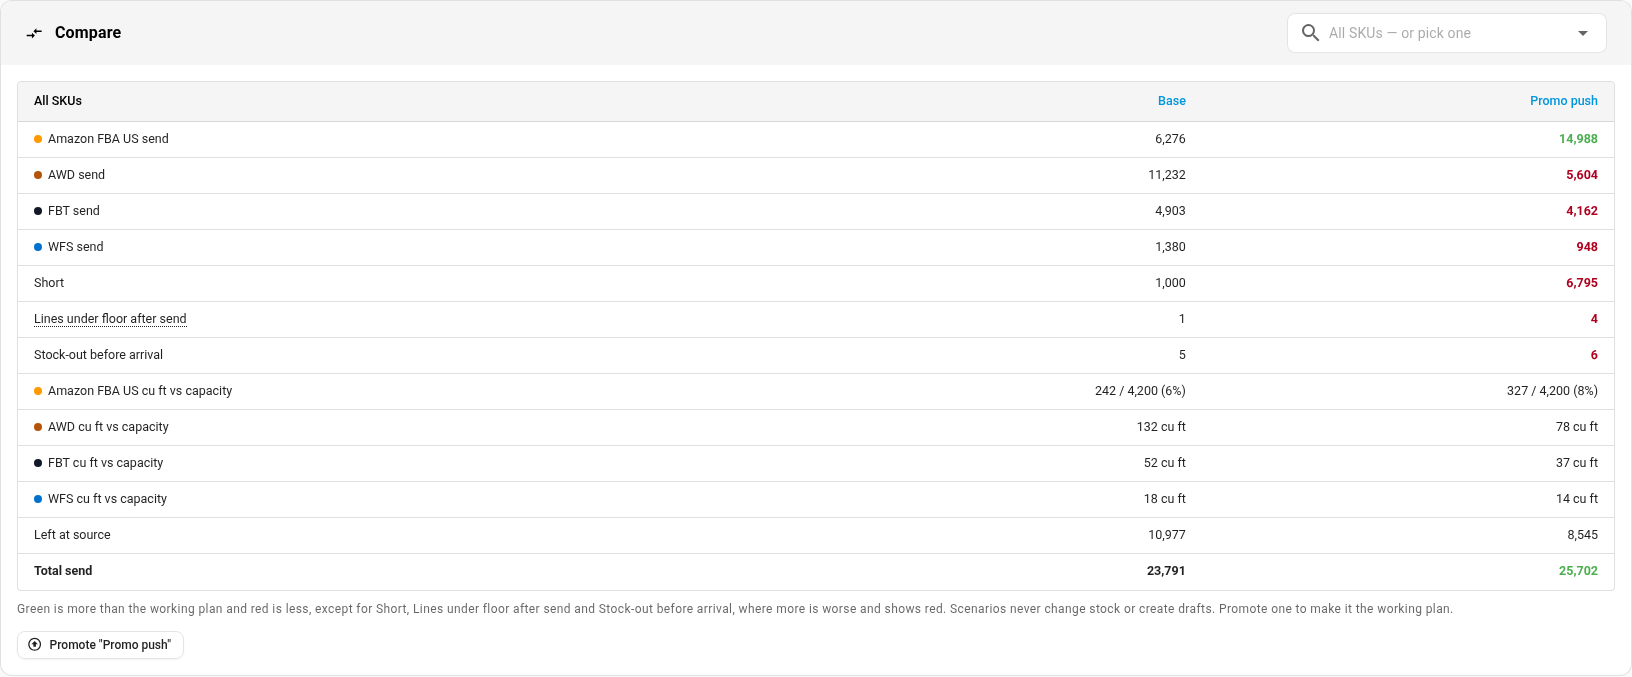
The first column, Base, is always the working plan. Each column header is a link that opens that plan on the Plan tab: Base opens the working plan, a scenario opens read-only. A number is green when it's more than the working plan and red when it's less, except for Short, Lines under floor after send and Stock-out before arrival: for those, more is worse, so a higher number shows red. The note under the table says the same: "Green is more than the working plan and red is less, except for Short, Lines under floor after send and Stock-out before arrival, where more is worse and shows red." The capacity and Left at source rows aren't colored, except that a network over its capacity limit shows in bold red.
| Row | What it shows |
|---|---|
| Network send | Units the plan sends to that destination. Each destination gets its own row, such as Amazon FBA US. |
| Short | Units the networks need that your warehouses can't cover. |
| Lines under floor after send | Lines (one SKU at one network) still below their floor after the send lands, across every SKU in the plan. Hover the label for the definition. |
| Stock-out before arrival | Lines that run out before the send arrives. |
| Network cu ft vs capacity (or units vs capacity) | For a network with a capacity limit: what it holds after the send against the limit, with the percentage, for example "309 / 4,200 (7%)". It's bold red when over the limit. A network with no limit shows only the cubic feet the send adds. |
| Left at source | Units left at your warehouses after the sends. |
| Total send | All units the plan sends. |
Compare one SKU
- In All SKUs — or pick one at the top of the Compare card, type at least two characters of a SKU or name.
- Pick the product.
The table now shows that SKU's send to each network, its shortfall, Networks under floor after send and what's left at source. The capacity and stock-out rows show only for all SKUs. The note under the table then reads "Green is more than the working plan and red is less, except for Short and Networks under floor after send, where more is worse and shows red." The first column header becomes the SKU, linked to the product page. Clear the field to go back to All SKUs.
Promote a scenario
- Click Promote on the scenario's row, or Promote "name" under the Compare card. The button is turned off for a scenario that isn't ready yet, with the reason "Only a calculated scenario can be promoted".
- Read the confirmation, Promote "name"?: "Its rules become the working policy for everyone and the working plan recalculates with them. Lines already drafted are not changed." The warning under it says that edits on the current working plan carry forward only where the same SKU and network still exist. The scenario's changes, such as a demand multiplier, stay on the working plan after this, through every later Recalculate, until you reset them. A temporary promotion like a sale multiplier keeps applying after the sale ends, so reset it with Tuned → Reset to Network rules when the sale is over; see what a promoted scenario leaves on the working plan.
- Click Promote and recalculate.
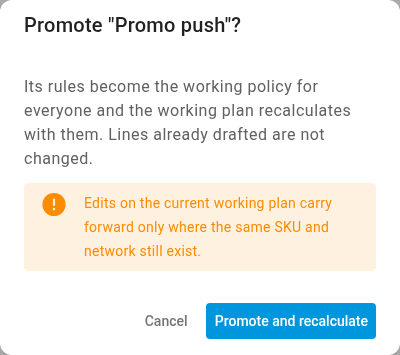
The message "Scenario promoted — the working plan is recalculating" confirms it, and you're taken to the Plan tab. A new working plan calculates with the scenario's rules, follows in the job tray, and replaces the previous working plan once it's ready. The previous plan is then Superseded in History. If the scenario was limited to a saved view's products, the new working plan is limited to the same products. That limit lasts only until the next Recalculate, which goes back to all products.
The scenario itself stays on the Scenarios tab, so you can compare or promote it again later.
When the working plan is already calculating
You can't promote while a working plan is calculating, because the scenario's rules would never be applied. The promotion is refused with "The working plan is calculating right now. Promote the scenario once it finishes." Wait for the calculation in the job tray to finish, then promote again.
Next steps
- Read the send plan to work with the new working plan.
- Work through a send run
- Archive plans and review history to clear out scenarios you no longer need.