Customize lifecycle states
A lifecycle state decides what SKU.io does with a product at each stage of its life: whether it's planned, reordered, backordered and listed, and how its channel quantity is worked out. SKU.io comes with Active, Phasing out and Discontinued. On the States tab you change what each of them allows, and you add your own states, such as a quality hold that returns products to Active after two weeks.
Before you begin
- You need the Settings → Edit permission to change states. Without it the tab says "You can view these rules. Ask an admin with Settings access to change them.", and the cells, Add state and the edit buttons are greyed out.
- Read How product lifecycle works if you're new to lifecycle states.
- A change to a cell affects every product already in that state, not only products you move later.
Change what a state allows
- Go to Settings, click Products, then click Product Lifecycle. The page opens on the States tab.
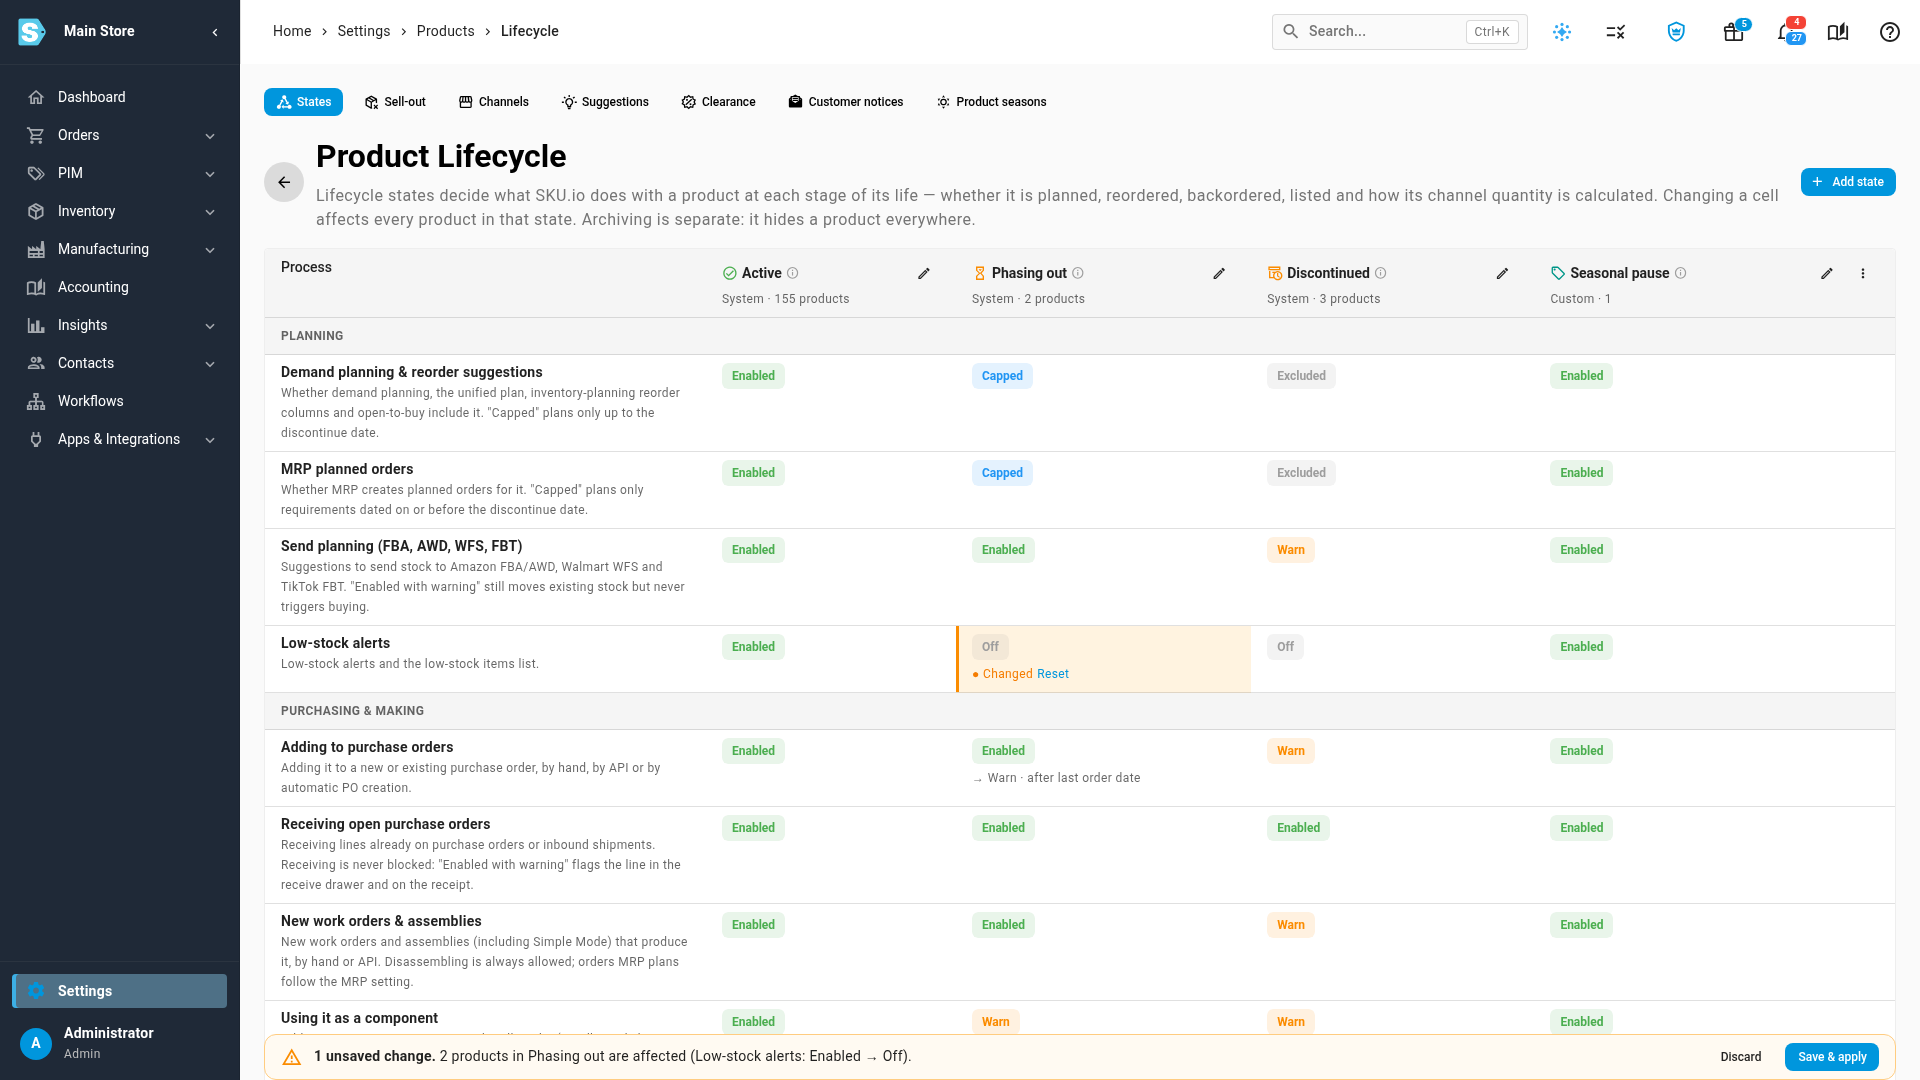
- Find the process in the Process column. The rows are grouped under Planning, Purchasing & making and Selling & channels, and each one has a line under its name saying what it controls.
- Click the cell where that process meets the state you want to change.
- Choose the new value from the list, for example Off or Enabled with warning. The cell shows the new value at once, highlighted in light orange, but nothing changes until you save.
- Read the bar at the bottom of the matrix. It counts your unsaved changes and says how many products each one affects, for example "2 products in Phasing out are affected (Low-stock alerts: Enabled → Off)."
- Click Save & apply.
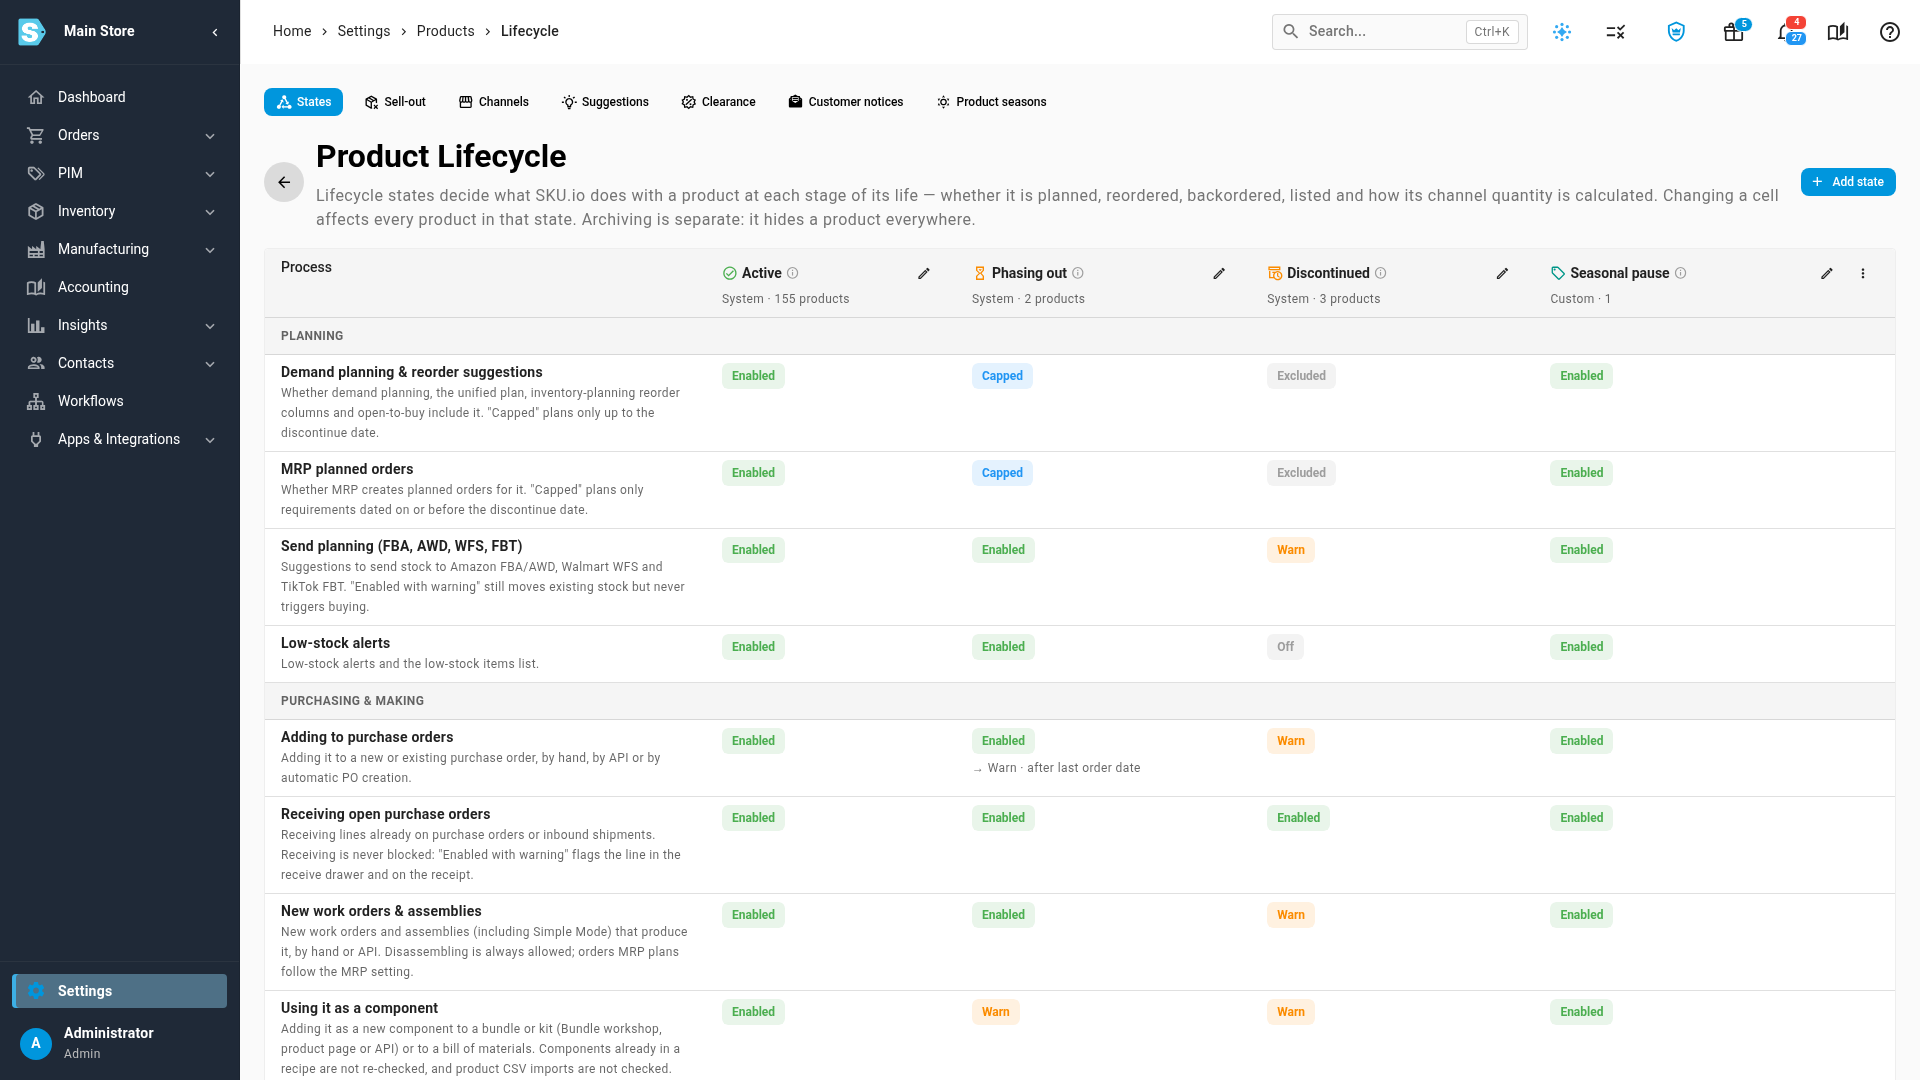
When products are in the state, saving starts a background job, Applying lifecycle policy, that re-applies the state to each of them. You can follow it in the job tray. When no products are in the state yet, the change saves at once and you see "Lifecycle policies saved".
To undo staged changes before you save, click Discard.
Things to know about the matrix:
- Each column header shows the state's icon in its colour, its name and a caption: System or Custom, and how many products are in it. Hover the information icon next to a name to read the state's description.
- A cell in a built-in state that you've changed from its default shows ● Changed. Click Reset next to it to stage the default value again, then save.
- Active must allow everything. If you try to restrict it, the save fails with "Active must keep every process running — create a custom state instead." Add a custom state for products you want to treat differently.
- Under Phasing out, Adding to purchase orders shows "→ Warn · after last order date": purchase orders stay allowed until the product's last order date, then warn.
- In the When it sells out row, a state set to Use the sell-out setting follows the Sell-out tab. Click Set in Sell-out tab under the cell to open it.
- Stock transfers and adjustments are always allowed, in every state. Channel order imports never fail because of a state: a blocked line is flagged on the order instead.
- If the states don't load, the tab says "Couldn't load lifecycle states." Click Retry.
Every row, its values and each state's defaults are listed in the Lifecycle policy matrix reference.
Add a custom state
Add a state when none of the built-in ones fits, for example Pre-launch, Seasonal pause or Quality hold.
- On the States tab, click Add state.
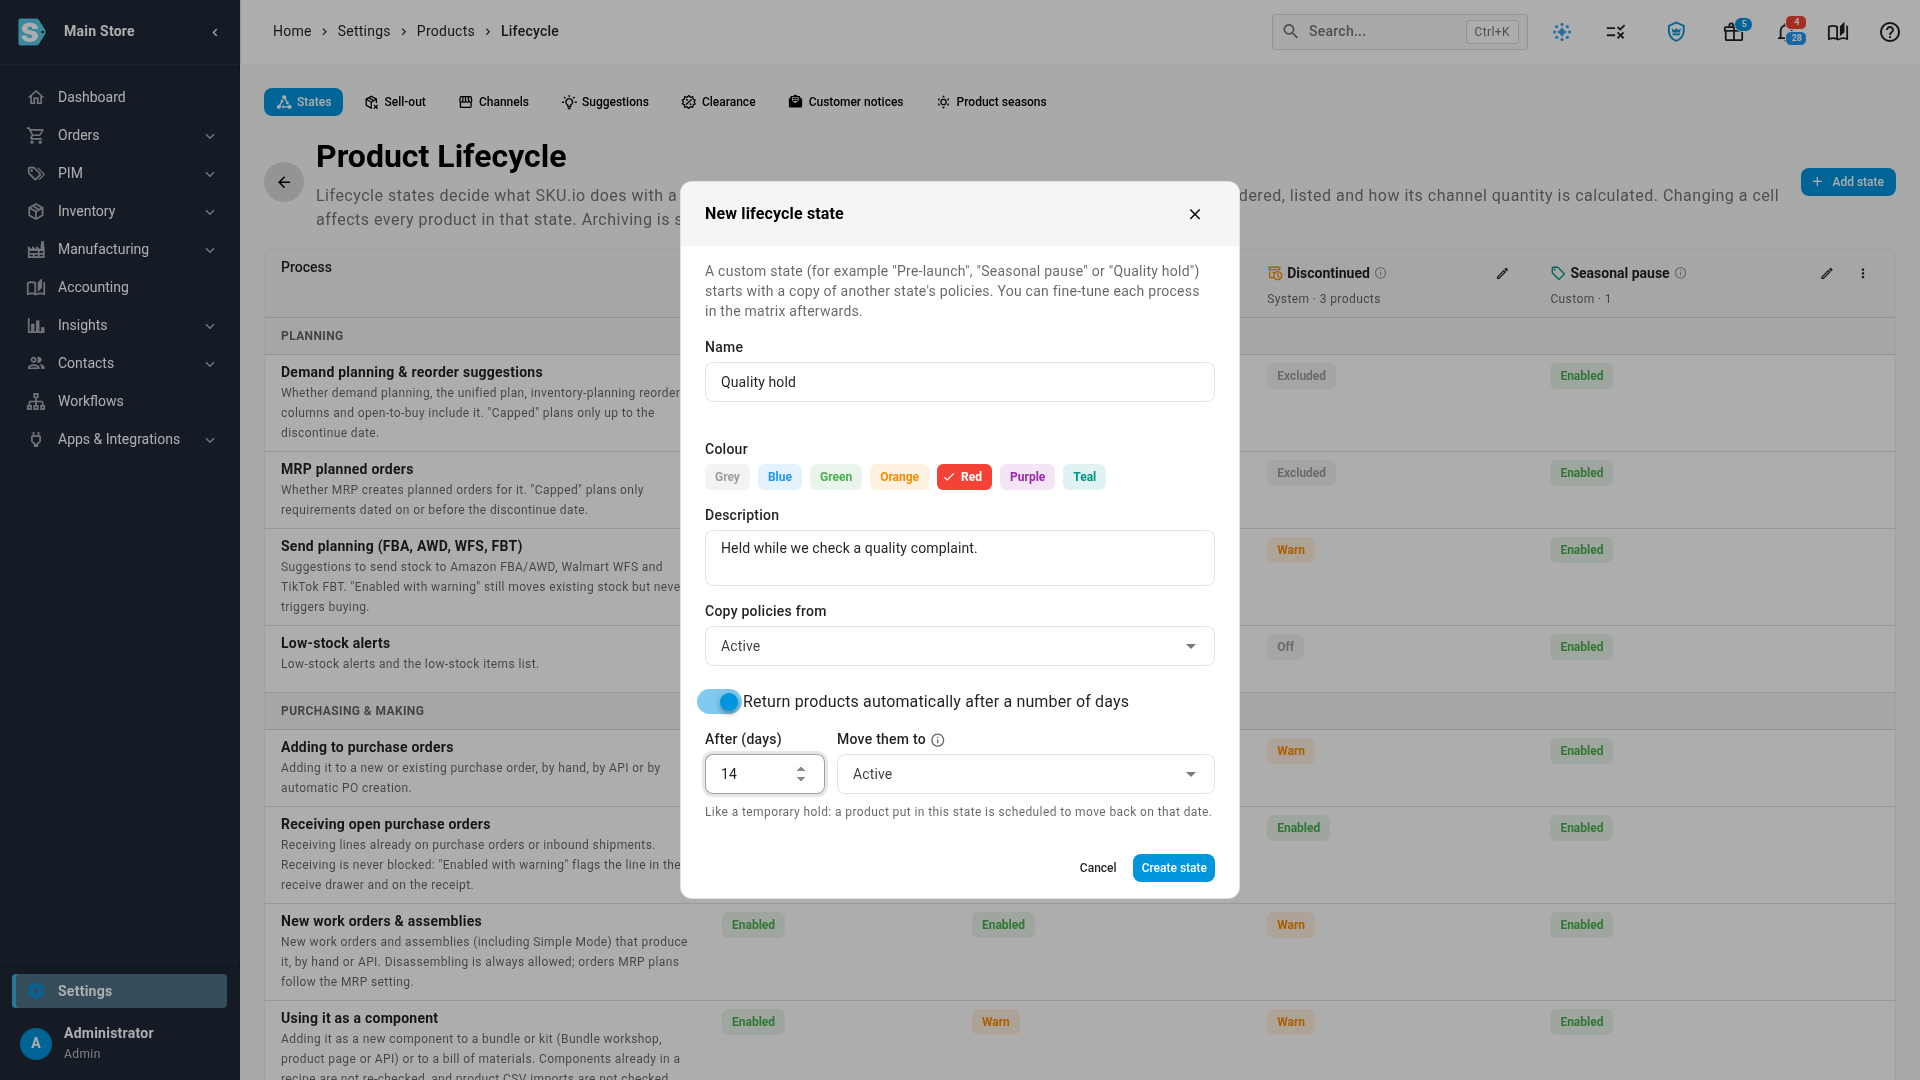
- In New lifecycle state, type a Name, up to 60 characters. Two states can't share a name: "A state with this name already exists."
- Pick a Colour. The state's chips and dots use it wherever the state appears.
- Optionally, type a Description, up to 500 characters. It shows when you hover the column's information icon, and on the state's option card when you change a product's lifecycle.
- In Copy policies from, choose the state whose rules the new one starts with. It starts from Active unless you change it.
- To make it a temporary state, turn on Return products automatically after a number of days. See the next section.
- Click Create state.
The new state appears as a column at the right of the matrix, with the caption Custom. Change its cells the same way as any other state's, then click Save & apply.
Return products automatically
A custom state can work like a temporary hold: when a product enters it, SKU.io schedules a move back.
- Turn on Return products automatically after a number of days.
- In After (days), enter how many days the product stays, from 1 to 3,650. It starts at 30.
- In Move them to, choose the state the product returns to. It starts at Active.
- Click Create state, or Save when you edit a state.
What to expect:
- The column caption adds the return, for example Custom · 0 · returns after 14 d.
- Each product you move into the state gets a scheduled change on the date it's due back. It's listed on the Scheduled tab of the Lifecycle workspace as Automatic return. See Schedule lifecycle changes.
- Any other lifecycle change to the product before that date cancels the pending return.
- Phasing out isn't offered in Move them to: it shows "Not available: needs a reason and a discontinue date". Return products to another state, then phase them out yourself. A state can't return to itself either.
- Built-in states have no automatic return. The switch only shows for custom states.
Move products into a custom state
You move products into a custom state the same way as into any other state. Open Change lifecycle on a product, or on a selection in the products list. Each custom state is listed as an option card that says Custom, plus "returns after N d" when it has an automatic return, then its description. A reason is optional.
The button says Move N products to followed by the state's name. When the move applies, any automatic return is scheduled. The dialog still offers to cancel open purchase order lines and backorders, but it has no option to notify customers: customer notices go out only for Phasing out and Discontinued. See Discontinue a product for the dialog, and Change lifecycle for many products or variants for a selection.
Rename or recolour a state
You can rename and recolour any state, the built-in ones included.
- Click the pencil icon in the state's column header.
- In Edit followed by the state's name, change the Name, Colour or Description.
- Click Save.
The new name and colour show everywhere the state appears: the product page, the products list, the Lifecycle workspace and the change dialog. A built-in state keeps its role when you rename it. For example, a renamed Discontinued still blocks new backorders by default.
Delete a custom state
Built-in states can't be deleted. A custom state can, once its products have somewhere to go.
- Click the ⋮ menu in the custom state's column header.
- Click Delete state.
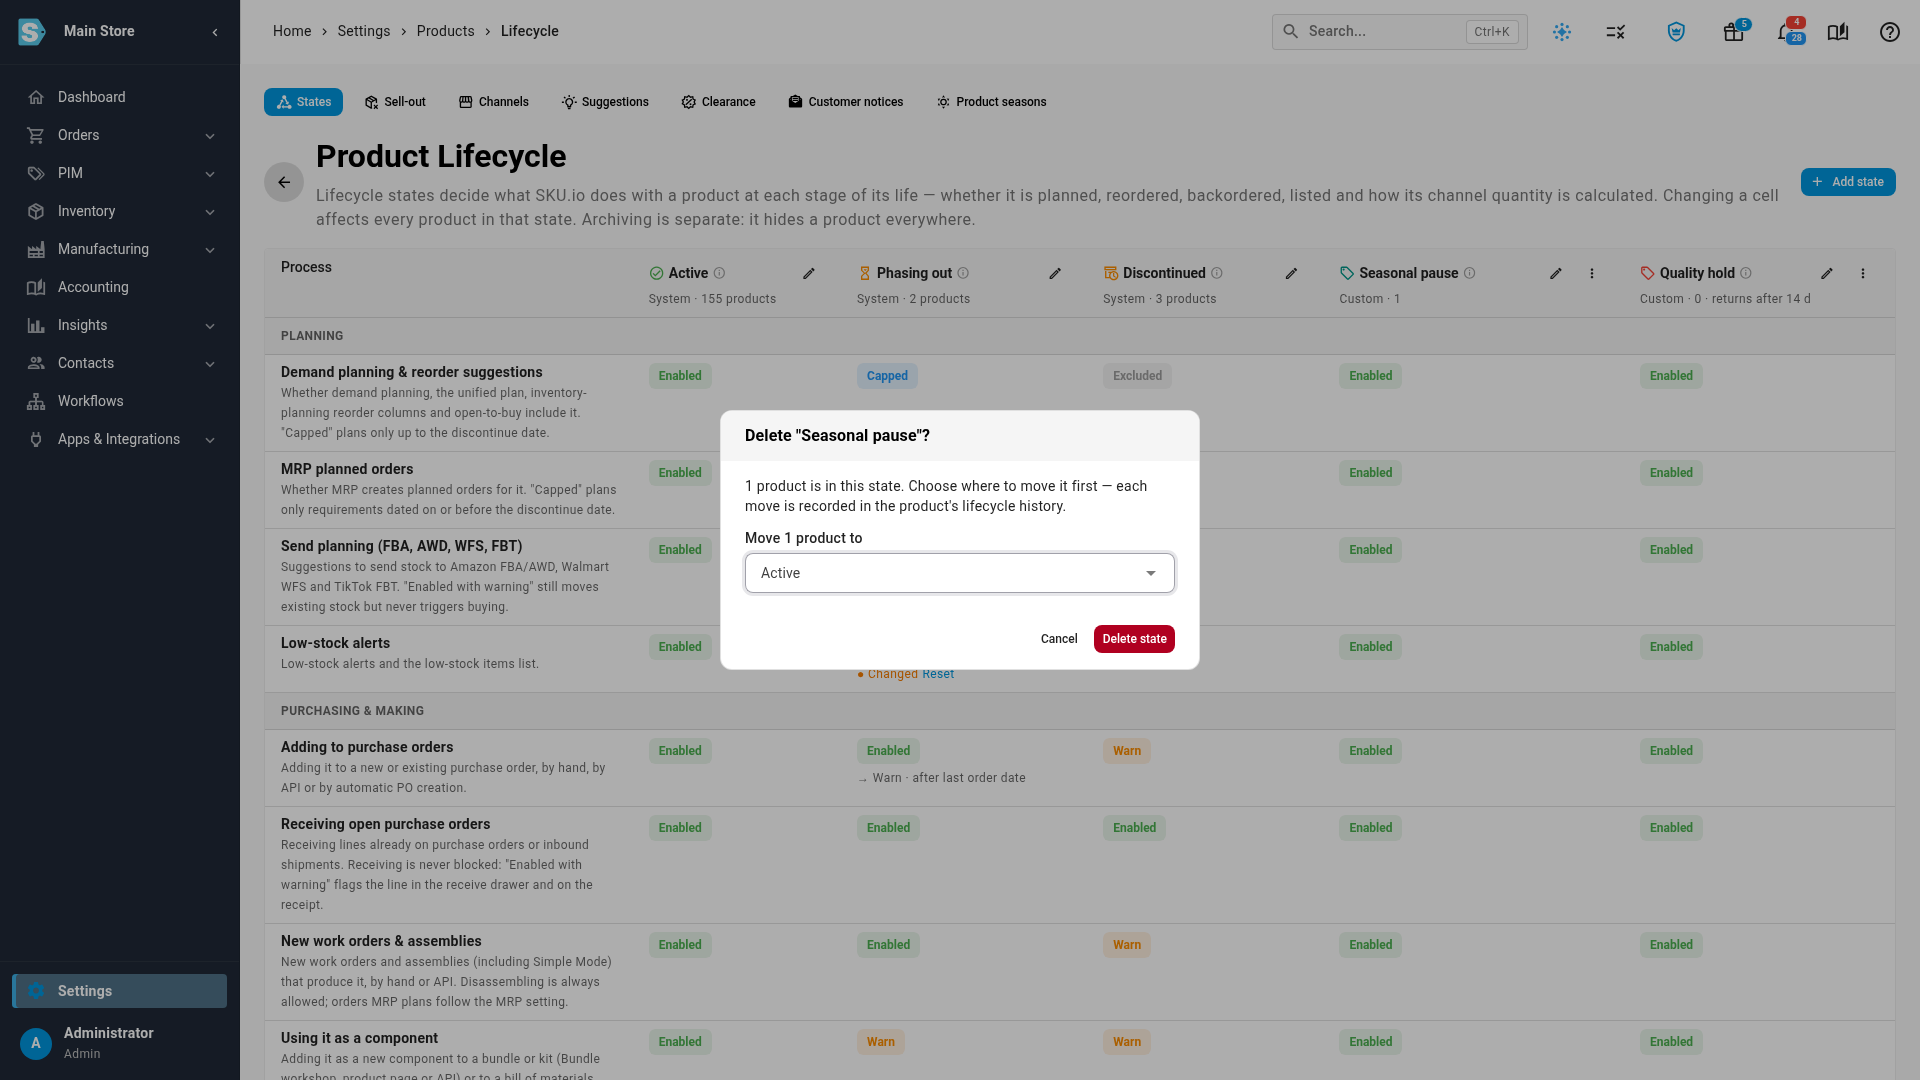
- If products are in the state, choose a state in Move N products to. Each move is recorded in the product's lifecycle history with the note that the state was deleted.
- Click Delete state.
What to expect:
- When no products use the state, the dialog says "No products use this state. Deleting it can't be undone."
- The Delete state button stays greyed out until you choose where to move the products: "Choose a state to move the products to first".
- Phasing out is listed but greyed out, with the reason under it: each product needs its own discontinue date. Move them to another state, or phase them out from the products list first.
- You can't undo these moves.
- If some products can't be moved, nothing is deleted, and the dialog says how many, for example "2 products could not be moved, so the state was kept." followed by the reason.
- Scheduled changes and automatic returns that lead into the deleted state now lead into the state you chose.