Track & pay purchase invoices
The Purchase Invoices list is your accounts-payable workbench: every supplier invoice, its approval state, its 3-way match, and what's still owed. Invoices are recorded against purchase orders — see Record a supplier invoice — and worked here.
The list
Go to Orders → Purchase Invoices:
- Approval chips — Pending Approval, Approved, Rejected, Auto-Approved — track the 3-way match review, not payment approval. A clean match is Auto-Approved; a mismatch waits as Pending Approval until someone reviews it.
- With a bill payment approval policy on, that filter is labelled Match Approval, and two more appear: Payment Approval (Awaiting approval, Approved, Rejected, Not requested) and My approvals, for bills waiting on you.
- Payment due chips — Overdue, Due Today, Due Soon — the aging view at a glance; the Aging Report and Variance Report buttons go deeper.
- 18 columns including the invoice and PO numbers, totals, Status, Approval, and the 3-way Match state.
- Connect Google Calendar pushes invoice payment due dates to your personal calendar.
The invoice page
Open an invoice to work it. The header shows its status (for example Partially Paid) with Add Payment, Edit, Print, and More; tabs cover Details, 3-Way Match, Payments, Notes, Tags, Accounting, Documents, and Activity.
Check the 3-way match
The 3-Way Match tab compares the purchase order, the receipt, and the invoice line by line — tiles for Total Lines, Qty Matched, Price Variance, and Qty Mismatch, above a grid of PO qty/price vs received qty vs invoiced qty/price with a per-line Match verdict. A clean match means you're paying for exactly what you ordered and received; see Invoicing and the 3-way match for the concept.
Approve for payment
The Details tab carries the money controls:
-
Payment Authorization warns when the supplier's payment details haven't been verified — confirm the payee before releasing funds. If the supplier's bank details have changed, only a verification made since the change counts, and the warning reads Bank details changed on (date) — verify before paying. Earlier verifications stay in the supplier's history, but they checked the old account.
-
The submit button sends the bill's balance for payment approval, and its label tells you what happens next. Hover it for the details.
Label When you see it Approve for Payment Nobody needs to review it: no payment approver is set, or, under a bill payment approval policy, the amount needs no approval or you can approve it yourself. Submitting approves it at once. Send Payment Request A default payer is set in Settings → Purchasing → Payment Approvals. The request goes to them to approve and pay. Approve & Pay You're the default payer, so you approve and record the payment yourself. Submit for Approval The request goes to approvers: those named by your bill payment approval policy, or your approval levels. No money moves until it's approved. Under a policy, the panel names who the request goes to, and the default payer no longer approves. They're told when the payment is approved and ready to pay. Once approved, the panel shows Approved to pay, and any part of the balance the approval doesn't cover shows as still needs approval. See Request and approve a bill payment.
-
Send Remittance Advice, on the Payments tab once the bill is paid or partly paid, emails the supplier what you've paid. You can also send one as you record the payment, below.
Record payments
Click Add Payment: in the header, on the Payment Authorization card, or on the Payments tab. The Pay dialog opens with the open balance at the top, on the Record a payment tab (or on Pay with Mercury, if that's your default way to pay; see Pay a bill with Mercury).
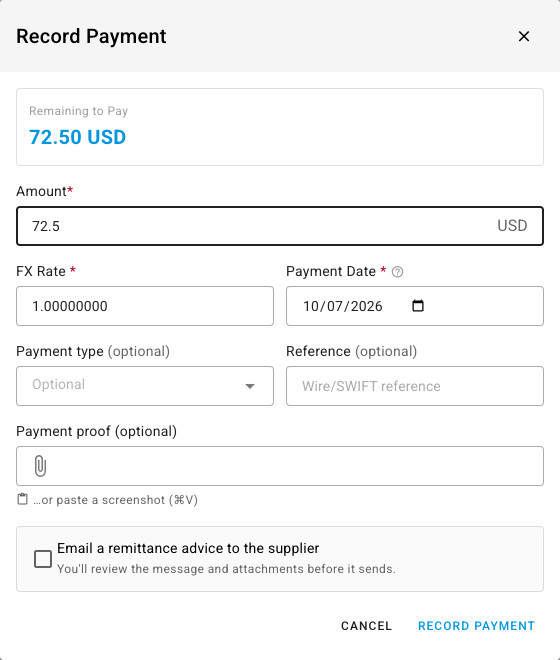
- Check the Amount, in the bill's currency. It starts at the remaining balance; change it for a part payment.
- Check the FX Rate. It starts at the bill's rate. On a bill that posts to your accounting system in the supplier's own currency, the rate for the payment date is used instead. See Post supplier bills in their own currency.
- Set the Payment Date: the day the money actually left your account. It starts at today. That's the date the payment lands on in cash flow and accounting, not the bill date.
- Optionally pick a Payment type and enter a Reference, such as the wire or SWIFT reference.
- Optionally add the Payment proof, such as a wire confirmation: choose the file, or paste a screenshot. SKU.io reads it and fills in the amount, date and reference it finds, marking each filled field; check them before you save. A warning appears if the proof is in another currency or for more than you owe.
- To tell the supplier, tick Email a remittance advice to the supplier. You review the message and its attachments before it sends.
- Click Record Payment.
The Payments tab shows the running position — PO total, invoice total, balance due, and every payment with its type and reference. With a bill payment approval policy on, a payment that synced from your accounting system without an approved request is kept, so the balance stays right, but carries a Paid outside approval chip to review. The proof is filed on the bill's Documents tab. You can also record payments from the supplier's Payables tab.
Line items
Invoice lines carry their nominal codes for posting. Add Product adds an invoiced product line; Add Cost Line records a non-product charge on the invoice.
Next steps
- Record a supplier invoice — creating invoices from a PO.
- Purchase invoices reference
- Request and approve a bill payment — when a bill payment approval policy is on.
- Track a supplier's payables — the supplier-scoped view.
Video transcript
Purchase invoices are your payables workbench — approval states, aging, and what's still owed, all in one list. Open an invoice to work it — status, terms, and the controls for approving payment and sending remittance advice. The three-way match compares the order, the receipt, and the invoice line by line — pay for exactly what you ordered and received. Payments tracks the running position — what's been paid, and the balance still due.