Buy labels in a batch with Shippit
Shippit can buy the labels in a label batch, with the couriers and rates on your own Shippit account. Shippit always ships from the pickup address on the Shippit account, so you first tell SKU.io which of your warehouses that address belongs to. Then you batch that warehouse's orders, buy and print the labels, and close the day with a Shippit manifest, which also books the courier pickup.
Before you begin
- Shippit is connected. See Connect Shippit. Until a label account is connected, Label Batches shows a card for each provider, Shippit included, with a Connect button.
- One Shippit account per warehouse. Each Shippit account ships from one pickup address, so it buys labels for one warehouse. To ship from another warehouse, connect another Shippit account whose pickup address is that warehouse.
- The warehouse has an address, and its postcode matches the pickup address set in Shippit (Settings → Company in Shippit).
- Every order has an email address, on its ship-to address or on the warehouse's address. Shippit won't take an order without one.
- The orders are domestic orders shipping from that warehouse today. Shippit labels can't be bought for international orders or for a later ship date.
- Your role needs Integrations → Edit to change the Shippit connection, and the Fulfillment Orders Ship permission (
fulfillment_orders.ship) to buy labels and create manifests.
Choose where the labels ship from
- Go to Apps & Integrations, choose Shippit, and open your Shippit connection.
- Under Setup, click Settings, then click the Labels tab.
- In Labels ship from, choose the warehouse at your Shippit pickup address. Below it, Shippit pickup address shows the address SKU.io read from Shippit, so you can check they match.
- Click Save.
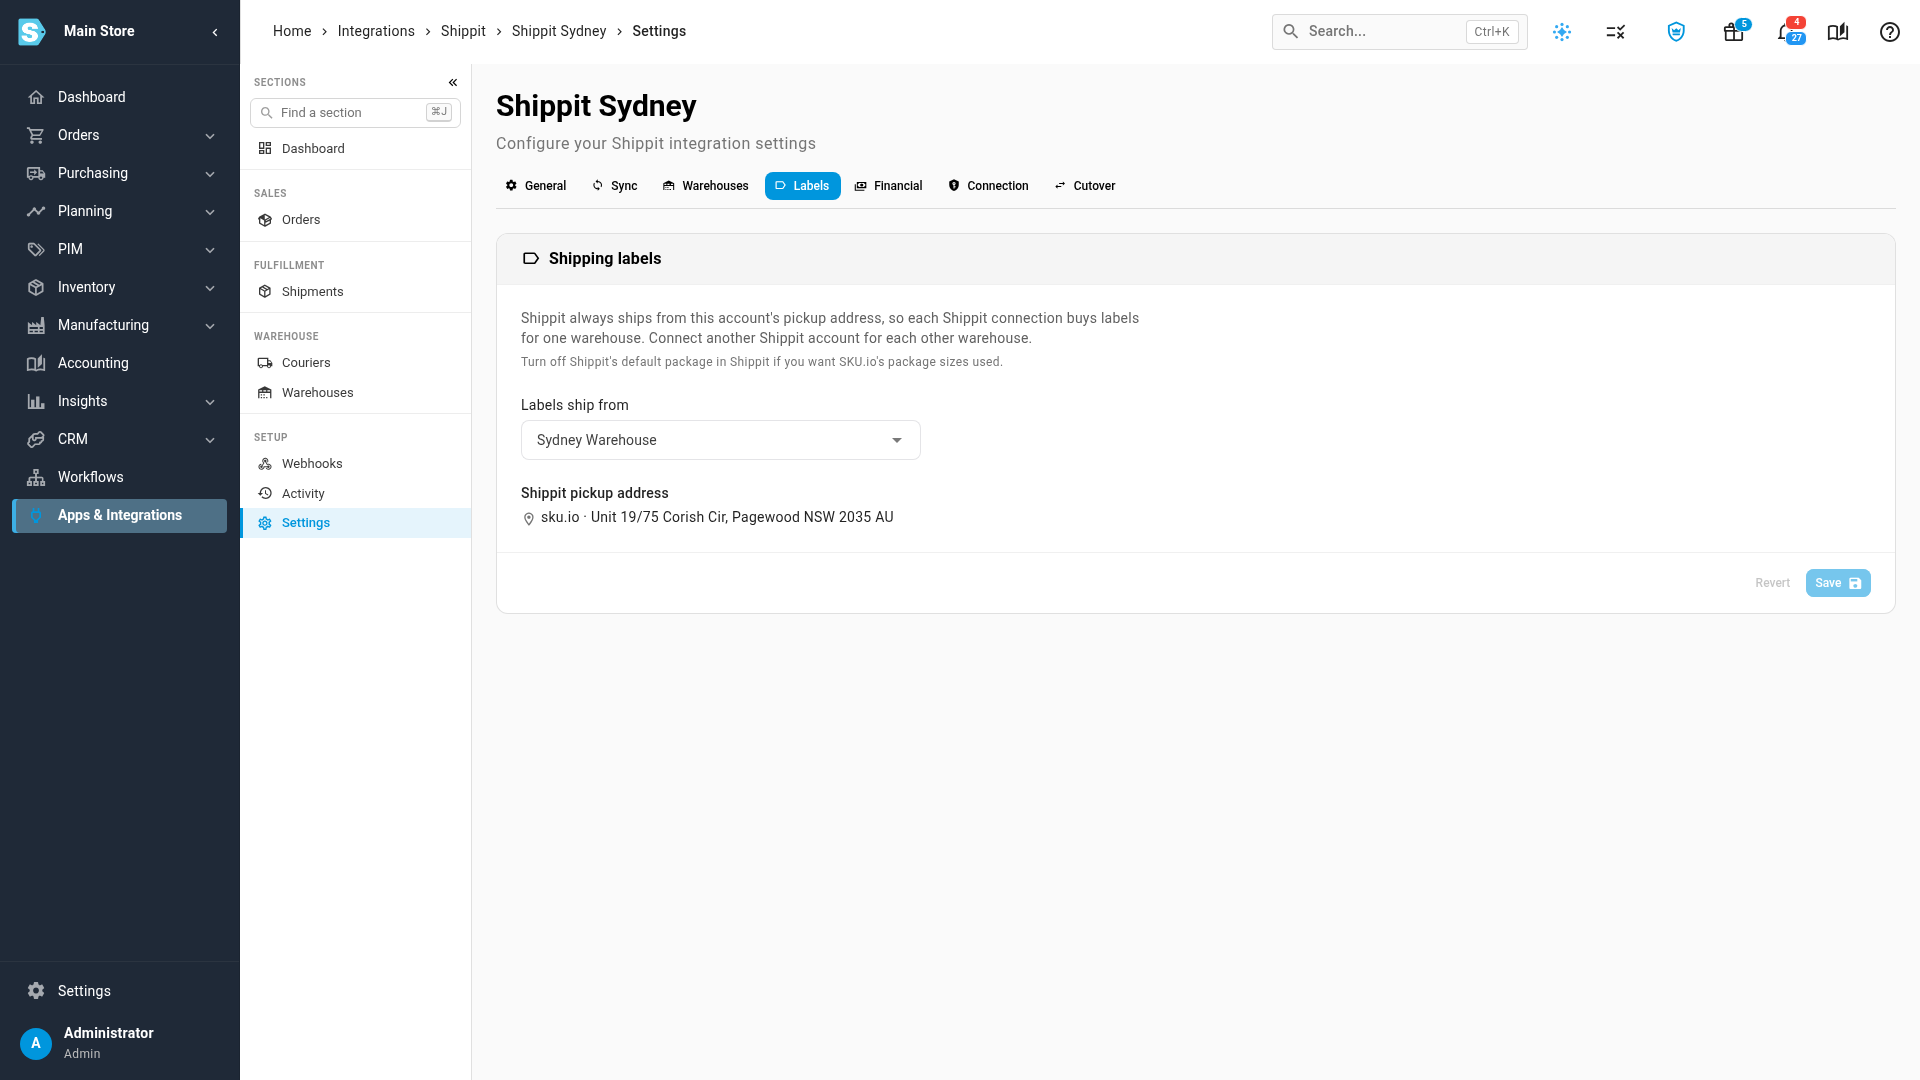
Until you choose a warehouse, the tab says Choose a warehouse to use this account in label batches, and the account buys no labels. If the warehouse's postcode doesn't match the pickup address, the tab warns you: update the pickup address in Shippit, or choose another warehouse.
Buy the labels
-
Go to Orders → Fulfillments, click the Label Batches tab, and click New batch.
-
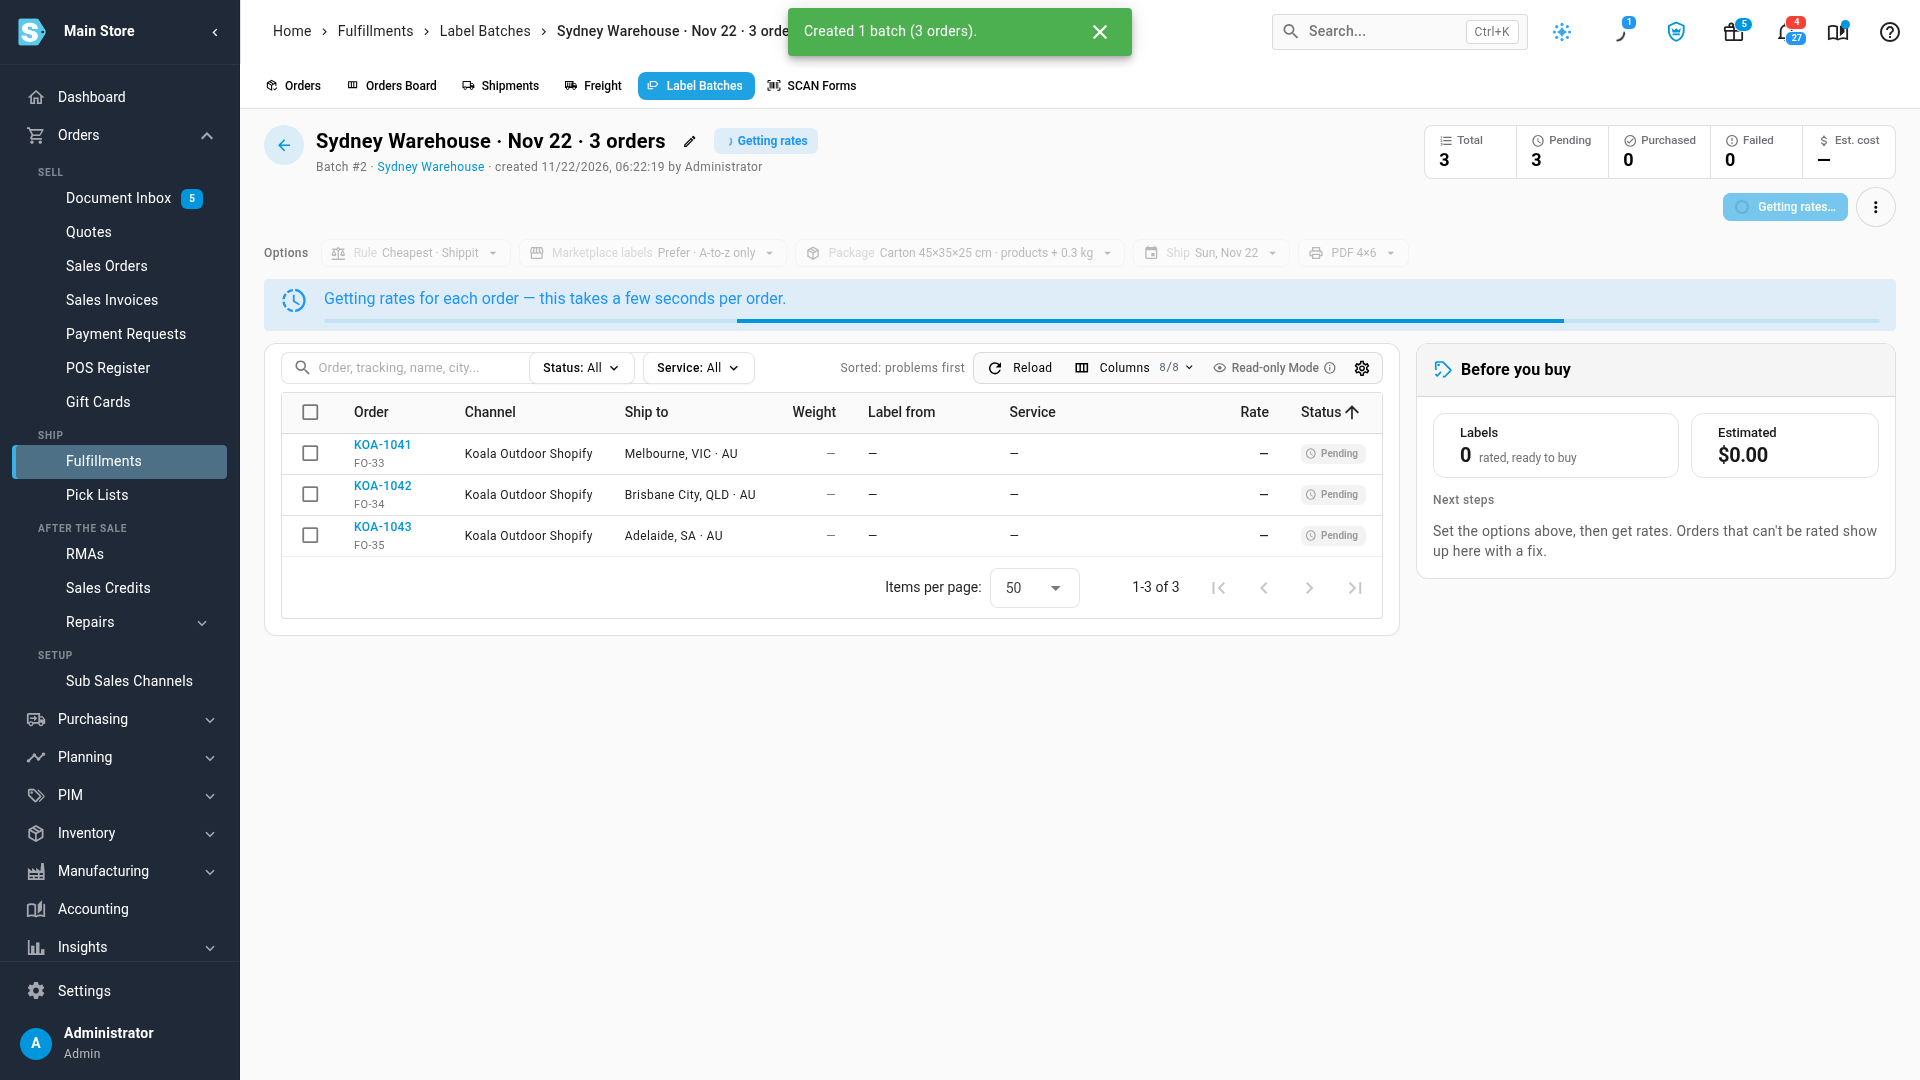
In Warehouse, choose the warehouse your Shippit account ships from, and click Create batch & get rates.
-
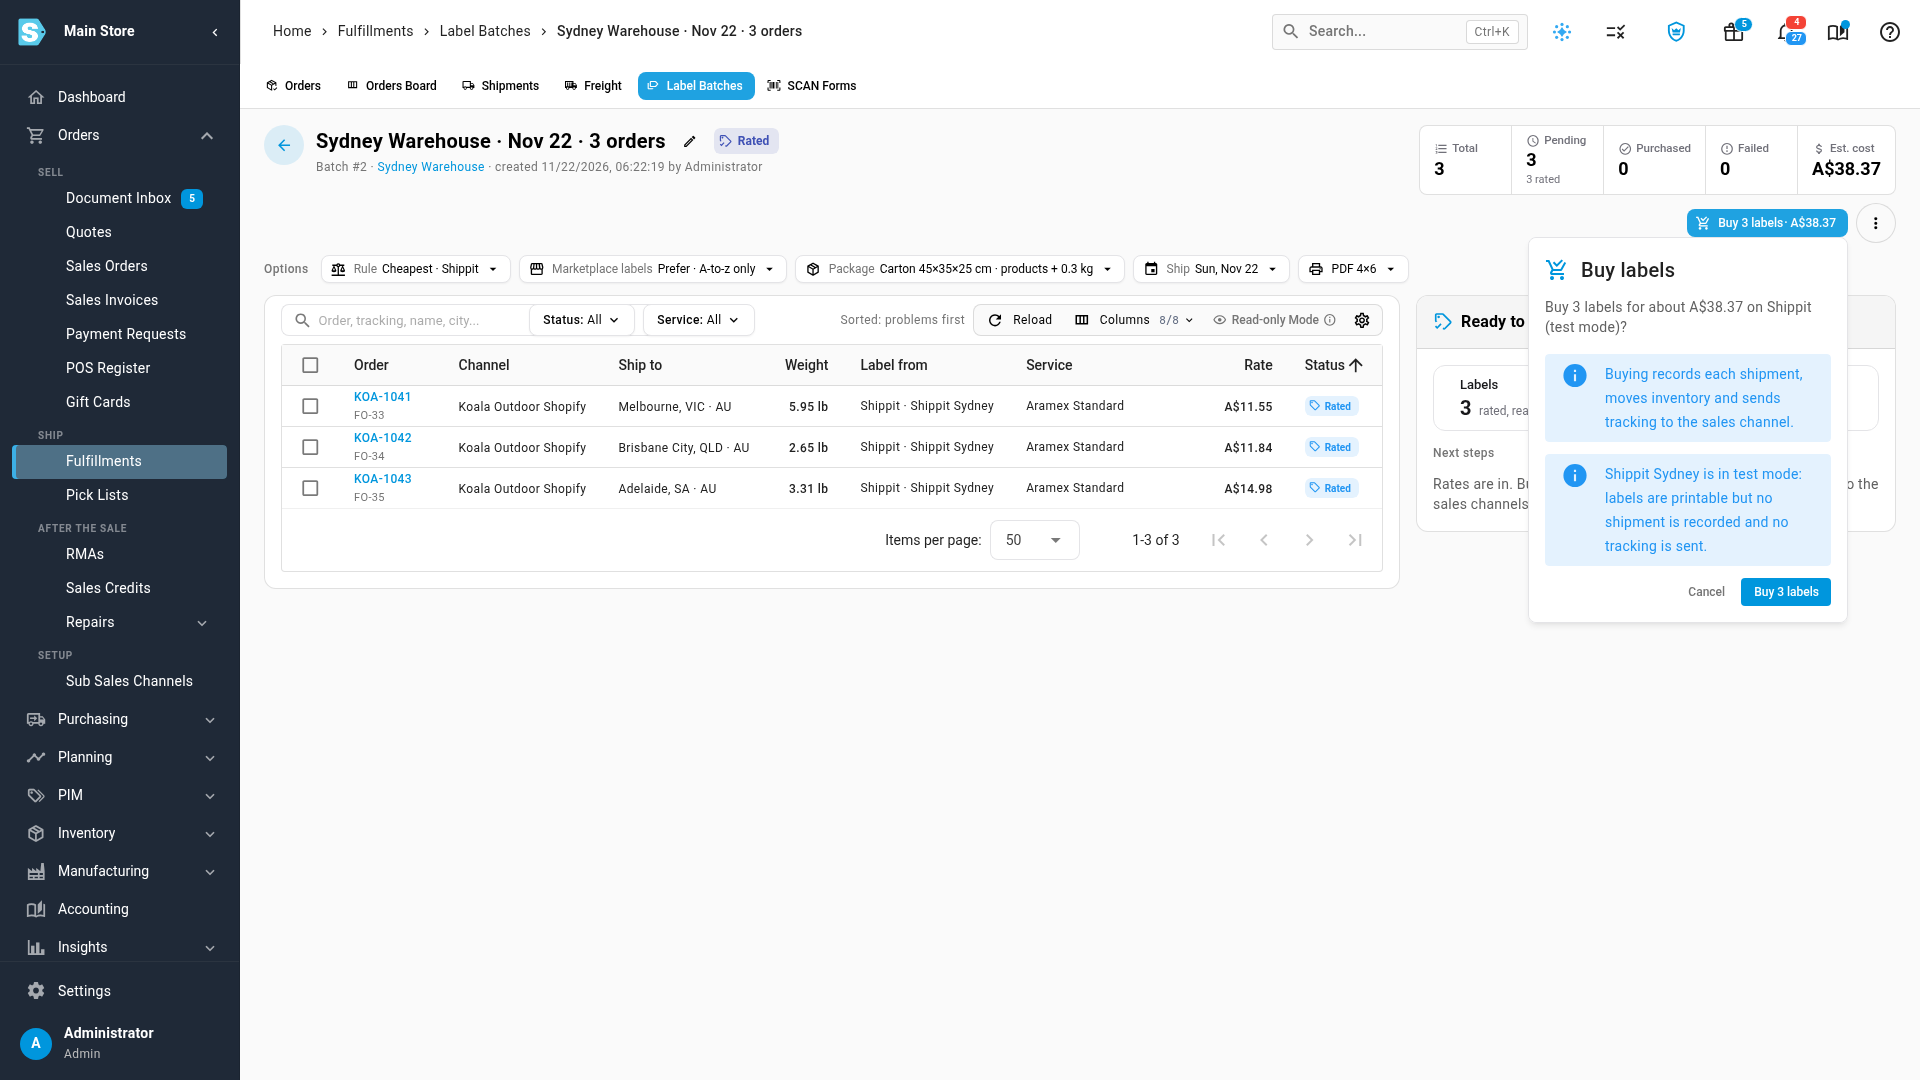
Check the rates. SKU.io rates each order with the couriers on your Shippit account and picks the cheapest. Label from shows the Shippit account, and Service shows the courier.
-
Click Buy labels (for example Buy 3 labels), and click it again in the confirmation. SKU.io creates each order in Shippit with its courier and fetches the label, which takes a few seconds per order.
-
When the batch shows Completed, every order has its Shippit tracking number. Click Print labels to get every label in one file.
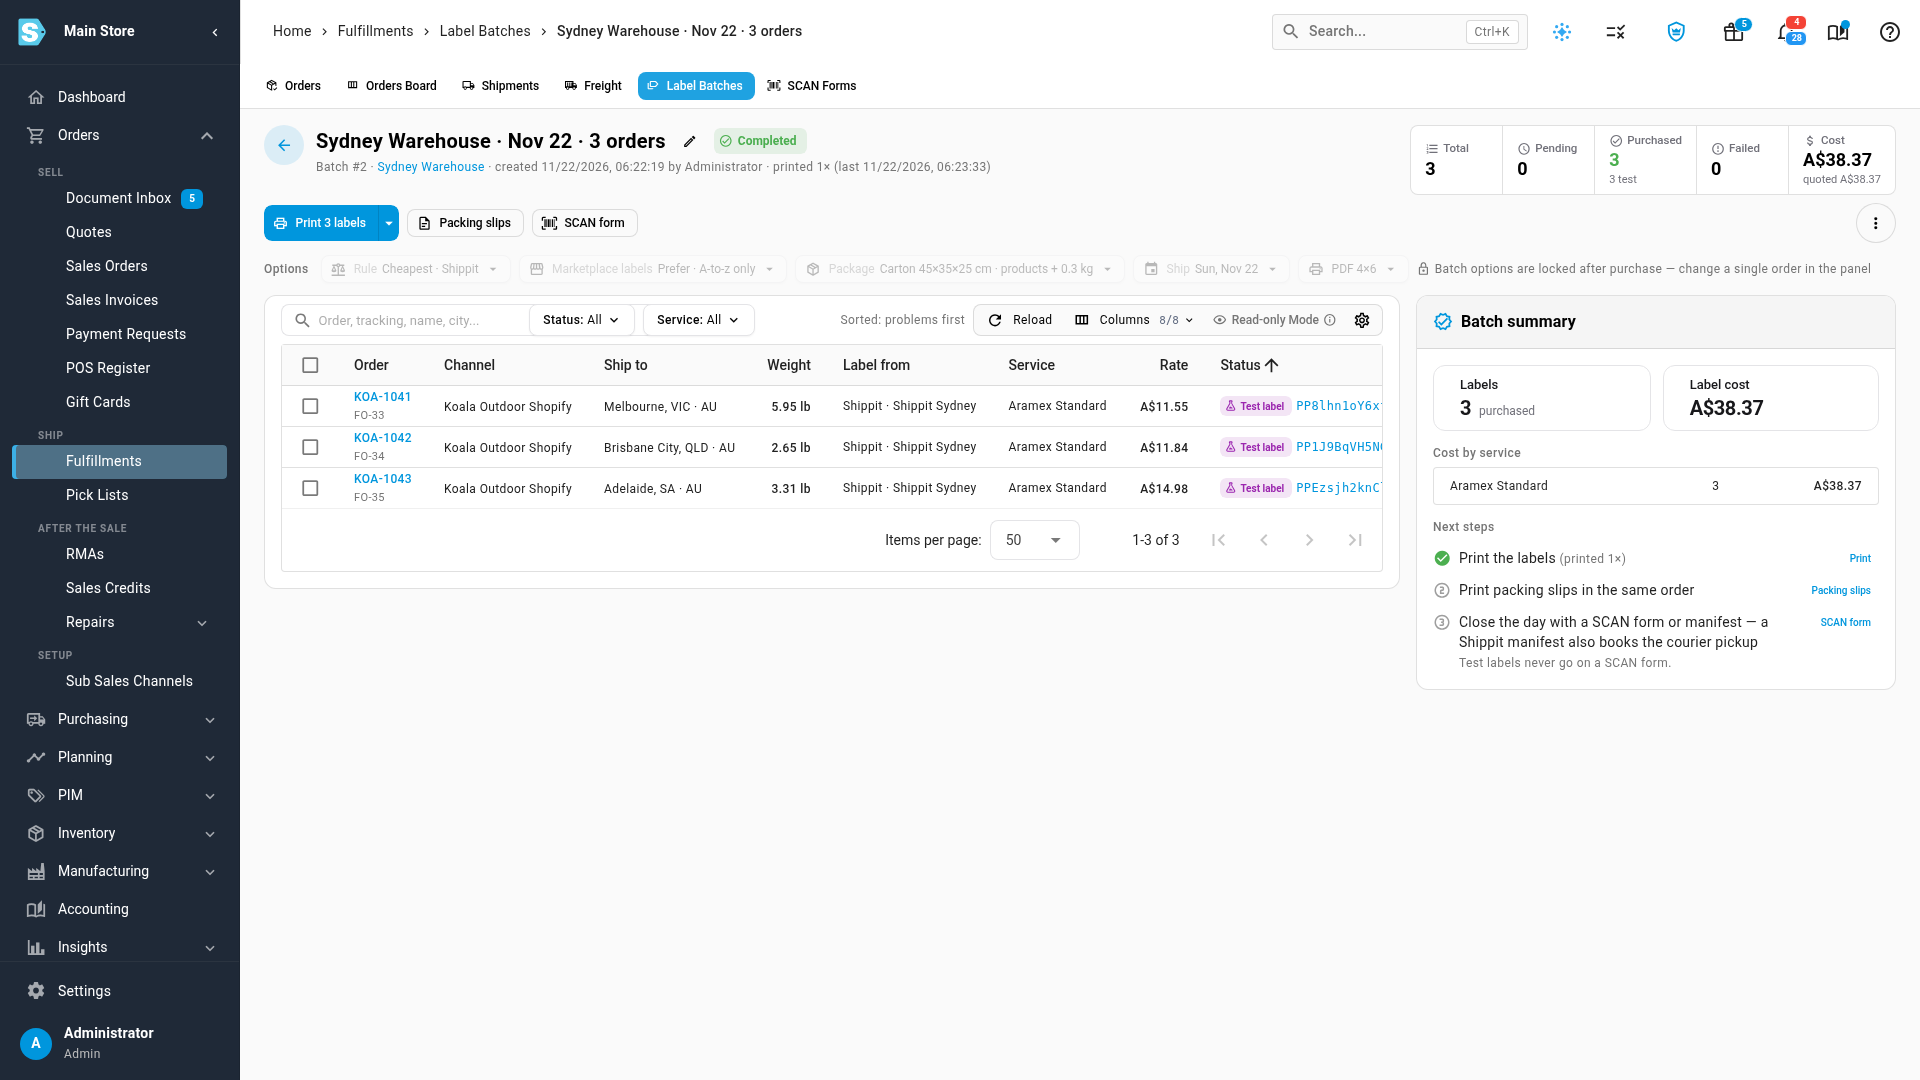
The rest of the batch works as it does for any label account: fixing orders under Needs attention, changing one order, and voiding a label are in Buy shipping labels in a batch. In the batch's Rule option, a Shippit account that ships from another warehouse is listed but can't be chosen, with Ships from … only under its name.
A Shippit connection to Shippit's staging (test) environment is in test mode, and the Buy labels confirmation says so. Its labels are marked Test label: you can print them, but SKU.io records no shipment, sends no tracking, and never puts them on a manifest.
Close the day with a Shippit manifest
A Shippit manifest books the courier to pick up the day's parcels, and gives you the manifest to hand over at pickup.
-
Go to Orders → Fulfillments, and click the SCAN Forms tab.
-
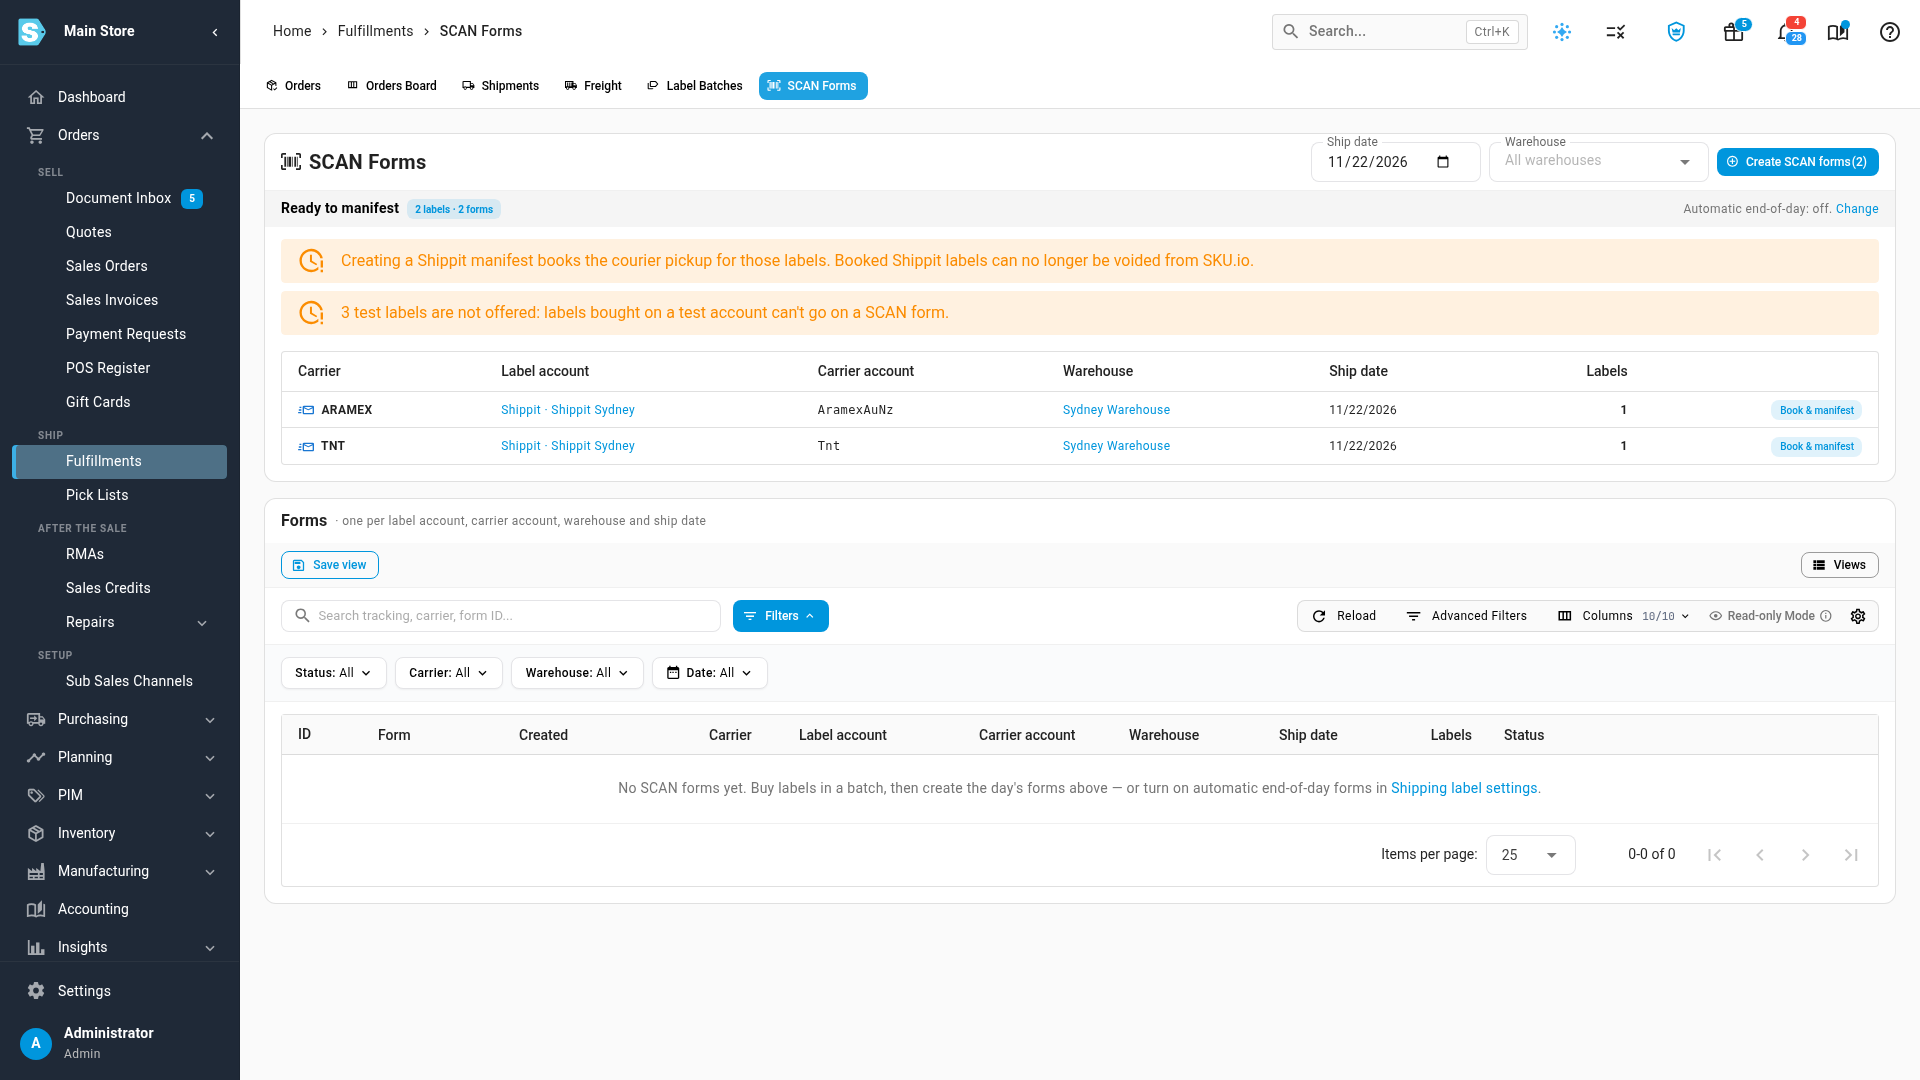
Under Ready to manifest, find the Shippit rows for your warehouse. There's one row for each courier, with the number of labels.
-
Click Book & manifest on a row. To book every row at once, click Create SCAN forms at the top instead.
-
Click Create in the confirmation.
-
When the manifest appears under Forms with the status Created, click Print, and hand it over at pickup.
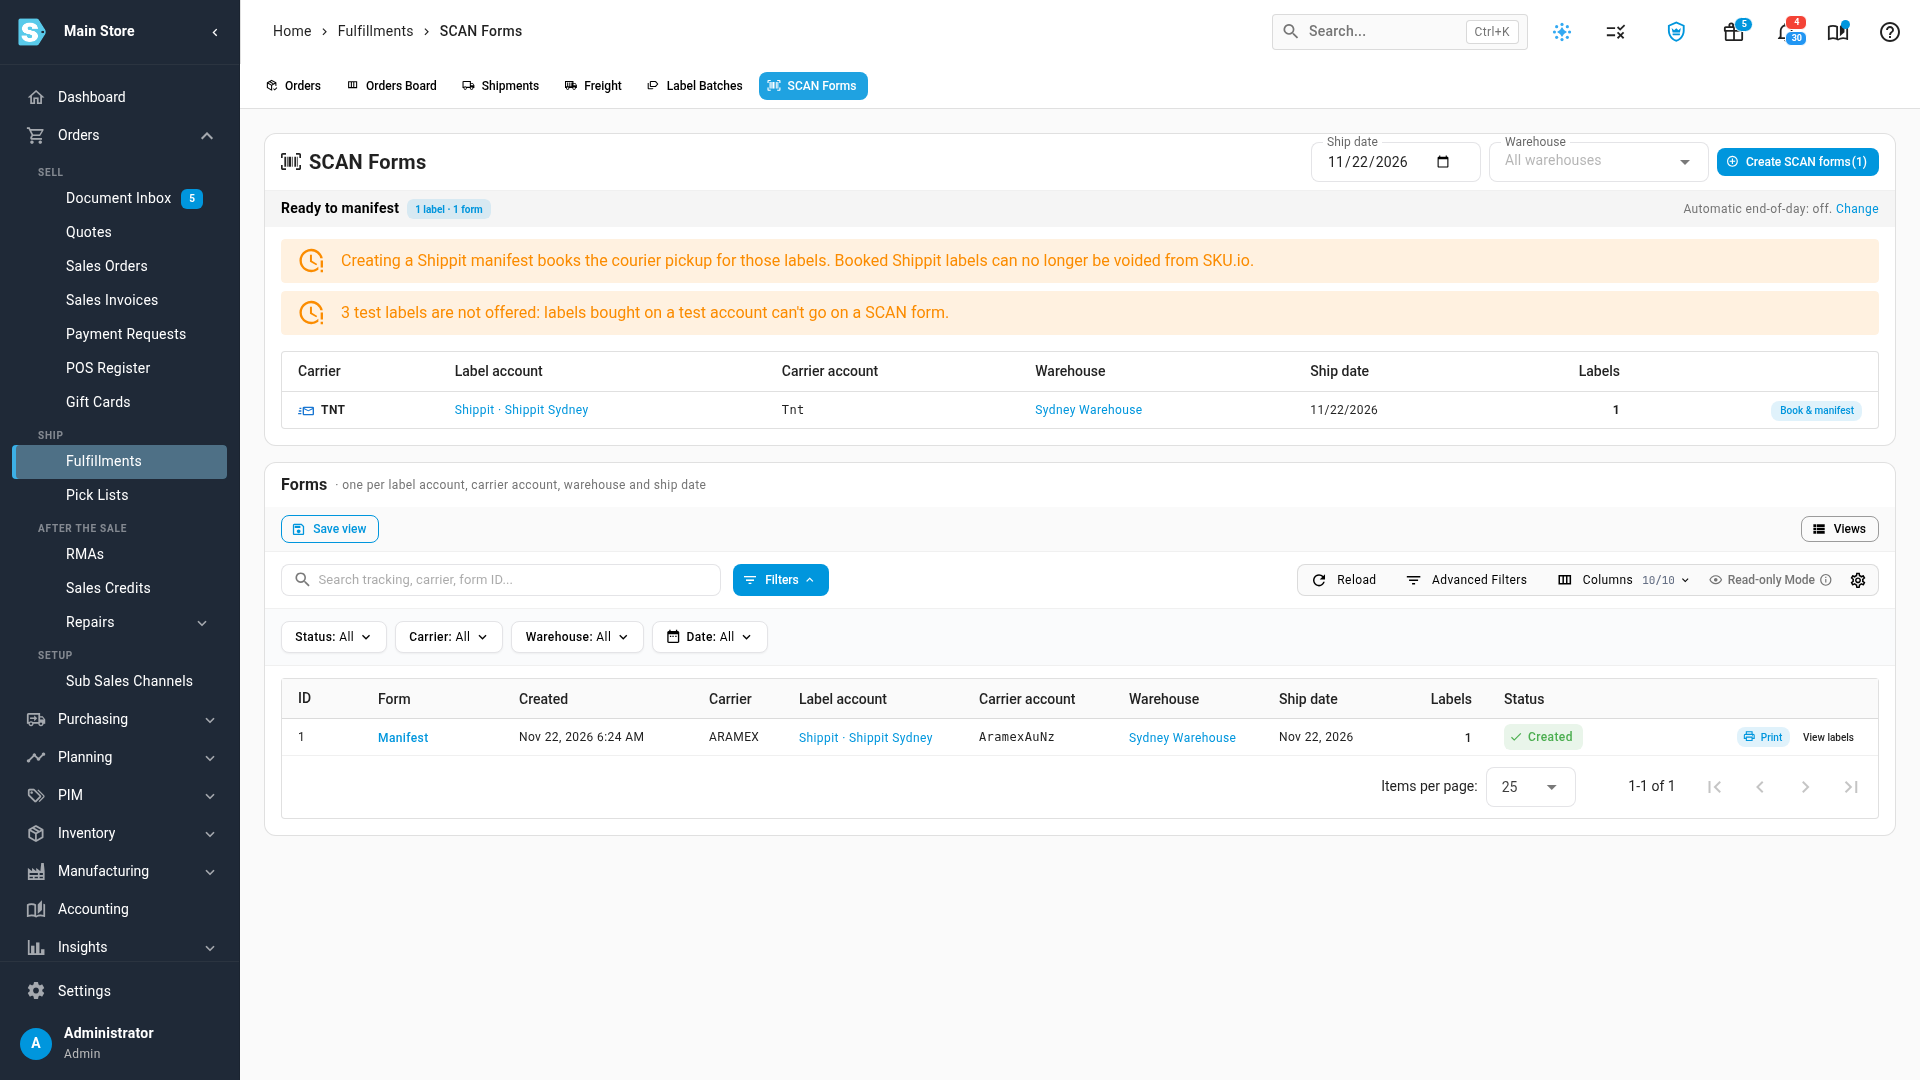
Booking can't be undone from SKU.io: once a label is on a manifest, Void label no longer cancels it. To cancel a booked parcel, cancel the pickup in Shippit or with the courier. Before booking, voiding a Shippit label cancels the order in Shippit, and the order can ship again.
Labels Shippit doesn't buy
- Labels outside a batch. Shippit buys labels in label batches only. It isn't offered when SKU.io buys a label for a dropship supplier or a repair shipment.
- International orders, and ship dates after today.
Next steps
Video transcript
To buy Shippit labels in batches, start by opening Apps and Integrations. Shippit always ships from the pickup address on your Shippit account, so SKU.io needs to know which of your warehouses that is. Choose Shippit from the list of integrations. Then open the Shippit connection whose labels you want to set up. In the menu on the left, under Setup, click Settings. Then click the Labels tab, at the top of the settings. In Labels ship from, choose the warehouse that sits at your Shippit pickup address. Below it, SKU.io shows the pickup address it read from Shippit, so you can check they match. Then click Save, at the bottom of the card, to keep your choice. Until you choose a warehouse, this account buys no labels. Now, to batch the orders, open Orders, and then choose Fulfillments in the menu on the left. At the top of the page, click the Label Batches tab. Click New batch, at the top right, to open the form. In Warehouse, type a few letters, and pick the warehouse your Shippit account ships from. The green badge shows how many open orders match. Leave Get rates switched on, and click Create batch and get rates. SKU.io rates each order with the couriers on your Shippit account, and picks the cheapest. In the table, Label from shows the Shippit account each label comes from, and Service shows the courier it picked. When the rates look right, click Buy labels, at the top right of the batch. The confirmation says this connection is in test mode, because it uses the Shippit staging account. Its labels print, but no shipment is recorded, and no tracking is sent. Click Buy labels again in the confirmation to start buying. SKU.io creates each order in Shippit, with its courier, and fetches the label. That takes a few seconds for each order. When the batch is completed, every order has its Shippit tracking number. Labels from a staging account are marked Test label. Click Print labels to get every label in one file. When the day's labels are printed, close the day from the SCAN Forms tab, at the top of the page. Ready to manifest lists the Shippit labels for today, with one row for each courier. Test labels are left out. The note at the top says that a Shippit manifest also books the courier pickup. Click Book and manifest on a row. The warning says that booked Shippit labels can no longer be voided from SKU.io. Click Create to book the courier and make the manifest. SKU.io asks Shippit to book the pickup, which takes a few seconds. When it's done, the manifest appears under Forms, with the status Created. Click Print to get the manifest, and hand it to the driver at pickup.