Allocate stock for a send
Between deciding to send stock and creating the shipment drafts, a sales order can take the same units off the shelf. Allocate stock stops that: it allocates the planned units at each ship-from warehouse, so nothing else can claim them while you prepare the send. You can allocate on its own from the selection bar, or as part of creating shipment drafts, where it's on by default.
These are ordinary allocations. They show under Inventory → Allocations with the status Allocated, and they are not stock holds; see Why these aren't stock holds.
Before you begin
- You need the Send Planner → Draft permission and the Warehouse Transfers → Create permission, because allocating sets stock aside in your warehouses. See Send Planner permissions.
- You must be on the working plan. A scenario never allocates stock: the action says "Scenarios never allocate stock or create drafts. Promote the scenario first."
- If you're previewing changes in Tune plan, click Apply & recalculate or Discard first. Allocations use the saved plan, not the preview.
Allocate stock for selected SKUs
-
Go to Inventory → Send Planner. The Plan tab opens.
-
Tick the checkbox at the start of each SKU row you want to send. The selection bar appears at the bottom of the page.
-
To act on every SKU instead of only the ticked ones, click All N in the selection bar. When filters are on, it reads All matching N and covers every row that matches, on every page.
-
In the selection bar, click ⋯ (More actions).
-
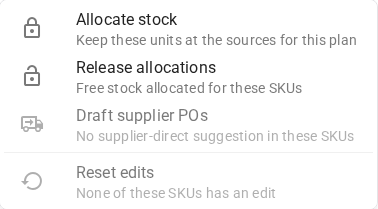
Click Allocate stock (Keep these units at the sources for this plan).
The message "N units allocated at the sources" confirms it. A lock icon appears next to the send quantity of every allocated line, and the line's details show the status allocated.
On a phone, tap the summary in the selection bar to open Cart preview, then tap Allocate stock at the sources.
Without the Warehouse Transfers → Create permission, Allocate stock is greyed out, and its tooltip (on a phone, the note under the button) says 'Allocating stock also needs the "Warehouse Transfers → Create" permission'. When the Send Planner → Draft permission is missing too, the tooltip names that one first.
When a source is short
The planner allocates each network and ship-from warehouse as a group, all or nothing. If a warehouse no longer has the units the plan assumed for a group, that group isn't allocated and the others are. The message then lists each short SKU, for example "N units allocated. 1 source is short and not allocated: JBC-JBCO-4: only 1,420 available now at the source (the plan assumed 1,680)."
If every group is short, nothing is allocated and the error lists the reasons. Recalculate the plan to pick up the current stock, or lower the quantity first; see Change a send quantity.
A kit with too few built units on the shelf is allocated as the built kits plus the components of the rest, which is what the network's kit flow takes when the kits are built.
Allocate while you create the drafts
In the Draft shipments to the networks dialog, Allocate the source stock now, so other orders can't take it before the drafts are verified is ticked by default. Each draft allocates its own stock: if one source is short, only that draft waits, and you can draft the quantity available or draft it without allocating. See Follow up on shipment drafts.

Without the Warehouse Transfers → Create permission, the option is unticked and greyed out, with the tooltip 'Allocating stock also needs the "Warehouse Transfers → Create" permission'. Drafts are then created without allocating anything.
Release allocations
- On the Plan tab, tick the SKUs whose stock you want to free, or click All N for every SKU.
- In the selection bar, click ⋯ (More actions).
- Click Release allocations (Free stock allocated for these SKUs).
The message "N allocations released" confirms it, and the lines go back to ordinary planned lines. Release covers every allocated line in the selection, including AWD sends and sends you enter manually that were already drafted but still keep their allocation on the planner's timer.
You can release while you're previewing changes in Tune plan. Releasing isn't available on a scenario.
When allocations end
You don't have to release allocations yourself. The planner releases the allocation for a send when any of these happens:
| What happens | What's released |
|---|---|
| You click Release allocations | The allocations of the selected lines. |
| The allocation time runs out | Allocations not handed to a draft within Release unused allocations after (hours), under Network rules → Planner settings. The default is 72 hours. The planner checks every hour, so a release can come up to an hour after the time is up. |
| You recalculate the plan | The new working plan replaces this one, and every allocation of a line that wasn't drafted yet is released. |
| You archive the plan | Every allocation the plan still has, including AWD and manual sends. |
| You change a line's send quantity | That line's allocation. The line goes back to a planned line, so allocate it again if you still need to. |
| A send run line is skipped, or the run is discarded or replaced | The allocations of that line, or of the whole run. A run replaced by a newer run releases only the lines not on a draft yet. See Work through a send run. |
| The network takes over | The draft's own allocation replaces the planner's when you verify an FBA plan, create a WFS inbound, submit an FBT plan or open a transfer. See How sends reach each network. |
| The draft is deleted, discarded or cancelled | The draft's allocation. Its row shows Deleted in network. |
Where allocations show
In the Send Planner
- A lock icon next to the send quantity on the grid, and next to the warehouse under Ship from in the SKU's details.
- The status allocated on each network's why card in the SKU's details.
- · stock allocated on a shipment draft's row under Shipments.
Under Inventory → Allocations
Each allocation is a row with the status Allocated, at the ship-from warehouse, for the planned quantity. The Source column says what it's for and links to it:
| Source | Meaning | The link opens |
|---|---|---|
| Send Plan #N | Allocated on the working plan and not drafted yet, or an AWD or manual send | The Send Planner, with that product's details |
| Send Run #N | Allocated by a send run | The Send runs tab |
| FBA Inbound Plan #N | Moved onto an FBA draft inbound plan | The FBA inbound plan |
| WFS Inbound Draft #N | Moved onto a WFS inbound shipment draft | The Create WFS Inbound Shipment page for that draft |
| FBT Inbound Plan #N | Moved onto an FBT inbound plan | The FBT inbound plan |
| Warehouse Transfer | Moved onto a draft warehouse transfer | The transfer |
A released allocation stays in the list with the status Cancelled. The Allocations list doesn't show when a planner allocation expires; the timer is the Release unused allocations after (hours) setting. For the rest of the list, see Browse allocations and the allocations reference.
What allocating does to your stock
An allocation lowers Available at the ship-from warehouse and leaves On Hand unchanged. Anything that reads available stock sees fewer units: sales orders can't allocate them, and if you publish stock to sales channels from that warehouse, the quantity published can drop too. See How allocations work and Stock states.
Allocating doesn't change what the planner reads for the networks. The stock at FBA, AWD, WFS and FBT comes from each integration's own inventory sync, not from your channel inventory settings.
Why these aren't stock holds
A stock hold, placed under Inventory → Stock Holds, moves units into On Hold for no order at all: damaged goods, quality checks, a ring-fenced promotion. The Send Planner's allocations commit units to a specific send, so they show as Allocated, never under On Hold or on the Stock Holds page. To set stock aside without a send, use a hold; see Place & manage stock holds.
Next steps
- Create shipment drafts
- How sends reach each network
- Set network rules, for Release unused allocations after (hours)