Create a clearance plan
A clearance plan marks prices down in steps, such as 25% off now, 40% off if sales fall behind, then 60% off, until the stock is gone by your target date. SKU.io suggests each step when it comes due, and nothing changes on your channels until you approve it, or until the plan applies it for you.
Before you begin
- Your role needs permission to manage pricing. Without it, New clearance plan is greyed out with "You don't have permission to manage pricing".
- Products need a price in the price level the plan changes. A product without one is skipped with "No price in the plan’s price tier".
- A product can be in only one active clearance plan at a time.
Steps
-
Go to PIM → Clearance Plans.
You can also click New clearance plan at the top of PIM → Lifecycle.
-
Click New clearance plan.
-
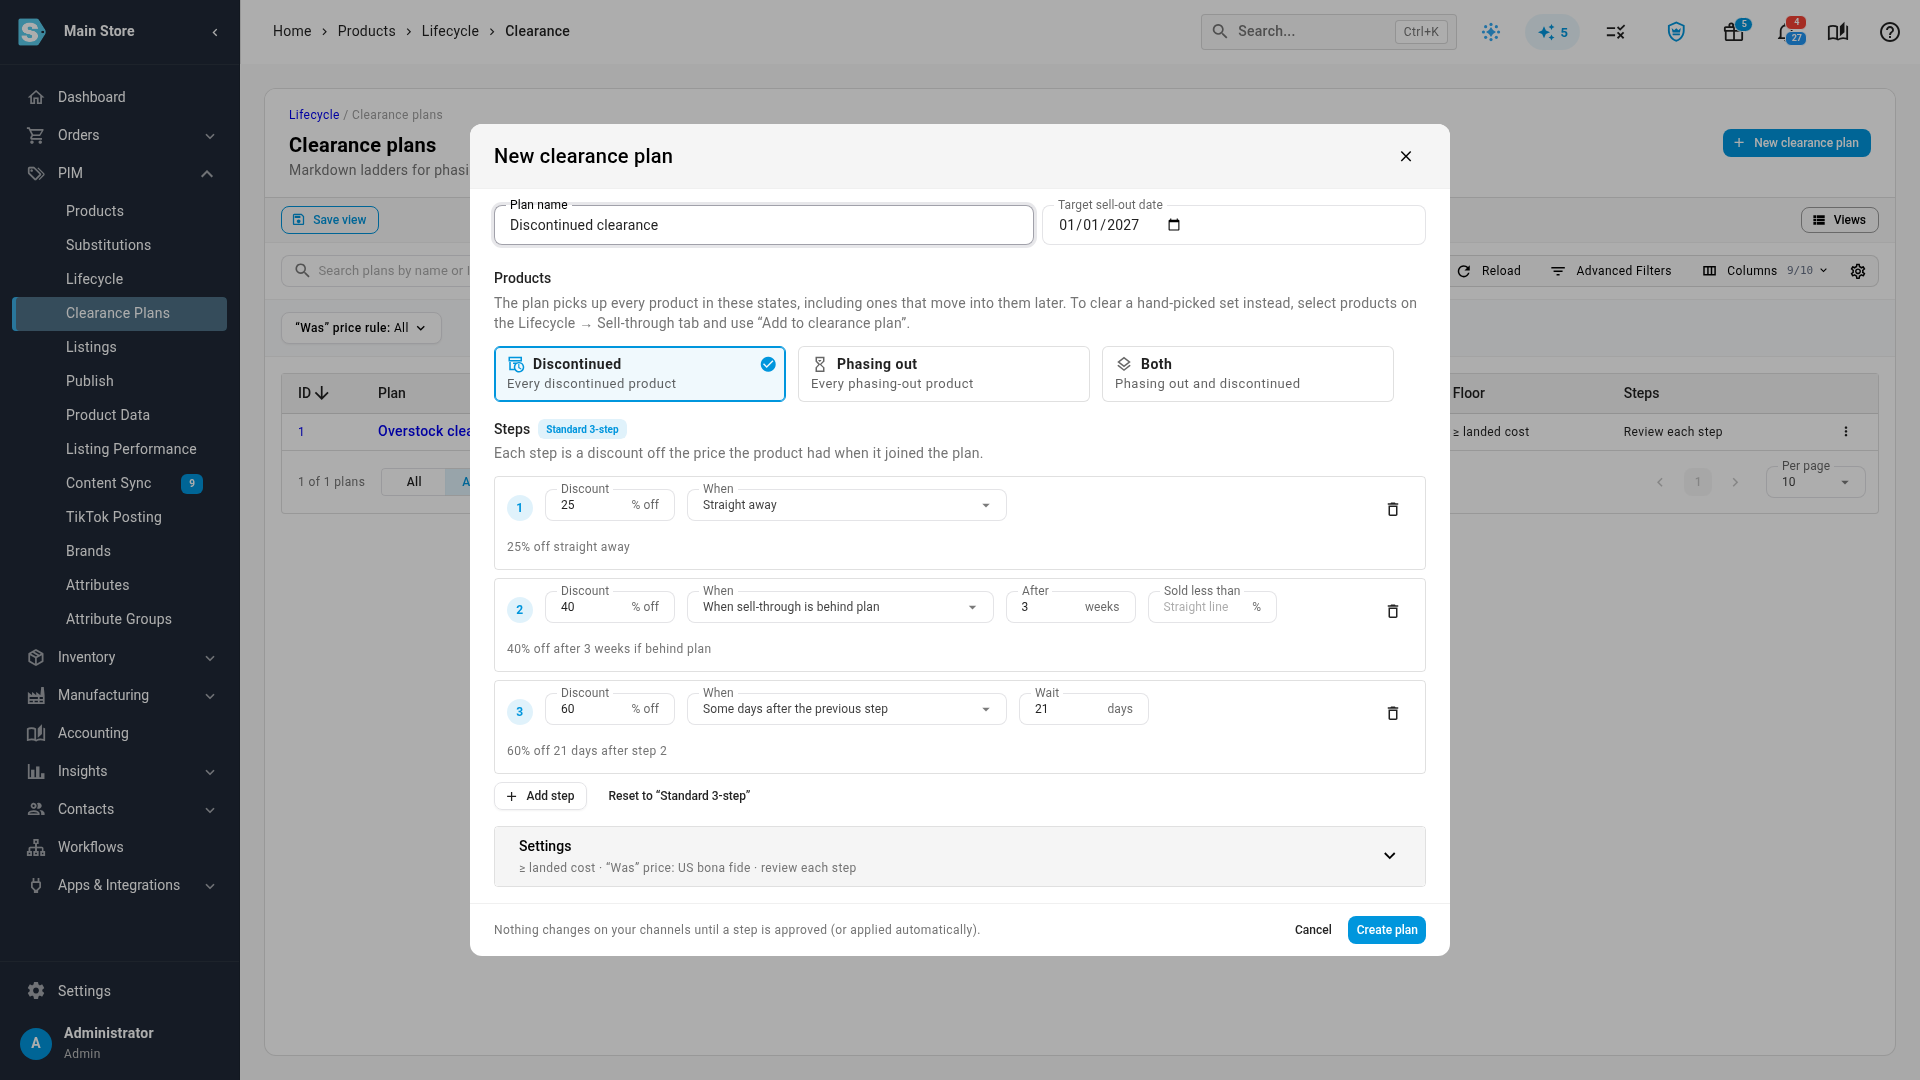
Enter a Plan name.
-
Check the Target sell-out date.
It starts 8 weeks from today. Steps that watch the pace of sales measure against it.
-
Under Products, choose Discontinued, Phasing out or Both.
-
Check the Steps.
A new plan starts from the Standard 3-step ladder. See Steps and when they come due.
-
To change where the plan applies, its price floor or how steps are applied, click Settings.
-
Click Create plan.
SKU.io checks the steps straight away and opens the plan's Review tab. The message says how many products joined and how many prices are waiting for review, counted the same way as the plan's Waiting for review card: held prices are included and named, such as "Created clearance plan with 5 products. 5 prices waiting for review (1 held)".
Next, approve the first markdowns. See Review and approve clearance markdowns.
Add products you pick
To clear a hand-picked set of products instead of a whole state, start from the products:
-
Go to PIM → Lifecycle and click the Sell-through tab.
-
Select the products.
To take every product that matches your filters, click All Filtered in the bulk actions bar.
-
Click Add to clearance plan.
-
Choose Add to an existing plan or Create a new plan.
Add to an existing plan is greyed out with "There are no active clearance plans yet" until you have one.
-
For an existing plan, pick it under Clearance plan. For a new plan, fill in the name, target date and steps as above.
-
Click Add N products or Create plan.
If any were left out, the message says how many and why, for example "Already in clearance plan #3".
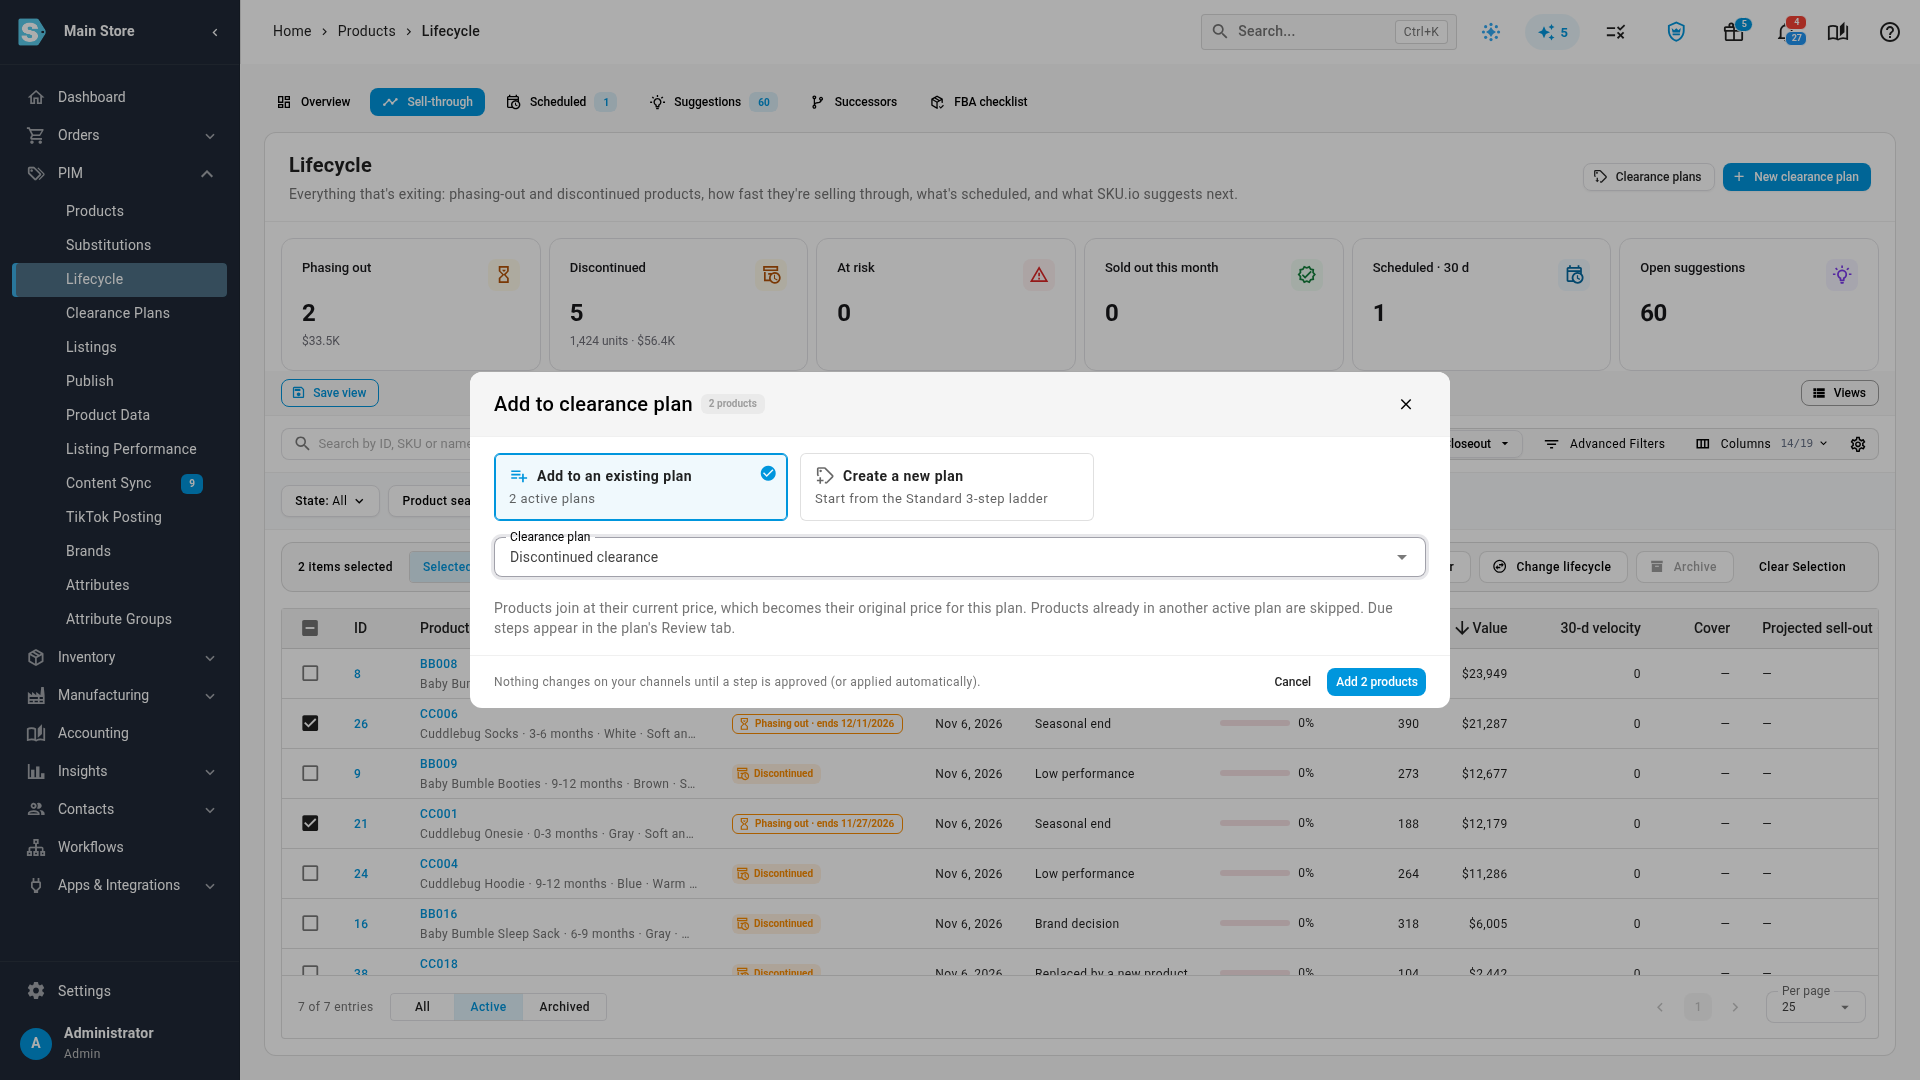
Products join a plan at their current price. That price becomes their original price for the plan, and every step is a discount off it.
Which products a plan picks up
| You create the plan from | Products in it |
|---|---|
| New clearance plan, choosing a state | Every product in that state when you create it, and every product that moves into the state later. SKU.io adds them on its morning check. |
| Products you ticked on the Sell-through tab | Only those products. To add more later, use Add products on the plan's Products tab. |
A product that's already in another active plan is skipped. A plan for a whole state picks it up once the other plan ends. If you take a product out of a plan, the plan doesn't add it back on its own, even if it's still in the state. See Review and approve clearance markdowns.
Steps and when they come due
Each step is a Discount off the product's original price, plus When it comes due.
| When | It comes due |
|---|---|
| Straight away | On the first check after the product joins the plan. |
| On a date | On the Date you pick. |
| When sell-through is behind plan | After the number of weeks you enter, if less than the Sold less than % of the stock has sold. Leave Sold less than empty to compare with a straight line from the start of the plan to the target date. |
| When stock will outlast the target date | When the stock would last longer than the weeks left to the target date, at the last 30 days' rate of sales. |
| Some days after the previous step | Wait the number of days you enter after the previous step was applied. |
The Standard 3-step ladder is:
- 25% off straight away.
- 40% off after 3 weeks if behind plan.
- 60% off 21 days after step 2.
Each step shows a sentence that says what it does, such as "40% off after 3 weeks if behind plan". Click Add step to add one, the bin icon to remove one, and Reset to “Standard 3-step” to start again.
The rules for a ladder:
- A plan has 1 to 10 steps.
- Each step must take more off than the one before: "Each step must discount more than the one before — prices never go up within a plan."
- The first step can't wait for a previous step.
- A discount must be between 0% and 100%.
While a step breaks a rule, the step shows the problem in red and Create plan is greyed out with "Fix the highlighted steps".
Plan settings
Click Settings in the window to see the plan's settings. The summary under it shows the current choices, such as "≥ landed cost · “Was” price: US bona fide · review each step". You can change every setting later on the plan's Settings tab.
Where it applies
- Price levels: the price levels whose prices the steps change. Leave it empty to change only your default price level. Prices on other price levels aren't touched.
- Channels: the channels the new prices are pushed to. Leave it empty to push to every channel the products are listed on.
- Target sell-out date: the date the plan aims to sell out by. It's optional, but When sell-through is behind plan with an empty Sold less than, and When stock will outlast the target date, need it.
Price floor and “was” price
Price floor sets the lowest price a step may suggest. A step that would go lower waits in the Review tab as Held. The default is Never below landed cost.
“Was” price (compare-at) chooses how the struck-through "was" price is picked, so it's legal where you sell. The default is US — bona fide prior price, with a Substantial period of 90 days.
Every floor and "was" price option is explained in the Clearance plan settings reference.
Applying steps
| Option | What happens |
|---|---|
| Review each step (default) | Due steps wait in the plan's Review tab until someone approves them. |
| Apply steps automatically | Due steps are applied on the morning check, and the new prices are pushed to the plan's channels. Steps held by the floor or a pricing guardrail still wait for review. |
SKU.io checks every plan every morning. With Apply steps automatically, the first step's prices are applied when you create the plan, because a Straight away step is due at once.
Open-to-buy link
To count the markdowns in your buying budget, pick a Merchandise plan. The clearance plan's projected markdown cost, (original price − clearance price) × units left, replaces the merchandise plan's planned markdown for that period, and is updated every day. While linked, that cell on the open-to-buy grid is read-only and shows the clearance plan's name. The link doesn't change budgets or purchase orders by itself. See How open-to-buy works.
The Clearance plans list
PIM → Clearance Plans lists your plans.
| Column | What it shows |
|---|---|
| ID, Plan | The plan. Click it to open it. |
| Status | Active or Ended. |
| Products | How many products are in the plan. |
| To review | Suggestions waiting for review. Click the count to open the plan's Review tab. |
| Target sell-out | The target date. |
| “Was” price rule, Floor | The plan's "was" price rule and price floor. |
| Steps | Review each step or Apply automatically. |
The toggle at the bottom shows Active plans by default, or Ended or All plans. Each row's ⋮ menu has Open plan, Review suggestions and Settings.