Reduce the cost of goods with a vendor credit
When a supplier credits you for goods you are keeping — they overcharged, or they gave you a price allowance after the fact — the credit should do two things: lower what you owe the supplier, and lower what those goods cost you. A vendor credit does both. Each line on the credit states what it does to the goods, and a Reduce the cost of the goods line re-prices the stock you still hold; the share that has already sold posts as a cost-of-goods-sold true-up instead.
One credit can cover goods from several of the supplier's purchase orders — a volume rebate usually does. You do not edit the original purchase orders or bills. The credit stays the document of record, and the cost change goes through the Cost Change Inbox like any other cost correction.
Before you begin
- The goods must have been received on a purchase order — the credit spreads over that order line's receipts.
- Know the supplier's credit memo: which purchase orders it covers, how many units on each, and the credit per unit.
- Know your cost-change policy — the Review policy link in the credit's Cost Impact panel opens Cost Change Policies. The Vendor credit price adjustment policy ships as review, so the cost change is held in the Cost Change Inbox until someone approves it. A/P drops as soon as you authorize either way.
- You need permission to work with accounting and purchasing documents.
Steps
Create the credit
-
Go to Orders → Vendor Credits.

-
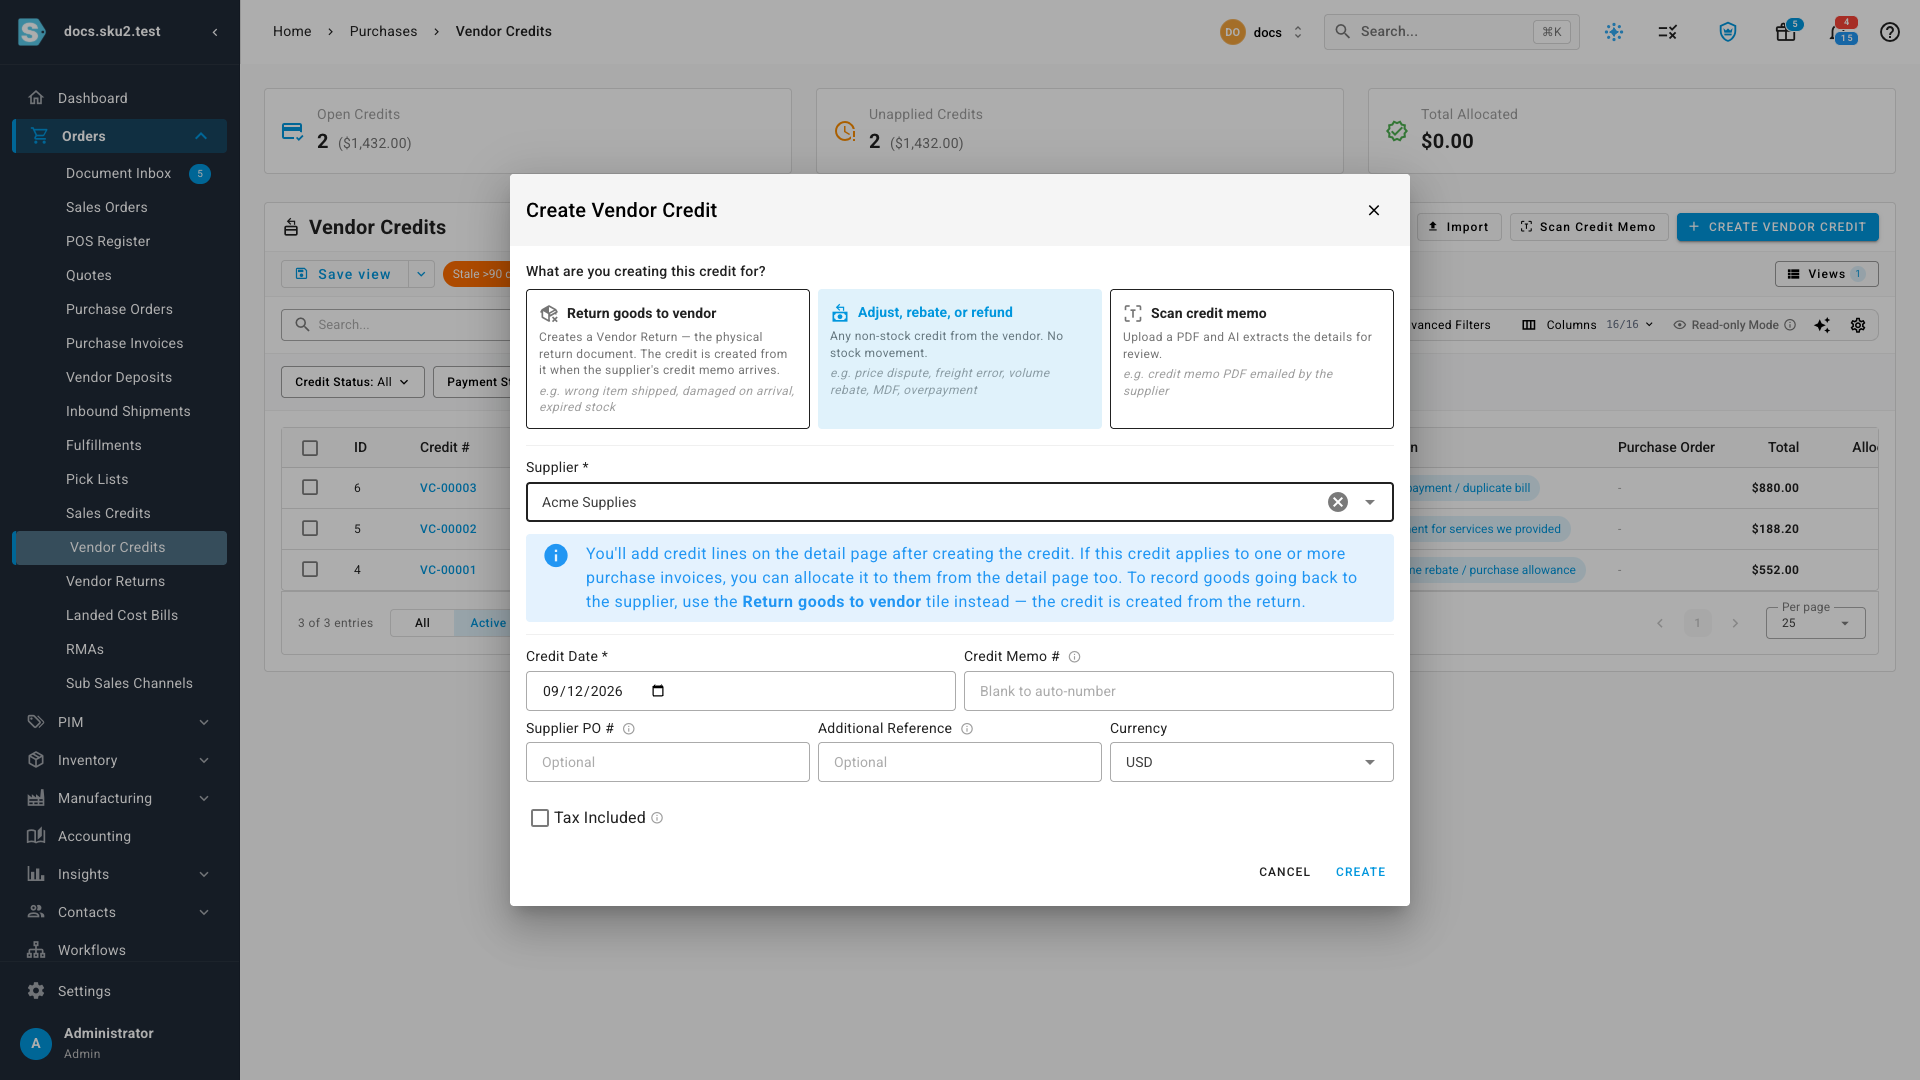
Click Create Vendor Credit, choose Adjust, rebate, or refund, and pick the supplier who issued the credit.
-
Click Create. The new credit opens in Draft.
Say what the credit is for
-
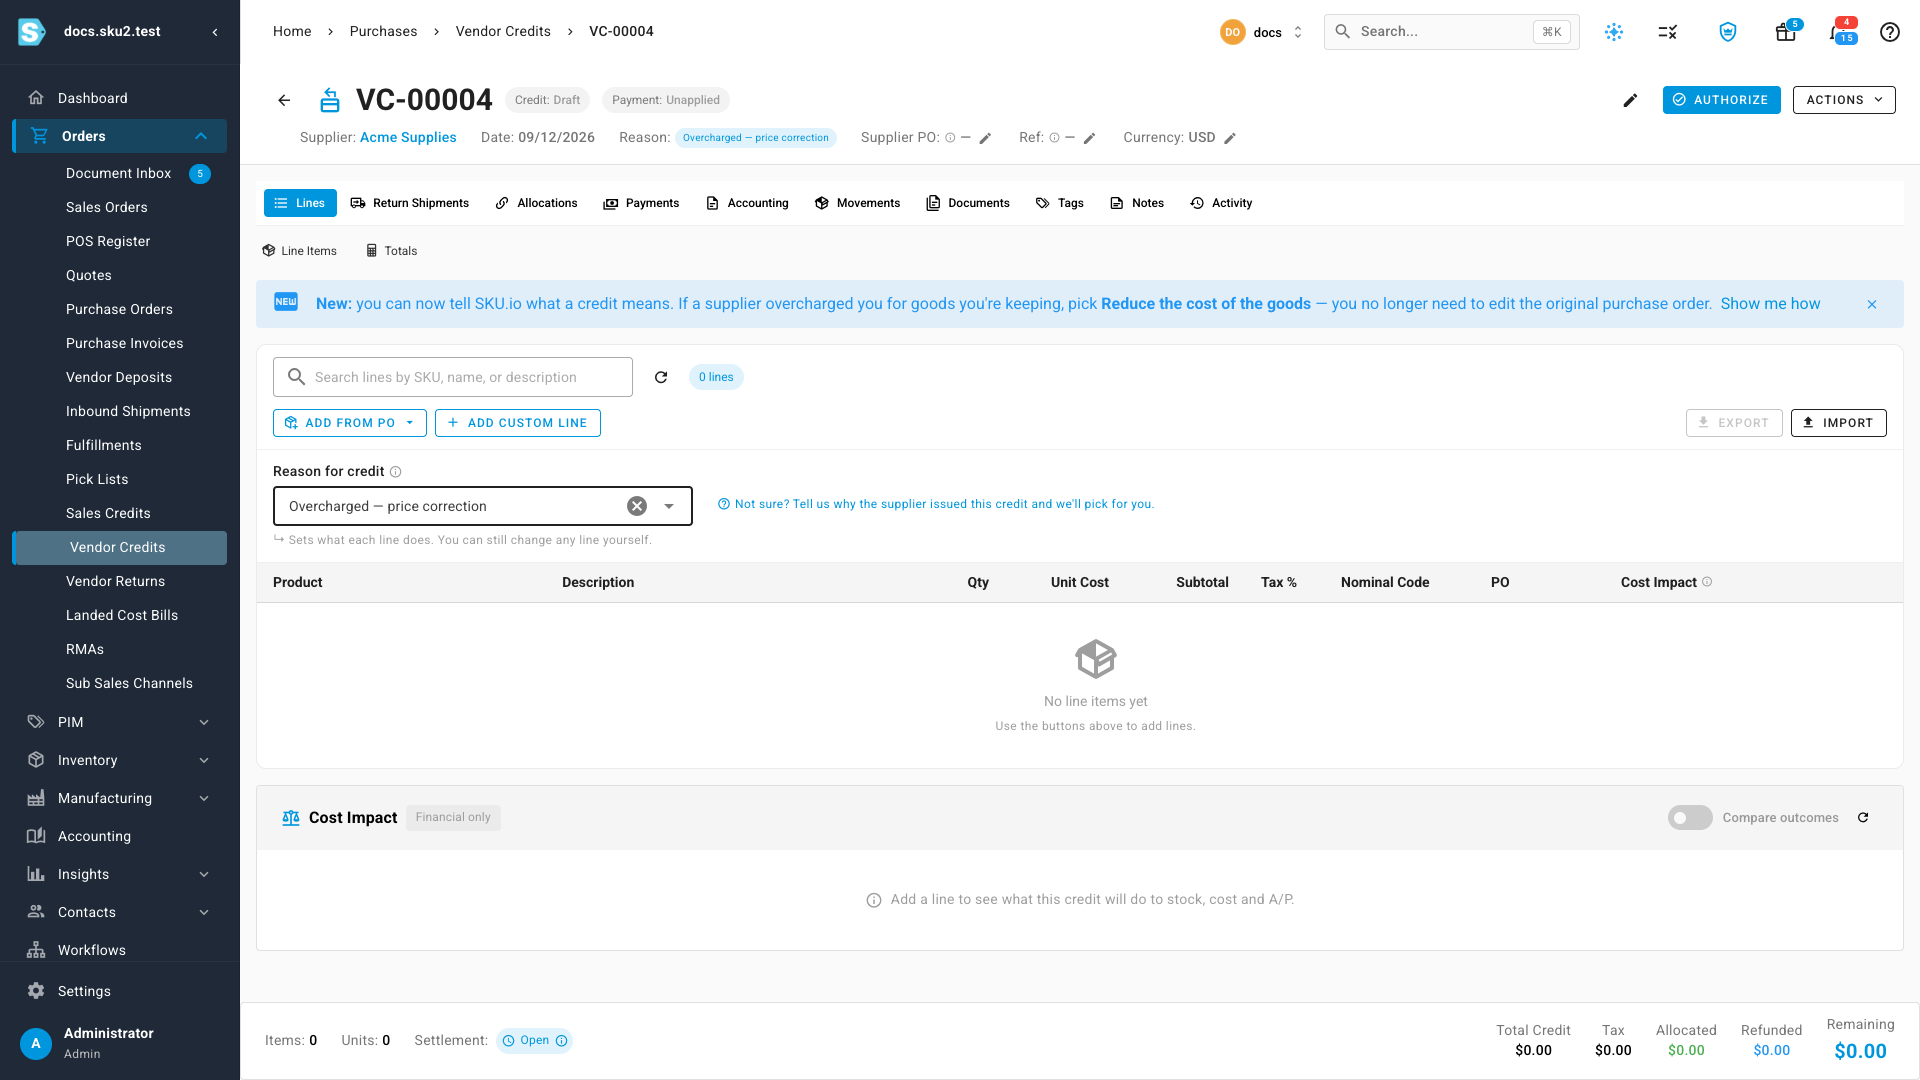
Under Reason for credit, choose Overcharged — price correction (or Volume rebate / purchase allowance for a rebate). The reason sets what each line does to the goods — for both of these that is Reduce the cost of the goods. You can still change any line yourself.
Add the goods from the purchase order
-
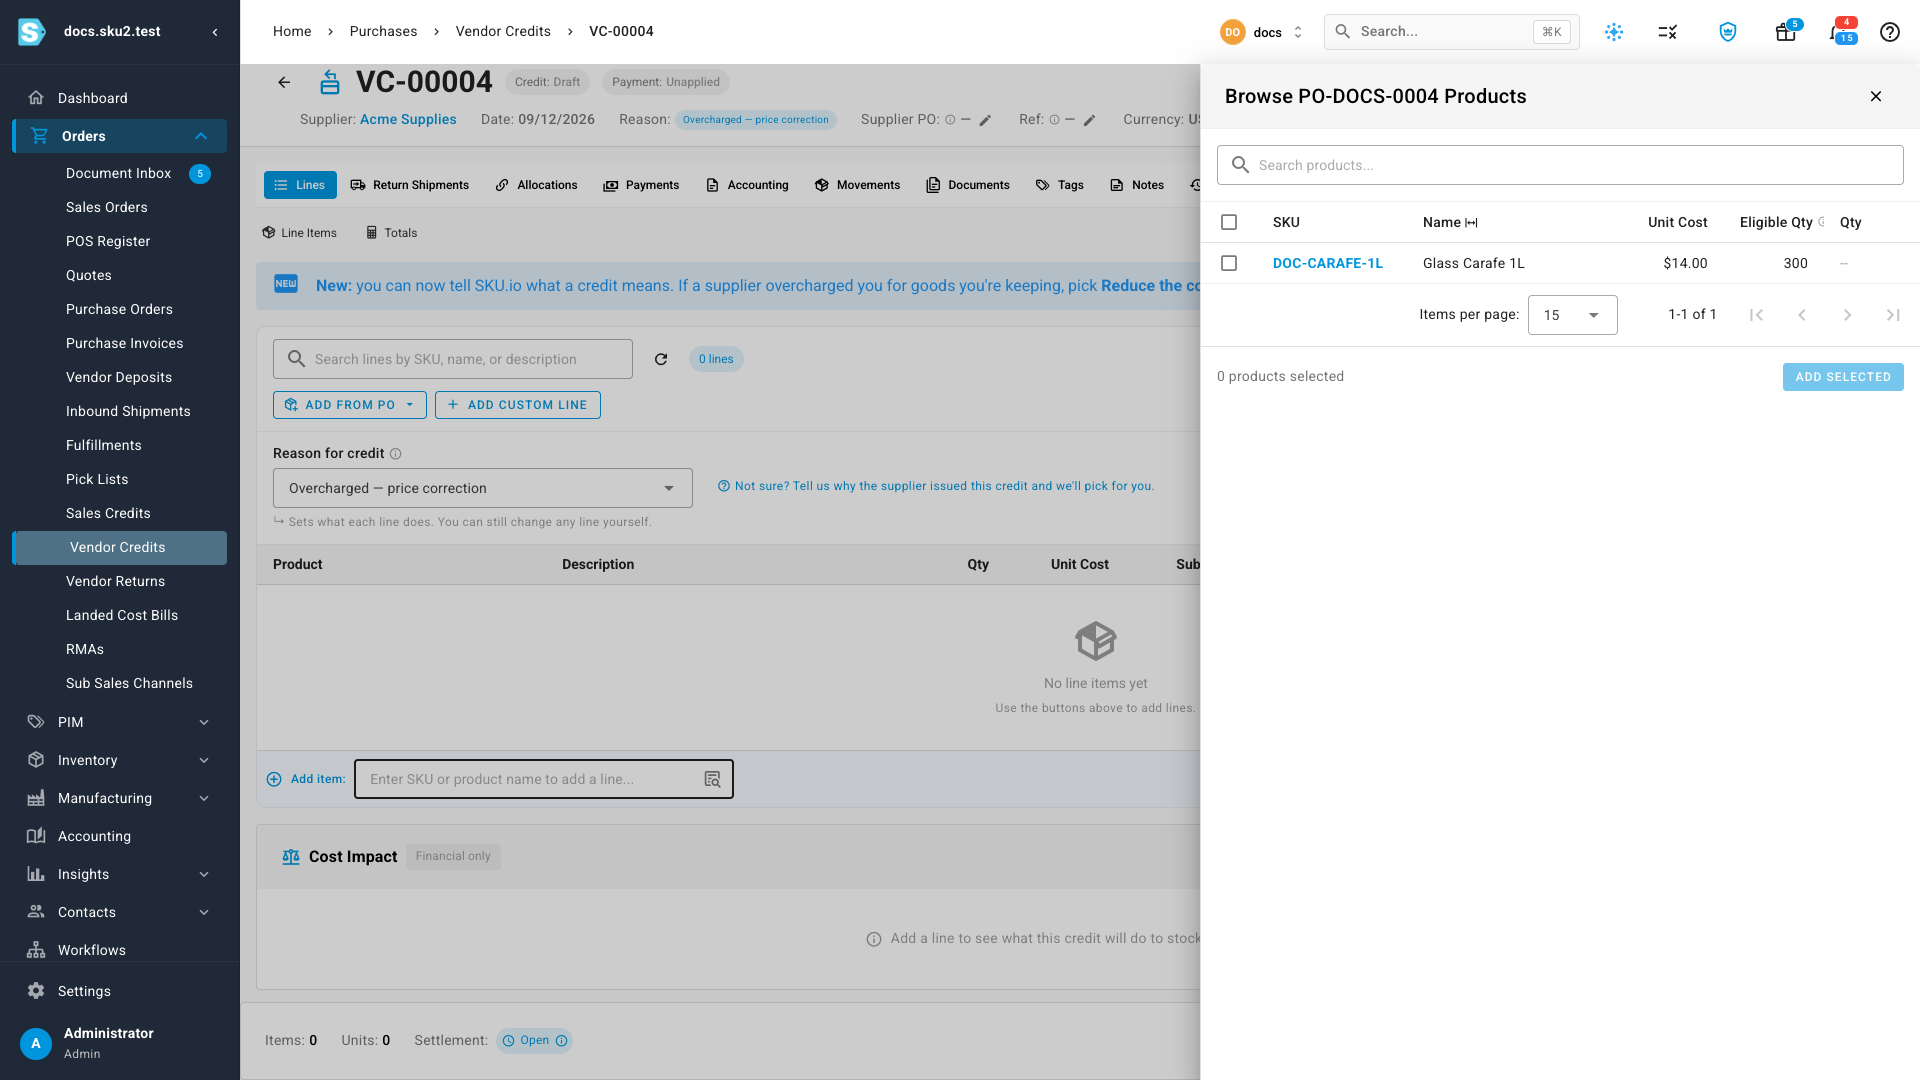
Click Add from PO, then Select a Purchase Order, and search for the order the supplier credited. Click Browse Lines.
-
Tick the line, enter the number of units the credit covers in Qty, and click Add Selected. Close the browse panel.
The line is added at the purchase order's unit cost.
-
Click the line's Unit Cost and enter the credit per unit — the supplier's credit amount divided by the units it covers. Press Enter.
The Cost Impact column now reads Reduce the cost of the goods, and the sentence under it spells out the effect — for example 300 units stay in stock · unit cost $14.00 → $12.75 (−$1.25/unit).
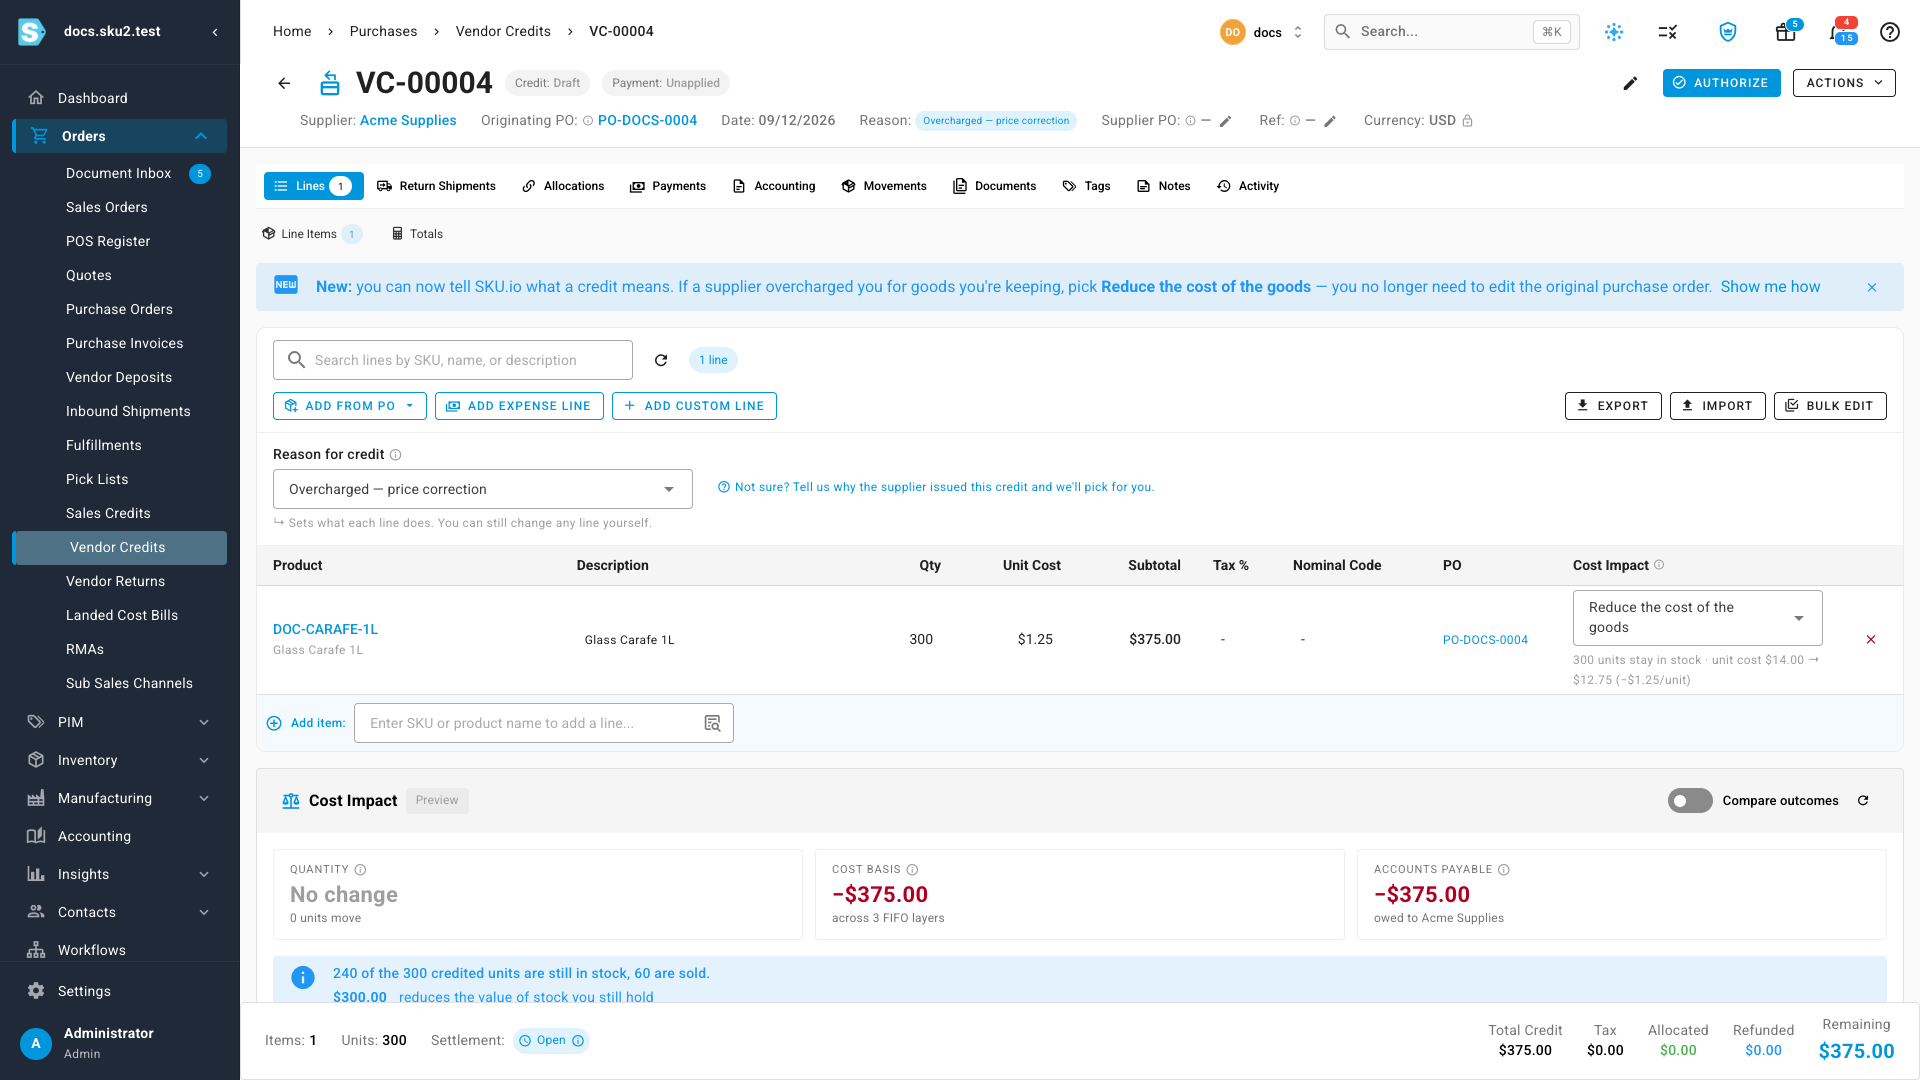
The credit spreads across every unit on the purchase order line, so crediting 100 of 300 units at $4.13 lowers all 300 by $1.38 each. The sentence under the line shows the spread, and the panel's layer table shows what each receipt gets.
Add goods from another purchase order
-
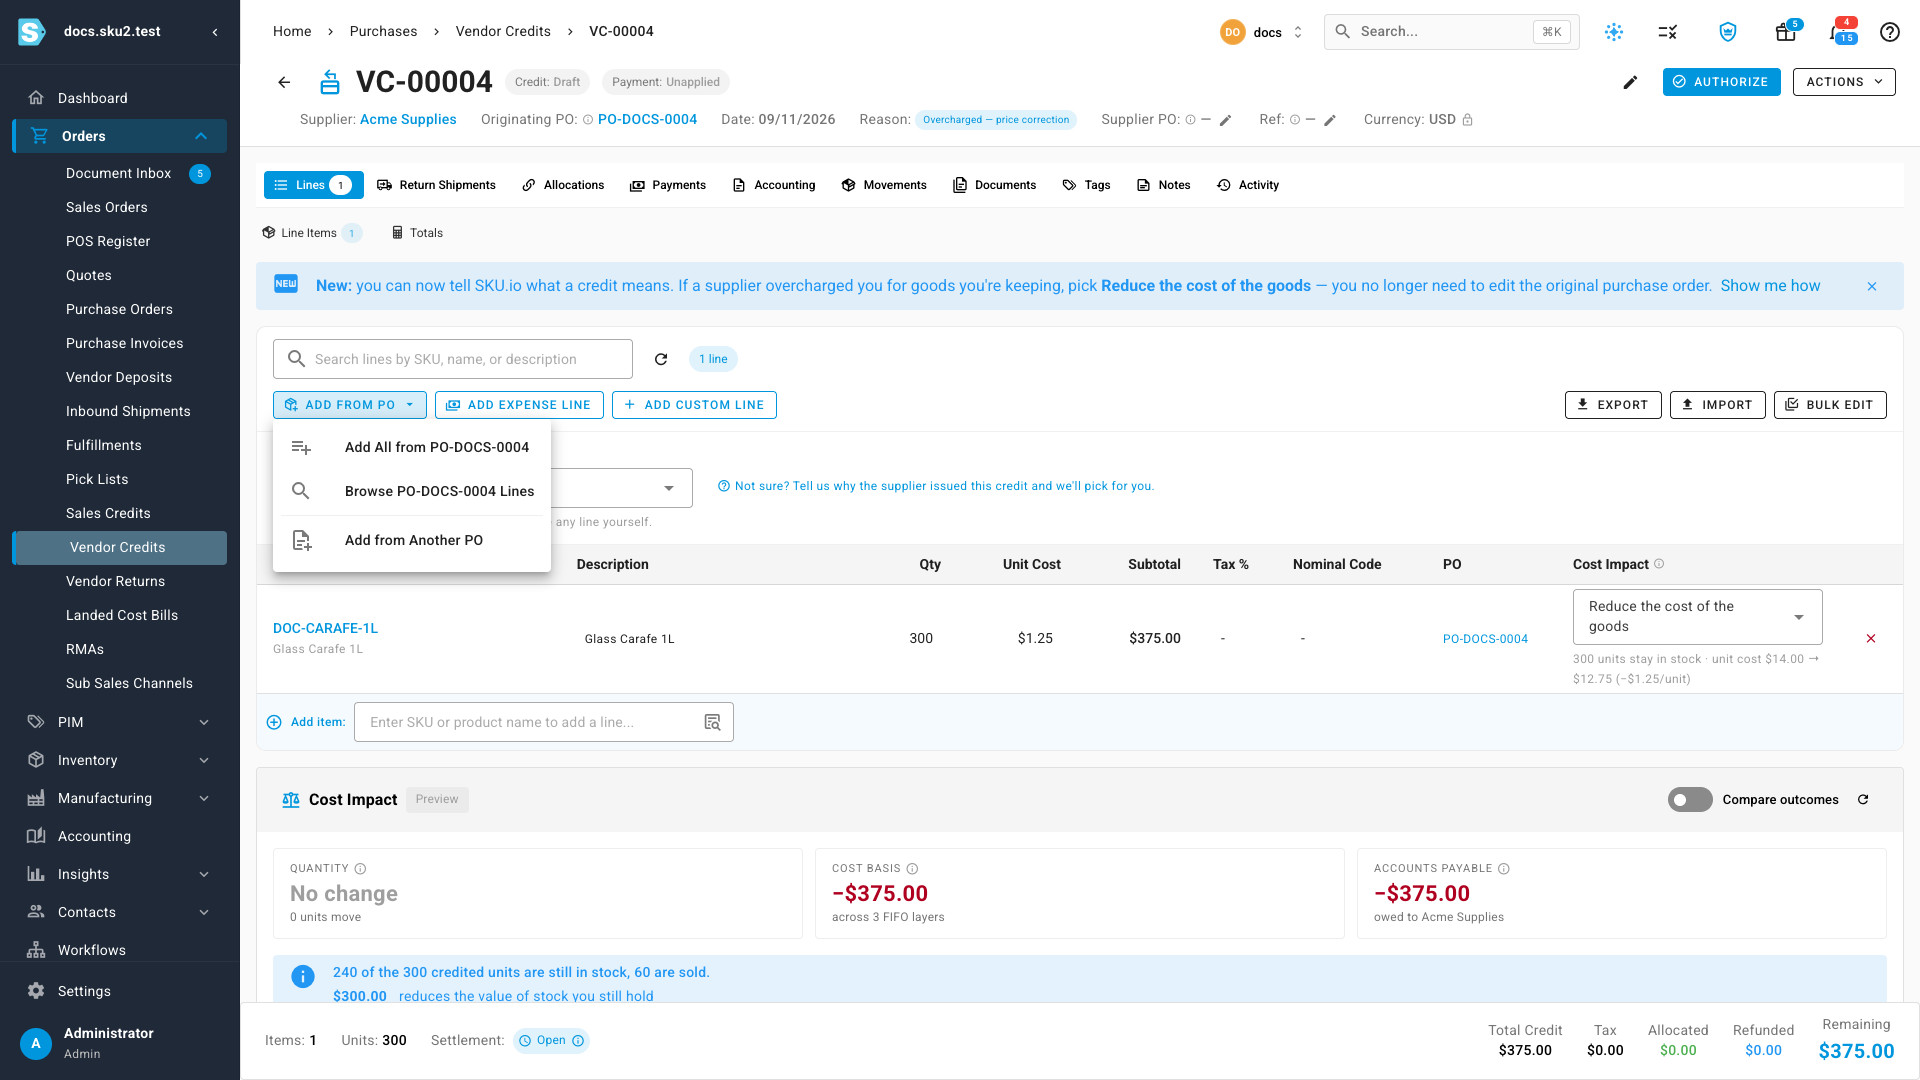
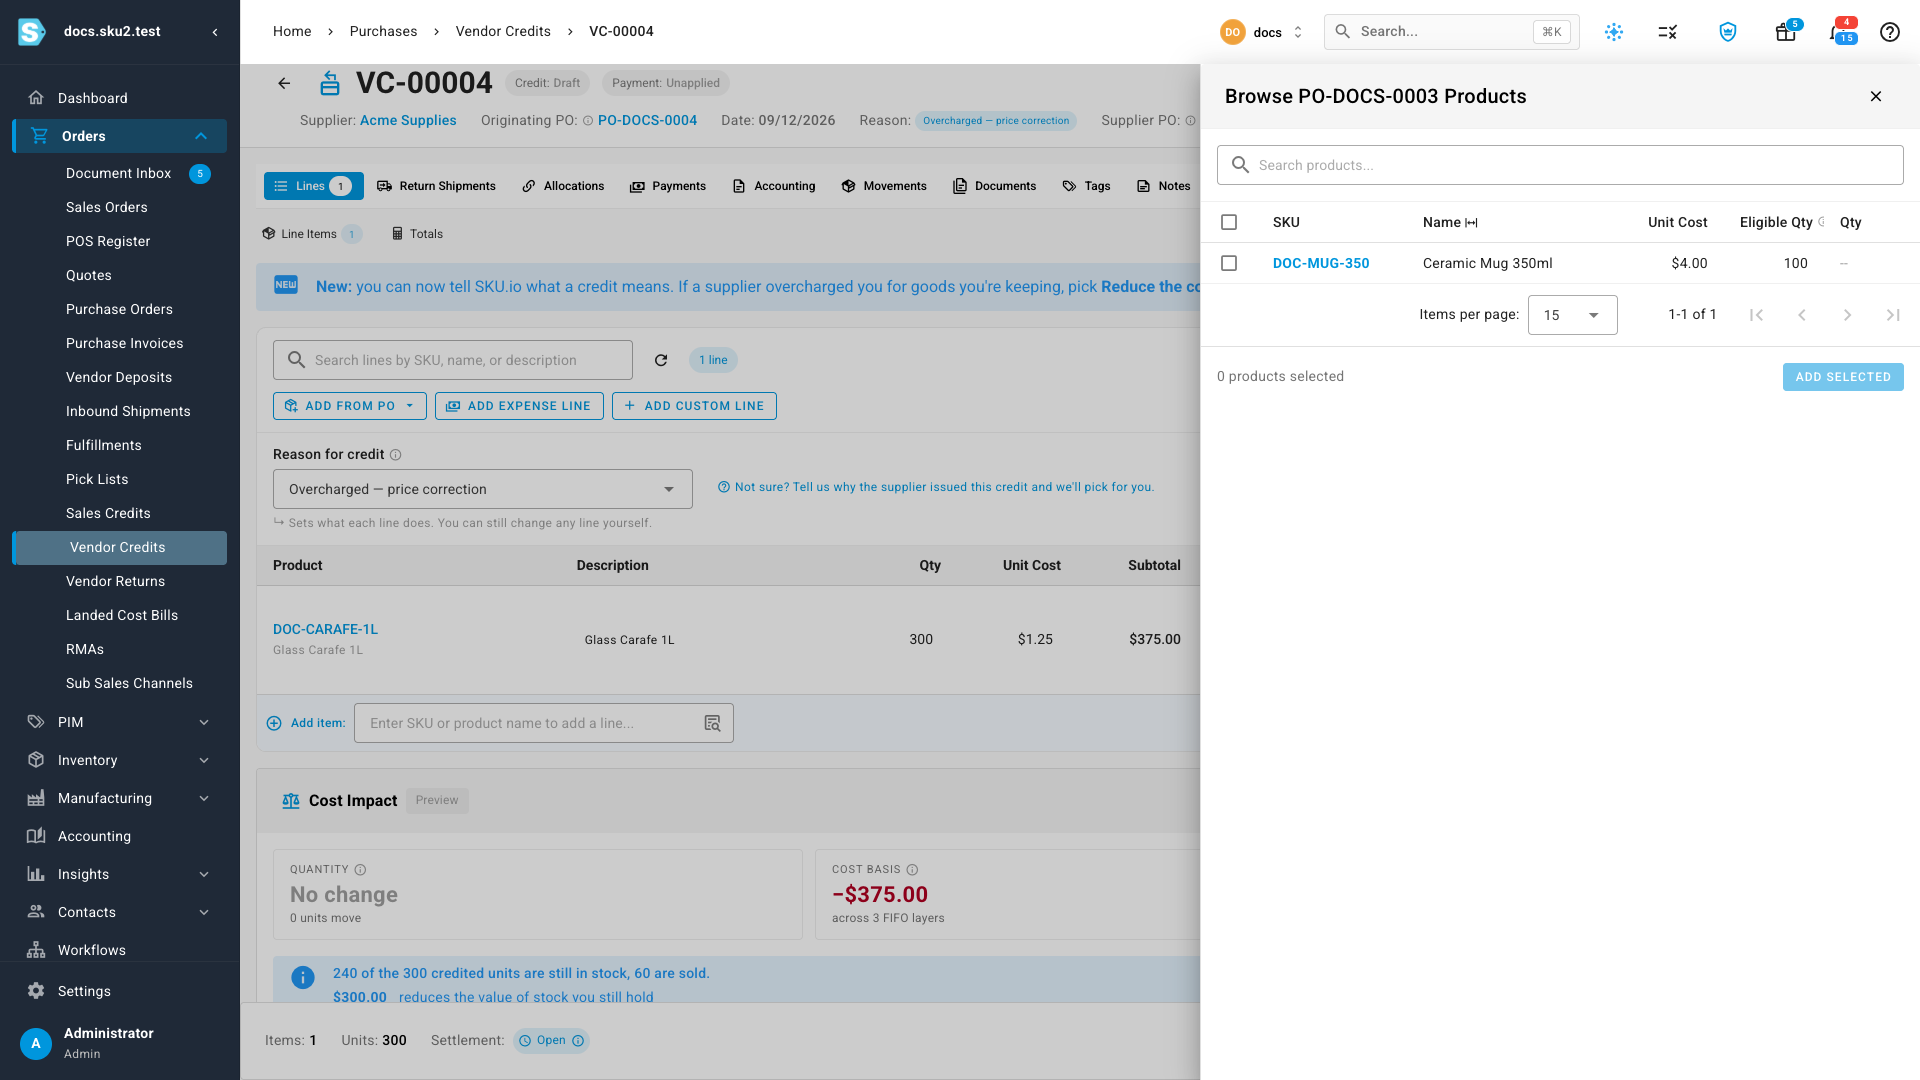
If the credit covers goods bought on more than one purchase order, click Add from PO again, then Add from Another PO. Search for the next order the supplier credited, choose it, and click Browse Lines. The panel is titled with that order.
-
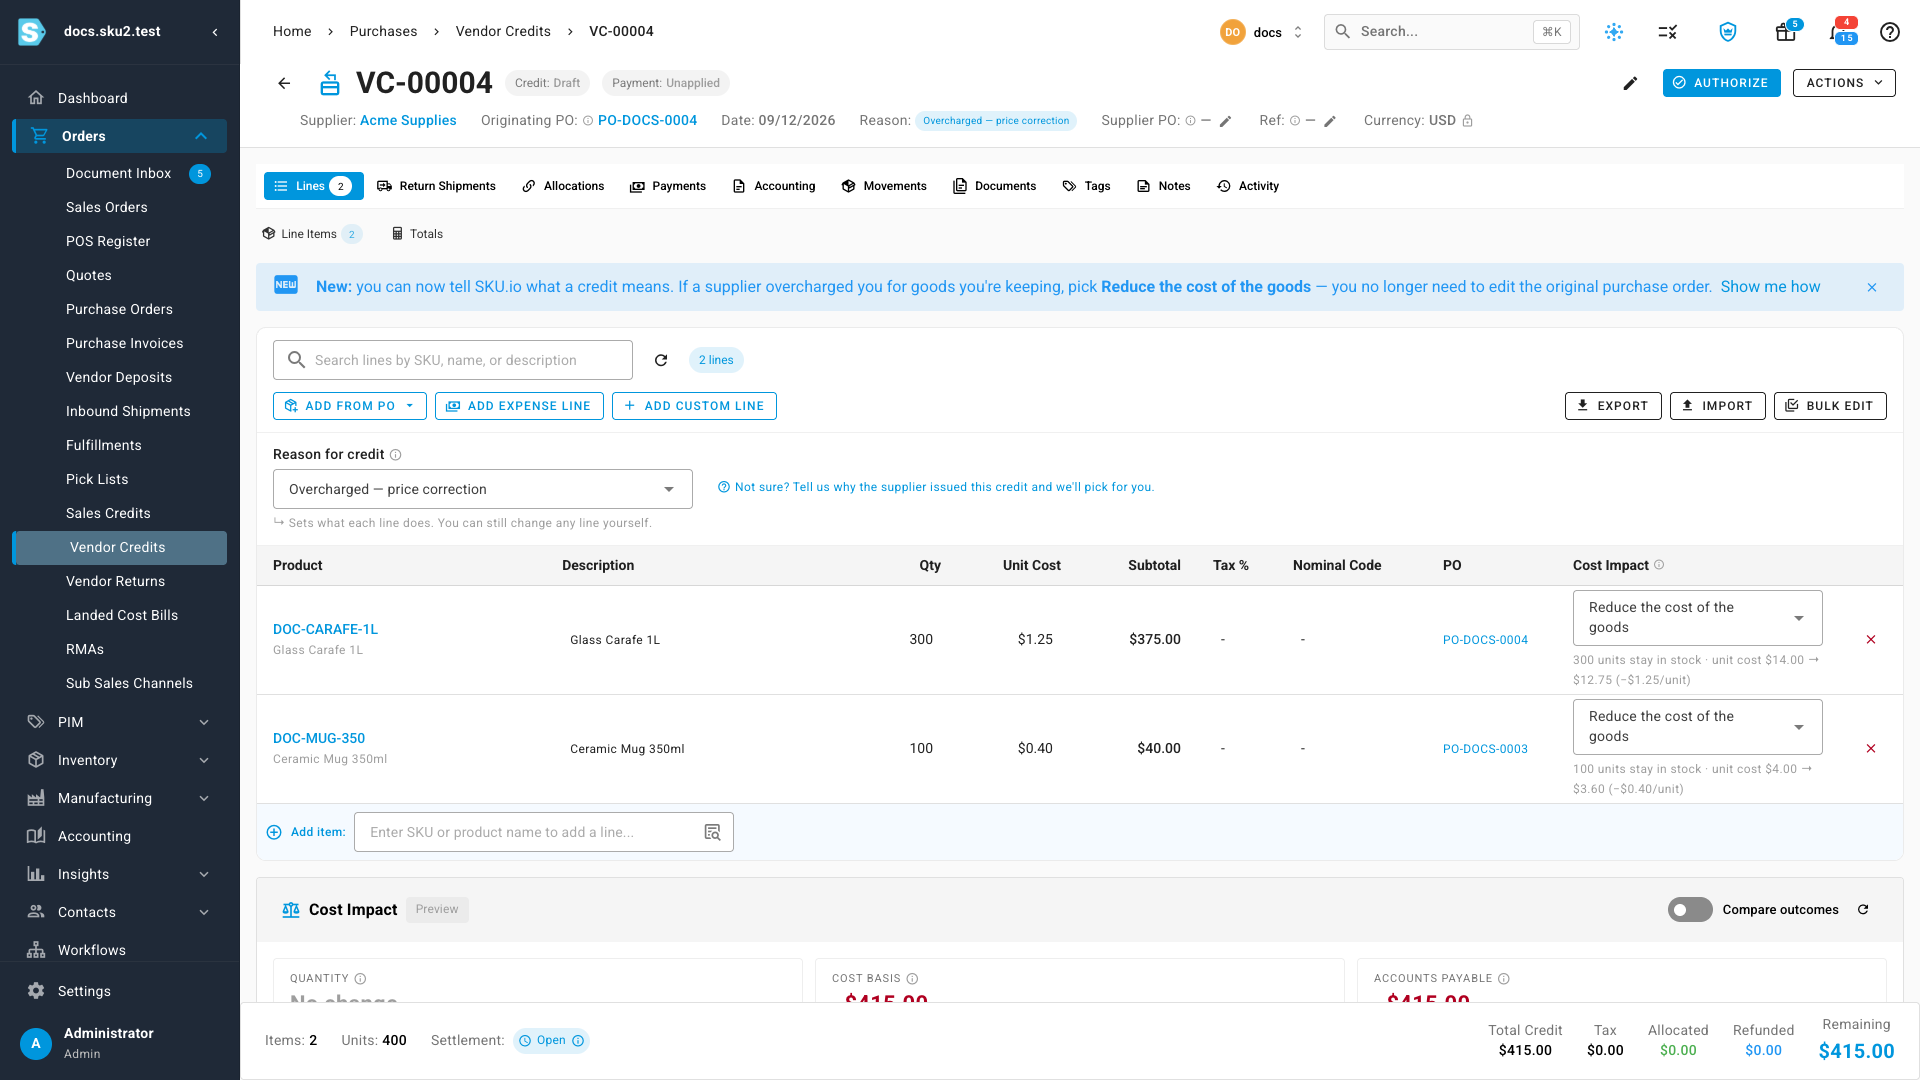
Tick the line, enter the credited units in Qty, click Add Selected, and close the panel. Then set that line's Unit Cost to its credit per unit, as in step 7. Repeat for each order the credit covers.
The PO column shows which order each line came from, and the Add from PO menu now lists every order already on the credit, with Add All and Browse for each.
For a rebate that runs to dozens of lines, upload them instead — see Import the lines instead below.
Check the Cost Impact preview
-
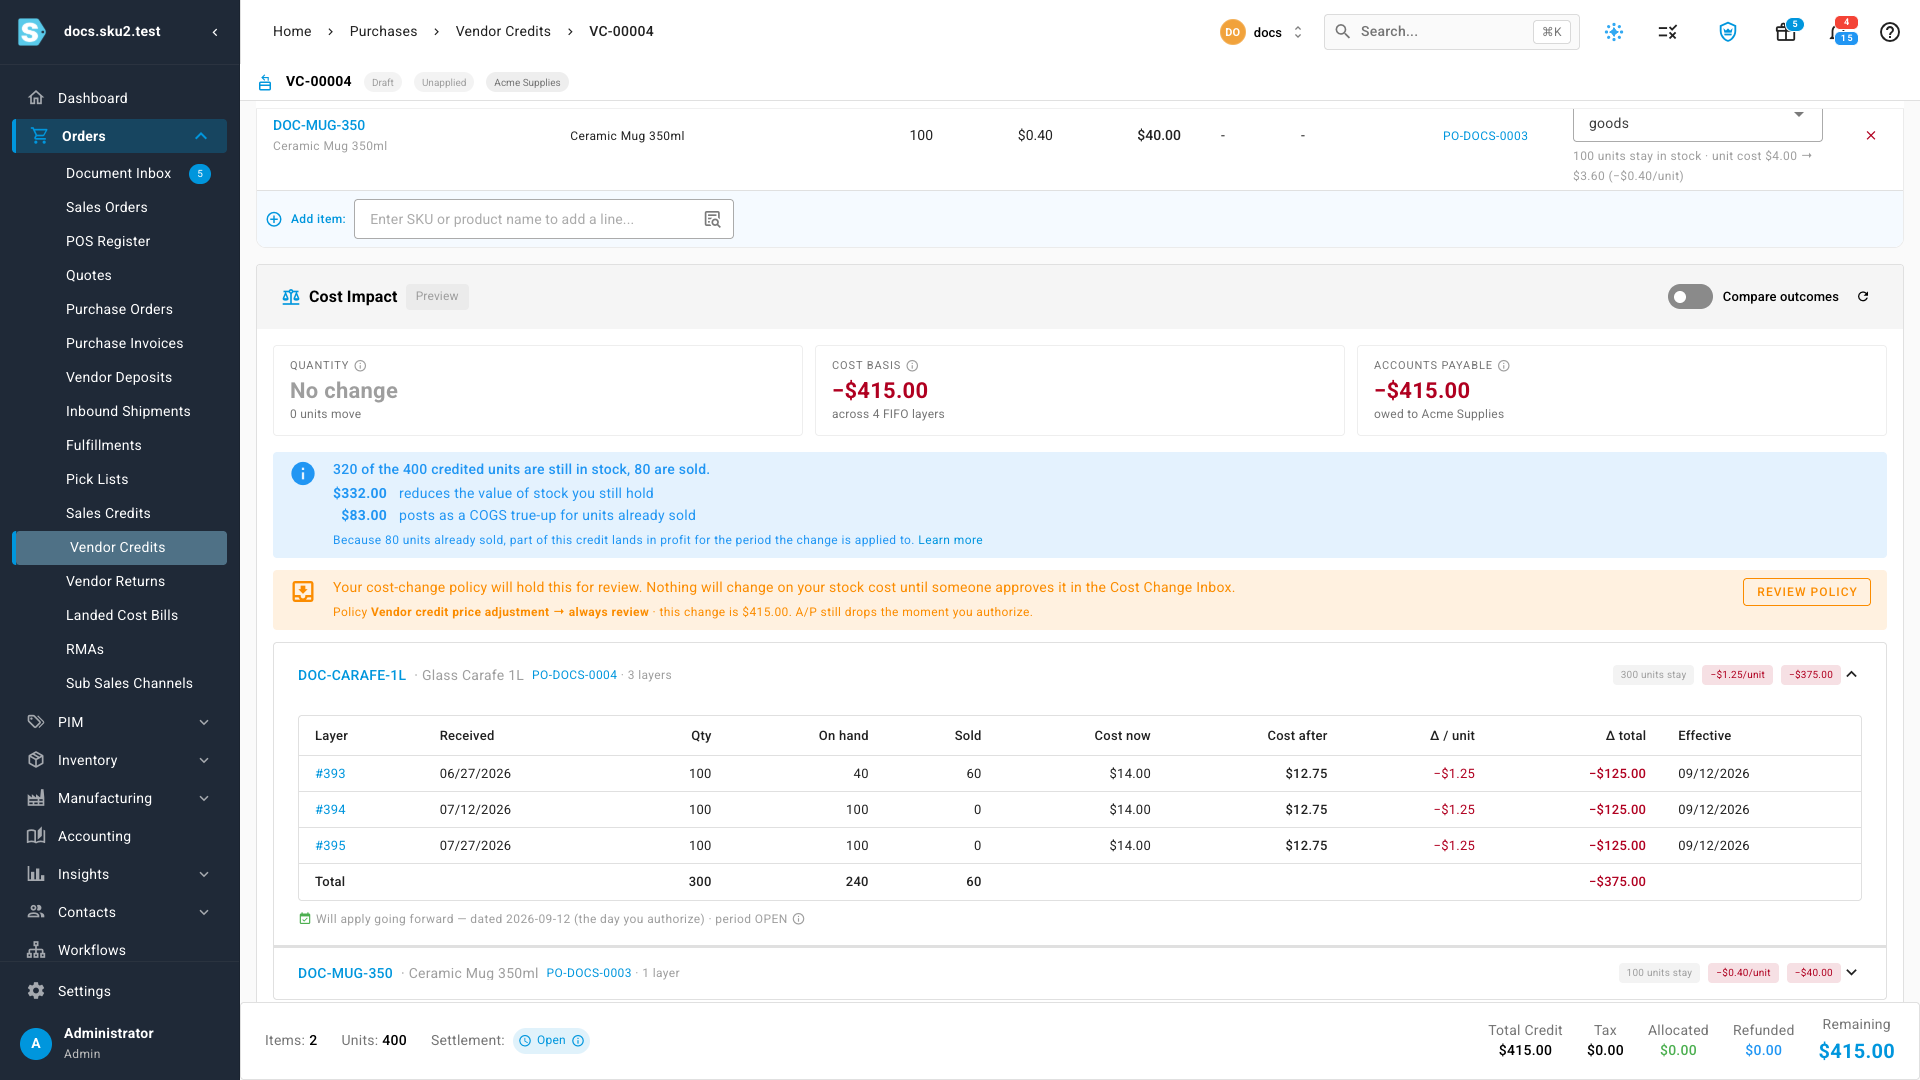
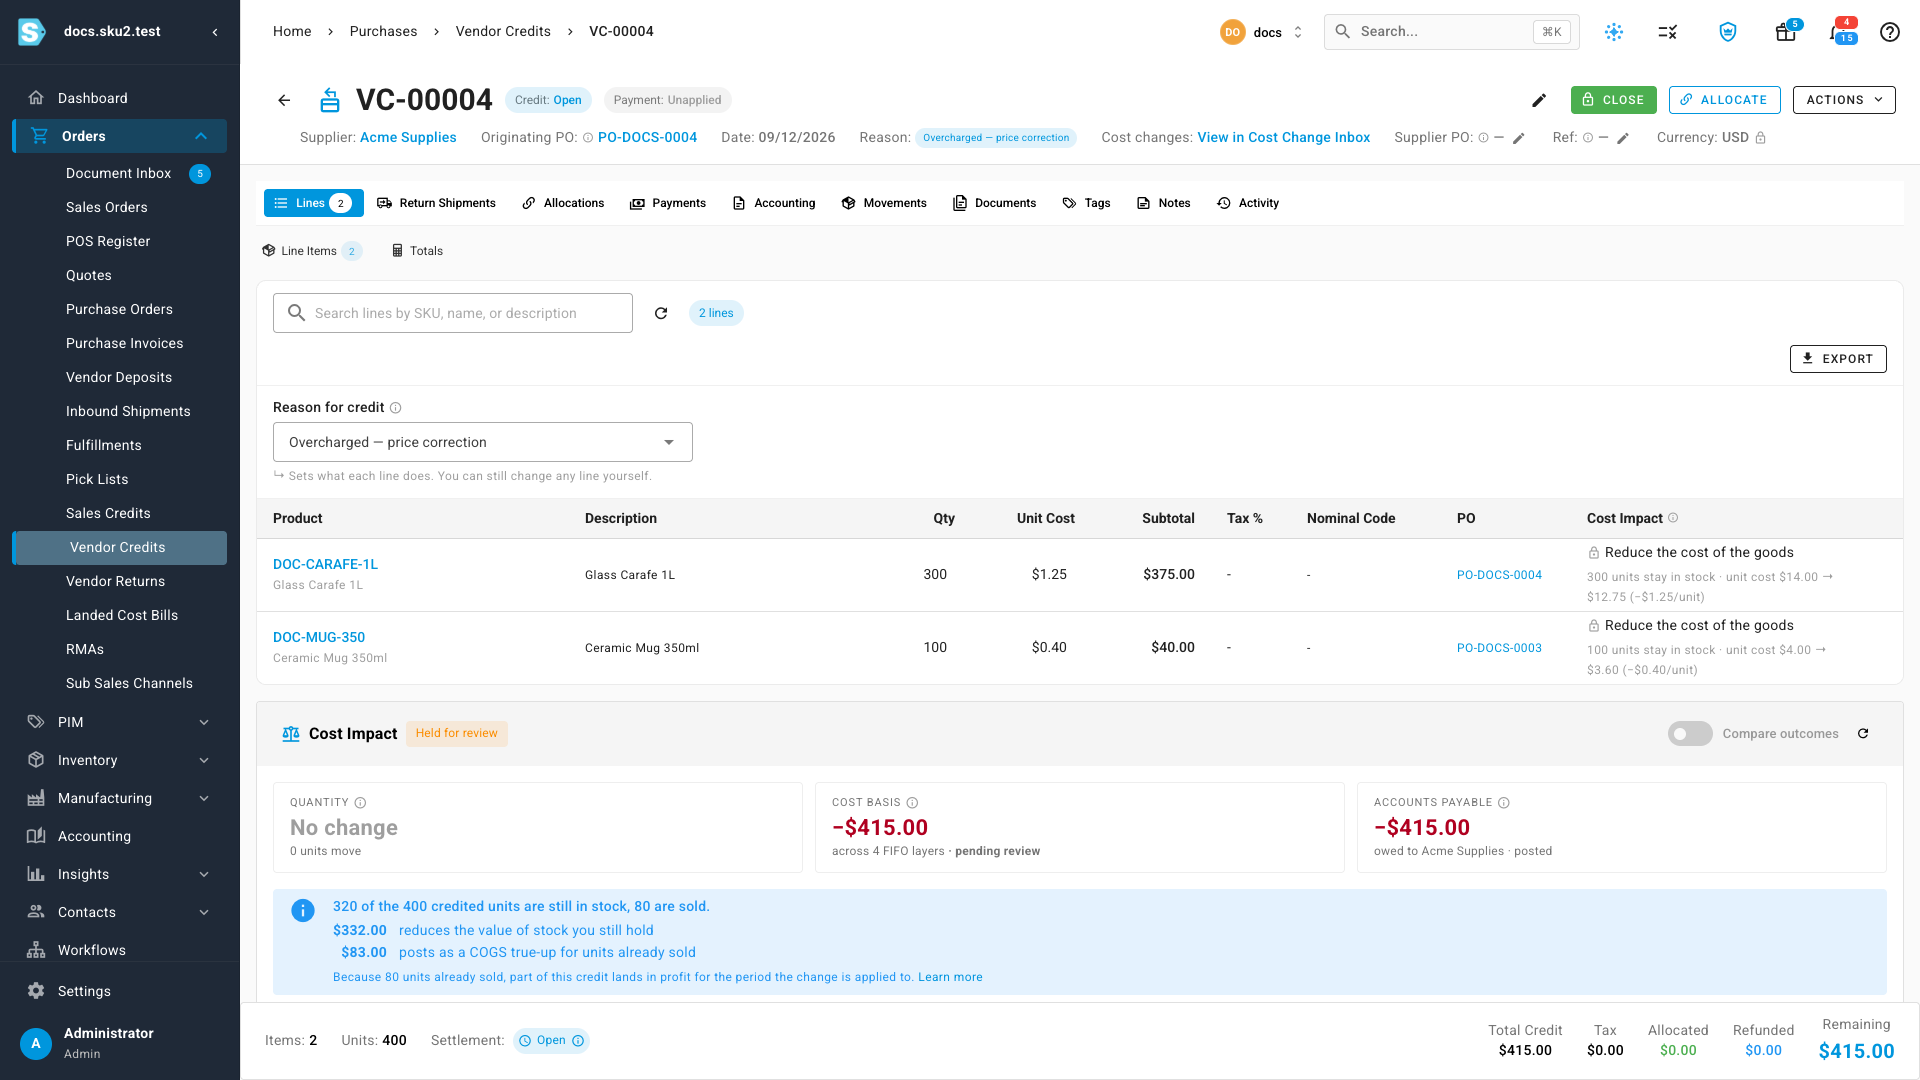
Read the Cost Impact panel under the lines. Nothing has posted yet — the panel shows what will happen:
- Quantity — No change. A cost credit moves no stock.
- Cost basis — the total the goods' recorded cost drops by, across the FIFO layers it touches, on every order the credit covers.
- Accounts payable — what you owe the supplier drops by the credit total.
Below the tiles, the panel splits the credit between stock you still hold (which becomes cheaper) and units already sold (which post as a COGS true-up for the period the change is applied to). Expand a product row to see each receipt layer's cost now, cost after, and the change.
Turn on Compare outcomes to see this side by side with keeping the credit Financial only — same A/P change, no change to the goods' cost. Show me an example walks through a worked case with sample numbers.
Authorize
-
Click Authorize. The dialog restates the plan in one sentence per line, with the A/P total and the split between stock value and COGS. Tick the acknowledgement and click Authorize.
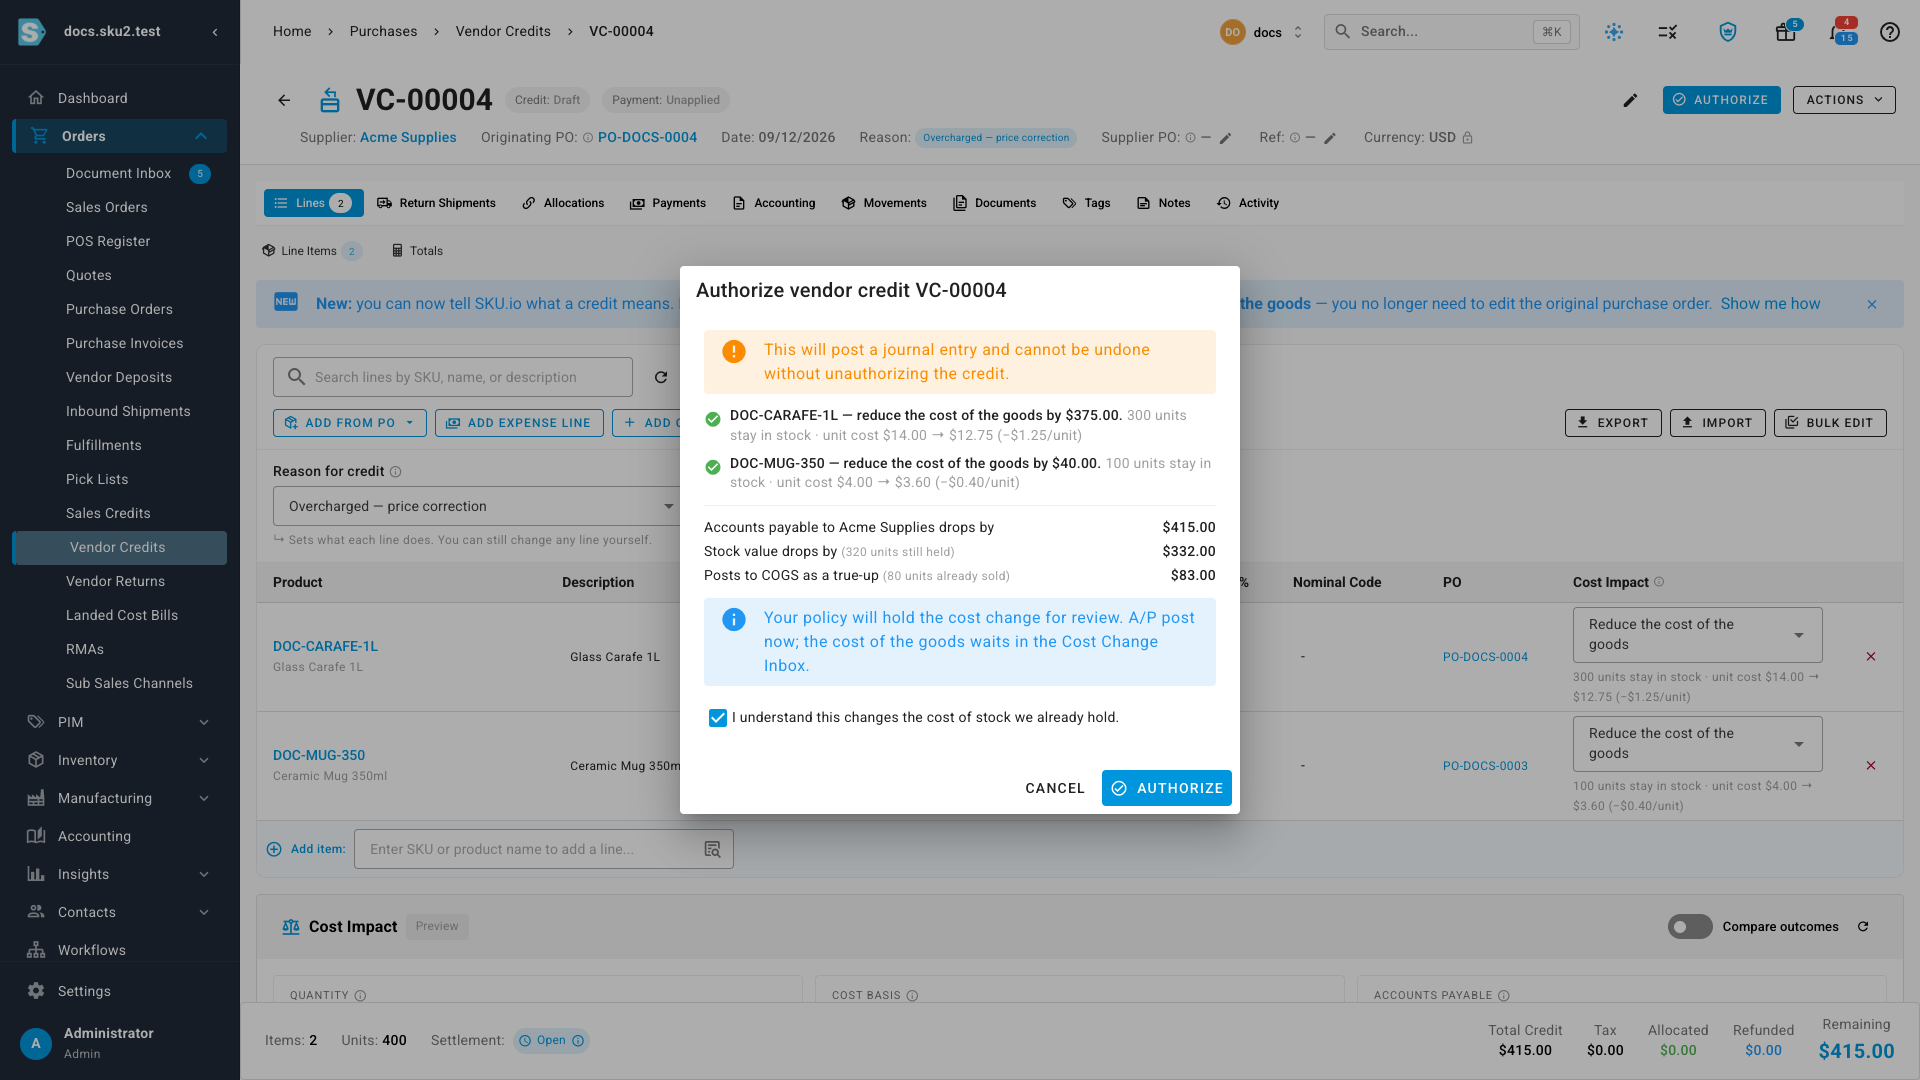
-
The credit is now authorized: what you owe the supplier has dropped, and the panel's status reads Held for review. The cost of the goods does not change until the cost change is approved.
Approve the cost change
-
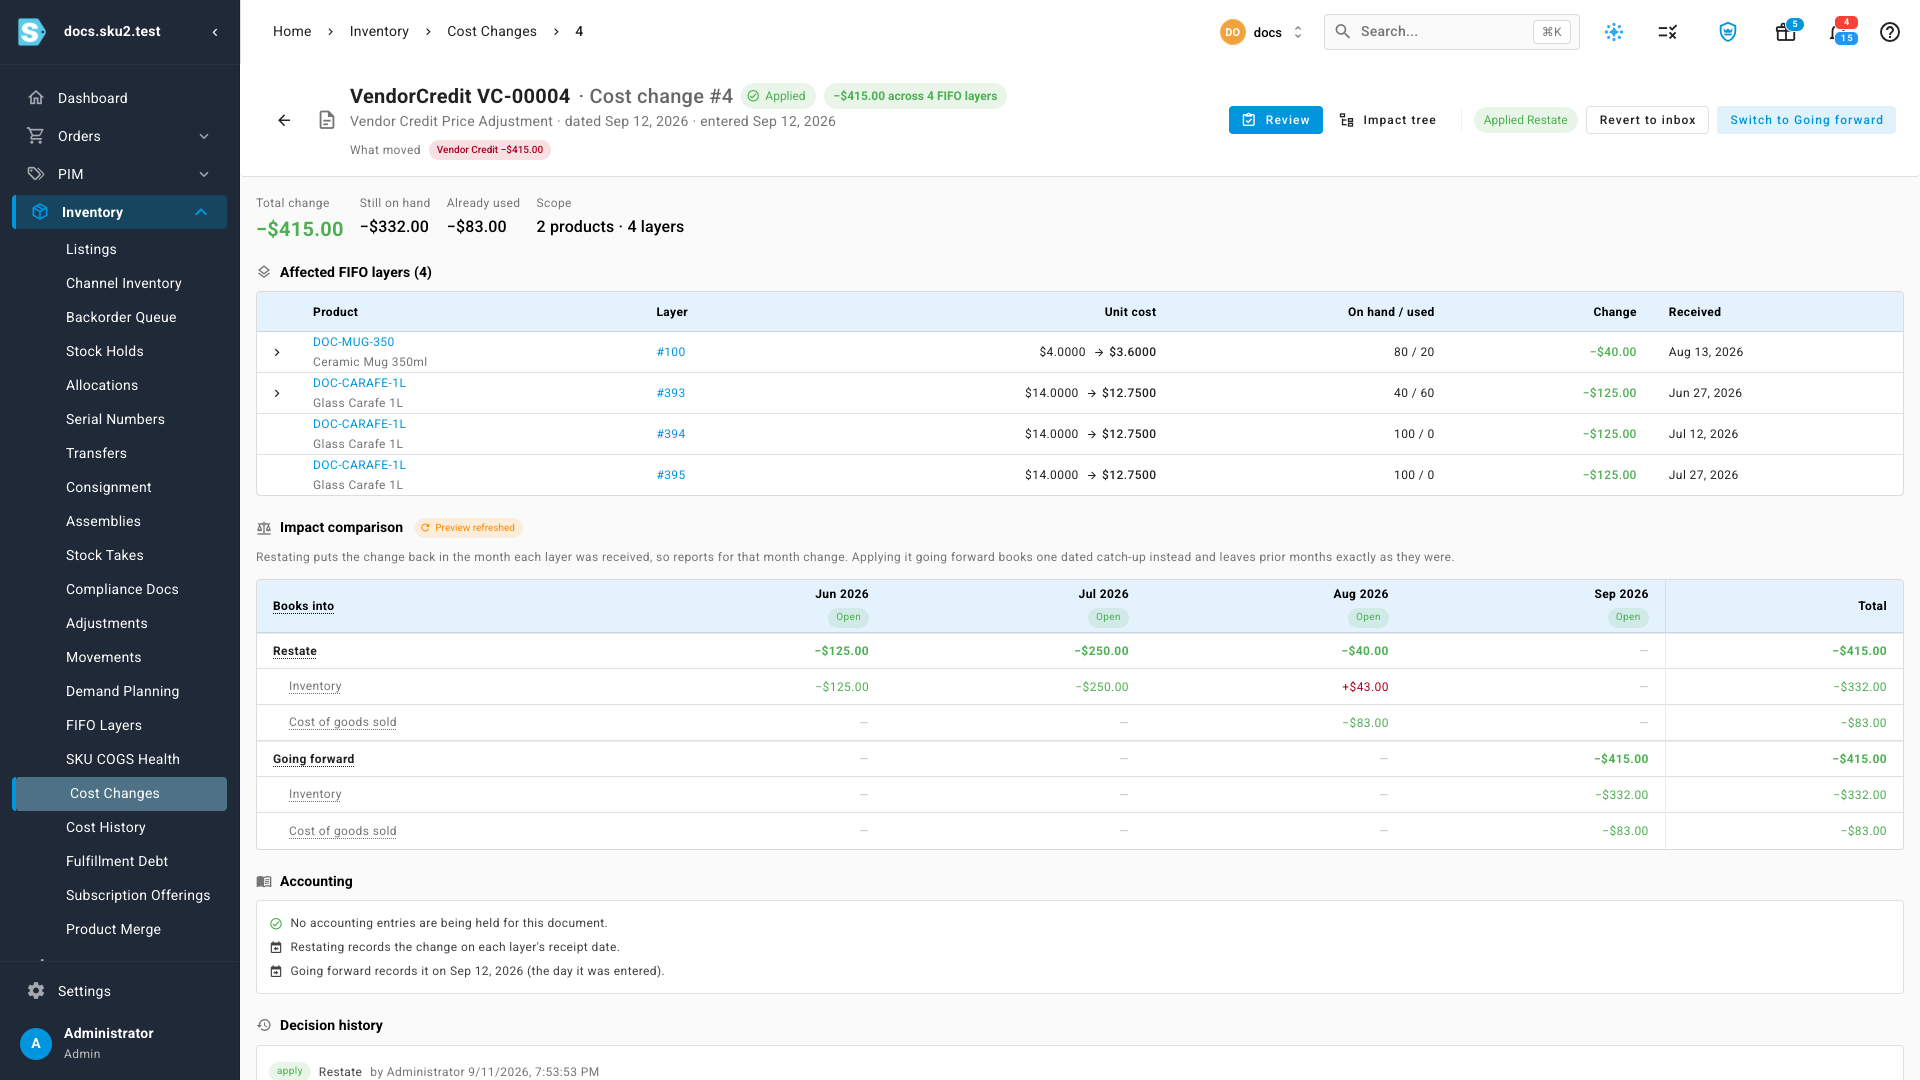
Click View in Cost Change Inbox. The change names the credit as its trigger and lists the affected FIFO layers.
-
Choose Restate to book the change on each layer's original receipt date (reports for those months change), or Going forward to book it on the day you apply it. Click Apply and confirm.
-
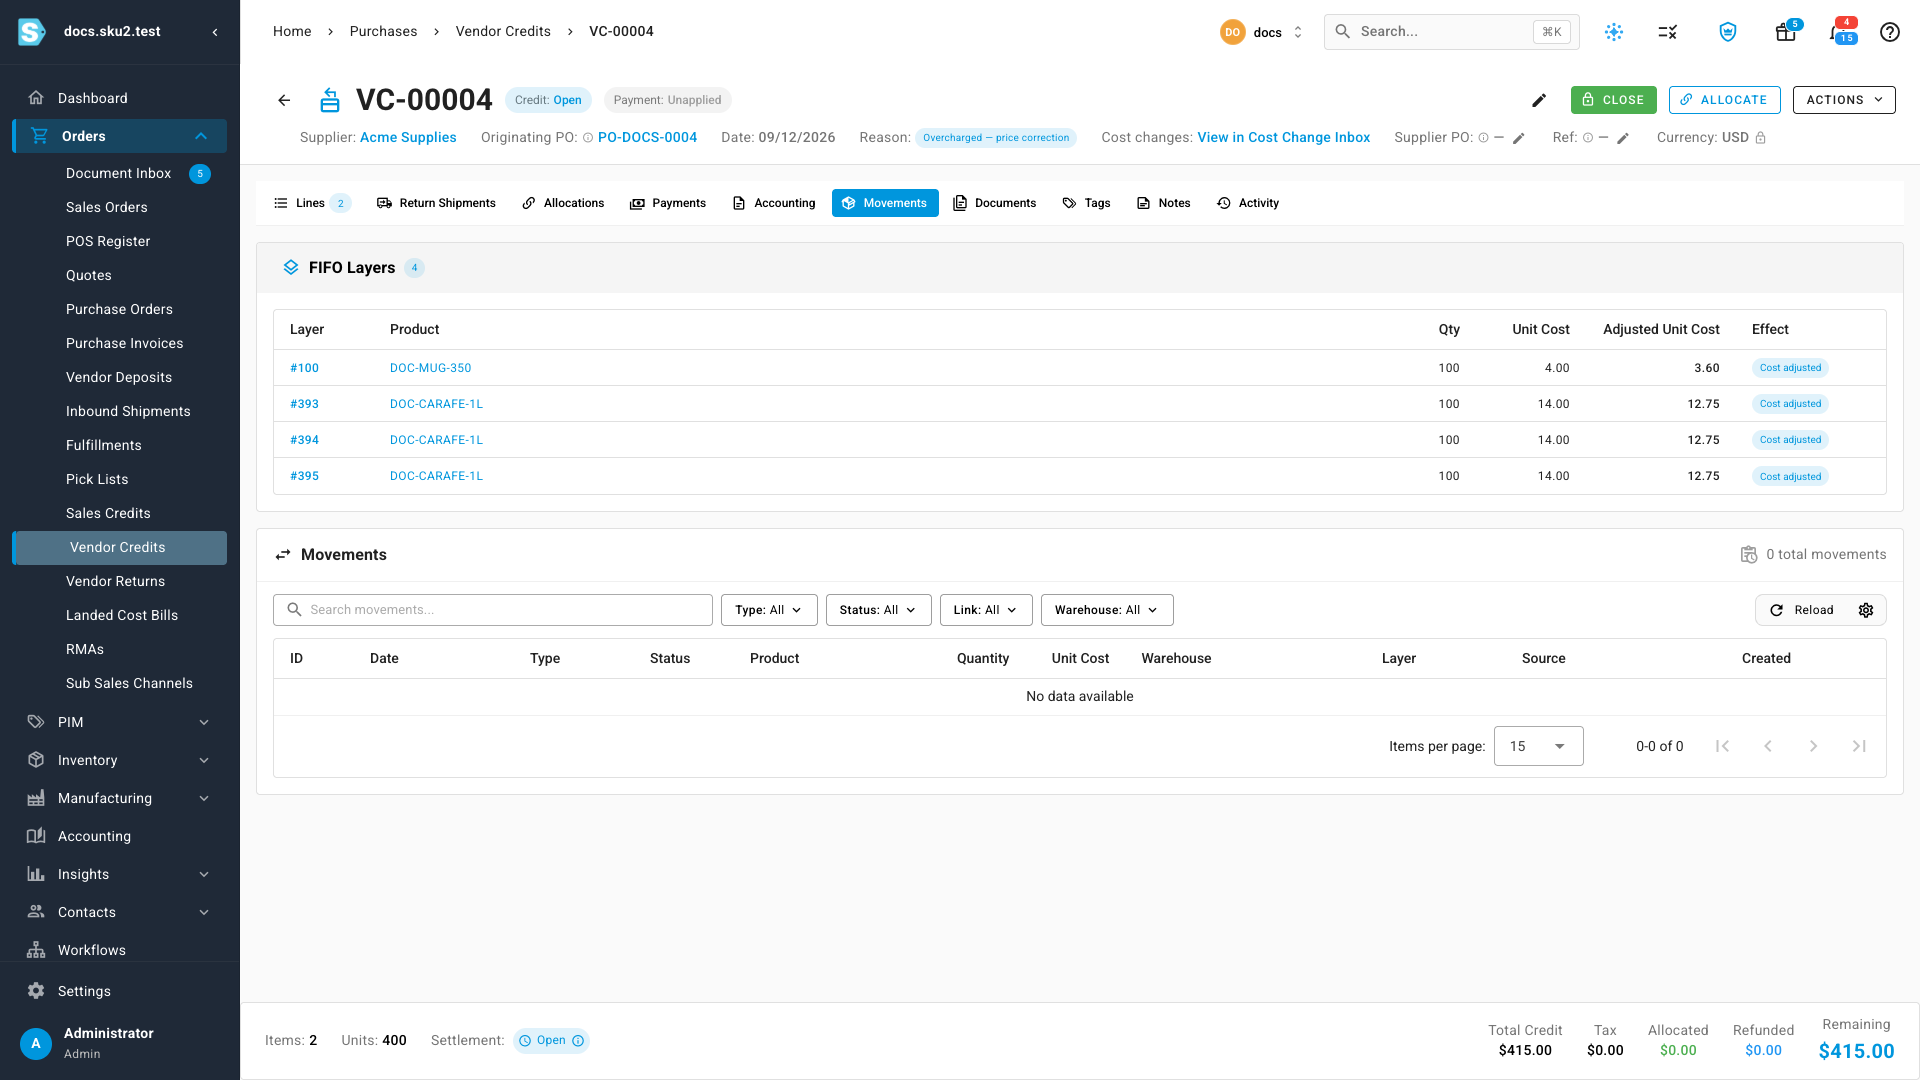
Back on the credit, open the Movements tab. FIFO Layers lists each receipt with its unit cost and Adjusted Unit Cost.
Import the lines instead
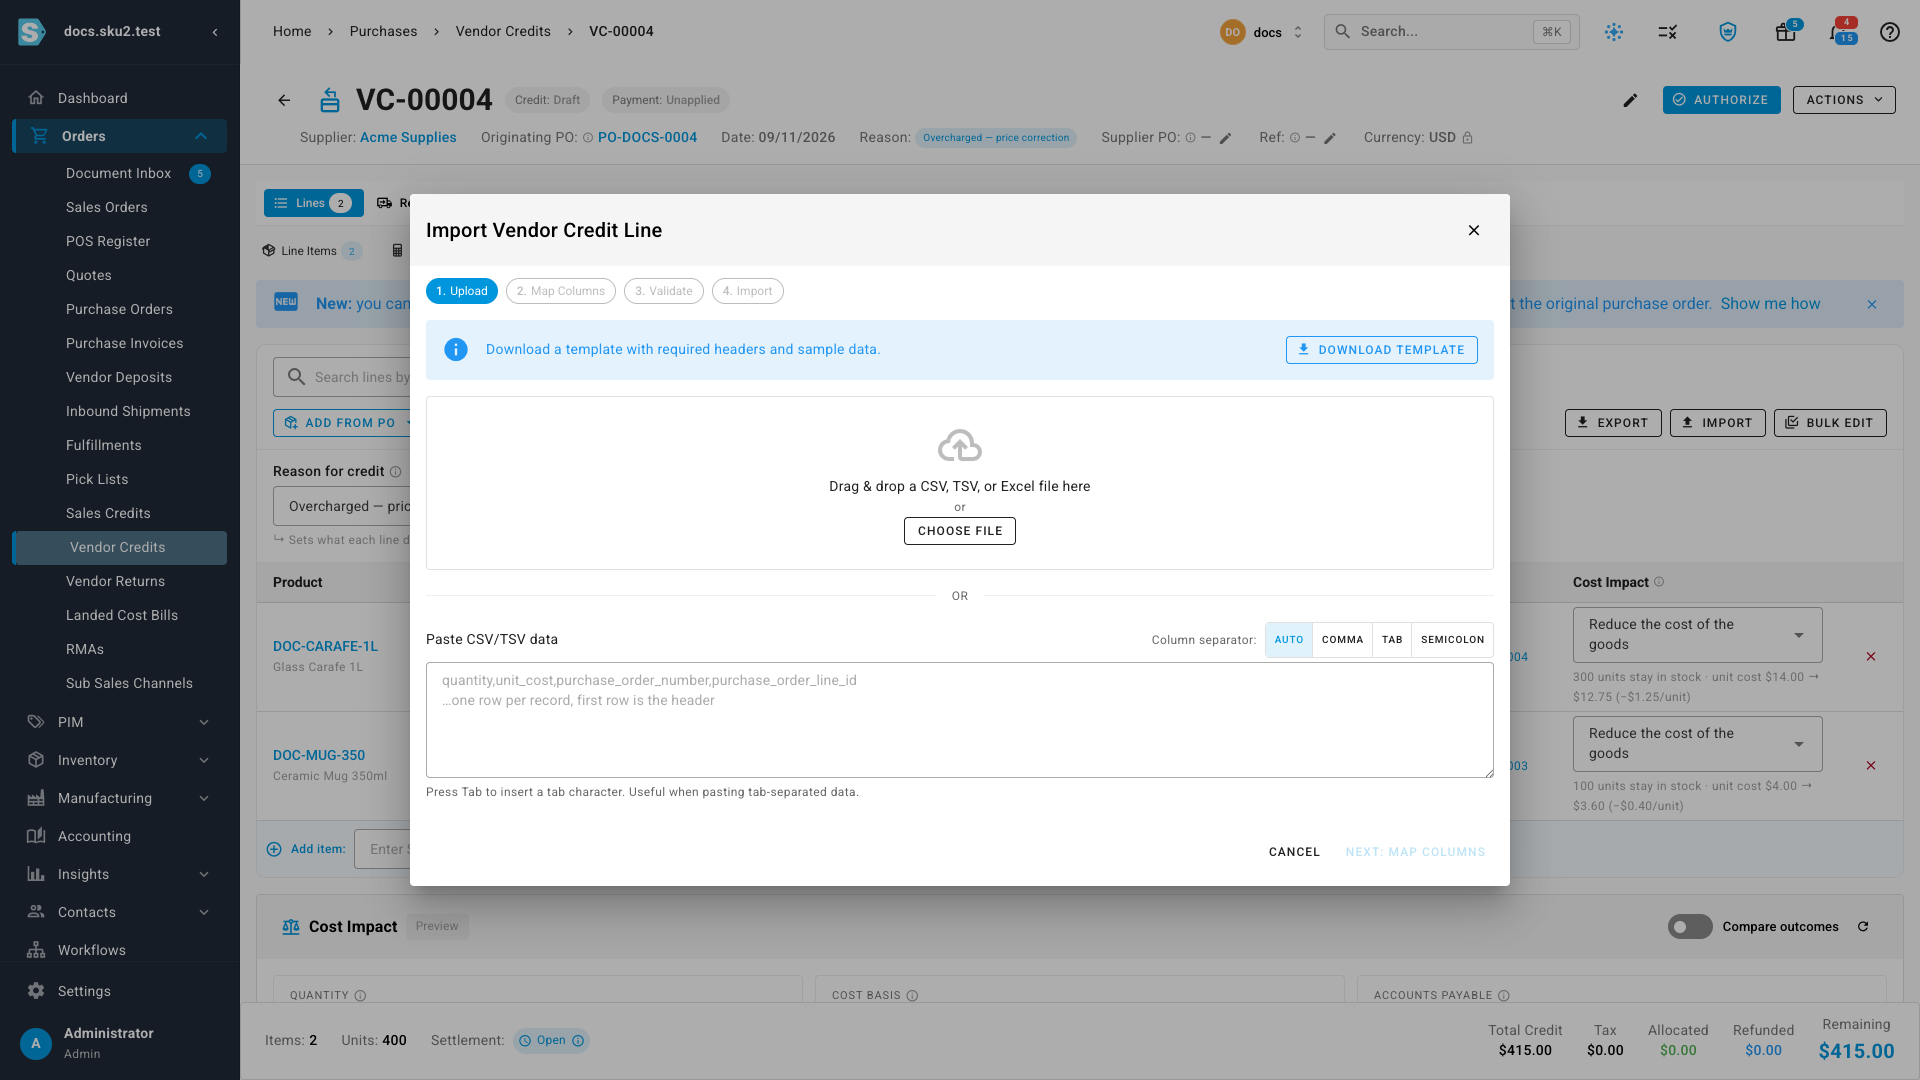
When a credit covers many lines — a promotion rebate across dozens of orders, say — upload them as a spreadsheet rather than browsing each order. The import adds lines to the credit you have open, so create the credit and set its Reason for credit first.
-
On the credit, click Import.
-
Click Download Template. The workbook has three sheets: Template (the headers), Sample Data, which lists every received line on the purchase orders already on the credit with its order number and line ID, and a Field Guide.
-
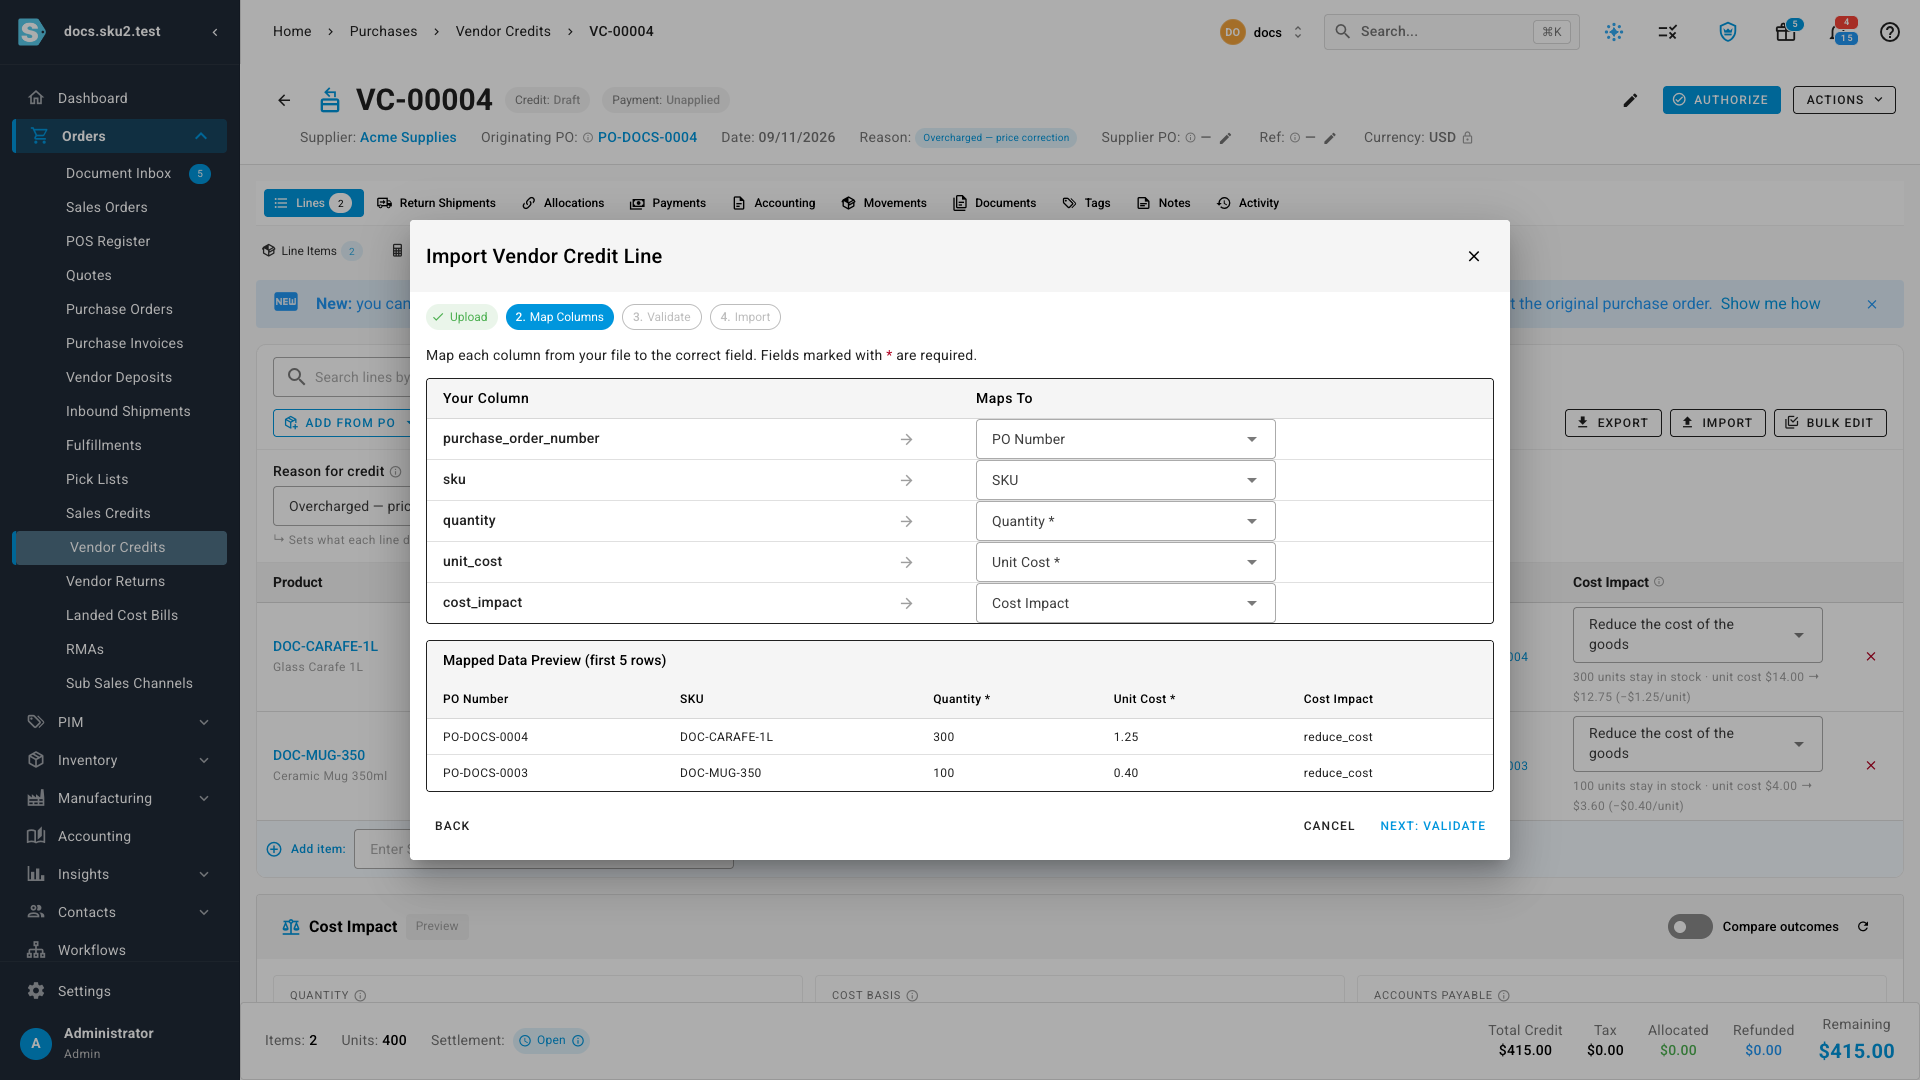
Fill in one row per credited line and upload the file (or paste the rows). Match each column to a field — the mapper recognises the template's headers on its own.
-
Review the check results. Every row is checked before anything is written, and each row lists its own errors and warnings. Rows with errors are skipped; the rest import. Click Import.
The columns:
| Column (template header) | Required | What to enter | Notes |
|---|---|---|---|
PO Number (purchase_order_number) | No | The purchase order the goods were bought on, for example PO-DOCS-0003 | Together with SKU, this picks the line on that order. The order must belong to the credit's supplier. |
PO Line ID (purchase_order_line_id) | No | The purchase order line's ID, as listed on the Sample Data sheet | Use it instead of PO Number + SKU when the same SKU appears more than once on one order. It always wins. |
SKU (sku) | No | The product's SKU | With a PO Number, it picks the line on that order. On its own, it is matched against the orders already on the credit when exactly one of them carries the SKU; otherwise the line is added without an order, and a warning says so. |
Description (description) | No | Line text | Filled from the product name when left blank. |
Quantity (quantity) | Yes | The units the credit covers, as a whole number | A Return the goods or Write the goods off line can't exceed the units received minus units already credited. |
Unit Cost (unit_cost) | Yes | The credit per unit | The supplier's credit amount for the line divided by its units. |
Cost Impact (cost_impact) | No | reduce_cost, return_goods, write_off_goods or financial_only — the on-screen label works too, for example Reduce the cost of the goods | Leave it blank and the line follows the credit's Reason for credit. Reduce the cost of the goods needs a purchase order line. A value that isn't one of the four is a row error. |
How rows match existing lines: a row that names a purchase order line already on the credit updates that line's quantity and unit cost; a row without an order updates the existing line with the same SKU; anything else adds a new line. The same SKU on two orders imports as two lines. Only a Draft credit accepts an import — unauthorize the credit first if it has already been authorized.
What each Cost Impact means
| Cost Impact | What happens to the goods | Use it when |
|---|---|---|
| Return the goods | Stock drops when you record the return shipment; the cost comes off at what those units cost you | The goods are going back to the supplier |
| Write the goods off | Stock drops as soon as you authorize; the cost is written off | The goods stay with you but can't be sold |
| Reduce the cost of the goods | Quantity doesn't change; the unit cost of these goods goes down. Units in stock get cheaper; units already sold get a COGS true-up | You keep the goods — the supplier just charged too much |
| Financial only | Nothing changes on stock quantity or cost | Rebates, co-op advertising, overpayments, services — anything that isn't about the goods' price |
A line can only Reduce the cost of the goods when it comes from a purchase order line — a credit with no purchase order has no receipts to adjust, so that option is greyed out with the reason.
Good to know
- One credit, many purchase orders. A credit can hold lines from any number of the supplier's purchase orders. Every order must belong to that supplier and be in the credit's currency — a line from another supplier's order, or an order in a different currency, is refused with a message naming the order.
- The credit can't take the goods below zero cost. If the amount is more than the remaining cost of those goods, Authorize refuses with the remaining amount — reduce the credit, or record part of it as Financial only.
- Unauthorize reverses it exactly. Unauthorizing the credit puts each layer's cost back where it was and records the reversal in the Cost Change Inbox.
- Two credits on the same goods stack. The preview of the second credit starts from the cost after the first, so nothing is counted twice.
- Already edited the purchase order price? If a purchase order or bill edit lowered the same line's cost after the credit's date, the Cost Change Inbox row and the credit's panel both warn you, with a link to the other document and a one-click Record as Financial only — so the same discount isn't applied twice.
Next steps
- Create & allocate vendor credits — the three ways to start a credit, and applying it to what you owe.
- Correcting COGS — how cost changes and restatements show up on orders and reports.
- Return goods to a vendor — when the goods are going back.
Video transcript
When a supplier refunds part of the price of goods you keep, those goods should cost you less. Open Orders, then Vendor Credits, where every credit you have received is listed, along with its status and the reason it was issued. Click Create Vendor Credit, and a dialog appears asking what kind of credit you are recording. Choose Adjust, rebate, or refund, because the goods stay on your shelf. Then pick the supplier who issued the credit, from the list. Click Create, and the new credit opens in Draft, ready for its lines. Set the reason for the credit. Overcharged, price correction, means you keep the goods and their cost comes down. Now add the goods that were credited. Click Add from PO, then Select a Purchase Order. Search for the credited purchase order by its number, and choose it from the list. Then click Browse Lines to see what was received. Tick the line and enter how many units the credit covers. Then click Add Selected, and close the browse panel once it has been added. Set the unit cost to the amount credited per unit. The line now spells out the effect: the goods stay, and their recorded value goes down. A credit can cover goods from more than one order, so click Add from PO again. The menu lists each PO already added here, with Add All and Browse for each. Click Add from Another PO to choose the next purchase order. Search for the next order the supplier credited, and choose it from the list. Then click Browse Lines, and the panel opens titled with the one you chose, showing what arrived. Tick the line and enter the credited units. Click Add Selected, and the row is added. Close the panel, and the new row shows its own order in the PO column. Set this row's credit per unit as well. The Cost Impact panel now adds up every order together. The Cost Impact panel previews the effect before anything is recorded. Stock you still hold drops in value, and the sold share posts as a COGS true-up. Scroll back up and click Authorize, then tick the acknowledgement. The dialog restates the plan: what you owe drops now, and the cost change waits for review. Confirm. The credit is authorized, and its cost change is held in the Cost Change Inbox. Click View in Cost Change Inbox to open the change this credit created, which shows every layer it touches. Choose Restate to date it to each receipt. Then click Apply, and a confirmation explains which months will change. Confirm, and after a moment every layer is restated to the new cost, dated back to its receipt. To see the result, go back to Orders, then Vendor Credits, and open the credit you just authorized from the list. Open its Movements tab, which lists each receipt layer with the adjusted unit cost. That's the whole change: the goods you kept are now cheaper.