Set up Floor mode
Floor mode turns shared warehouse scanners into workstations for your floor team. An admin sets it up once: choose the Floor mode rules, enroll each shared scanner as a kiosk device, add the boxes your packers use, and give everyone a badge to sign in with. After that, your team picks up a scanner, scans their badge, and works.
Before you begin
- To change the Floor mode settings and add boxes, you need access to Settings.
- To enroll scanners, you need the Enroll & manage kiosk devices permission (
kiosk_devices.manage). To issue badges for other people, you need Issue & revoke users' badges (badges.manage). Roles that can already manage users have both. - Your warehouse uses warehouse locations, so picks and counts follow its bins.
Steps
- In the sidebar, open Settings, then under Fulfillment choose Floor Mode.
- Turn on Pack before shipping if every order should be scanned at the pack station before it ships.
- Leave Badge sign-in counts as two-factor on enrolled kiosks on, or turn it off to ask for a two-factor code after every badge scan.
- To apply small floor counts without a manager, enter a number in Apply floor counts automatically within.
- Click Save Changes.
- Choose Kiosk Devices, then click Add device, fill in the scanner's details and click Save & get code.
- On the scanner, open the enroll page the dialog shows, and scan the QR code or type the enrollment code.
- Choose Boxes, click Add box, and add each box your packers use.
- Give everyone on the floor a badge: the whole team from Users & Permissions → Issue & print badges, or your own from User Profile → Create my badge.
- Give your floor team the Floor mode permissions they need.
Each part is described below.
Choose the Floor mode rules
Go to Settings → Fulfillment → Floor Mode.
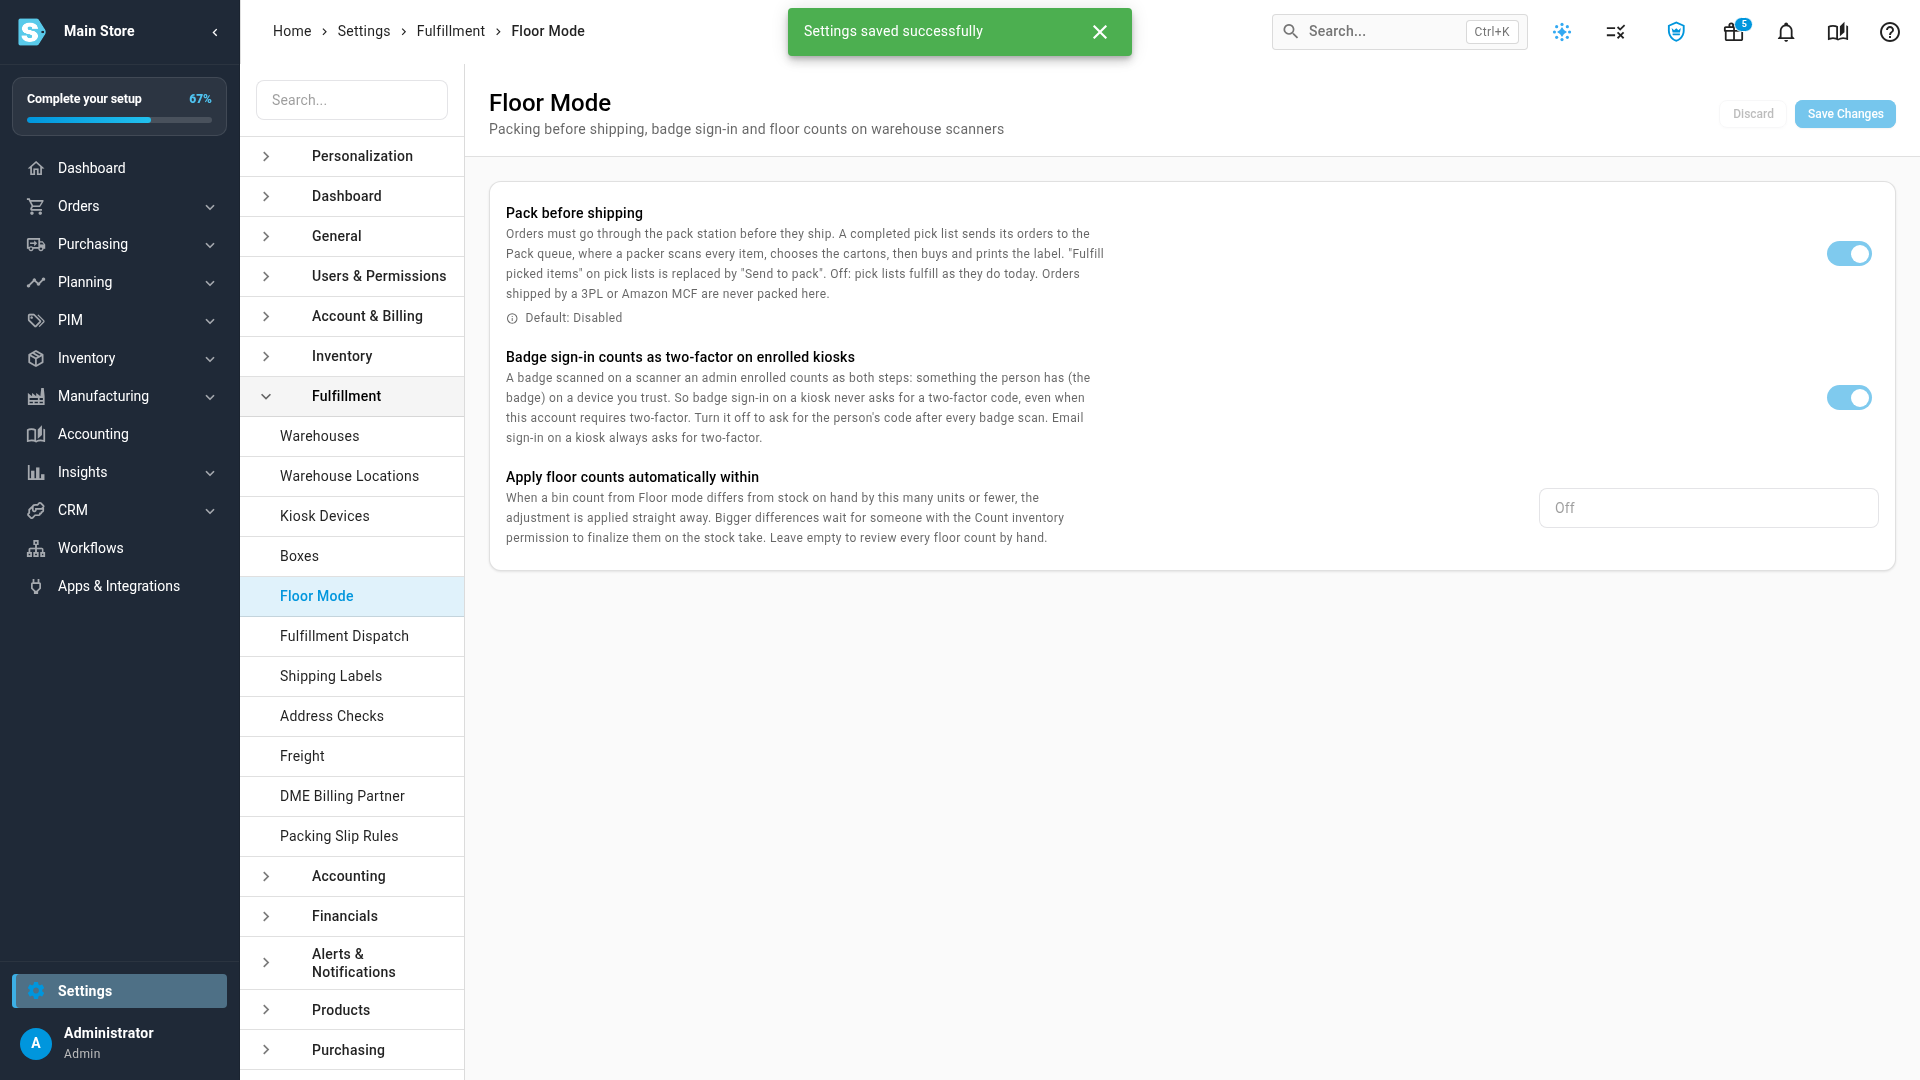
| Setting | What it does |
|---|---|
| Pack before shipping | Off by default. On: a completed pick list no longer ships its orders. Its Fulfill picked items button becomes Send to pack, which puts the orders in the pack station's queue. A packer then scans every item, chooses the cartons, and ships the order from there. Orders shipped by a 3PL or Amazon MCF are never packed here. |
| Badge sign-in counts as two-factor on enrolled kiosks | On by default. A badge scanned on a scanner you enrolled counts as both sign-in steps: something the person has, on a device you trust. So badge sign-in never asks for a two-factor code, even when your account requires two-factor. Turn it off to ask for the person's code after every badge scan. Email sign-in on a scanner always asks for two-factor. |
| Apply floor counts automatically within | Empty by default, so a manager reviews every bin count from Floor mode. Enter a number of units, and a count that differs from stock on hand by that many units or fewer is applied straight away, which also releases the bin's hold. Bigger differences still wait for someone with the Count inventory permission. |
Click Save Changes.
Add a shared scanner
A kiosk device is a scanner your team shares. It belongs to one warehouse, it only shows warehouse tasks, and it signs its user out when it's left idle.
-
Go to Settings → Fulfillment → Kiosk Devices, and click Add device.
-
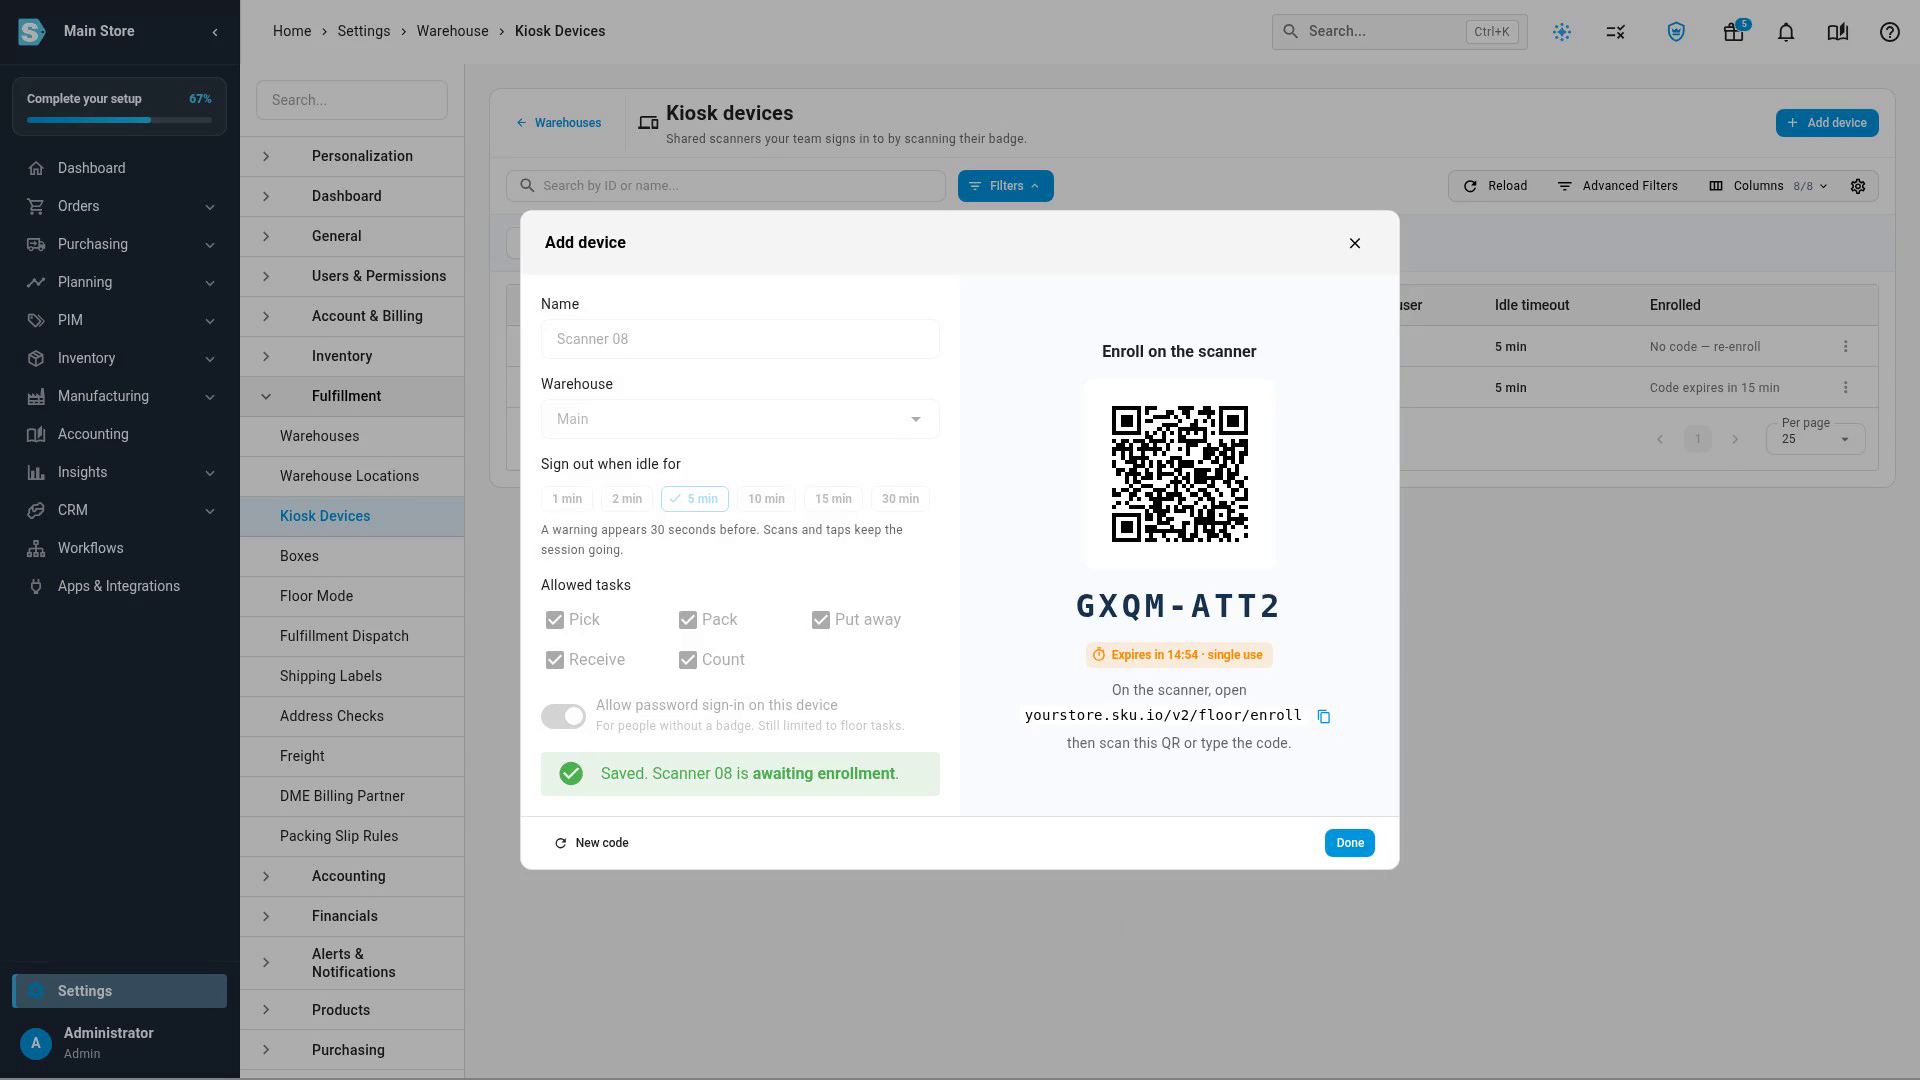
Fill in the dialog:
Field What to enter Name A name you'll recognize on the device's label, such as Scanner 08. Warehouse The only warehouse this scanner works in. Floor screens on it never show another warehouse. Sign out when idle for 1, 2, 5 (the default), 10, 15 or 30 minutes without a scan or tap. A warning appears 30 seconds before. Allowed tasks The tiles this scanner shows: Pick, Pack, Put away, Receive and Count. All are on by default. Allow password sign-in on this device On by default, for people without a badge. Their session is still limited to floor tasks. -
Click Save & get code. The device is saved as Awaiting enrollment, and the dialog shows an enrollment code and a QR code.
-
On the scanner, open the enroll page shown under the code (your SKU.io address followed by
/v2/floor/enroll). Scan the QR code, or type the 8-character code, and tap Enroll device. You can also scan the QR with the scanner's camera app, which opens the page and enrolls in one step. -
The scanner shows "… is enrolled" with its warehouse, idle time and tasks. Tap Continue to open the badge screen. In the list, the device's status turns Active.
The code works once, for 15 minutes. If it expires, open the device's row menu and choose Re-enroll device for a new one.
Manage your scanners
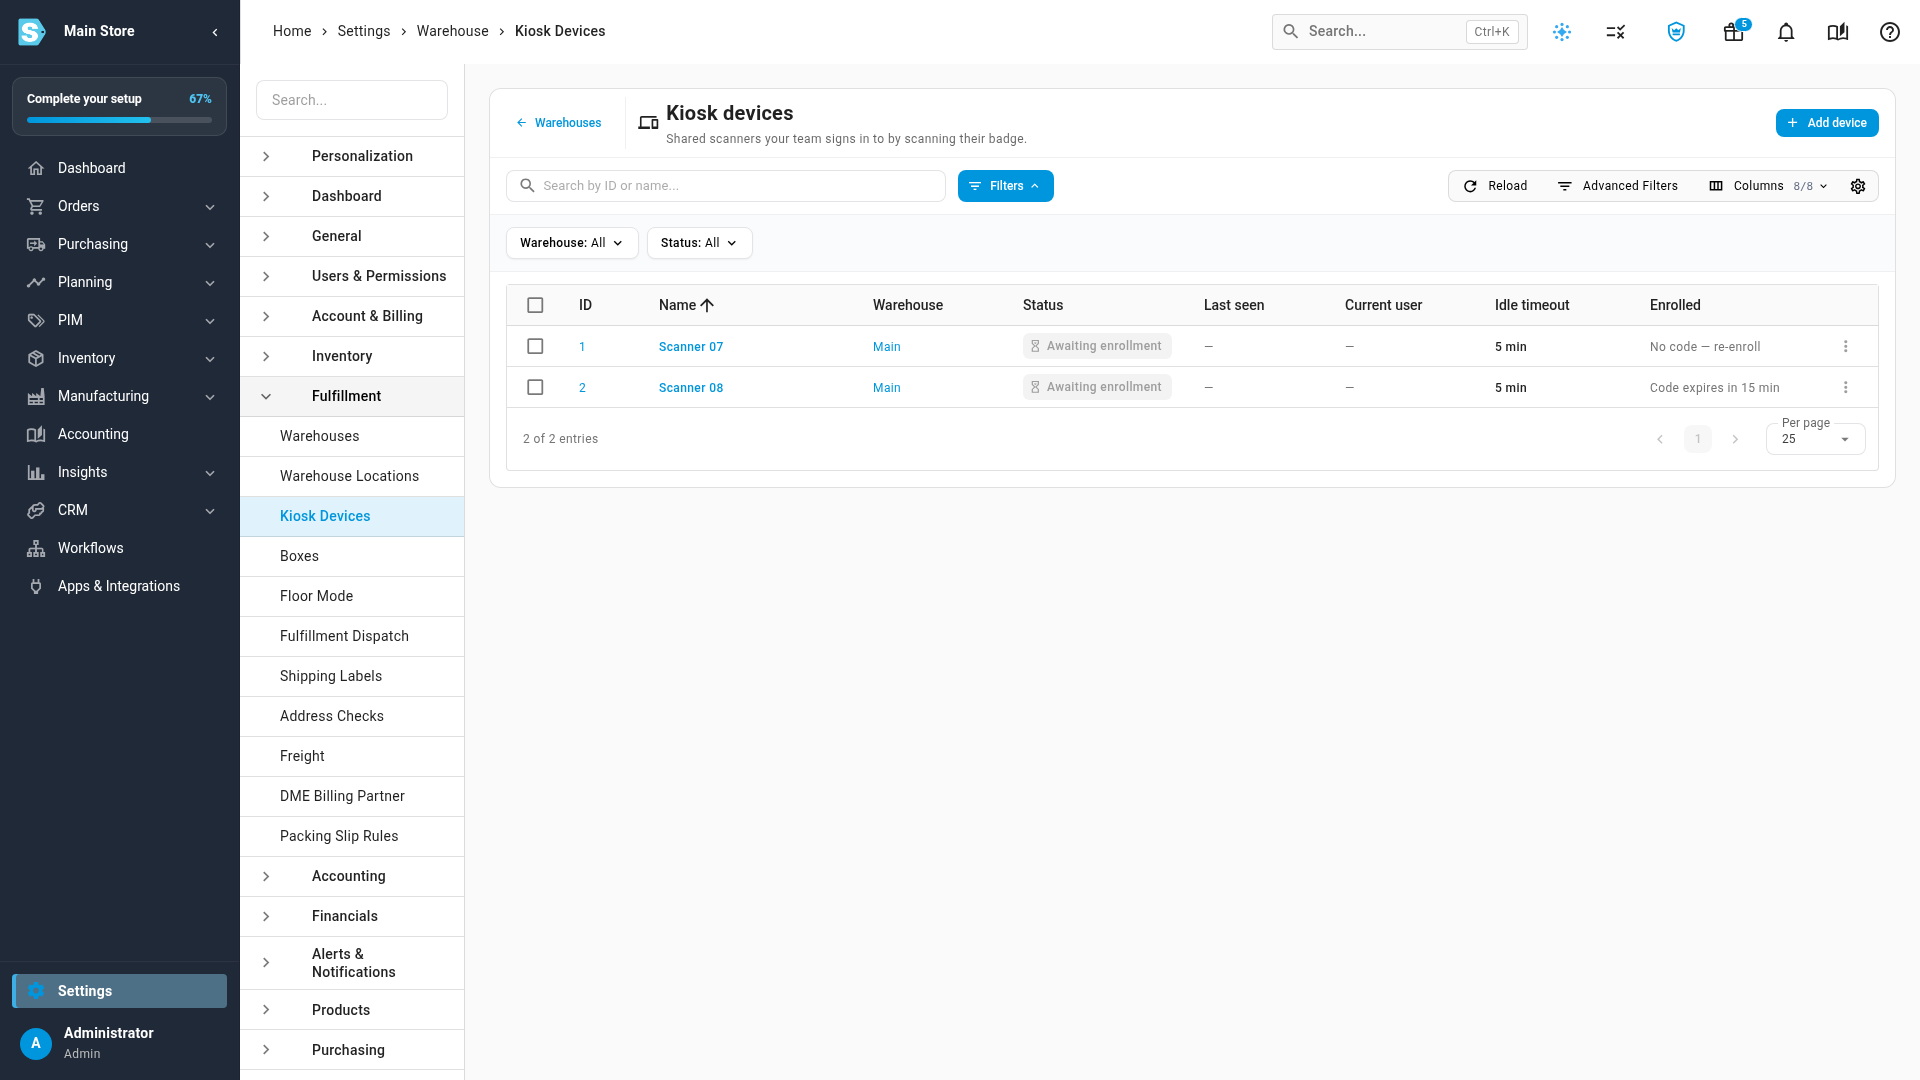
The Kiosk devices list shows each scanner's status (Awaiting enrollment, Active or Revoked), when it last reached SKU.io, who is signed in on it right now, and its idle time. From a row's menu you can:
- Edit settings: change the name, warehouse, idle time, allowed tasks or password sign-in. Moving a scanner to another warehouse signs out whoever is on it.
- Sign out the person who's signed in.
- Re-enroll device: make a new enrollment code. The scanner stops working until it's enrolled again with the new code.
- Revoke device: retire the scanner for good, for example when it's lost. Whoever is signed in is signed out, and the scanner shows "This scanner was removed by an admin". Select several rows to revoke them together.
Add your boxes
Packers choose a box for each carton at the pack station, with a tap or by scanning the box's barcode.
- Go to Settings → Fulfillment → Boxes, and click Add box.
- Enter the box's Name, its Inside dimensions (L × W × H), its Tare weight (the empty box), and a Barcode (optional) if you've labelled your stock of boxes.
- Under Warehouse, keep All warehouses, or choose the one warehouse that stocks this box.
- Click Add box.
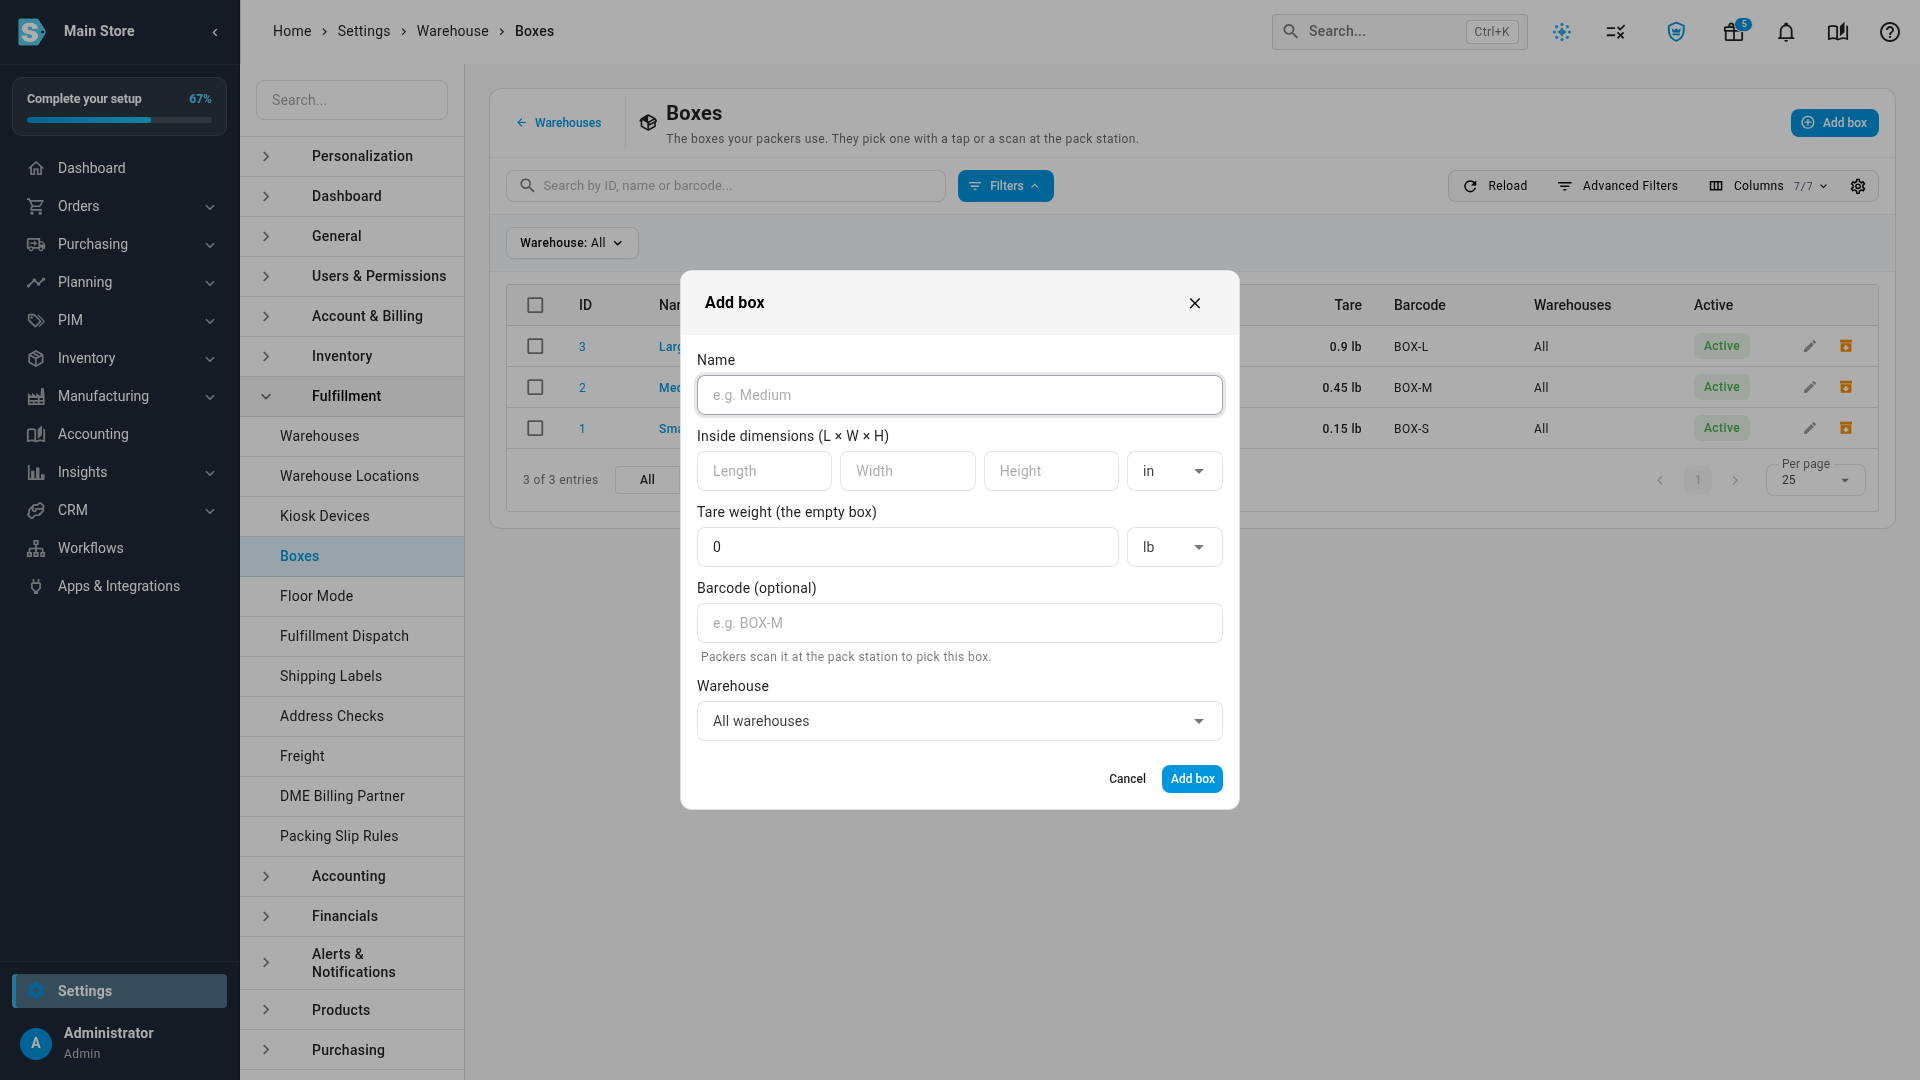
SKU.io uses the tare weight to estimate each carton's weight. To stop offering a box, archive it; the Active and Archived filters under the list switch between them. Without any boxes, packers type each carton's dimensions instead.
Issue badges
Everyone who works on a shared scanner signs in with a badge: a card with a QR code and a barcode that's personal to them. A badge only works on scanners enrolled for your account, and only for warehouse tasks. Each person has one badge at a time.
Badge your team
- Go to Settings → Users & Permissions. The Users list opens.
- Tick the people who work on the floor.
- Choose Issue & print badges, then click Issue & print.
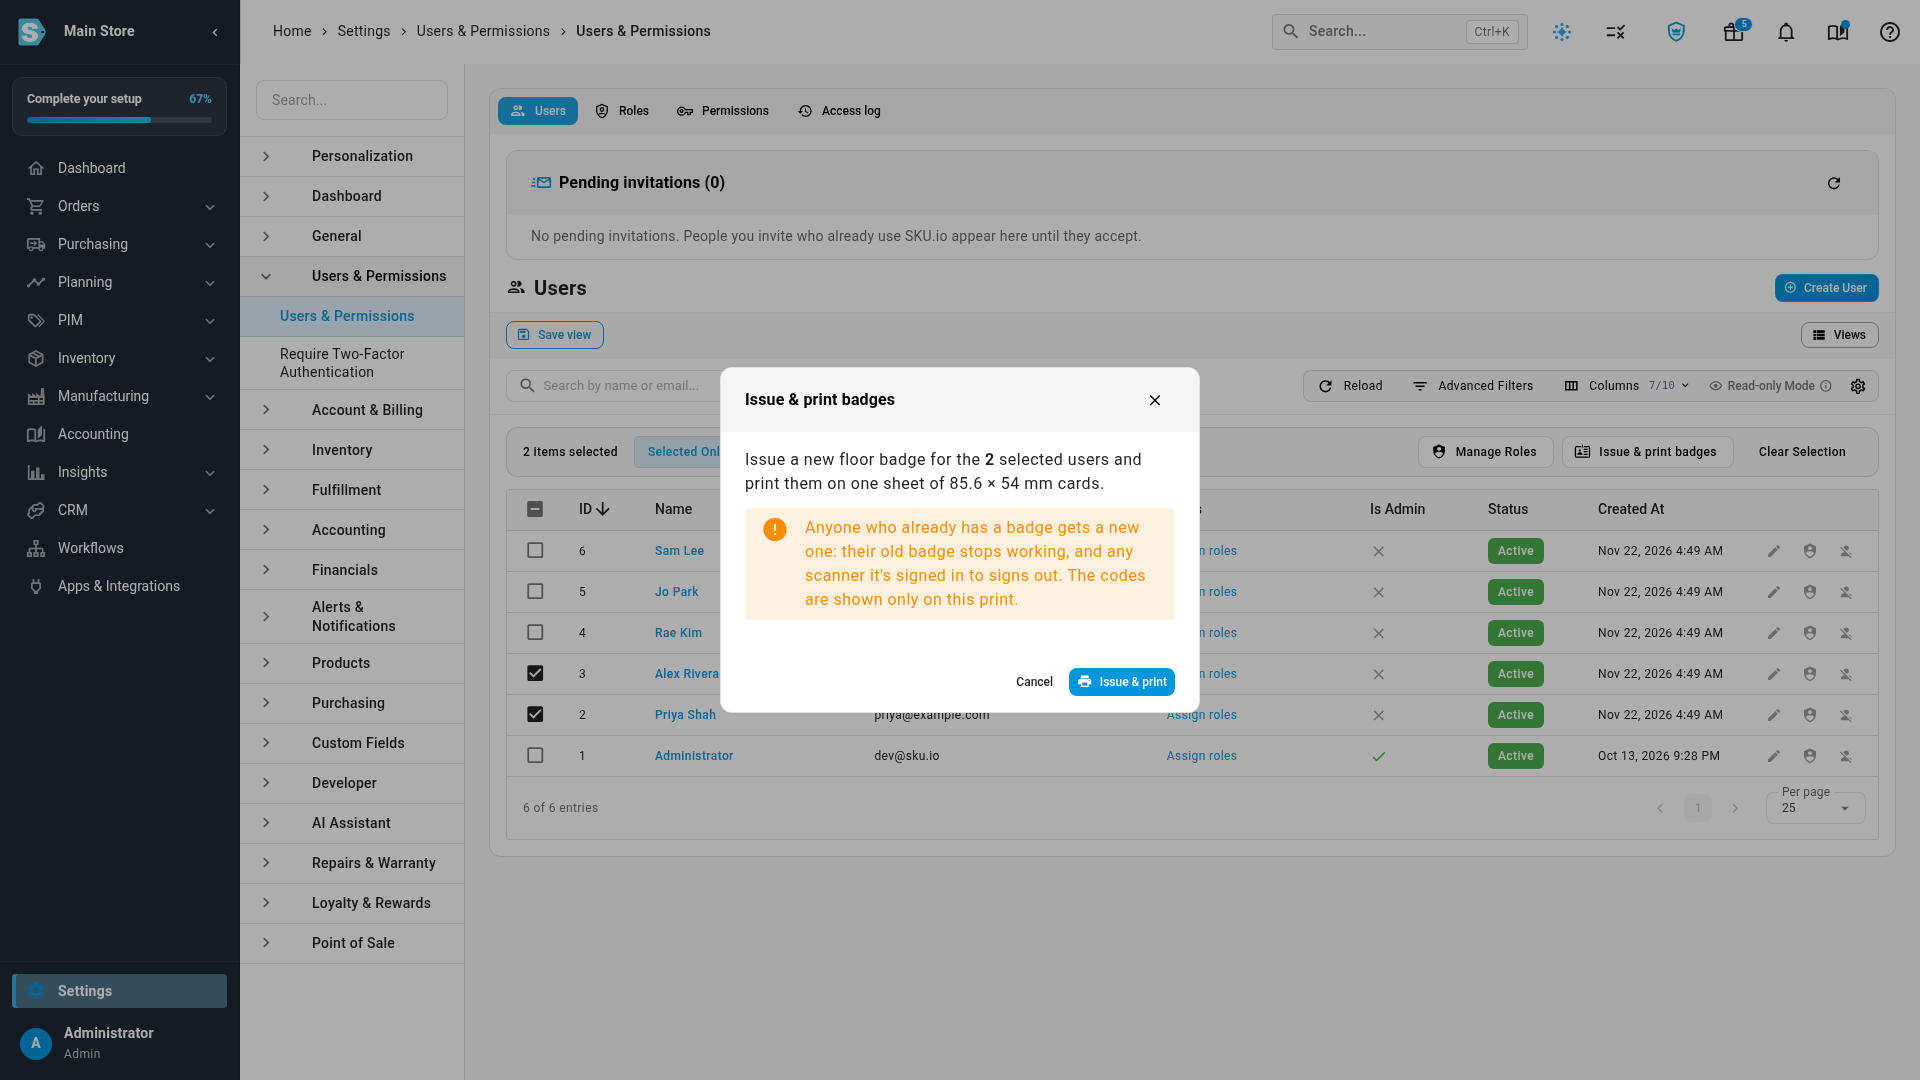
Each person gets a new badge, and all of them print on one sheet of 85.6 × 54 mm cards. Anyone who already had a badge gets a new one, and their old badge stops working. The codes are shown only on this print, so if it doesn't open, use Print again before you close the dialog.
To issue, print or revoke one person's badge, open them from the users list and use the Floor badge section of their dialog.
Create your own badge
- Click your name at the bottom of the sidebar, and choose User Profile.
- Under My badge, click Create my badge.
- Click Print badge to print the card, or save it as a PDF from the print dialog.
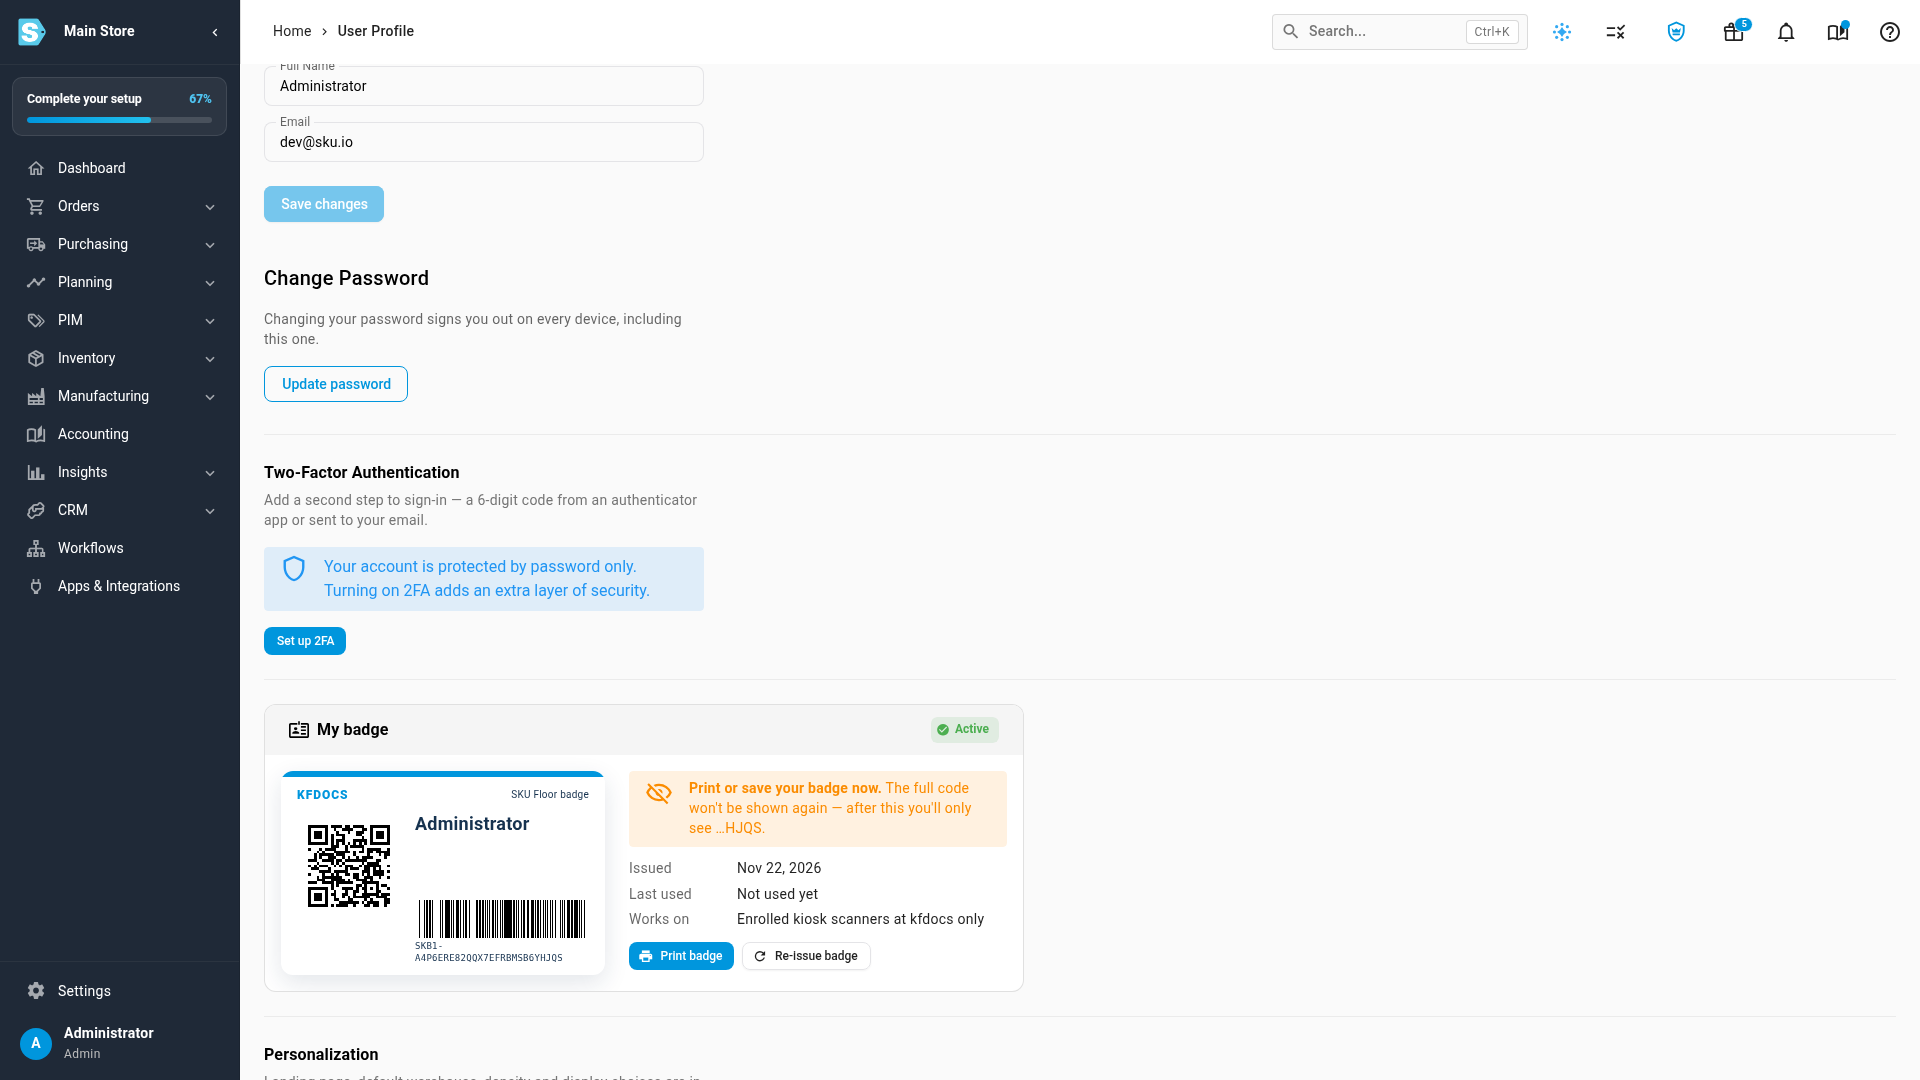
The full code is shown only this once. Afterwards My badge shows only its last four characters, when it was issued, and when and where it was last used. If you lose the card, click Re-issue badge: the old badge stops working straight away, and any scanner it's signed in to signs out.
Give your team access
Floor mode has its own permissions, under Floor mode, Pack station, Kiosk devices and Sign-in badges in a role. See Create a role.
| Permission | Lets someone | Given at first to roles that can |
|---|---|---|
Use Floor mode (floor.use) | Open Floor mode and sign in on a scanner with their badge. | Fulfill sales orders |
Pack & ship at the pack station (packing.pack) | Work the pack station. | Ship fulfillment orders |
Skip item verification when packing (packing.override) | Use Verify all at the pack station, with a reason. | Administer fulfillment orders |
Enroll & manage kiosk devices (kiosk_devices.manage) | Add, enroll, edit, sign out and revoke scanners. | Edit users |
Issue & revoke users' badges (badges.manage) | Issue, print and revoke other people's badges. | Edit users |
Floor mode only shows the tiles a person's permissions allow. For example, someone without receiving permissions doesn't see Receive. A person without Use Floor mode can't sign in on a scanner: their badge scan says they don't have access to Floor mode.
Next steps
- Sign in on a shared scanner: what your team does with their badge.
- Report an empty bin with Not here: picking and bin checks in Floor mode.
- Pack orders at the pack station: verify, box and ship.
Video transcript
Floor mode turns shared warehouse scanners into workstations for your floor team. An admin sets it up once. In the sidebar, open Settings, at the bottom of the menu. Settings lists every part of your account's setup, in groups. Click the Fulfillment group, and then choose Floor Mode, the settings for your warehouse scanners. Turn on Pack before shipping to send picked orders to the pack station. There, every item is scanned before the order ships. Badge sign-in counts as two-factor on the scanners you enroll. Turn it off to ask for a code after each badge scan. To apply small bin counts straight away, enter a tolerance in units. When you're happy with your choices, click Save Changes to keep them. Next, add each shared scanner that your team will use. In the Fulfillment group, choose Kiosk Devices, and then click Add device. Give the scanner a name you'll recognize, such as the number on its label. Then choose the one warehouse that this scanner works in. Pick how long it waits before it signs someone out, and the tasks it allows, such as picking and packing. When the details are right, click Save and get code, at the bottom of the dialog. SKU.io shows an enrollment code and a QR code. They work once, for fifteen minutes. On the scanner, open the enroll page that's shown here, under the code. Then scan the QR, or type the code. When you've enrolled it, click Done. The scanner is now ready for badges. Next, choose Boxes to list the cartons your packers use. To add one, click the Add box button at the top right. Enter the box's name and its inside dimensions, and then its empty weight. If your boxes have a barcode label, enter that too. Packers then pick a box at the pack station with a tap or a scan. Everyone who works the floor signs in with a badge. To badge your whole team at once, open Users and Permissions in the settings menu. Then tick the box next to each person who works on the warehouse floor. Choose Issue and print badges, in the bar above the list. Each person gets a new badge, and they all print together, on one sheet of cards. You can also make your own badge. To do that, open your name at the bottom of the sidebar, and choose User Profile. Find the My badge card, and click Create my badge. Your badge card appears, with a QR code and a barcode. Print it right away, with Print badge, because the full code is shown only once.