Set a supplier's lead times, per warehouse
A supplier's lead time is the number of days between placing a purchase order and the stock arriving. Demand planning adds it to the days of stock you want to hold, so a supplier that takes three weeks gets ordered from earlier than one that takes three days. When one supplier reaches some of your warehouses faster than others, give those warehouses their own lead time instead of averaging them into one number.
Before you begin
- You need permission to edit suppliers.
- Each override is for one of your warehouses — the place the stock is delivered to — not the supplier's own ship-from locations.
Set the supplier's default lead time
-
Go to Contacts → Suppliers and open the supplier — for example, Acme Supplies.
-
Open the Settings tab and click Edit (or press E).
-
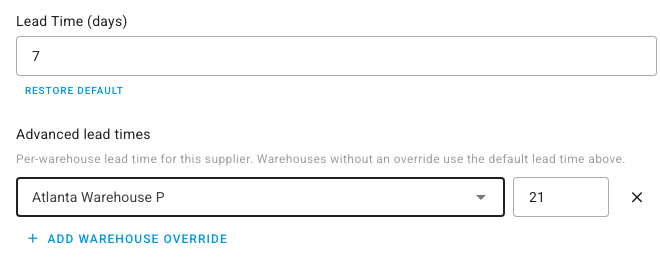
Under Purchasing Defaults, enter Lead Time (days).
Leave it blank to use your account's default lead time. A blank field shows a Default chip; a field you've changed offers Restore Default to go back to the account value.
Override the lead time for one warehouse
- In the same Purchasing Defaults section, under Advanced lead times, click Add warehouse override.
- Pick the Warehouse the stock is delivered to.
- Enter the number of Days this supplier takes to reach that warehouse.
- Repeat for any other warehouse that differs. Each warehouse can appear once; when every warehouse has an override, Add warehouse override is turned off.
- Click Save.
To remove an override, click the × beside it and save. Warehouses without an override keep using the default lead time above.
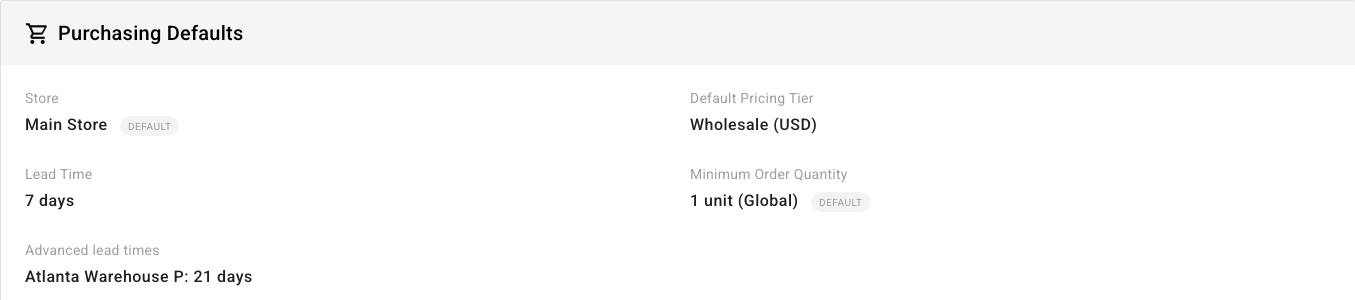
After you save, the read-only view lists each override under Advanced lead times:
Which lead time a forecast uses
When you build a forecast under Inventory → Demand Planning with Include Lead Time ticked, SKU.io picks one lead time for each product, taking the most specific one that's set:
| Order | Lead time | Where you set it | Shown as |
|---|---|---|---|
| 1 | The product's own per-warehouse planning policy, when its Lead Time Source is Manual | Item planning policies | Policy |
| 2 | This supplier's override for the destination warehouse | Advanced lead times, above | Supplier WH |
| 3 | The measured lead time from your receiving history — only when Use measured lead times when available is ticked on the forecast | Calculated for you | Measured |
| 4 | A lead time set for this product on this supplier | The product's Suppliers tab | Product |
| 5 | The supplier's Lead Time (days) | Purchasing Defaults, above | Supplier |
| 6 | Your account's default lead time | Account settings | Default |
Per-warehouse lead times (rows 1 and 2) only apply when the forecast has a Destination Warehouse. With All warehouses selected there's no single destination, so the forecast skips straight to the measured, product, or supplier lead time.
Check which lead time a forecast used
- Go to Inventory → Demand Planning.
- Pick the supplier in Suppliers and the warehouse in Destination Warehouse, then click Build Forecast.
- To see each product's lead time in the results, click Columns and turn on Lead.
- To see where a product's lead time came from, click the calculator icon at the end of its row. The calculation details show Lead Time with a chip naming its source.
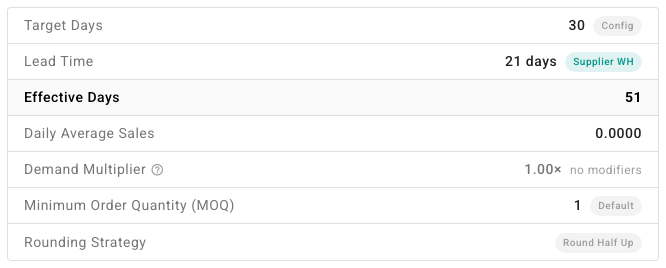
Effective Days is the target days of stock plus the lead time — the stretch of demand the forecast orders enough to cover.
Lead time and the buffer for Amazon FBA
Sending stock to Amazon has a second leg after the supplier's: Amazon has to check the shipment in before it's sellable. The FBA replenishment planner covers that leg separately and adds a safety buffer on top. To open it, go to Apps & Integrations, open your Amazon connection, click FBA, open FBA Inbound, and then the Demand Planning tab. Send stock to FBA with an inbound plan covers what to do with its suggestions.
Its suggested quantities cover a horizon made of:
- Target days of supply — how many days of Amazon sales you want on hand.
- Amazon receive lead — the typical time from creating an inbound plan to Amazon receiving it. SKU.io takes the median of your past received plans; with no history yet, it assumes 0 days.
- Buffer days — extra days of cover for delays. The default is 7.
- The supplier's lead time, when you set Replenish Via to Purchase Order and pick a supplier — because the stock still has to come from the supplier first. With Warehouse Transfer, the stock is already in your warehouse, so no supplier lead time is added.
To change the target or the buffer:
- On the FBA Demand Planning page, click Settings.
- Set Target days of supply and Buffer days. The same dialog holds Velocity window (days), Min shelf life (days), and Case-pack rounding.
- Click Save. The suggestions recalculate, and the banner above the grid spells out the horizon — for example, "37-day coverage horizon (30d target + 0d Amazon receive lead + 7d buffer)".
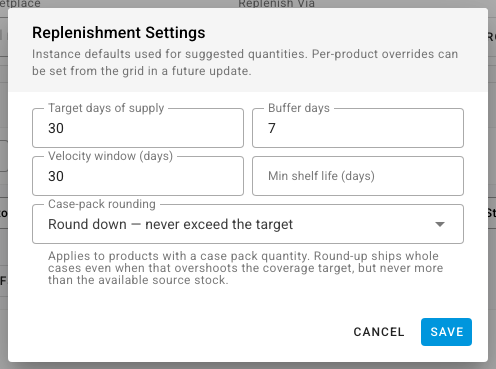
These settings apply to the whole Amazon connection; they're separate from the supplier lead times on this page.
Next steps
- Forecast demand and replenish stock — build the forecast these lead times feed.
- Manage a product's suppliers — set a lead time for one product from one supplier.
- Create & edit a supplier — the rest of the supplier's purchasing defaults.