Set up apparel attributes, sizes and AI suggestions
Apparel and footwear buyers slice sales by gender, age group, silhouette, fabric, print and size. Those reports only work when your products carry those values, and when sizes sort the way you buy them (NB, 0-3M … 2T … 14), not alphabetically. This guide sets up the standard kids apparel and footwear attributes, maps the sizes SKU.io can't place on its own, and fills empty attributes with AI suggestions that you review before anything is saved.
If your products come from Shopify, map your store's tags, vendors and styles first. That fills a lot of attributes for free, and AI then only has to fill what's left. See Map Shopify tags, vendors and styles to attributes.
Before you begin
- To add attributes, map sizes, and run or review suggestions, you need the Products Edit permission (
products.update). - Your products have a Size attribute (for example, from your Shopify size option). Sizes are read from it.
- For the AI engine, AI must be turned on for your workspace in Settings → AI Assistant, and your role must include AI. Without it, suggestions use keyword matching instead.
Steps
- Go to PIM → Attributes.
- Open the menu (⋮) next to Create Attribute, and choose Add kids apparel & footwear attributes.
- Click Add attributes.
- Click Size scale, and check that your sizes sit on the scale.
- Under the list of supplied sizes, select a size marked Needs review, and click Map to….
- Choose its Scale size, and click Map.
- Go to PIM → Products, and select the products you want values for.
- Open Bulk actions, and choose Suggest attribute values with AI.
- Pick the attributes and an engine, then click Suggest.
- Go back to PIM → Attributes, and click Suggestions.
- Review the suggestions, then click Accept all High and confirm.
The sections below walk through each part.
Add the kids apparel and footwear attributes
The Attributes page has three extras for apparel catalogs: a Size scale button and a Suggestions button in the header, each with a count of what's waiting for you, and a one-click setup in the menu (⋮) next to Create Attribute.
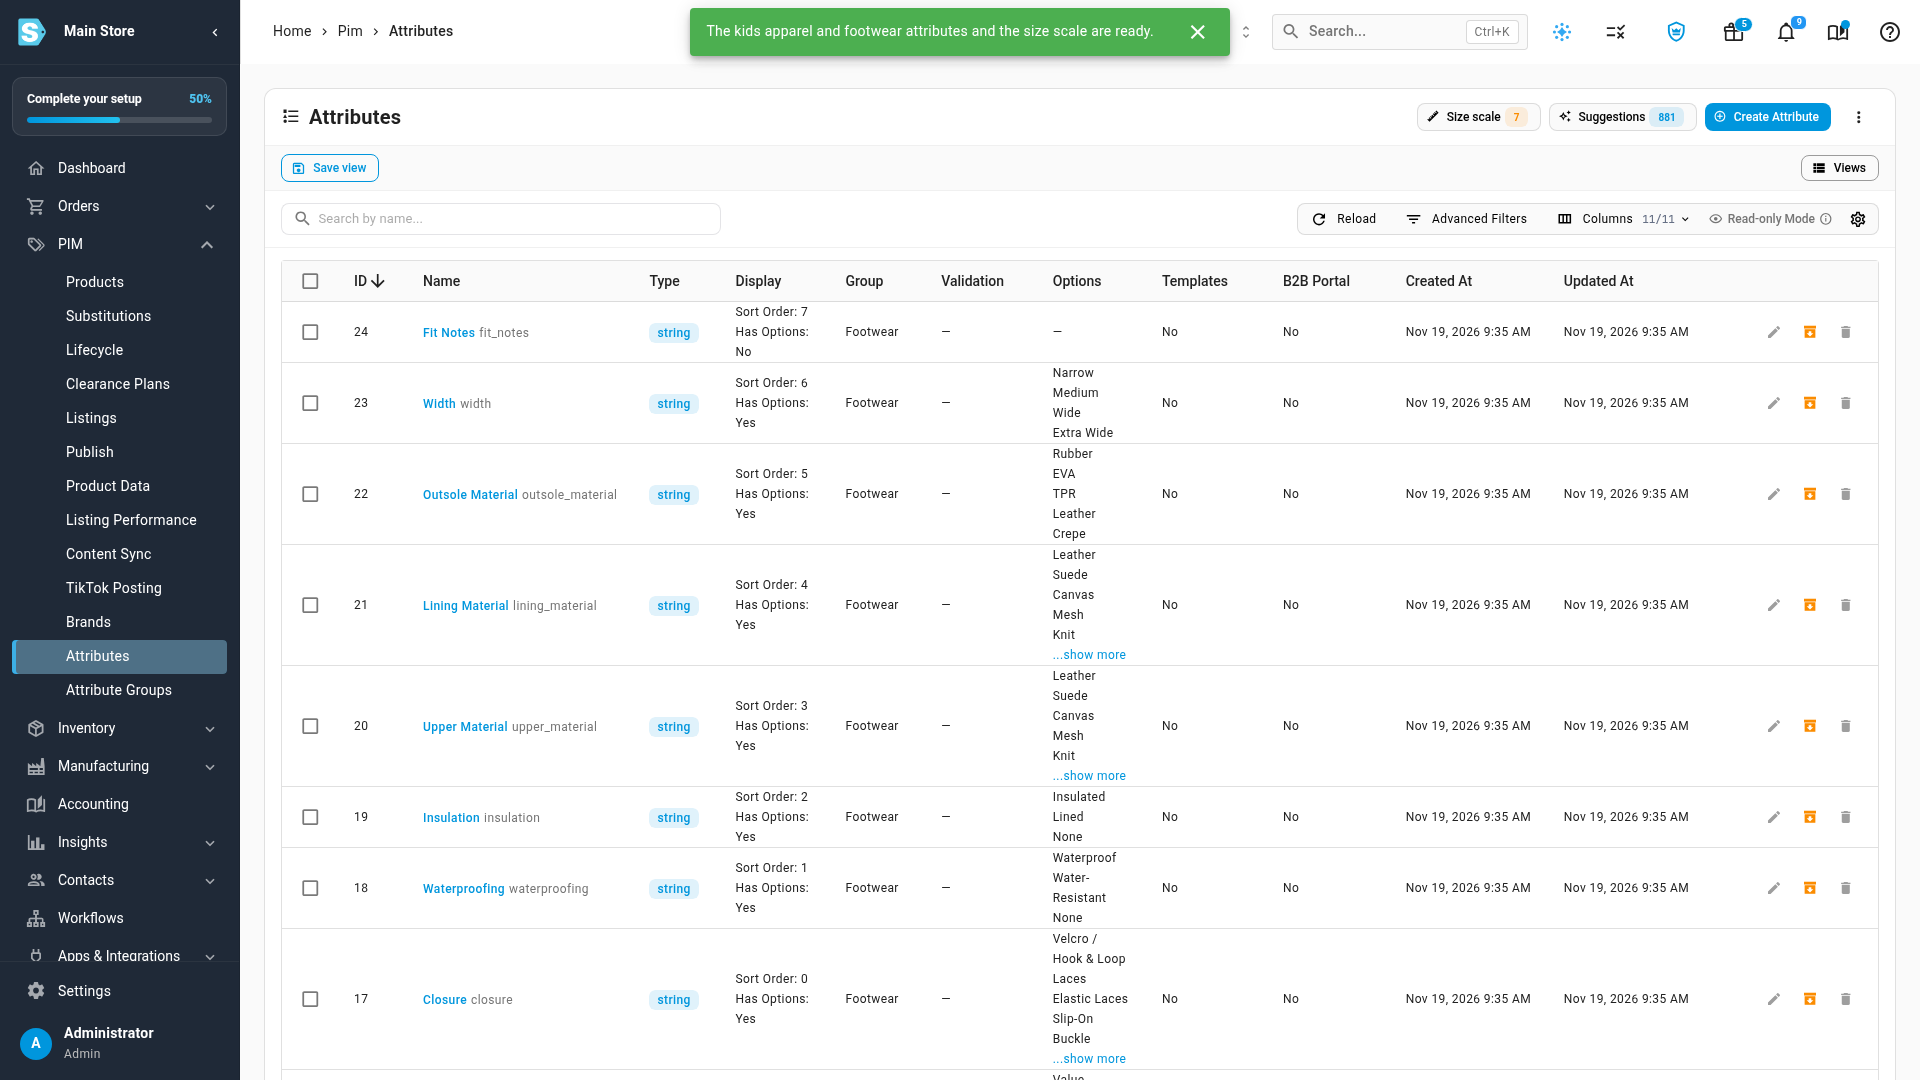
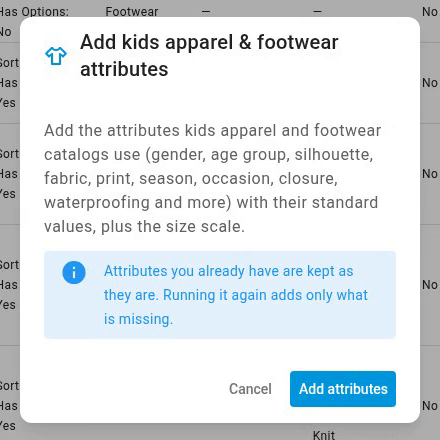
Choose Add kids apparel & footwear attributes and click Add attributes. It adds each attribute with its standard values, plus the size scale:
| Group | Attributes it adds |
|---|---|
| Apparel | Gender (Girl, Boy, Unisex), Age Group (Baby, Toddler, Kids, Youth, Adult), Silhouette (Top, Bottoms, Dress, Romper, One Piece, Pajamas, Footie, Leggings, Swim, Outerwear and more, plus footwear styles such as Sneakers, Sandals and Rain Boots), Fabric, Print (Solid, Stripes, Dots, Floral, Graphic, Plaid/Gingham and more), Season, Occasion (Holiday, Easter, Back to School, Special Occasion and more), and a few more for buying analysis |
| Footwear | Closure, Waterproofing, Insulation, Upper Material, Lining Material, Outsole Material, Width (Narrow, Medium, Wide, Extra Wide) and Fit Notes |
Attributes you already have are kept as they are, so it's safe to run again: a second run only adds what is missing. Setting Print also fills Print vs Solid, so older reports that use it keep working.
Reports combine the two into one segment, such as "Baby Girl" or "Kids Boy". A product whose tags or suggestions say both Girl and Boy is treated as Unisex.
Check the size scale
Click Size scale in the header of the Attributes page. (The Size attribute's row has a ruler icon that opens the same page.)
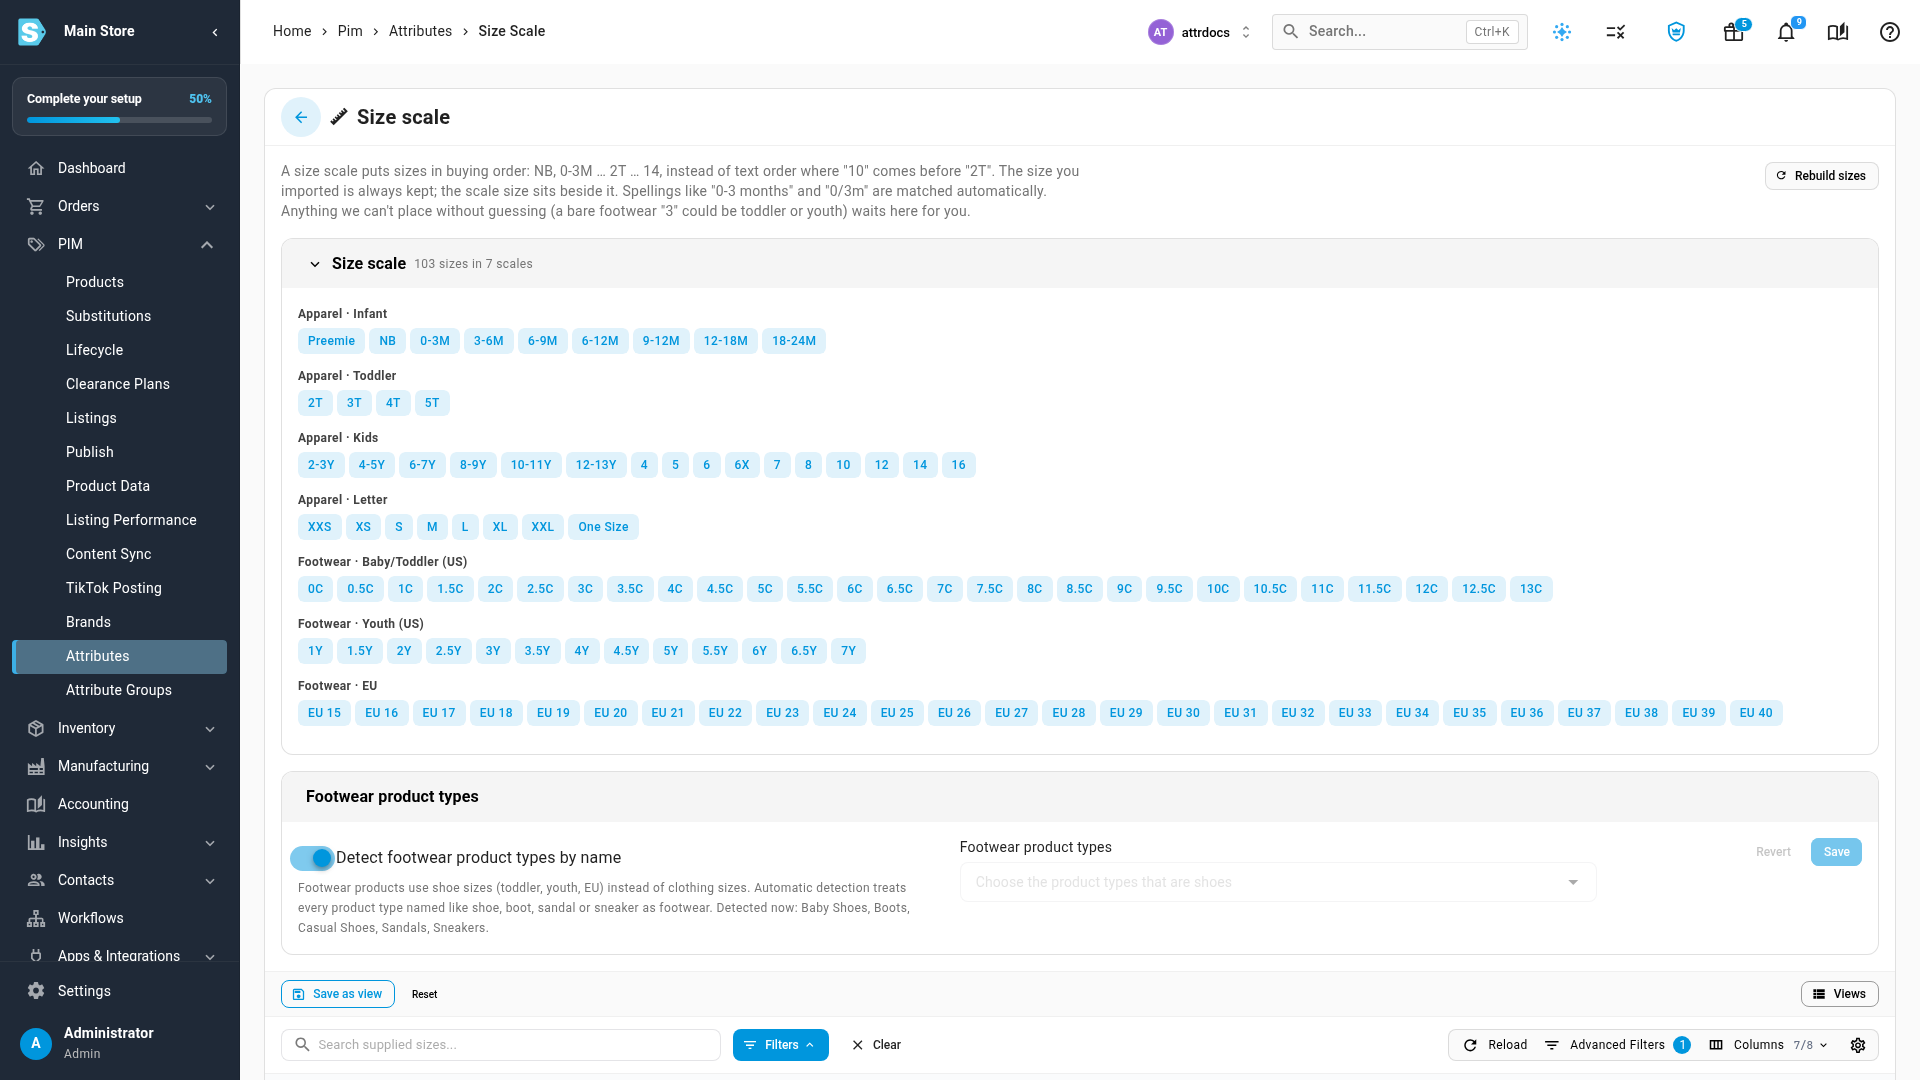
The Size scale card lists every size in buying order, in seven scales:
| Scale | Sizes |
|---|---|
| Apparel · Infant | Preemie, NB, 0-3M, 3-6M, 6-9M, 6-12M, 9-12M, 12-18M, 18-24M |
| Apparel · Toddler | 2T, 3T, 4T, 5T |
| Apparel · Kids | 2-3Y … 12-13Y, then 4, 5, 6, 6X, 7, 8, 10, 12, 14, 16 |
| Apparel · Letter | XXS, XS, S, M, L, XL, XXL, One Size |
| Footwear · Baby/Toddler (US) | 0C to 13C, including half sizes |
| Footwear · Youth (US) | 1Y to 7Y, including half sizes |
| Footwear · EU | EU 15 to EU 40 |
Hover a size to see the age group it belongs to.
The size you imported is always kept. The scale size sits beside it, and reports sort and group by the scale size. Common spellings are matched for you: "0-3 months", "0-3 mo" and "0/3m" all become 0-3M, "Newborn" becomes NB, "3 youth" becomes youth 3Y, and "EU 22" becomes EU 22. A width written into the size, such as "8W" or "8 Wide", is split off into the width.
Which products use shoe sizes
The Footwear product types card decides which products are read against the footwear scales. With Detect footwear product types by name on, every product type named like shoe, boot, sandal or sneaker counts as footwear, and the card lists the types it found. To choose them yourself, turn it off, pick the types under Footwear product types, and click Save. The sizes are worked out again in the background.
Map sizes that need review
Below the cards, the list shows every size your products use. By default it's filtered to Needs review: sizes SKU.io won't place without guessing.
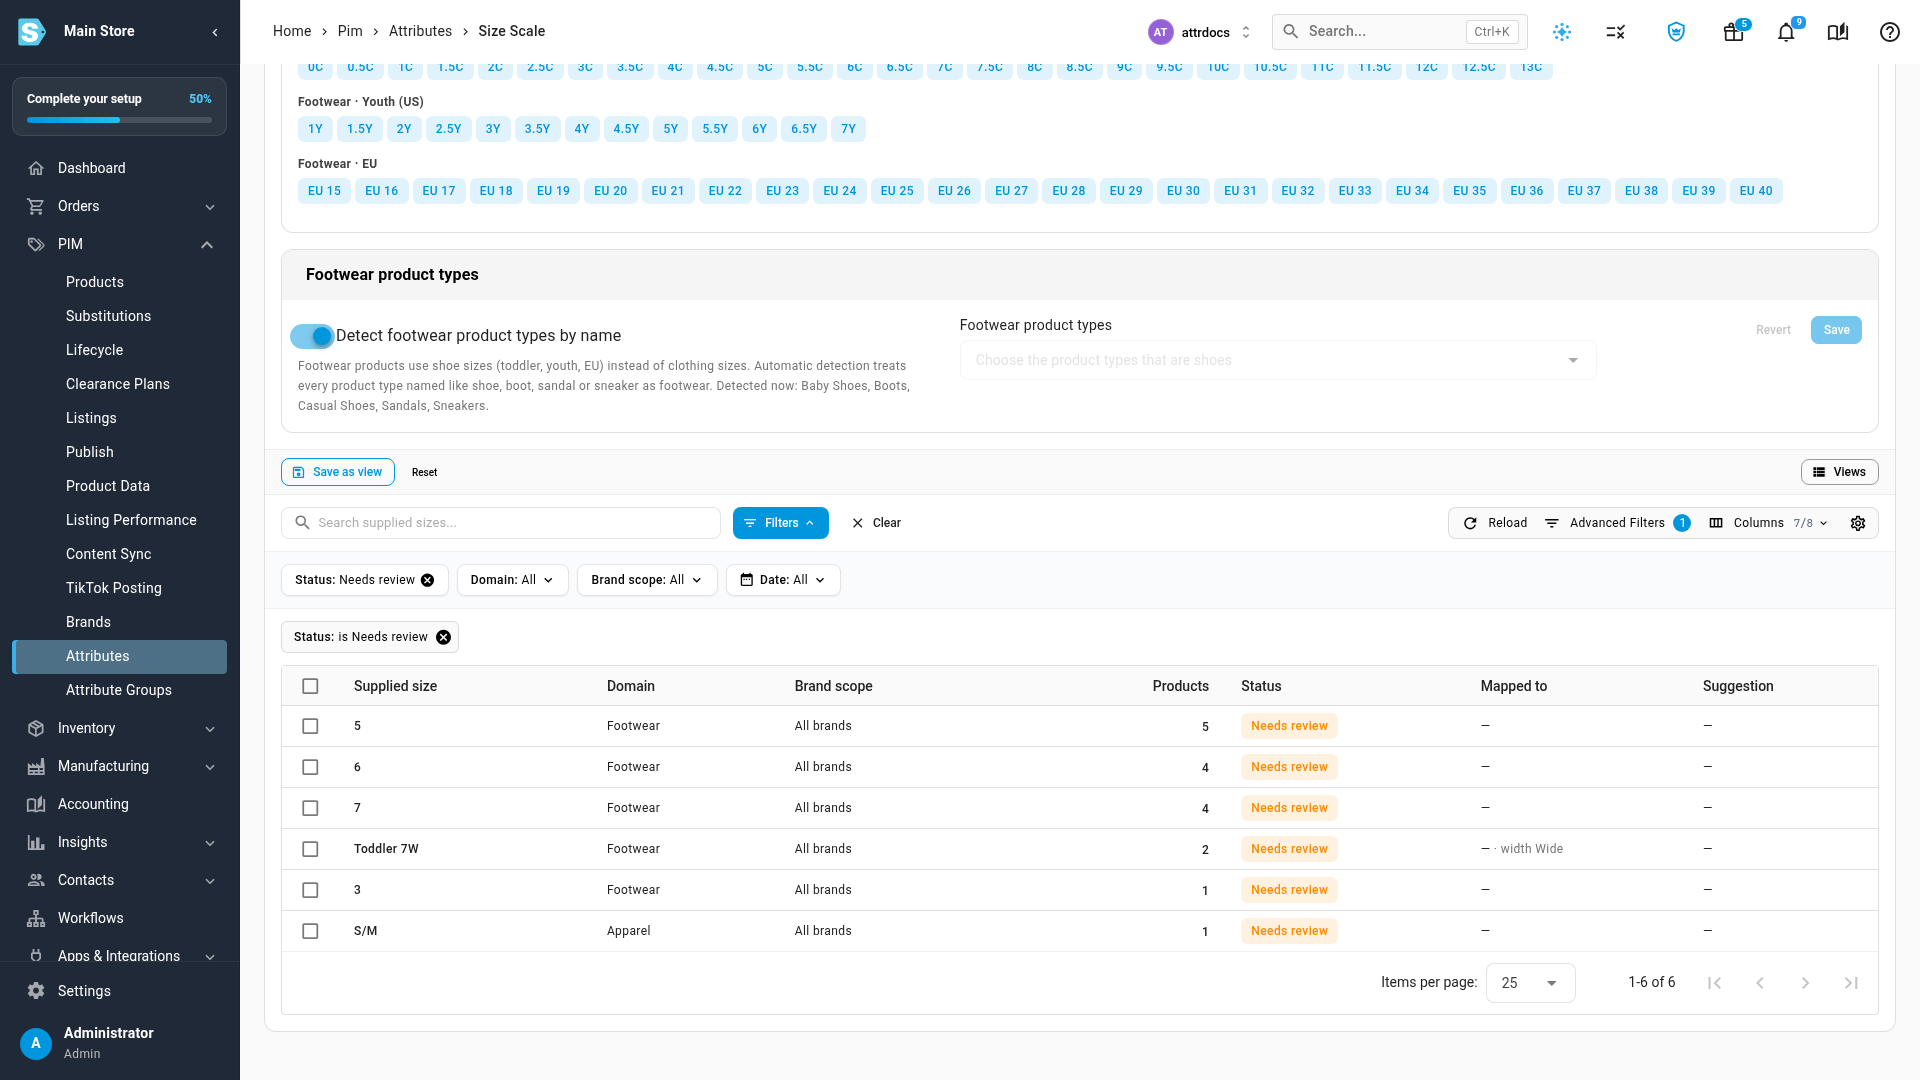
Sizes are never merged on a guess:
- A bare footwear size from 1 to 7 could be a toddler or a youth size, so it waits for you.
- A month range that isn't on the scale, such as "3-9M", waits for you. It's never moved to the nearest size, and 6-12M is never folded into 6-9M or 9-12M.
- A bare footwear number from 15 to 40 is read as an EU size.
To map a size:
- Select one or more sizes in the list.
- Click Map to… above the list.
- Under Scale size, type and choose the size it should be.
- Under Applies to, leave all brands, or choose one brand. A brand-only mapping wins over the all-brands one, which helps when one brand means a toddler size by a bare "3".
- Click Map.
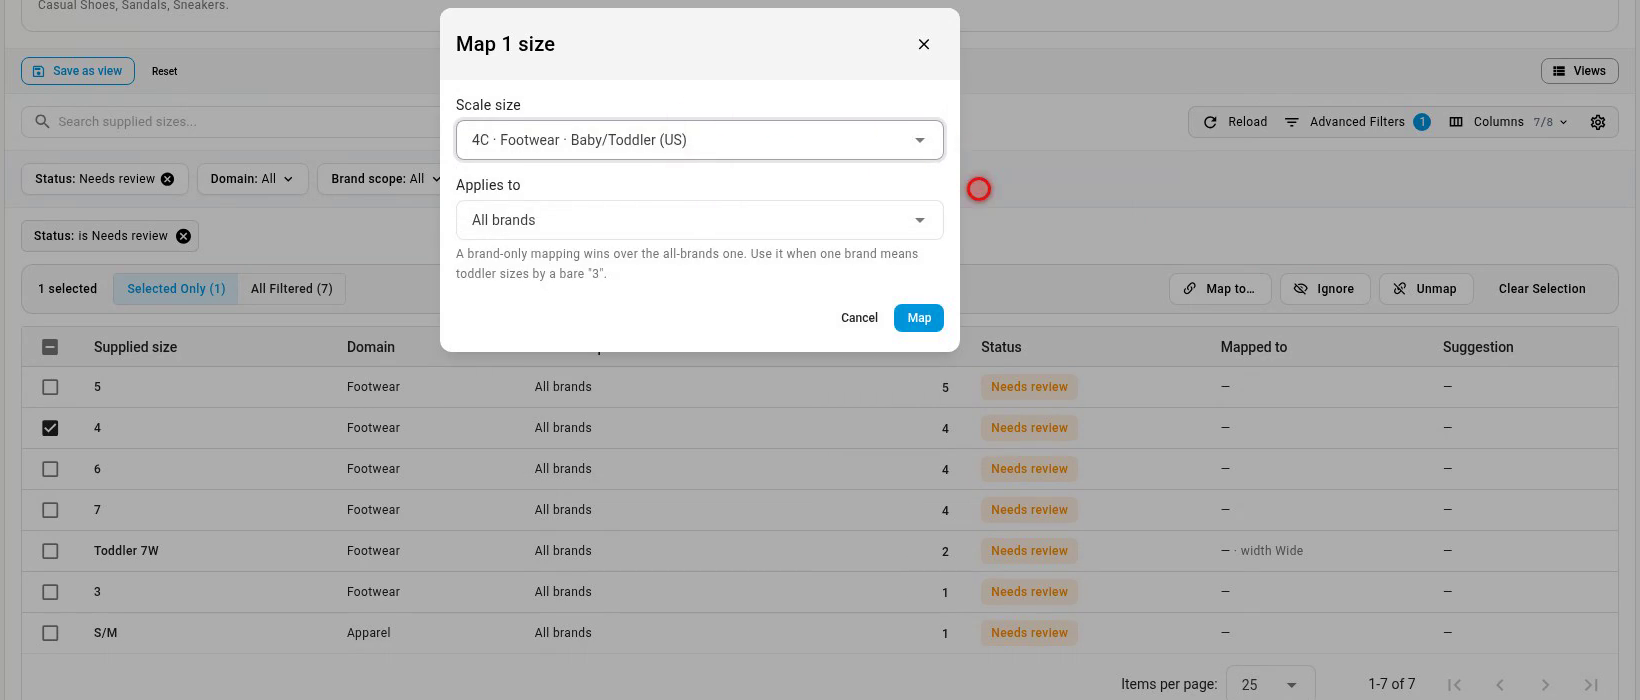
Every product with that supplied size gets the scale size, and the list updates. When a size has a suggestion, the Suggestion column shows it with a Use button. The other bulk actions are Ignore (keep the supplied size but give it no scale size) and Unmap (send a mapped size back to Needs review). Both ask you to confirm first.
Rebuild sizes at the top of the page works every product's scale size out again. Use it after a large import. It runs as a job you can follow in the job tray.
Ask AI to suggest attribute values
AI reads each product's title, description, tags, product type and vendor, and suggests a value for attributes that are empty. It never changes a value you've already set.
-
Go to PIM → Products.
-
Search or filter to the products you want, and select them. The action works on the rows you've checked, not on All Filtered.
-
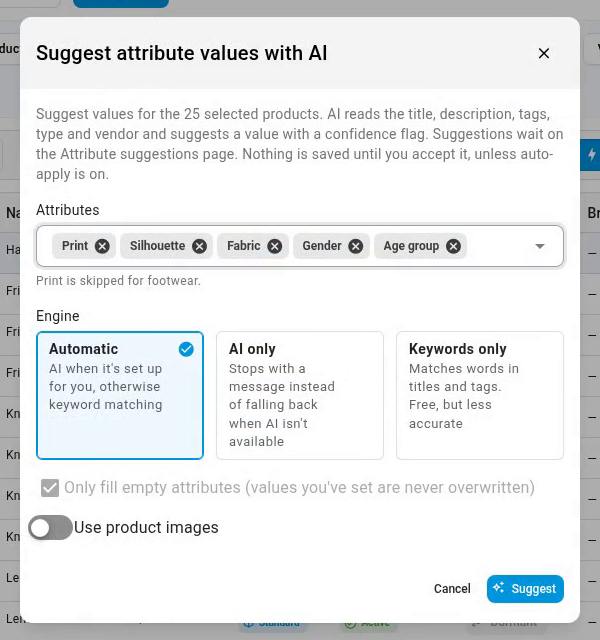
Open Bulk actions, and choose Suggest attribute values with AI.
-
Under Attributes, keep the ones you want filled: Print, Silhouette, Fabric, Gender and Age Group are picked to start with. Print is skipped for footwear.
-
Choose an Engine:
Engine What it does Automatic Uses AI when it's set up for your workspace, otherwise keyword matching. AI only Uses AI, and stops with a message instead of falling back when AI isn't available. Keywords only Matches words in titles and tags. Free, but less accurate. -
Optionally, turn on Use product images. It also sends each product's first image, which helps with print and silhouette, but each run costs more.
-
Click Suggest.
The run continues in the background. Follow it in the job tray, or click Review suggestions in the message. You can also start a run from the Suggestions page with Suggest values. There, it covers every product that's missing one of the attributes.
Variants of the same style are grouped: AI looks at the style once, and the suggestion applies to every variant in it. A style that already has suggestions waiting is skipped on the next run.
Review and accept suggestions
On the Attributes page, click Suggestions. The Attribute suggestions page lists every suggestion waiting for review.
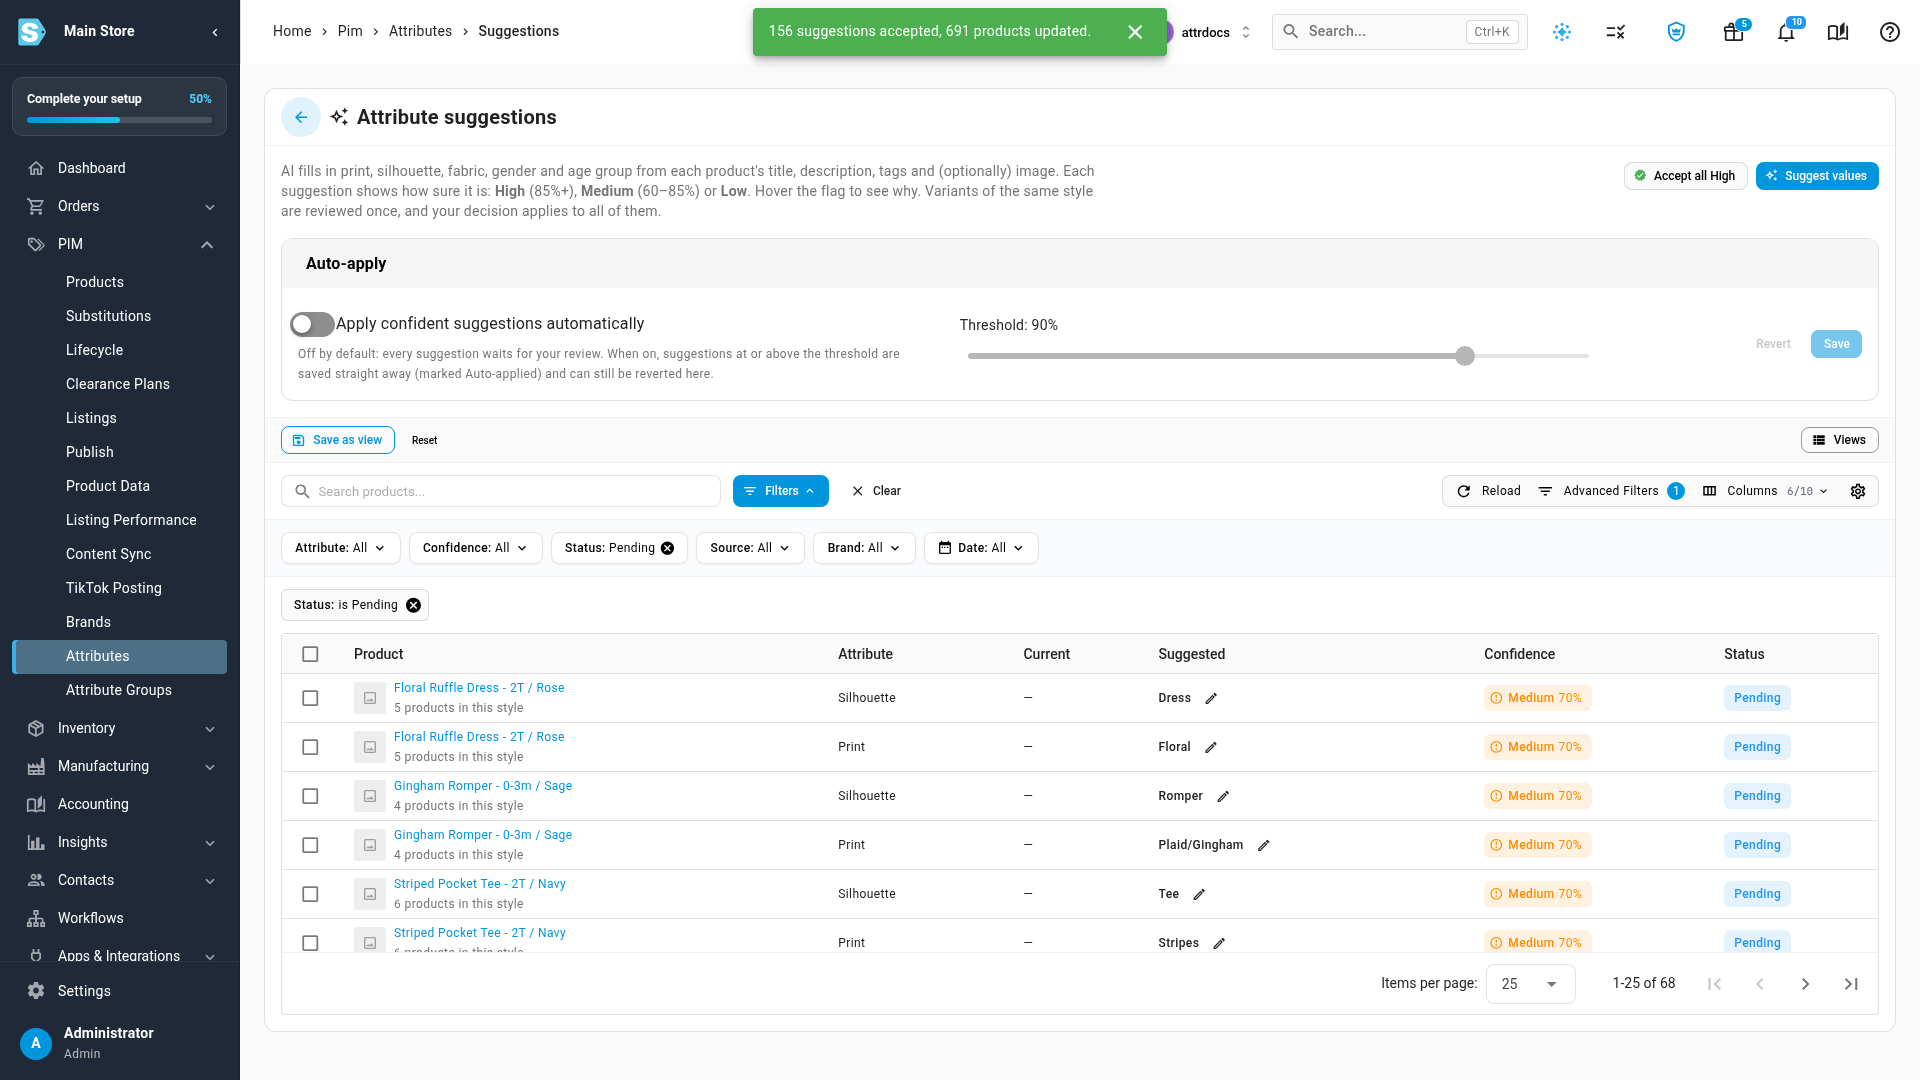
Each row shows the product (with how many products are in its style), the attribute, its current value, the suggested value and a confidence flag:
| Flag | Confidence |
|---|---|
| High (green) | 85% or more |
| Medium (amber) | 60% to 85% |
| Low (red) | Under 60% |
Hover a flag to see why it was suggested and whether it came from AI or keywords. A suggestion based only on the title is never rated above 70%.
To work the list:
- Accept all High accepts every pending High suggestion that matches your current filters and search, on every page. Confirm in the dialog.
- To change a value before accepting it, click the pencil beside the suggested value, choose the value, and save it.
- Select rows to Accept, Reject, Set value… (choose a different value, then save it) or Revert. Selected Only acts on the rows you checked, All Filtered on every row that matches your filters.
- Filter by Attribute, Confidence, Status, Source or Brand.
Accepting saves the value on every product in the style. Revert clears an accepted value again, but only if it's still the value the suggestion wrote. If someone fills an attribute before you review its suggestion, the suggestion is marked stale instead of overwriting it.
Apply confident suggestions automatically
The Auto-apply card at the top of the Suggestions page is off by default, so every suggestion waits for your review. To skip the review for confident ones:
- Turn on Apply confident suggestions automatically.
- Set the Threshold with the slider, between 50% and 100%. It starts at 90%.
- Click Save.
From then on, suggestions at or above the threshold are saved as soon as they're made and marked Auto-applied. They stay in the list, and you can still revert them.
Next steps
- Map Shopify tags, vendors and styles to attributes: fill attributes and brands from your Shopify store, and group variants into styles.
- Manage attributes: create and edit your own attributes and their values.
- Set a product's categories & attributes: check or change the values on one product.
- Read the Sales by Size report: see sales in size-scale order.
Video transcript
Attributes describe your products, such as gender, age group, fabric and print. For a kids apparel or footwear catalog, start from the standard set. Click the three-dot menu button at the top right of the list. Choose Add kids apparel and footwear attributes. It adds each attribute with its standard values, plus the size scale. Anything you already have is kept, so it's safe to run again. Click Add attributes, and the set is ready in a moment. Click Size scale to see every size in buying order. Infant sizes come first, then toddler, kids and letter sizes. Footwear has separate baby, youth and EU scales. The size you imported is always kept, and the scale size sits beside the original. Below, sizes that can't be placed without guessing wait for your review. A shoe size that's only a number could be toddler or youth, so it's never merged on a guess. Tick the one you want to place, then click Map to, above the table. In the dialog, click Scale size, and type the correct scale size. Choose it from the matches, then click Map to save the mapping. Every product with that supplied size now gets its scale size. Next, let AI fill the attributes your products are missing. Open the Products list, from the PIM menu in the sidebar on the left. Search or filter the list down to the products you want, then tick the box at the top to select every row. Then click Bulk actions above the table, and choose Suggest attribute values with AI. In the dialog, pick the attributes you want filled, then choose an engine. Automatic runs AI when it's set up for your workspace, and keyword matching otherwise. Click Suggest to start the run. It continues in the background, so you can keep working. Suggestions wait for you on the Attribute suggestions page, under PIM and Attributes. Open it from the button of the same name, at the top of that page. Each suggestion carries a confidence flag: High, Medium or Low. Variants of one style are reviewed once, and your decision covers every variant. To change a value first, click the pencil beside the suggestion. When the High suggestions look right, click Accept all High, then confirm in the dialog. The values are saved on every product in each style. To skip the review for confident suggestions, turn on Apply confident suggestions automatically. Then drag the slider to set the threshold. Click Save to keep the setting. It's off by default, and anything applied this way can still be reverted from this list.