Send dropship vendors a shipping label
Instead of letting a dropship vendor ship on its own carrier account, you can send it a prepaid shipping label bought on yours. Labels are off for every supplier until you turn them on in that supplier's Dropship settings. A few store-wide defaults then apply to every supplier that gets labels. For how labels are scheduled, shipped and voided, see How dropship shipping labels work.
Before you begin
- A label provider is connected. Labels are bought through your Shippo, ShipStation, Starshipit or EasyPost account. To use EasyPost, go to Apps & Integrations → EasyPost, paste an API key from your EasyPost account (Account Settings → API Keys), and click Save & Connect. A test key lets you try it without buying real postage.
- The supplier has a dropship warehouse with a complete address: street, city, ZIP and country. Labels ship from that address. You add it under the supplier's Settings → Warehouses.
- Your products have a weight and dimensions, or the supplier has a default package. SKU.io uses them to fill in the package for the vendor.
- You can edit settings and suppliers.
Turn on shipping labels for a supplier
-
Go to Contacts → Suppliers and open the supplier.
-
Open the Settings tab, then choose Dropship in the list of sections. Under Shipping labels, a supplier that doesn't get labels reads Off: the vendor ships on its own carrier account and enters tracking on the purchase order.
-
Click Edit at the top of the page.
-
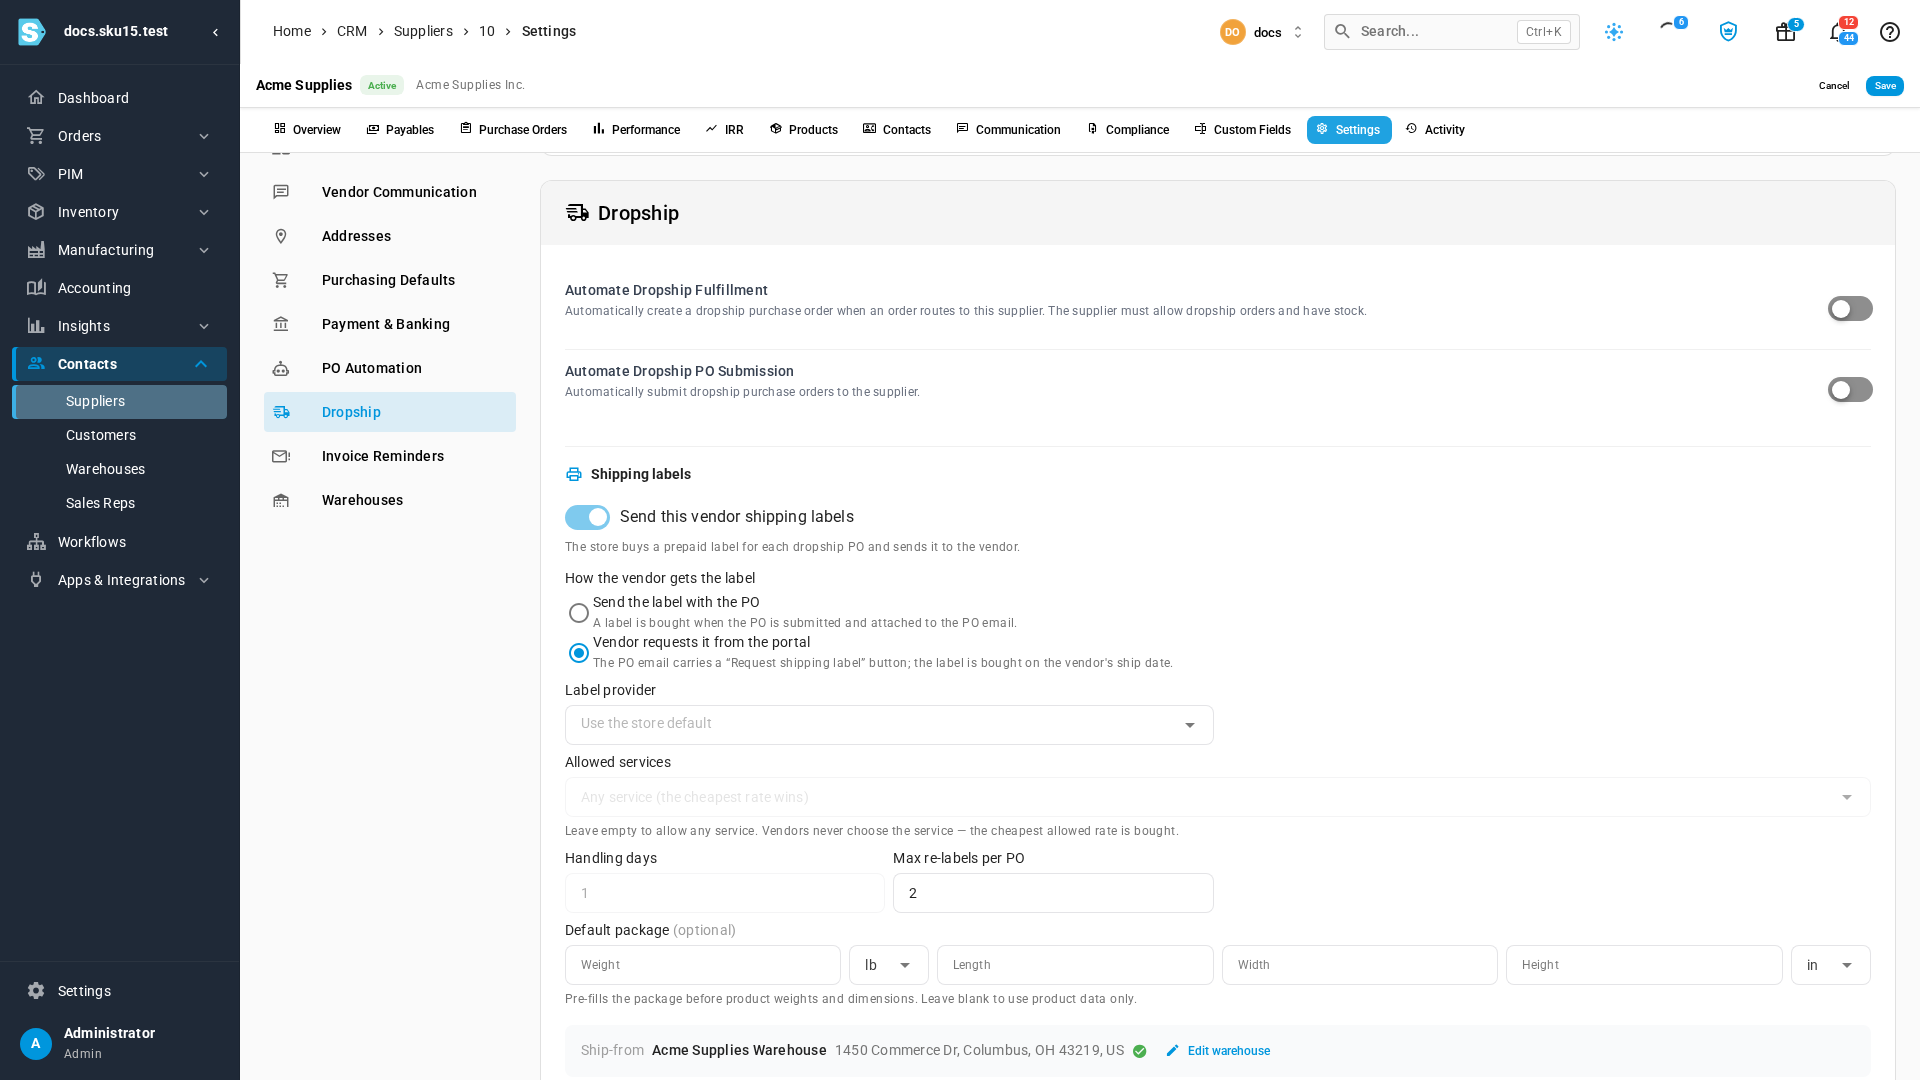
Turn on Send this vendor shipping labels.
-
Under How the vendor gets the label, choose one:
Choice Use it when Send the label with the PO The vendor ships within a day or two. The label is bought when you submit the purchase order and attached to the PO email. Vendor requests it from the portal The ship date isn't known yet. The PO email has a Request shipping label button, and the vendor picks a date. This is selected when you turn labels on. -
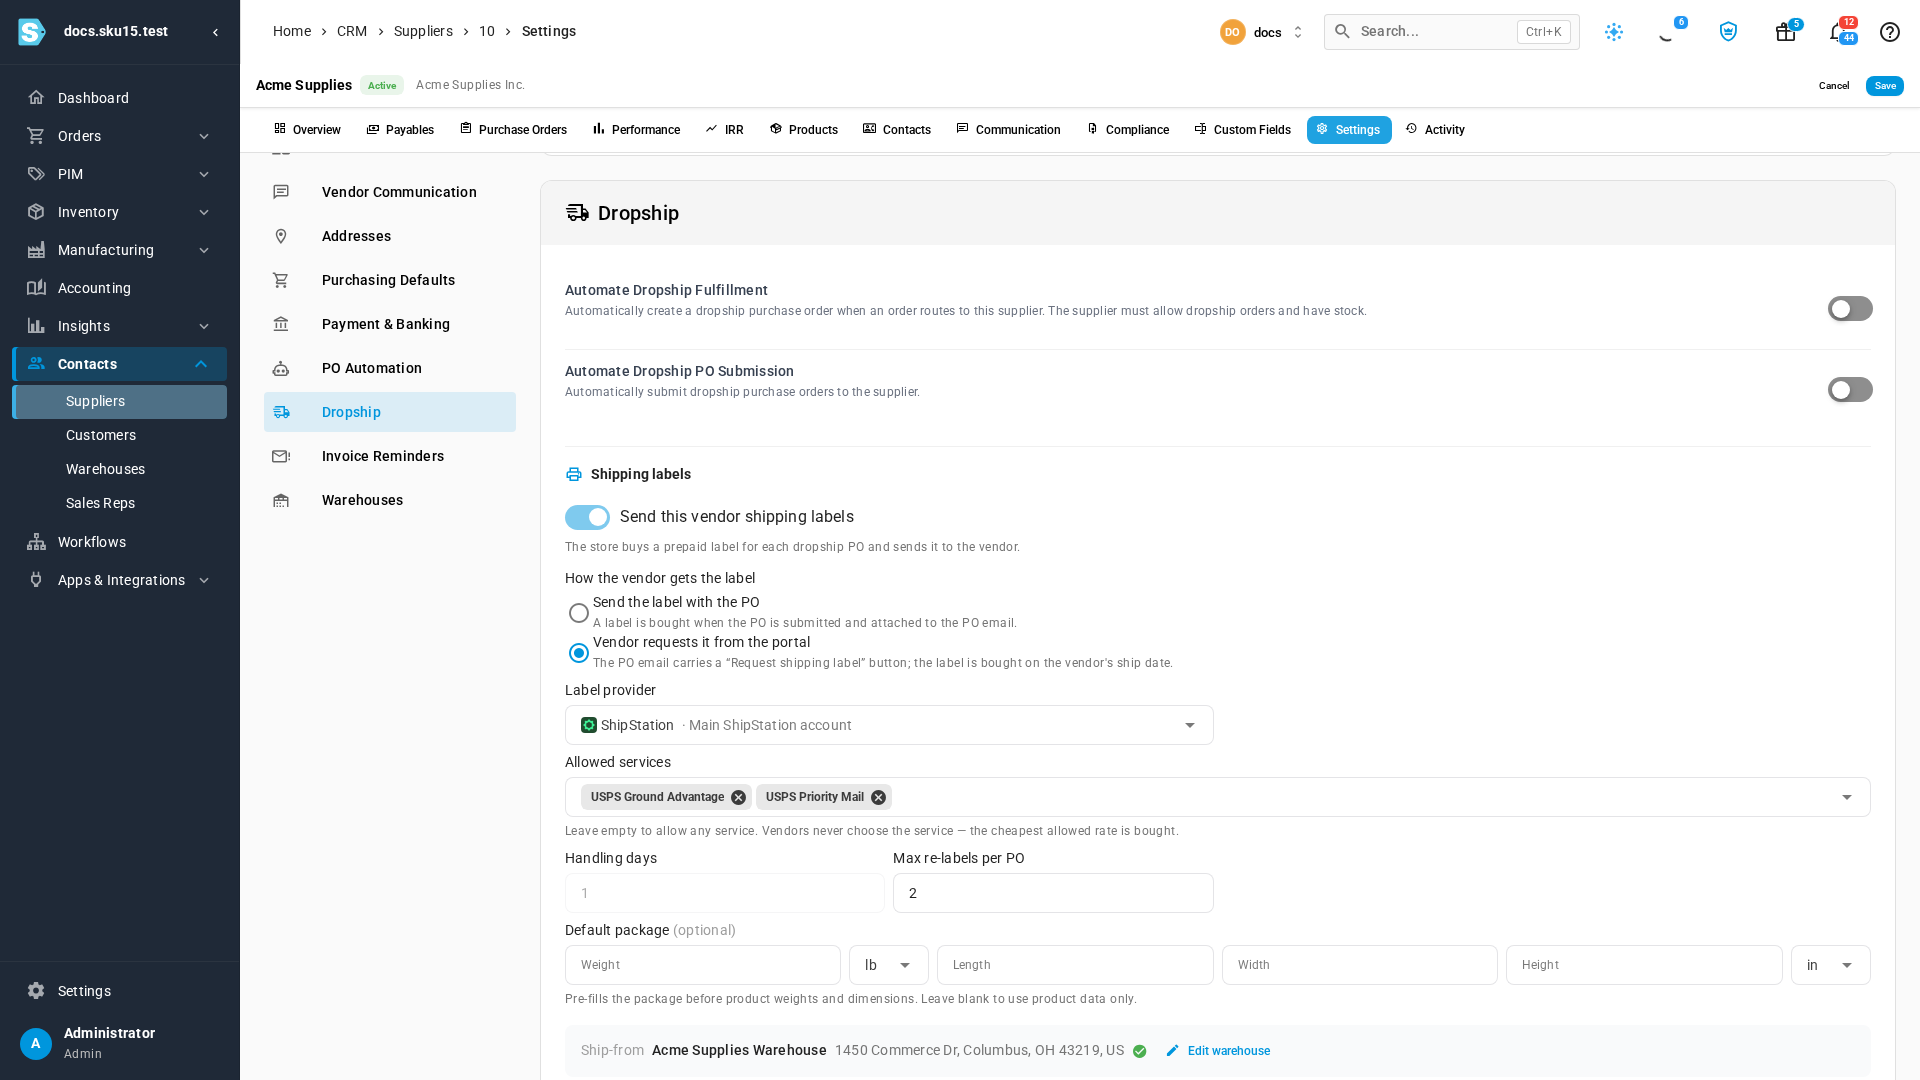
In Label provider, choose the connected account that pays for this supplier's labels. Each account is listed with its provider's logo and name, for example ShipStation · Main ShipStation account. Leave it empty to use the store default.
-
In Allowed services, choose the services you're willing to pay for, such as USPS Ground Advantage and USPS Priority Mail. SKU.io buys the cheapest of them for each label. Leave it empty to allow any service. To choose services, the supplier needs its own Label provider.
-
With Send the label with the PO, set Handling days: the label's ship date is the submit date plus this many business days. (If the purchase order has an estimated ship date, that date is used instead.)
-
Set Max re-labels per PO: how many replacement labels the vendor can get by itself. The default is 2.
-
Optionally, enter a Default package (weight and size). It's used instead of the products' own weights and dimensions to fill in the vendor's package.
-
Check Ship-from. It shows the dropship warehouse's address with a green check when it's complete, and Edit warehouse when it needs fixing.
-
Click Save.
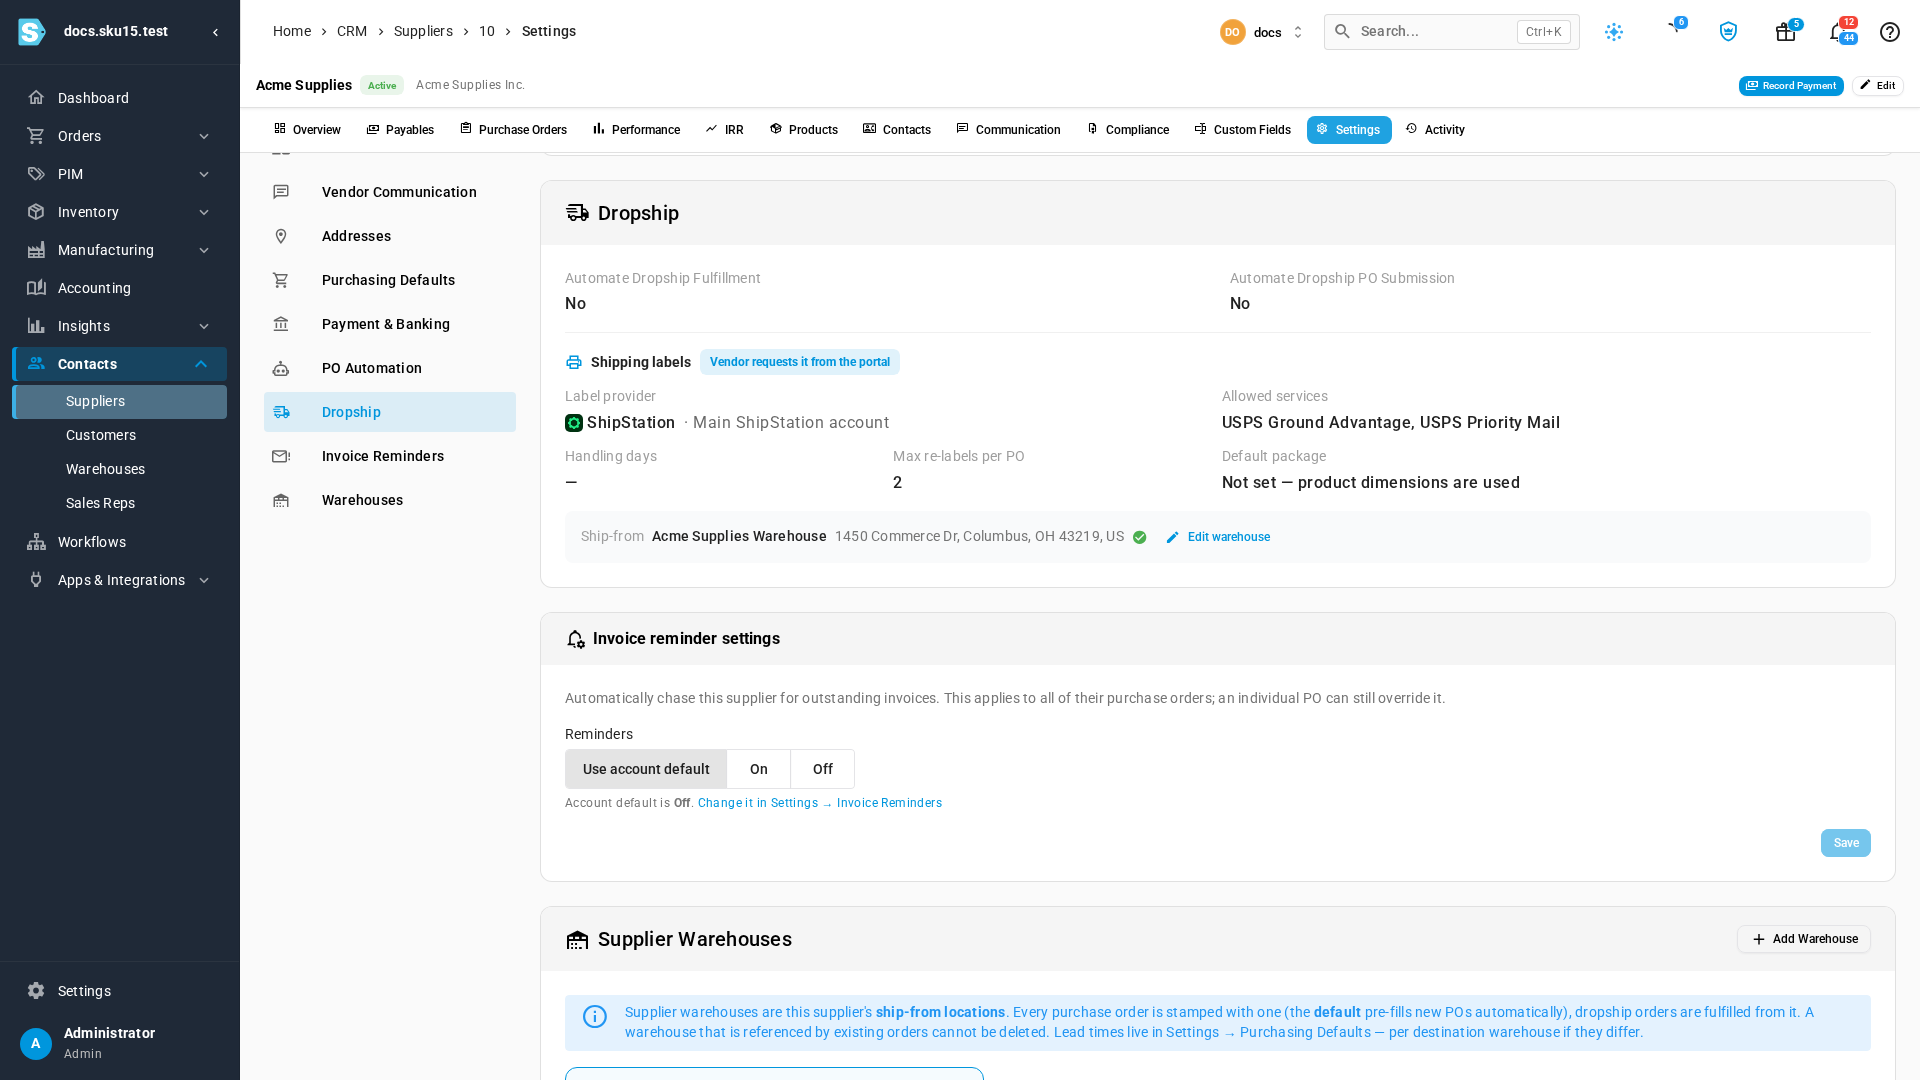
What you'll see: the Shipping labels heading shows how the vendor gets its label, and Label provider shows the provider's logo. From now on, this supplier's dropship purchase orders get a Shipping label card headed Labels via ShipStation, and the PO email carries the label or the Request shipping label button.
To stop sending labels, click Edit and turn the switch off. The supplier's new dropship POs then show no Shipping label card, no label status in the PO list, nothing about labels in the PO email, and no label section on the vendor's order page. Labels already requested or bought keep going.
Labels can't be turned on while one of the supplier's dropship warehouses has an incomplete address. SKU.io shows "Complete the ship-from address on dropship warehouse … before sending labels." Click Edit warehouse and add the missing street, city, ZIP, or country. When no label provider is connected, the Label provider list is unavailable, and its tooltip asks you to connect one.
Set the store defaults
-
Go to Settings → Purchasing → Dropship Labels.
-
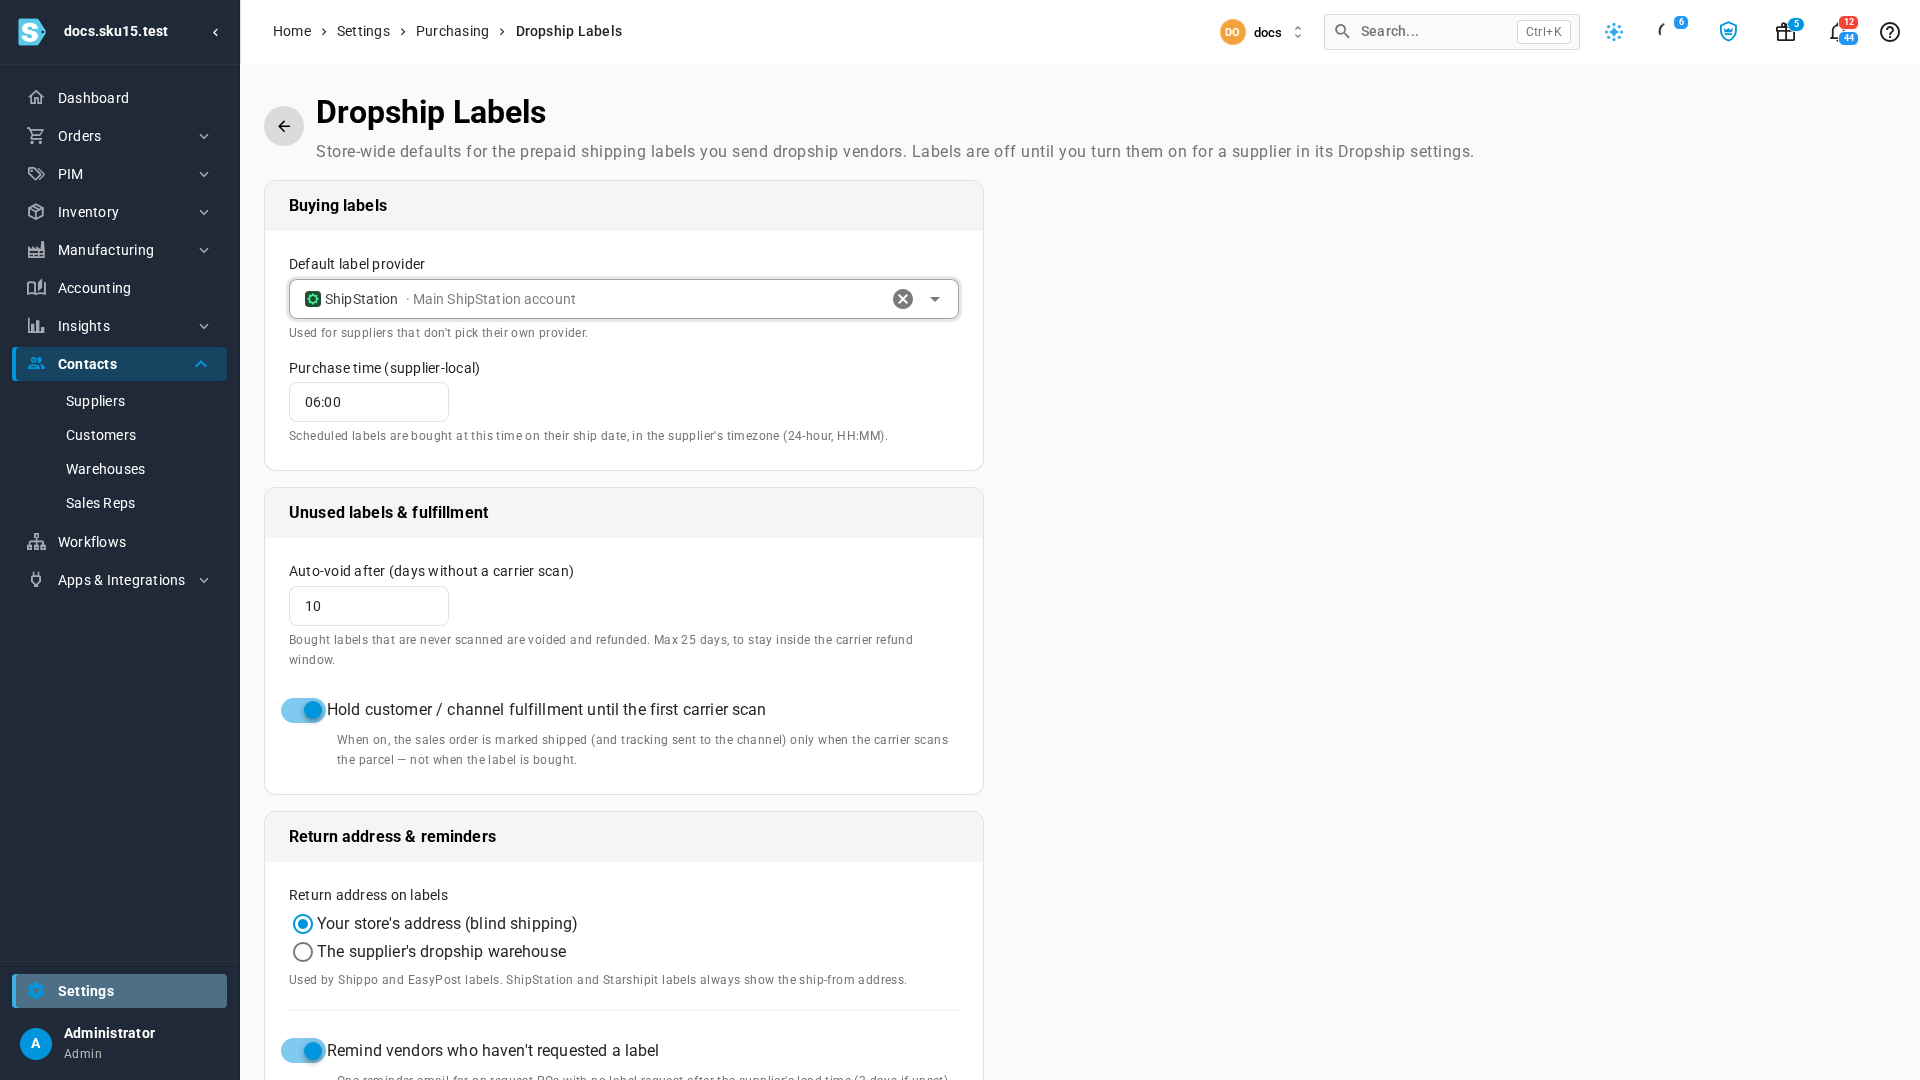
In Default label provider, choose the account labels are bought on. A supplier that doesn't pick its own provider uses this one.
-
Check Purchase time (supplier-local). A label scheduled for a ship date is bought at this time on that date, in the supplier's time zone. The default is 06:00.
-
Set Auto-void after (days without a carrier scan). A label that's bought but never scanned is voided and refunded after this many days. The default is 10, and the most is 25, which keeps it inside the carriers' refund window.
-
Leave Hold customer / channel fulfillment until the first carrier scan on, unless you want the order marked shipped as soon as the label is bought. While it's on, your customer and sales channel get the tracking number when the carrier first scans the parcel.
-
Under Return address on labels, keep Your store's address (blind shipping), or choose The supplier's dropship warehouse. This applies to Shippo and EasyPost labels. ShipStation and Starshipit labels always show the ship-from address.
-
Leave Remind vendors who haven't requested a label on to send one reminder to a vendor that hasn't asked for its label.
-
Click Save Changes.
Next steps
- Manage a dropship label on a purchase order: track, buy, reschedule and void labels, and see your vendor's page.
- How dropship shipping labels work: when labels are bought, shipped and voided.
- Approve and submit a purchase order
Video transcript
Shipping labels are switched on one supplier at a time. In the sidebar, open Contacts, and then choose Suppliers from the list. Your suppliers appear in a list. Select the supplier you want to set up, and wait for its page to open. Go to its Settings tab, near the end of the row of tabs. Then choose Dropship, in the list of sections on the left of the page. Shipping labels start out off. Then the vendor ships on their own account, and its orders show no label options. Click Edit, at the top right of the supplier's page, to change its settings. Then turn on Send this vendor shipping labels. Now choose how the vendor gets each label. Send the label with the PO buys it as soon as you submit the order. Vendor requests it from the portal lets the vendor ask once the order is ready to ship. It's selected for you, and suits most suppliers. Click Label provider, and pick the connected account that pays for this supplier's labels. Each one shows its logo, so here we choose ShipStation. Then click Allowed services, to list what the provider offers. Choose each service you're happy to pay for, such as Ground Advantage and Priority Mail. Every label then uses the cheapest of the services you chose. Max re-labels per PO caps how many replacement labels a vendor can get by itself. Labels ship from the supplier's dropship warehouse, so its address must be complete. When you're done, click Save at the top of the page. This supplier's dropship purchase orders now carry a Shipping label card. A few more settings apply to every supplier that gets labels. Open Settings, at the very bottom of the sidebar. Choose Purchasing, to list the settings for buying from suppliers. Then open Dropship Labels, where the label defaults are kept together. The Default label provider is used by any supplier that doesn't pick its own. Click it, and choose your ShipStation account from the list of connected accounts. Purchase time is when a scheduled label is bought, in the supplier's time zone. A label with no carrier scan after this many days is voided, so you get your money back. Leave the shipping hold in place. Your customer then hears the order shipped at the first carrier scan, not when the label is bought. Return address on labels picks the address printed for returns. ShipStation labels always show the ship-from address instead. Vendors who haven't asked for a label get a single reminder email. When the settings look right, click Save Changes.