Create & open a warehouse transfer
A warehouse transfer moves stock from one of your warehouses to another. You start it as a Draft: pick an origin and a destination, then add the products and quantities to move. When the lines are right, you open it, which allocates the stock at the origin so nothing else can take it. Opening doesn't ship anything or change on-hand stock. That happens when you ship the transfer.
For the full lifecycle, see How warehouse transfers work.
Before you begin
| Requirement | Why it's needed |
|---|---|
| Create warehouse transfers permission | Shows the Create button, and lets you duplicate a transfer. |
| Update warehouse transfers permission | Lets you add, change and import lines, edit the transfer's details, and open it. |
| At least two warehouses | A transfer needs a different origin and destination. |
| Stock at the origin (to open) | Creating a draft never checks stock. Opening allocates it and refuses if the origin can't cover a line. See Not enough stock at the origin. |
Steps
- Go to Inventory → Transfers.
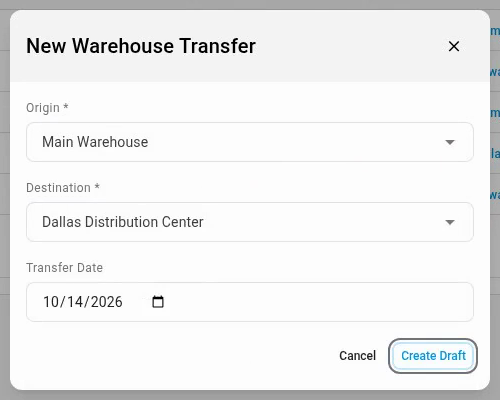
- Click Create, at the top right of the page. The New Warehouse Transfer dialog opens.
- Under Origin, search for the warehouse the stock ships from, and pick it.
- Under Destination, pick the warehouse the stock ships to. If the origin has a Default Destination Warehouse, it's already filled in; change it if this transfer goes elsewhere. The list never offers the warehouse you chose as the origin.
- Check the Transfer Date, the day the stock leaves. It starts on today.
- Click Create Draft. The new transfer opens as a Draft.
- In the Add item box below the lines, type part of a product's name or SKU, and pick the product from the list. It's added with a quantity of 1.
- To change the quantity, click the number in the Qty column, type the quantity to move, and press Enter.
- Repeat steps 7 and 8 for each product you're moving.
- Click Open Transfer, at the top of the page.
What you'll see after step 6: the draft gets a transfer number, by default WH- followed by a zero-padded number (for example WH-0042). Its Shipping method is your default for transfers. To change the prefix, the number of digits or that default, see Set transfer numbering and shipping defaults. The cursor is already in the Add item box, ready for the first product.
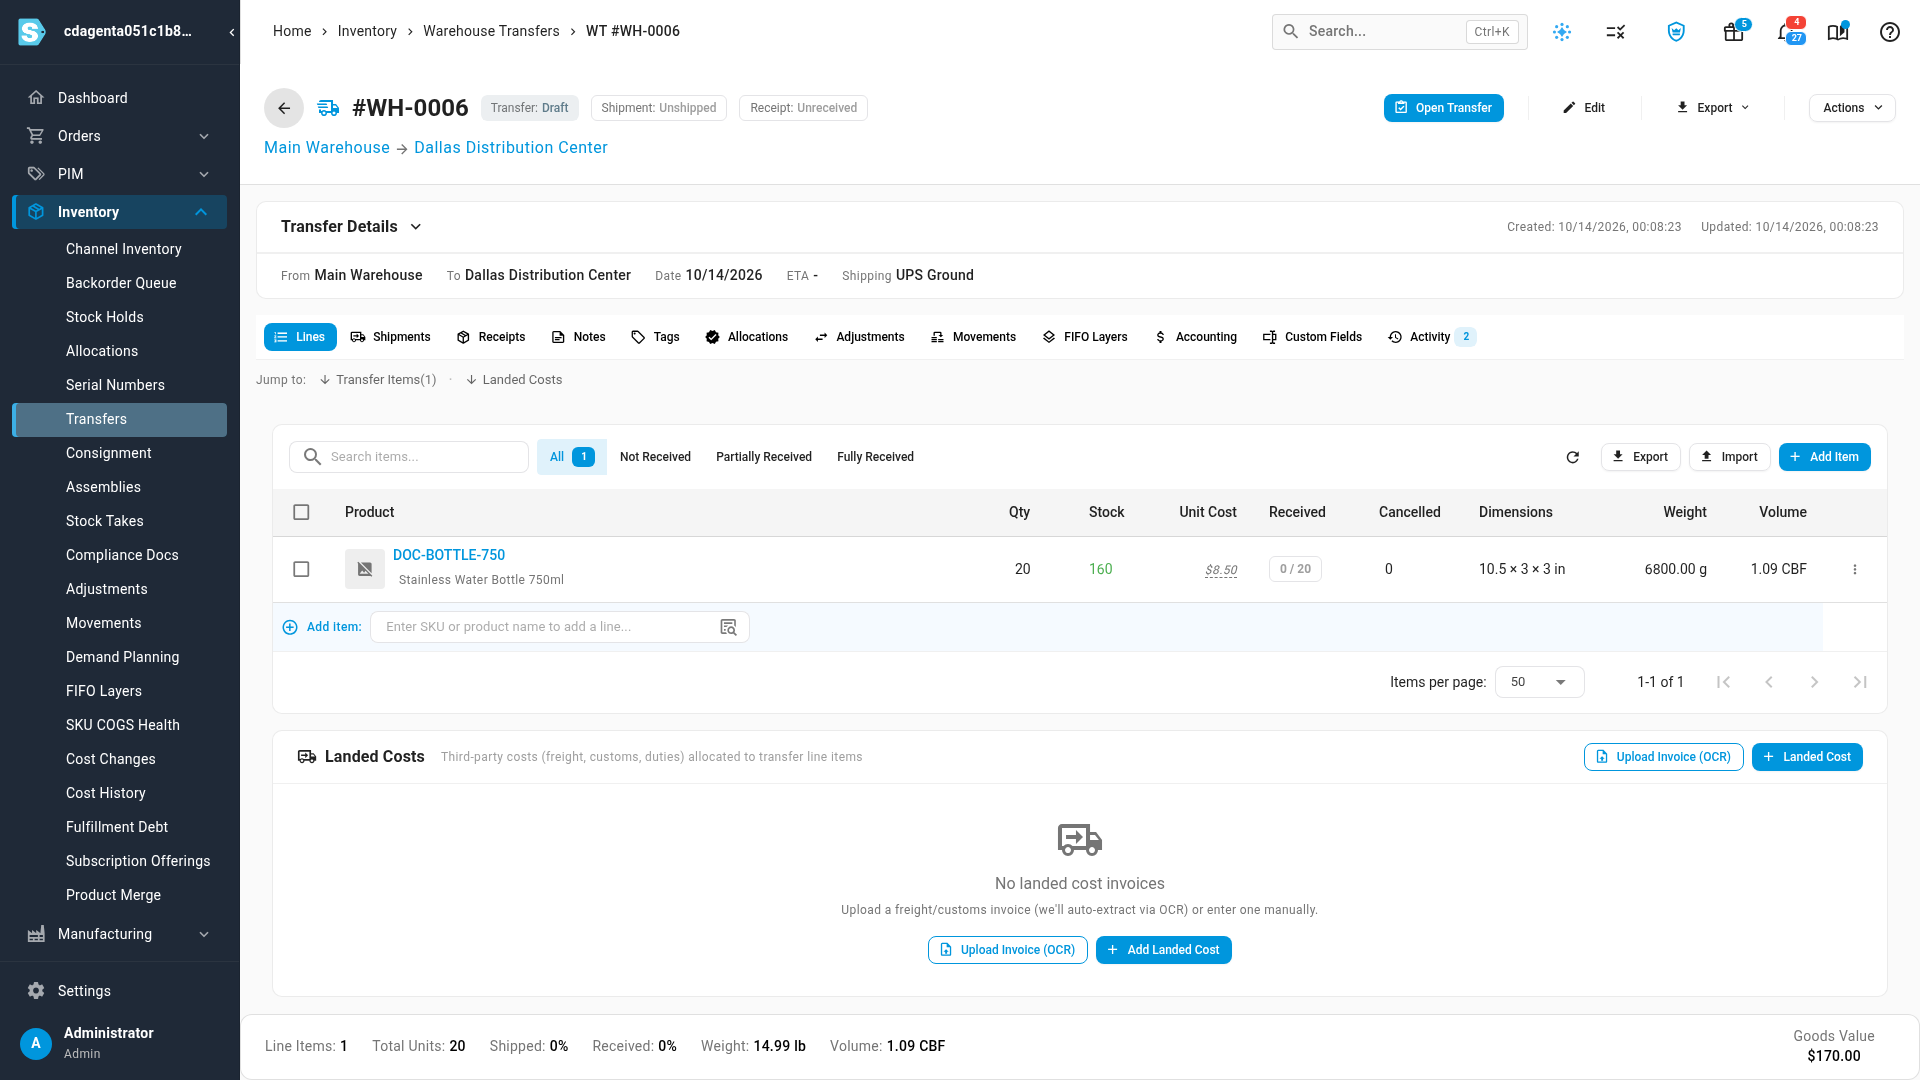
Each line saves as soon as you add or change it, so there's no save step. The Stock column shows how many units are available at the origin. To pick several products at once, click the browse icon at the end of the Add item box.
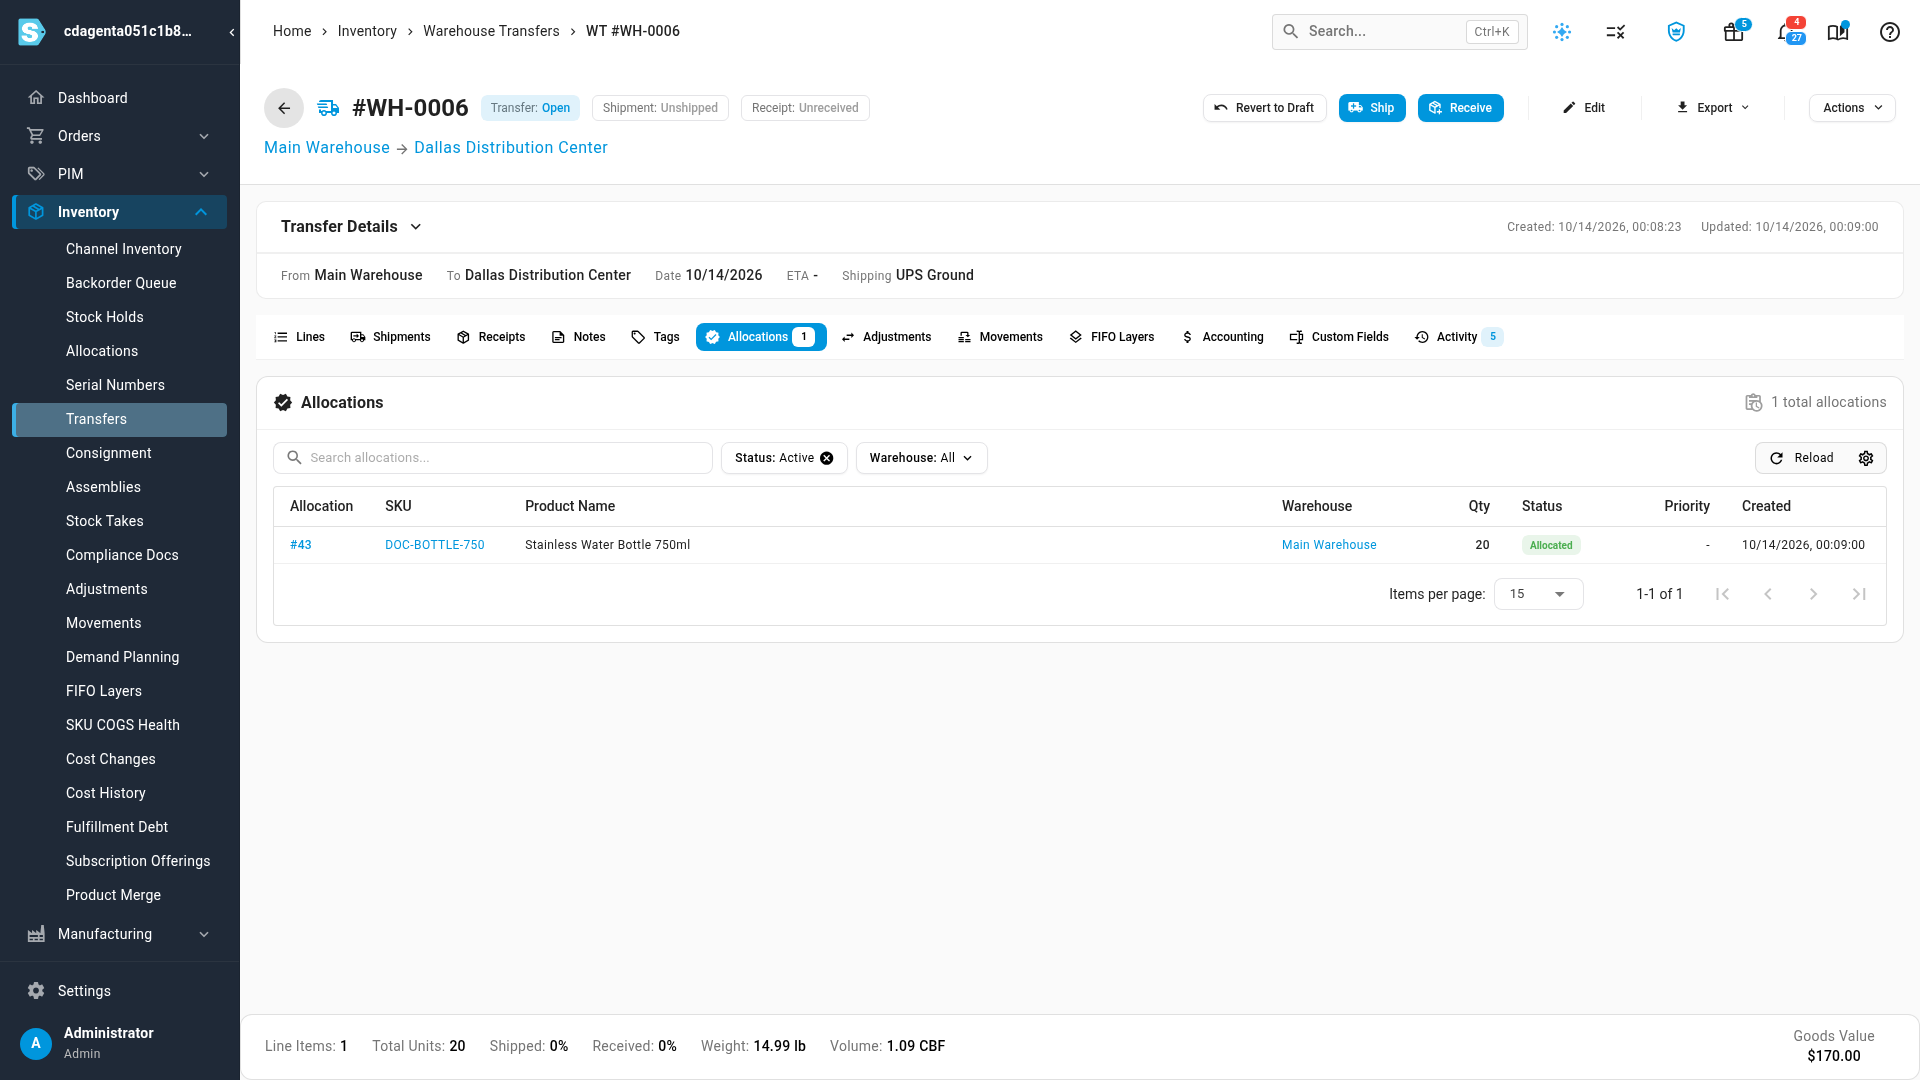
What you'll see after step 10: the transfer moves to Open, and SKU.io confirms "Transfer opened. Stock is allocated at the origin, ready to ship." The Allocations tab counts one allocation per line. The Shipment status stays Unshipped, and the page now offers Ship, Receive and Revert to Draft.
You can create a draft even when the origin is short, and add products whose stock hasn't arrived yet. The stock check happens only when you open the transfer, so you can plan a transfer ahead of a restock and open it once the goods land.
Set the shipping method, dates and warehouses
The New Warehouse Transfer dialog asks only for the warehouses and the date. To set the rest, open the transfer and click Edit. The Transfer Details card then shows From Warehouse, To Warehouse, Shipping Method, Transfer Date and ETA (the estimated arrival date). Change what you need and click Save.
If you set an ETA, the transfer also needs a Transfer Date, and the ETA can't fall before it.
Start a transfer from Inventory Aging
When a product has sat too long in one warehouse, you can start a transfer for it straight from the Inventory Aging report. On the product's row, click Act and choose Transfer stock.
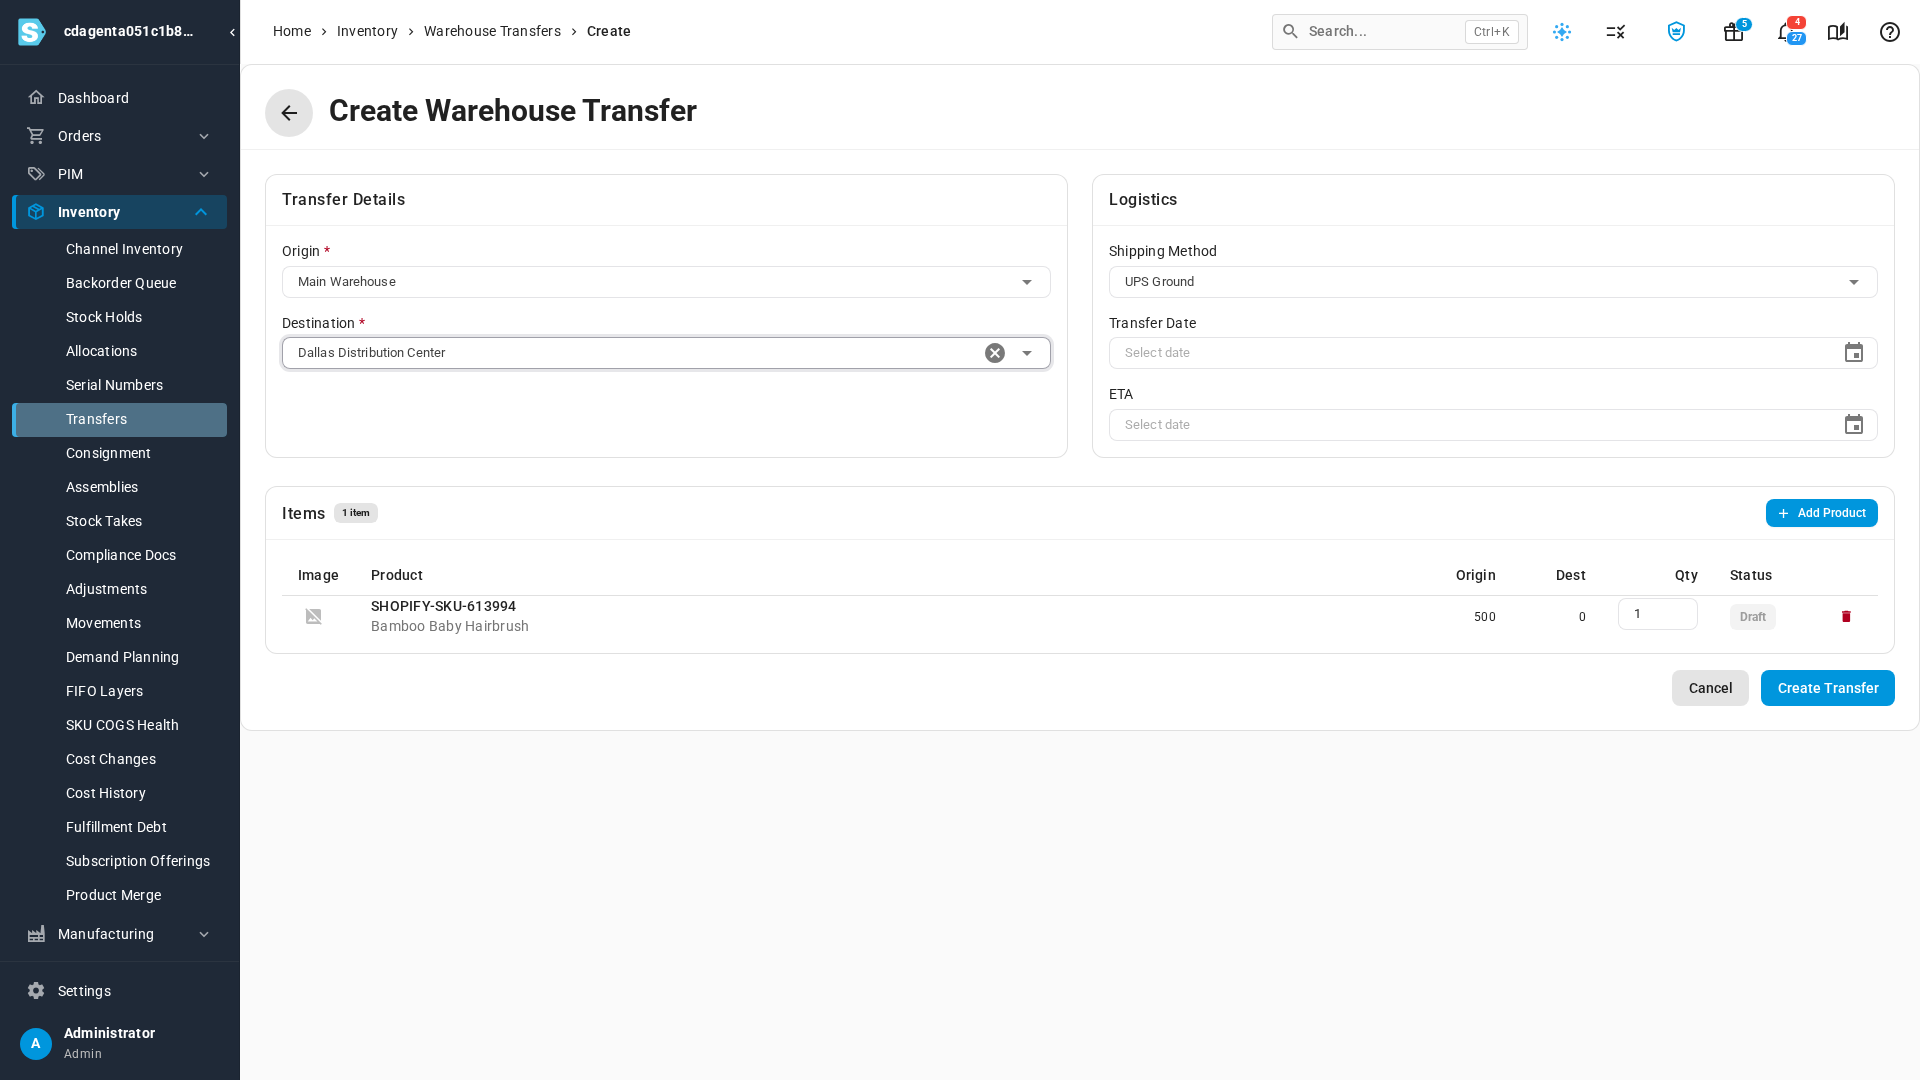
This opens the Create Warehouse Transfer page with the product already under Items, and Shipping Method set to your default. Choose the Origin and Destination: the Origin and Dest columns then show how many units each warehouse has available. This page also has Transfer Date and ETA fields; leave Transfer Date empty and the transfer is dated today. Set the quantity in Qty, add any other products with Add Product, and click Create Transfer. The transfer is created as a draft with those lines. Open it as in step 10 above.
Edit transfer lines
You can add, remove and change lines until those units ship. On the transfer's page:
- Add a line: use the Add item box (or Add Item, which puts the cursor there).
- Change a quantity: click the number in Qty, type the new quantity, and press Enter.
- Remove a line: open the line's ⋮ menu, choose Delete line, and confirm with Remove.
What happens to allocations:
- On a Draft, edits are free. Nothing is allocated yet, so changing lines only changes the plan.
- On an Open transfer, SKU.io adjusts the allocation to match. Raising a line allocates more stock at the origin; lowering it releases the difference back to available. Raising a line beyond what the origin can cover is refused. See Not enough stock at the origin.
Once part of a line has shipped, those units are locked. Lowering the line below the shipped amount is refused with "Cannot reduce transfer line … active quantity below already-shipped quantity." Raising it above the shipped amount is always allowed.
Changing the origin on an open transfer pulls the stock from the new warehouse instead. You can't change either warehouse once any line has been received: SKU.io refuses with "Cannot change warehouse of warehouse transfers with receipts." Receiving is covered in Receive a transfer.
Import transfer lines
Instead of adding products one by one, you can import a list into a Draft transfer.
- On the transfer's page, click Import above the lines. The Import Warehouse Transfer Lines dialog opens.
- For a correctly formatted starting file, click Download Template.
- Drop your file into the dialog, click Choose File, or paste the rows into the box. CSV, TSV and Excel files are accepted.
- Click Next: Map Columns, and check that your columns map to SKU and Quantity. Both are required.
- Click Next: Validate, review the results, then click Import.
| Column | Required | Format | Notes |
|---|---|---|---|
| SKU | Yes | Text | Must match a product's SKU. Case doesn't matter. |
| Quantity | Yes | Whole number, 1 or more | The quantity to move. |
How the rows are handled:
- A SKU that's already on the transfer updates that line's quantity to the imported quantity. It isn't added on top.
- The same SKU on several rows combines into one line with the total quantity.
- Rows with an error are skipped and listed, and the other rows still import. Errors include an unknown SKU ("Product with SKU '…' not found."), a missing quantity, and a quantity that isn't a whole number above zero.
On an open or closed transfer, Import is unavailable. Its tooltip reads "Import works on Draft transfers only. To change lines on an open transfer, edit them in the table." Editing lines in the table keeps the allocation at the origin in step. To import into an open transfer that nothing has been received on, click Revert to Draft, import, and open it again.
Duplicate a transfer
Duplicating is the fastest way to repeat a regular move, such as a weekly top-up from a central warehouse to a store.
- Open the transfer you want to repeat.
- Click Actions, then choose Duplicate.
What you'll see: a new Draft opens with the same origin, destination, shipping method and product lines. It gets its own transfer number and today's date, and holds no stock until you open it.
Open a transfer
Step 10 above opens the transfer. A few rules apply:
- A transfer needs at least one line to open. Until it has one, Open Transfer looks disabled and its tooltip reads "Add at least one line item before opening the transfer."
- Every line is allocated in full, or the open is refused. A transfer is an operational commitment, not customer demand, so unlike a sales order it has no backorder. See How allocations work.
- The allocated units move from Available to Allocated in the origin's stock states. On Hand doesn't change until you ship.
To make an open transfer fully editable again, click Revert to Draft. It's available while the transfer is open and nothing has been received, and it releases the line allocations.
Guards you may hit
Not enough stock at the origin
When you open a transfer, or raise a line on an open one, the origin's available stock must cover each line in full. If any line asks for more, the whole open is refused, naming the product that fell short: "Not enough quantity of product (SKU)."
Only available stock counts. Units already Allocated, On Hold or Non-Sellable at the origin can't be pulled into a transfer. To go ahead, lower the line to what's available, free up stock (for example by releasing an allocation or a stock hold), or wait for a restock and open the draft later.
Transfers created automatically for an Amazon FBA or AWD inbound can go ahead past a shortage, because the goods have already left the warehouse. SKU.io records a note on the transfer instead of refusing. Transfers you create yourself always get the hard stop above.
Destination must differ from origin
A transfer can't move stock to the warehouse it came from, so the Destination list leaves out the origin. To move stock between bins within one warehouse, use a location transfer instead.
Amazon FBA isn't in the warehouse lists
The Origin and Destination lists don't include Amazon FBA warehouses. Stock goes to FBA through an inbound plan and comes back through a removal order.
Next steps
- Ship a transfer: move the allocated stock into transit.
- Receive a transfer: book the stock in at the destination.
- Close a transfer, add costs & post accounting: finish and cost the move.
- How warehouse transfers work: the draft, open, ship, receive and close lifecycle.
- Transfer statuses, fields & list: every status and field, and the list's columns.
Video transcript
A warehouse transfer moves stock from one of your warehouses to another. Open Inventory in the sidebar, then click Transfers, about halfway down the list. Then click Create, at the top right corner of the page. A small dialog opens, asking for two warehouses. Under Origin, start typing the warehouse the stock ships from, then pick it from the list. Under Destination, do the same for the location the shipment is headed to, and select that location. The list never offers the origin, because stock can't move to where it already sits. Transfer Date starts on today, so change it if the goods leave another day. Then click Create Draft, and the draft opens on its own page. The draft opens with its own number, shown at the top. The shipping method is already set to your default for transfers. Its status is Draft, so it holds no stock yet, and you can change it freely. Now add the products to move. In the Add item box, type part of a name or SKU. Pick the right match from the list, and it's added with one unit. To change that, click the quantity shown on its line. Type the number to move, then press Enter. The Stock column shows how many units are available at the origin warehouse. When the lines are right, click Open Transfer at the top, then open the Allocations tab. Each line's units are now Allocated at the origin, so no other order can take that stock. Nothing ships yet, so the shipment stays Unshipped, and on-hand counts don't change. Revert to Draft makes it editable again, until anything is received. Otherwise, it's ready to ship whenever the goods leave.