Recover money Amazon owes you
Amazon loses and damages FBA stock, refunds orders that never come back, receives less than you shipped, and sometimes charges the wrong fee. It pays for some of that on its own, but much of it has to be claimed, one case at a time, before a deadline. Recovery reads your Amazon data, lists every claim with the case text already written, walks you through filing each one in Seller Central, and matches Amazon's payment to the case when it arrives. You keep everything you recover.
In the video:
- 0:02 Open Recovery
- 0:21 Read the Recovery home
- 0:44 Start a filing session
- 1:03 Check the case text
- 1:29 File it in three steps
- 1:52 Paste the case ID and save
- 2:18 Work from the full list
- 2:36 Assign cases to your team
- 2:55 When Amazon pays part of a claim
- 3:17 Check Amazon's payments
- 3:35 Tune Recovery settings
Before you begin
- Your Amazon channel is connected to SKU.io and you use FBA. Recovery reads the inventory ledger, inbound shipments, returns, removals, reimbursements, and fees that SKU.io already syncs.
- You have access to Seller Central for the same account. SKU.io prepares each case, but you file it with Amazon yourself.
- For case text tailored to each claim, connect an AI key under Settings → AI Assistant. Without one, Recovery writes each case from a fixed template instead, and filing works the same way.
Open Recovery
- In the sidebar, open Apps & Integrations.
- Choose your Amazon channel.
- Click FBA at the top of the page.
- Click Recovery in the row of FBA tabs.
Recovery scans your Amazon data in the background and lists what it finds here. To check again at any time, click Re-scan; the scan's progress shows in the job tray.
Read the Recovery home
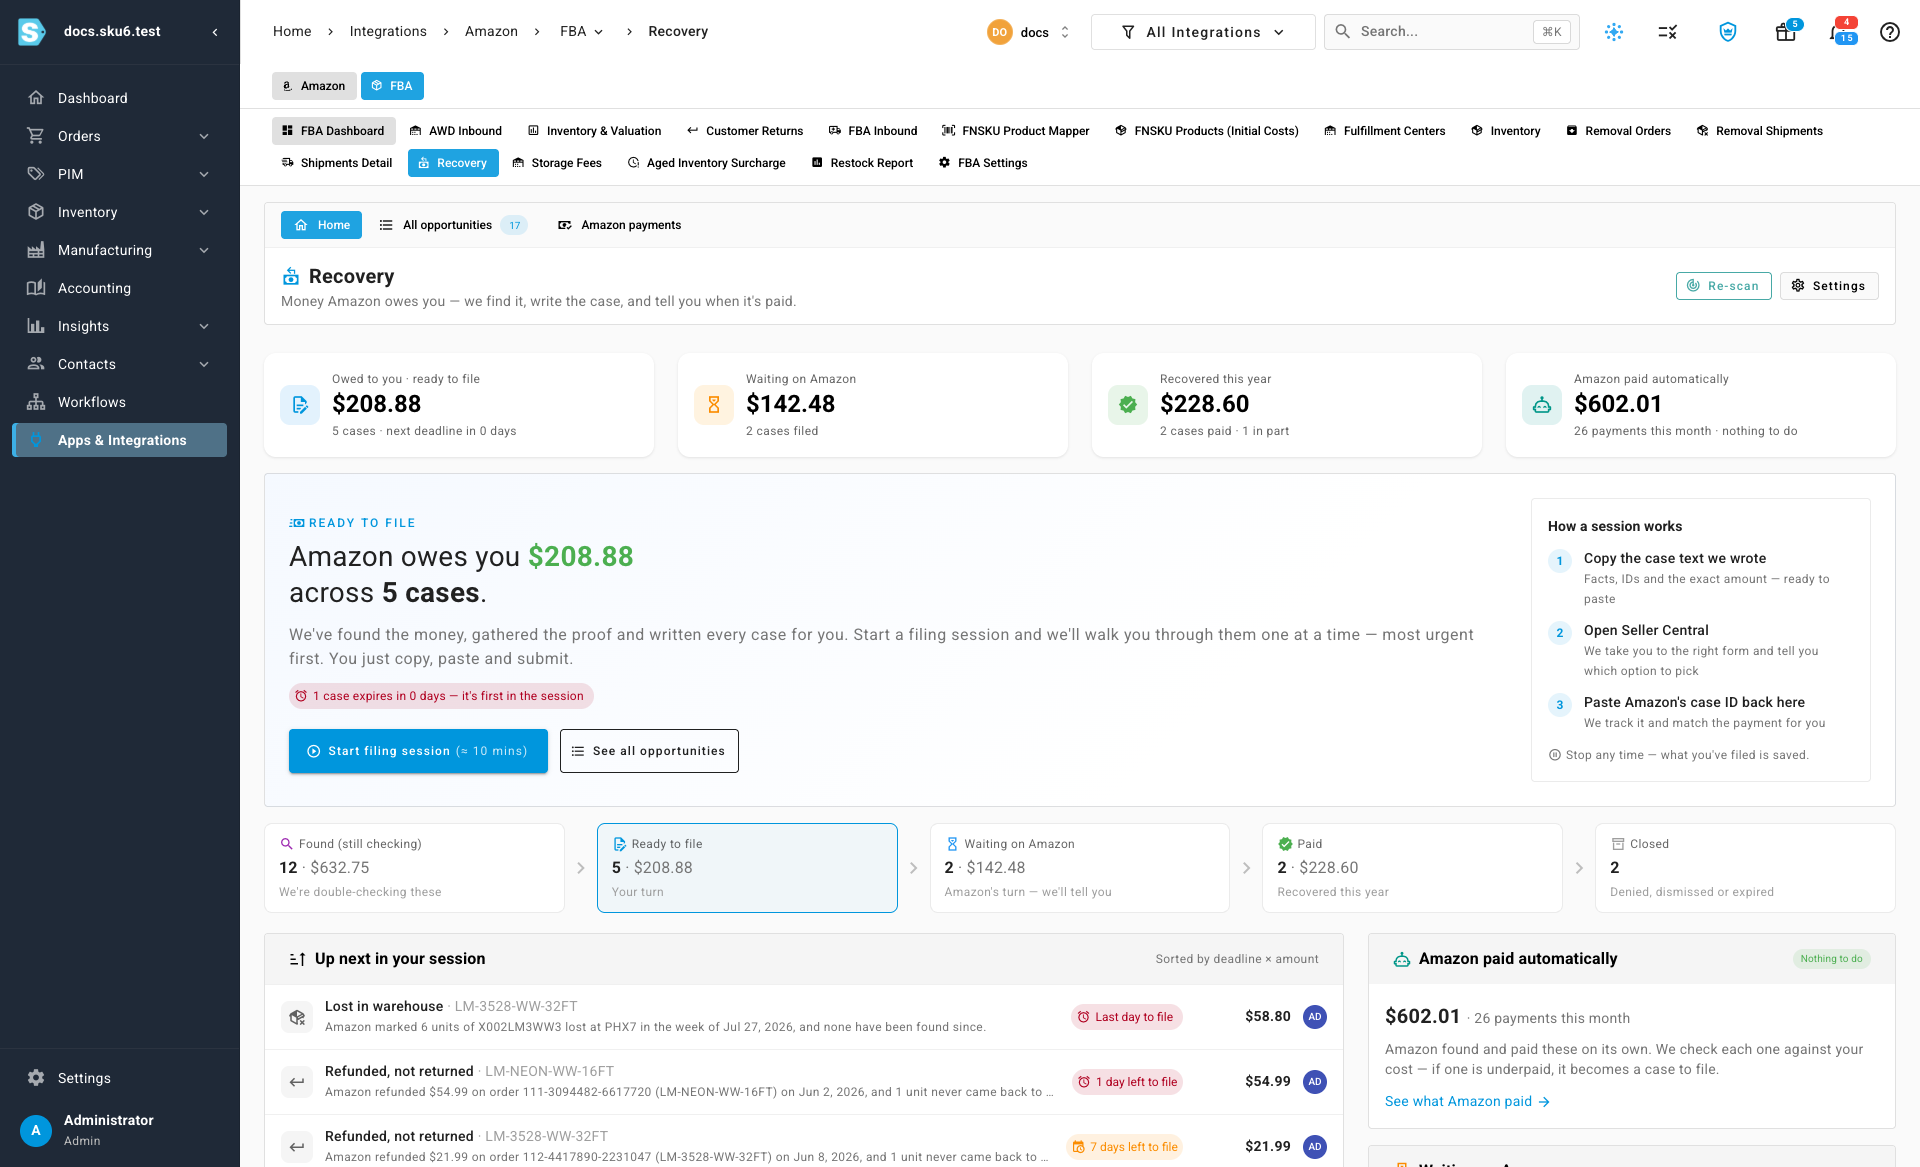
The home page answers three questions: how much you're owed, where your claims stand, and what to do next.
| Tile | What it counts |
|---|---|
| Owed to you | Cases that are ready to file, with the number of cases and the nearest deadline. |
| Waiting on Amazon | Cases you've filed that Amazon hasn't paid yet. |
| Recovered this year | What Amazon has paid against cases you filed this year, including cases it paid in part. |
| Amazon paid automatically | Payments Amazon made on its own this month. There's nothing for you to do. |
Below the ready-to-file card, a strip follows every case through its stages:
| Stage | Meaning |
|---|---|
| Found (still checking) | SKU.io isn't fully sure about the claim yet. Check the evidence before filing. |
| Ready to file | Your turn: the claim is solid and the case text is written. |
| Waiting on Amazon | You've filed the case. SKU.io watches for Amazon's payment. |
| Paid | Amazon paid the case, in full or in part. |
| Closed | The case was denied, dismissed, or its deadline passed. |
Every case shows how long you have left to file it. The deadline chip turns amber when fewer than 14 days are left and red under 7 days. Amazon's windows differ by type of claim, so the most urgent cases are always listed first.
File your cases in a filing session
A filing session takes you through every case that's ready to file, most urgent first.
-
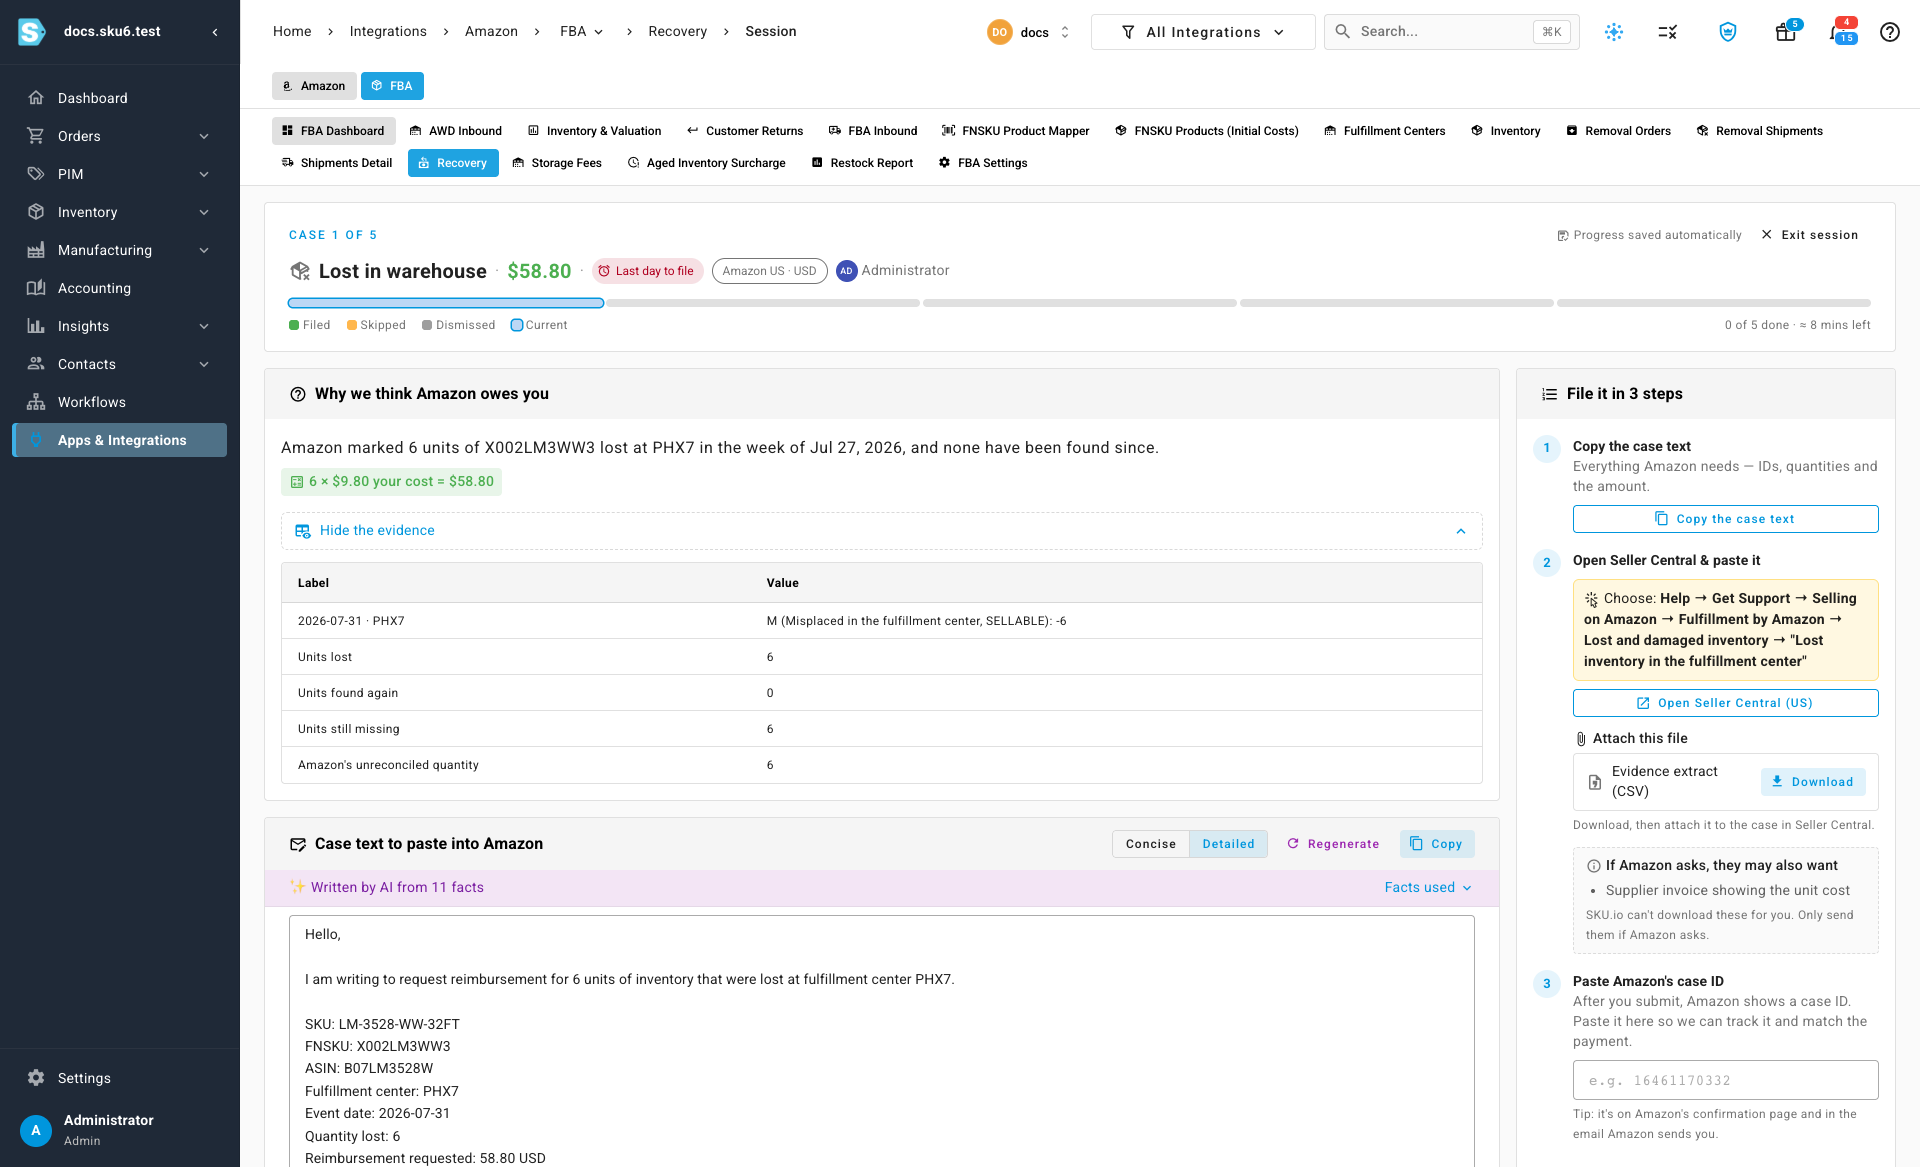
On the Recovery home, click Start filing session. The header shows which case you're on (for example Case 1 of 5), what went wrong, the amount, and the days left to file.
-
Read Why we think Amazon owes you. It explains the claim in one sentence and shows the math, such as the number of units times your cost. Click Show the evidence to see the numbers behind it.
-
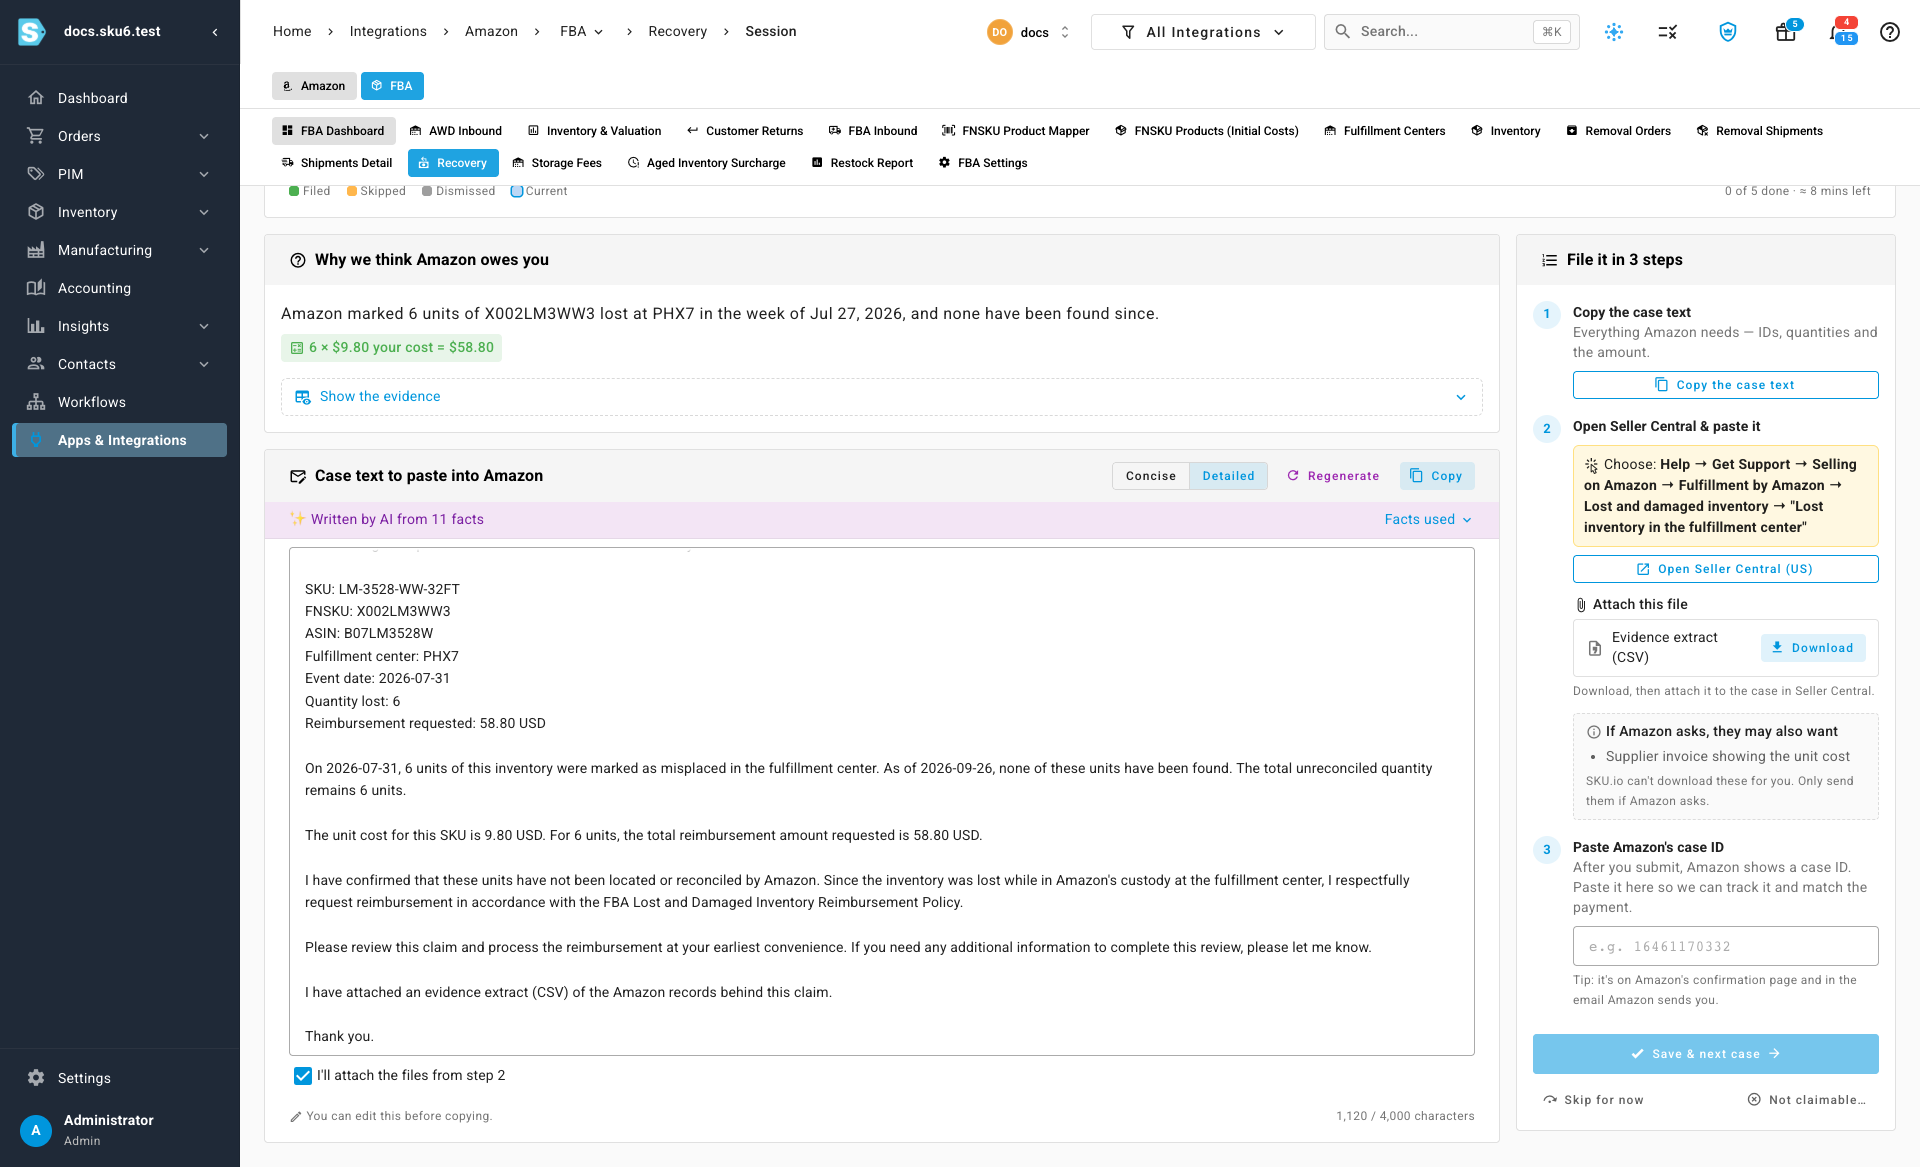
Check the case text under Case text to paste into Amazon. Written by AI from N facts means it was drafted only from the facts listed under Facts used. The Detailed version is shown first. It walks Amazon's agent through the evidence, so they can check the claim without asking you for more. Switch to Concise for a shorter text, or click Regenerate for a fresh draft. You can edit the text; your changes are saved as you type, and automatic updates never overwrite them.
The text ends by offering Amazon the files SKU.io prepares for the case, for example "I can provide an evidence extract (CSV) of the Amazon records behind this claim if needed." If you'll attach those files, tick I'll attach the files from step 2 under the text, and the sentence changes to "I have attached …". SKU.io remembers your choice for the next case.
-
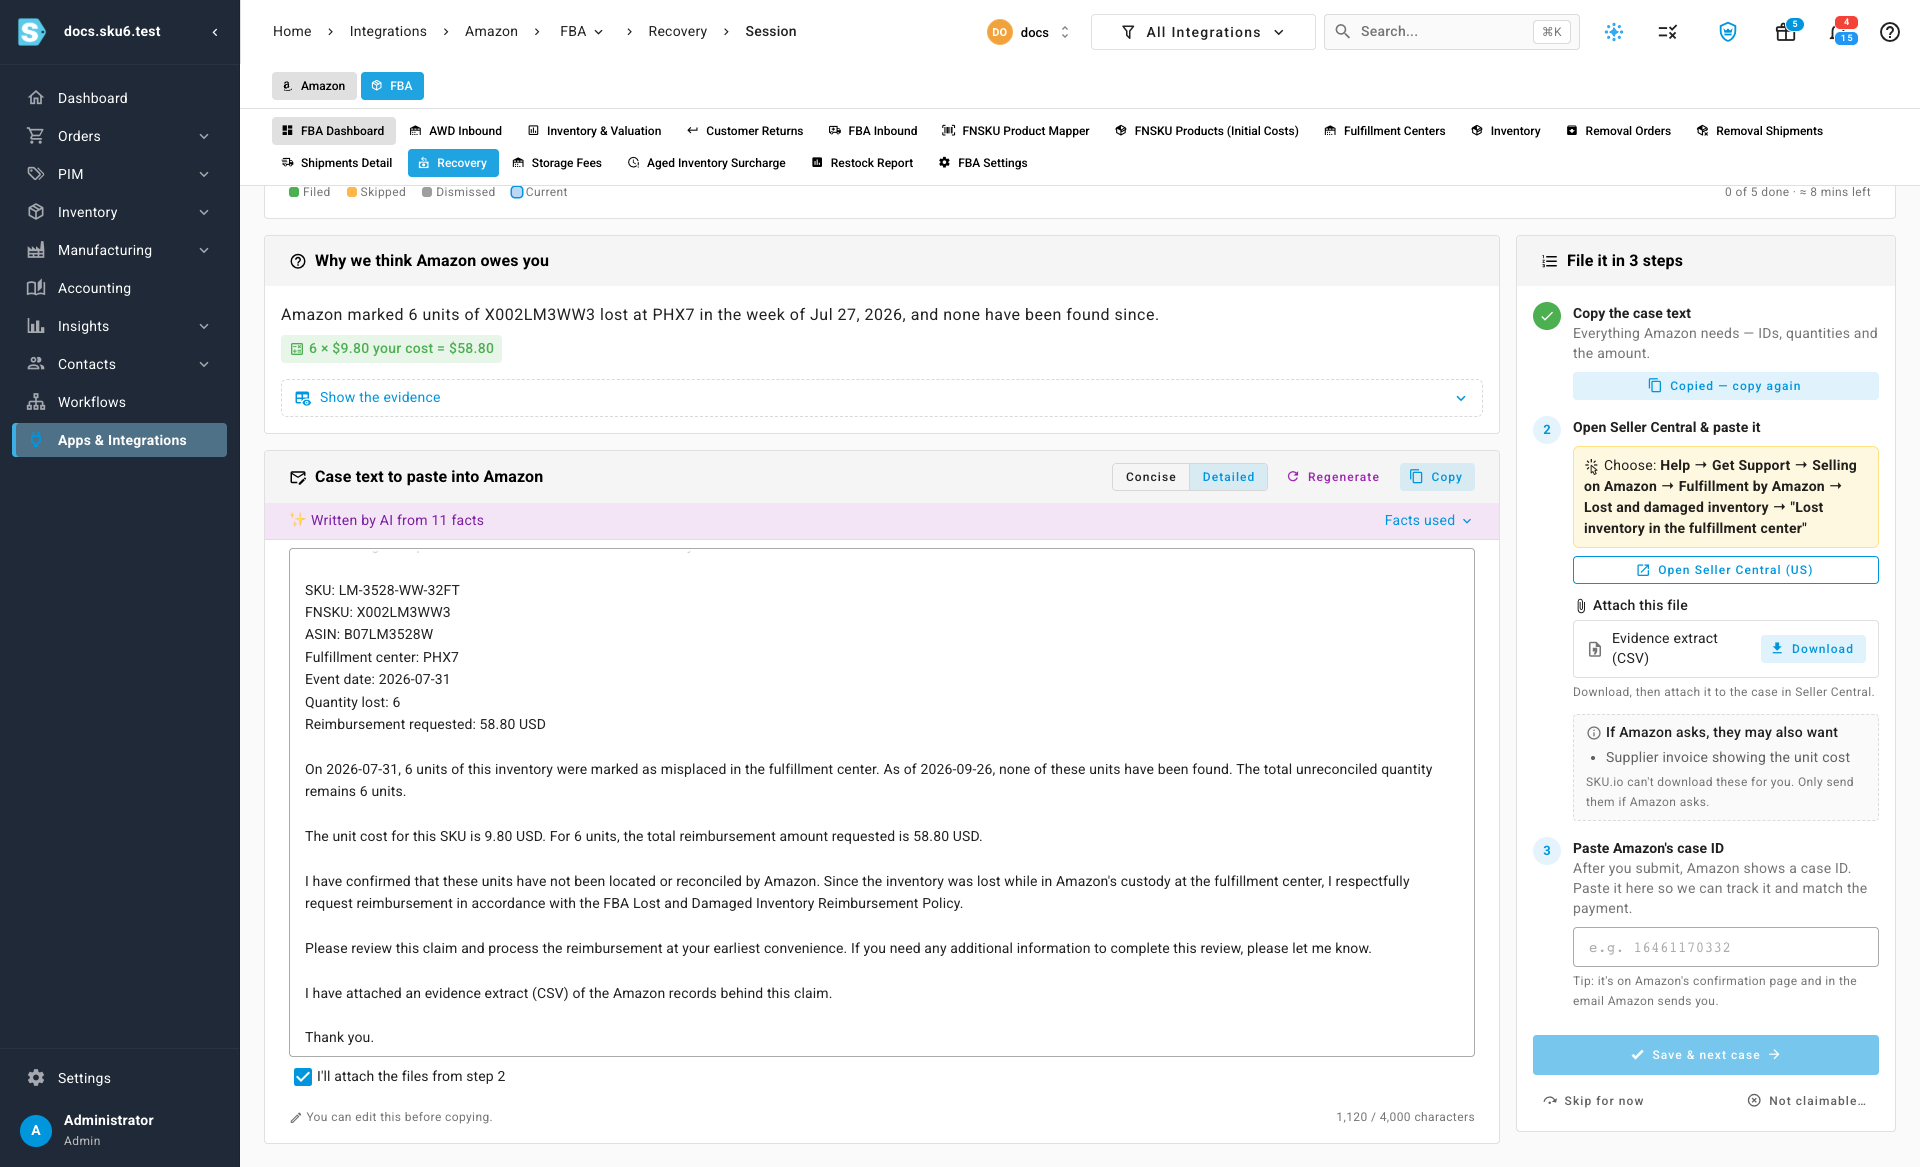
Under File it in 3 steps, click Copy the case text.
-
Click Open Seller Central. The yellow box tells you exactly which menu options to choose to reach the right form. Paste the case text there.
-
Under Attach this file (or Attach these files), click Download next to each file and attach it to your case in Seller Central. The evidence extract is a CSV written for Amazon's agent: the claim with Amazon's own IDs, the evidence behind it, and the matching rows from the Amazon reports SKU.io keeps for you, such as the FBA Customer Returns report and the Settlement report for the order, or the Inventory Ledger for the unit. Where your cost matters to the claim, your latest purchase order for the product is offered as a PDF too.
If Amazon asks, they may also want lists paperwork that comes from your own records, such as a supplier invoice, a packing list or a carrier's proof of delivery. You only need to send those if Amazon asks.
-
Submit the case in Seller Central. Amazon shows a case ID on its confirmation page and in the email it sends you.
-
Back in SKU.io, paste the ID under Paste Amazon's case ID. Amazon case IDs are a long number, usually 10 or 11 digits; a partial ID is flagged and can't be saved.
-
Click Save & next case. The case moves to Waiting on Amazon, and the next case opens.
On any case you can also:
- Click Skip for now to leave it in your queue and move on.
- Click Not claimable to dismiss it. Choose a reason, such as Already filed outside SKU.io, Amazon already reimbursed this, Units were found or returned, Our data is wrong, or Too small to pursue. Dismissed cases move to Closed.
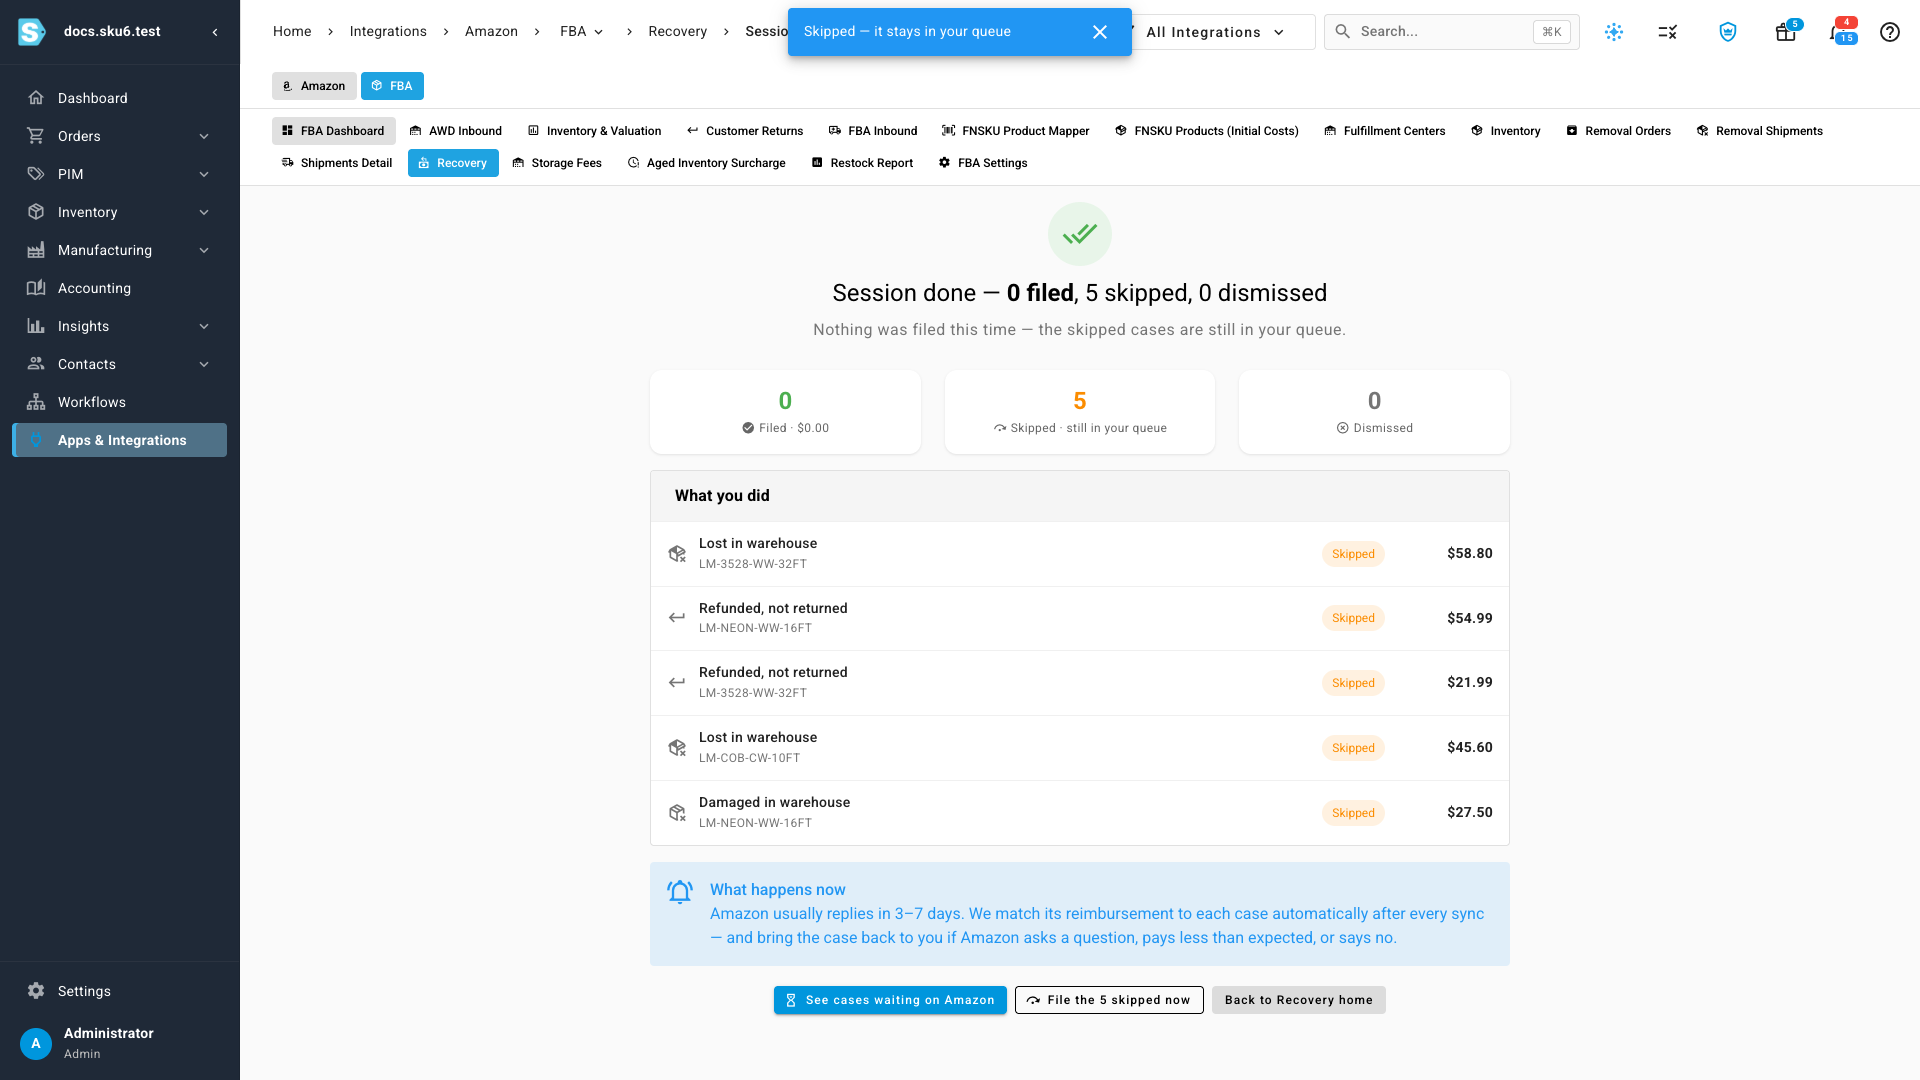
Progress is saved as you go, so you can click Exit session at any time. When you reach the end, a summary shows how many cases you filed, skipped, and dismissed, and how much is now waiting on Amazon. Click File the … skipped now to go back through the ones you skipped.
Check a case before it's ready
Cases in Found carry a One quick check before it's ready card. Look over the evidence; if the claim is right, click Looks right — move to Ready to file and it joins your next filing session. If it isn't, click Not claimable and give a reason.
Work from the full list
Click All opportunities to see every case in one list, sorted by deadline and amount, with the selected case's details in a pane beside it. That pane has the same case text and filing steps as the session.
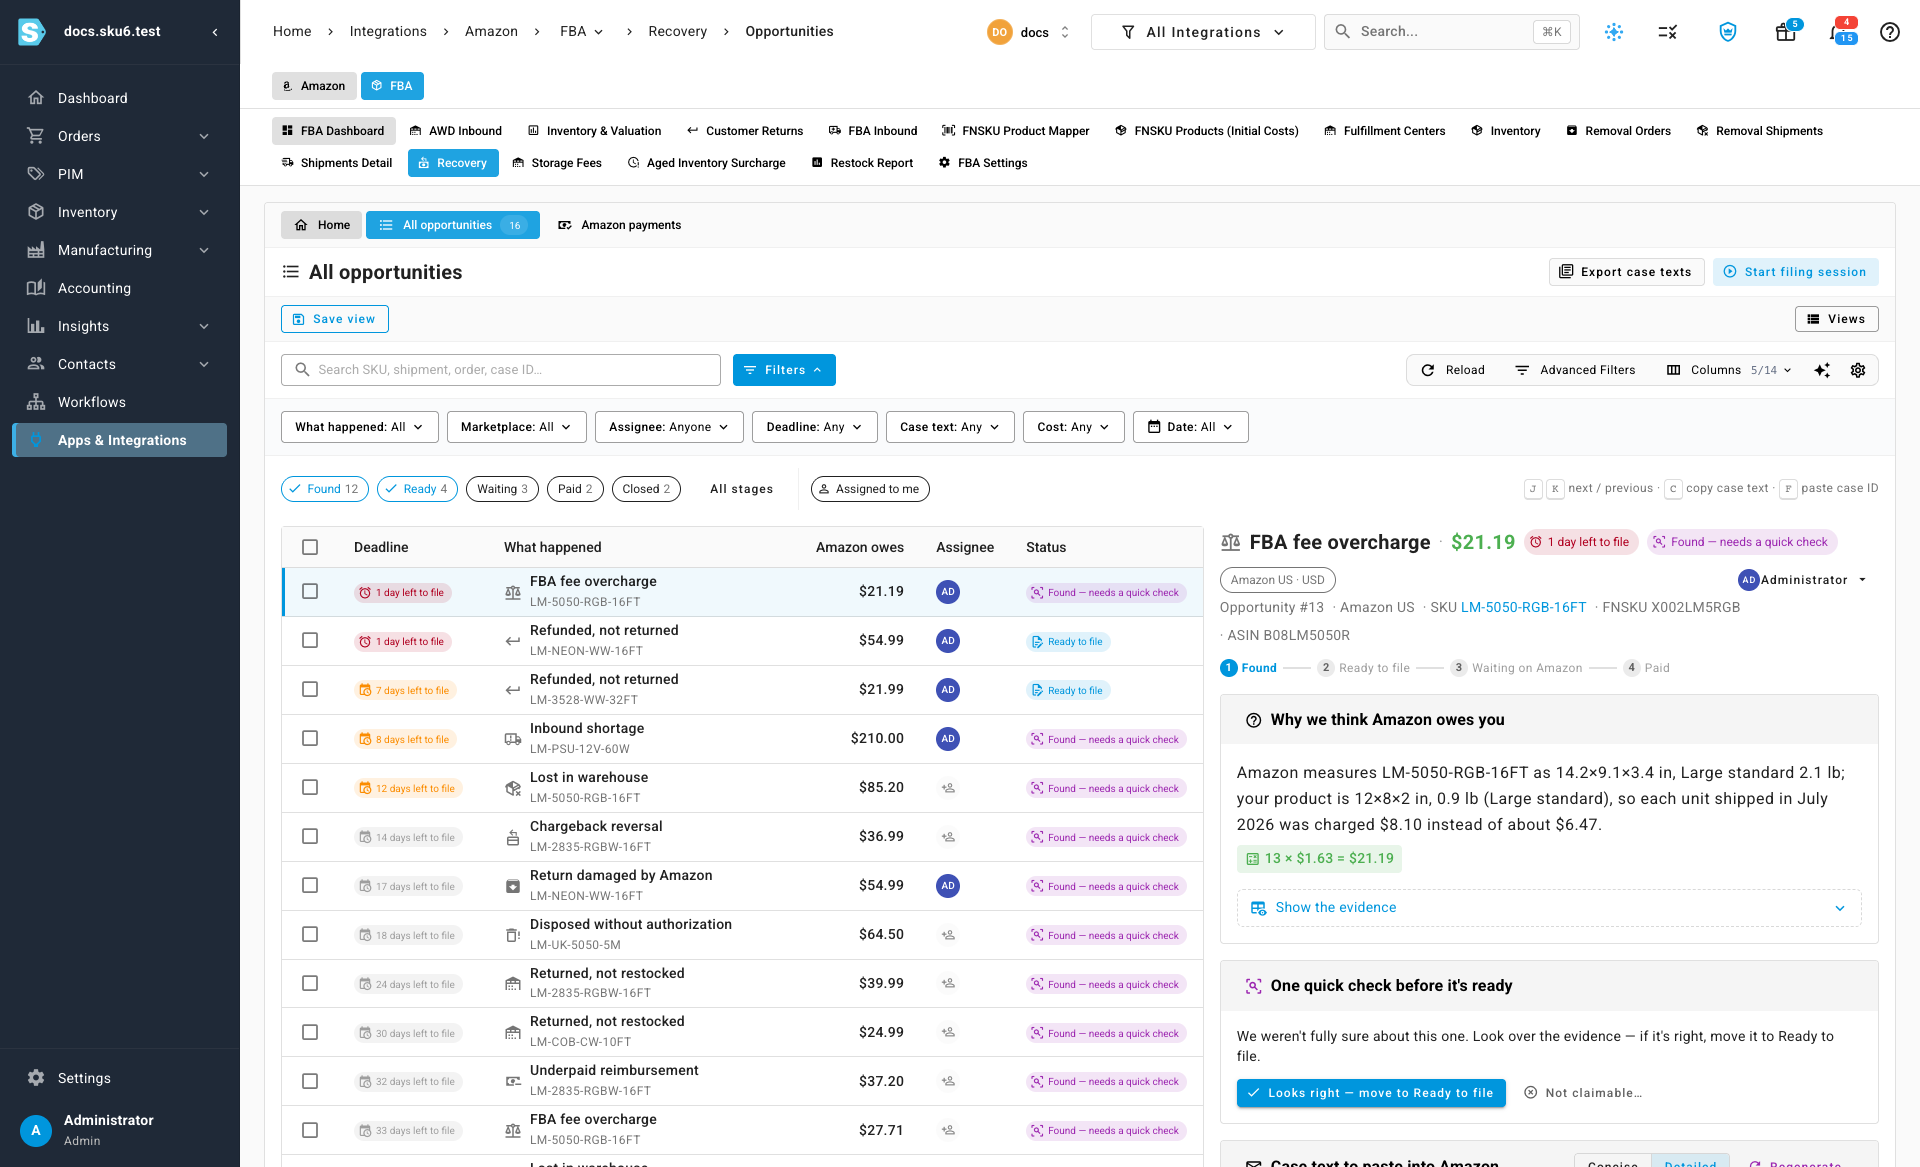
- Turn the stage chips above the list (Found, Ready, Waiting, Paid, Closed) on and off to choose which cases you see, or click Assigned to me.
- Use the filters for what happened, marketplace, assignee, deadline, case text, cost, and date.
- Use the keyboard: J and K move to the next and previous case, C copies the case text, and F jumps to the case ID box.
To work on several cases at once, tick them in the list. The bar above the list shows how many you selected and their total, with these actions:
| Action | What it does |
|---|---|
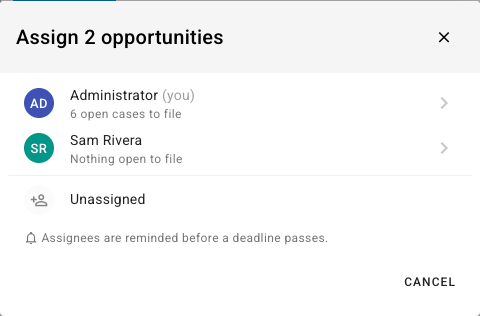
| Assign… | Opens a list of your team, with each person's open cases to file. Choose someone, or Unassigned. Assignees are reminded before a deadline passes. |
| Export case texts | Shows the case text for every selected case, ready to Copy all or Download .txt. |
| Dismiss… | Dismisses the selected cases. A reason is required. |
| File N selected in a session | Starts a filing session with just the selected cases. |
Follow a case after you file it
Once a case is Waiting on Amazon, there's nothing to do until Amazon answers. SKU.io matches each reimbursement Amazon pays to its case after every sync. Open a case from the list to see its timeline. If Amazon writes back, click Record Amazon's answer and choose They asked for more information, They denied it, or They said they paid. View case in Seller Central opens the case on Amazon's side.
What happens next depends on the answer:
-
Paid: the case shows the reimbursement that paid it, with its amount and date.
-
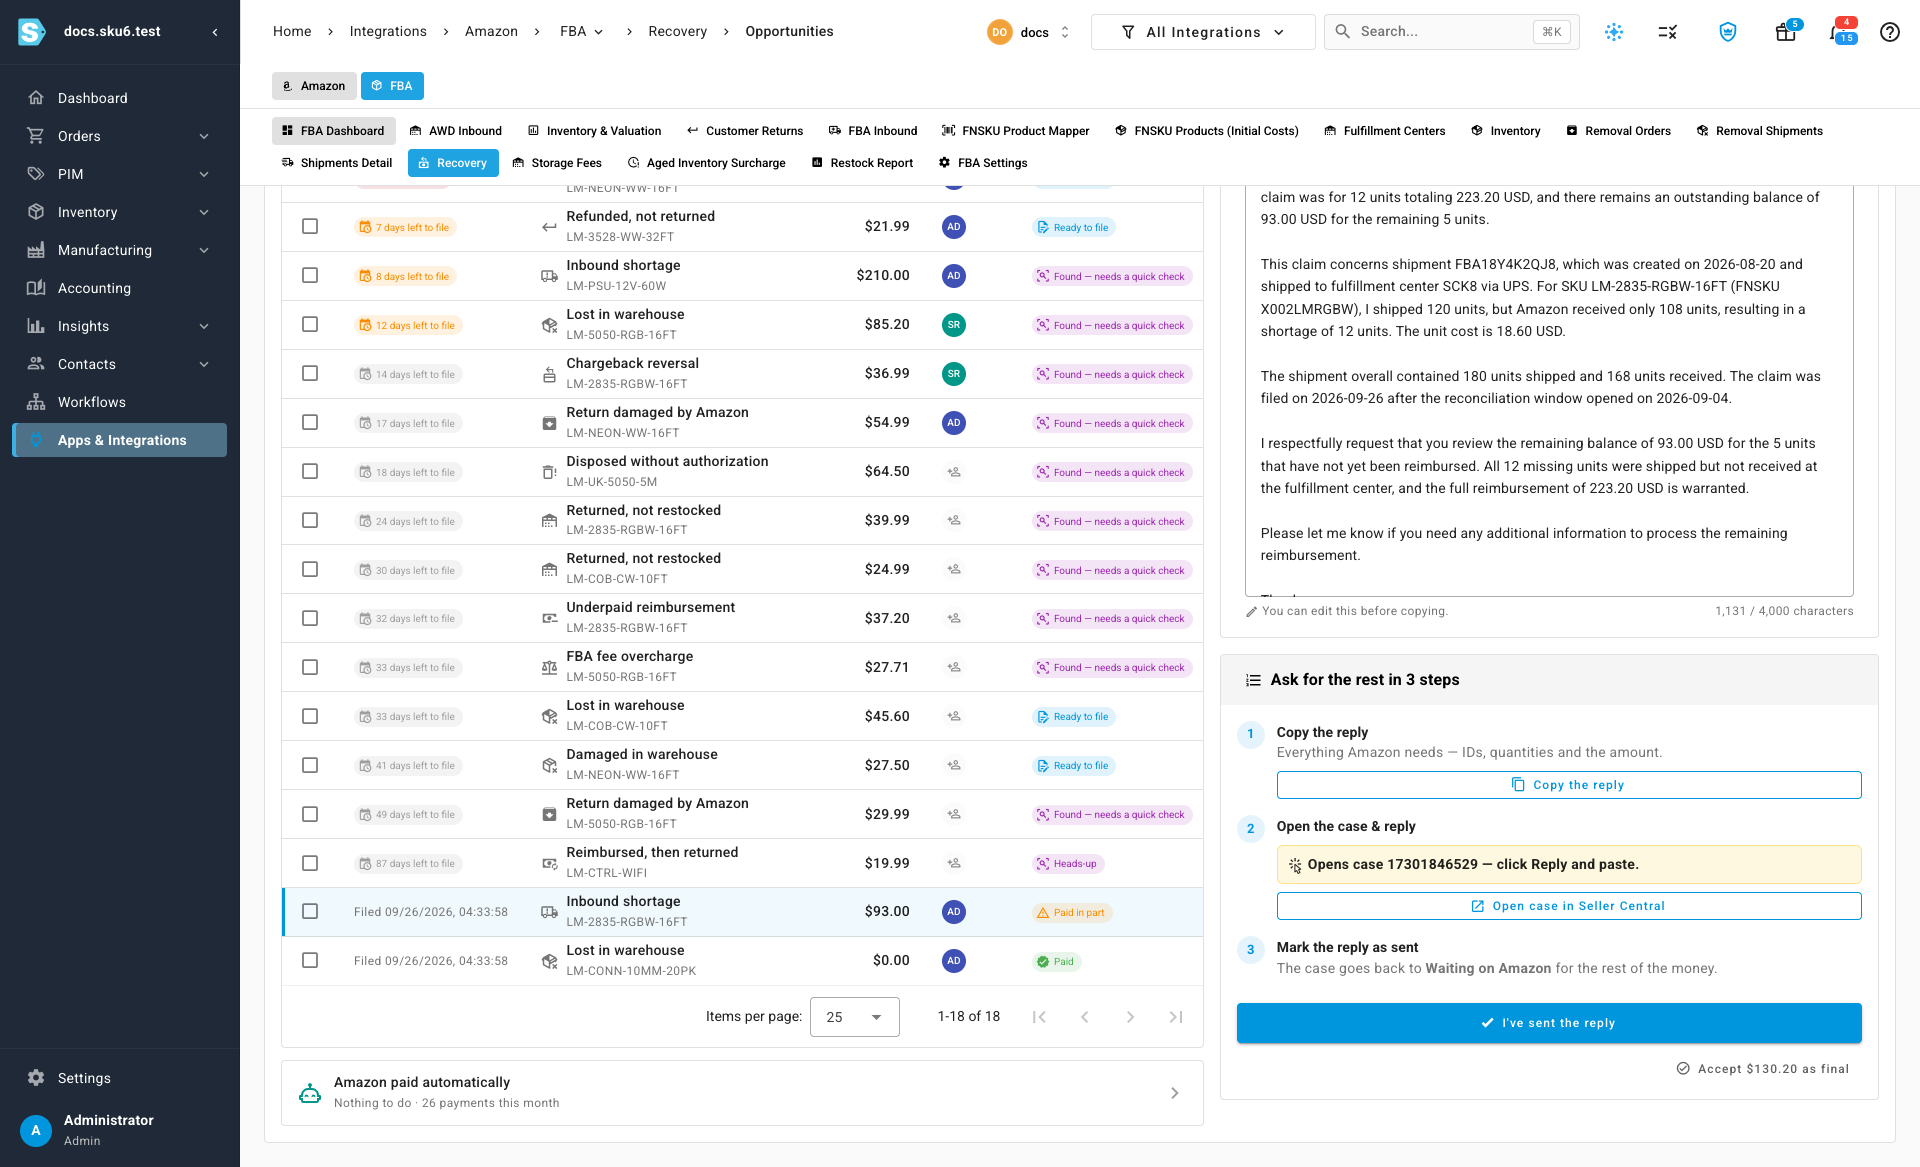
Paid in part: the case shows how much Amazon paid and how much is still owed, and a reply asking for the rest is already written under Reply to paste into the case. Copy it, click Open case in Seller Central, click Reply on the case, and paste. Then click I've sent the reply to move the case back to Waiting on Amazon. If you'd rather keep what Amazon paid, click Accept … as final.
-
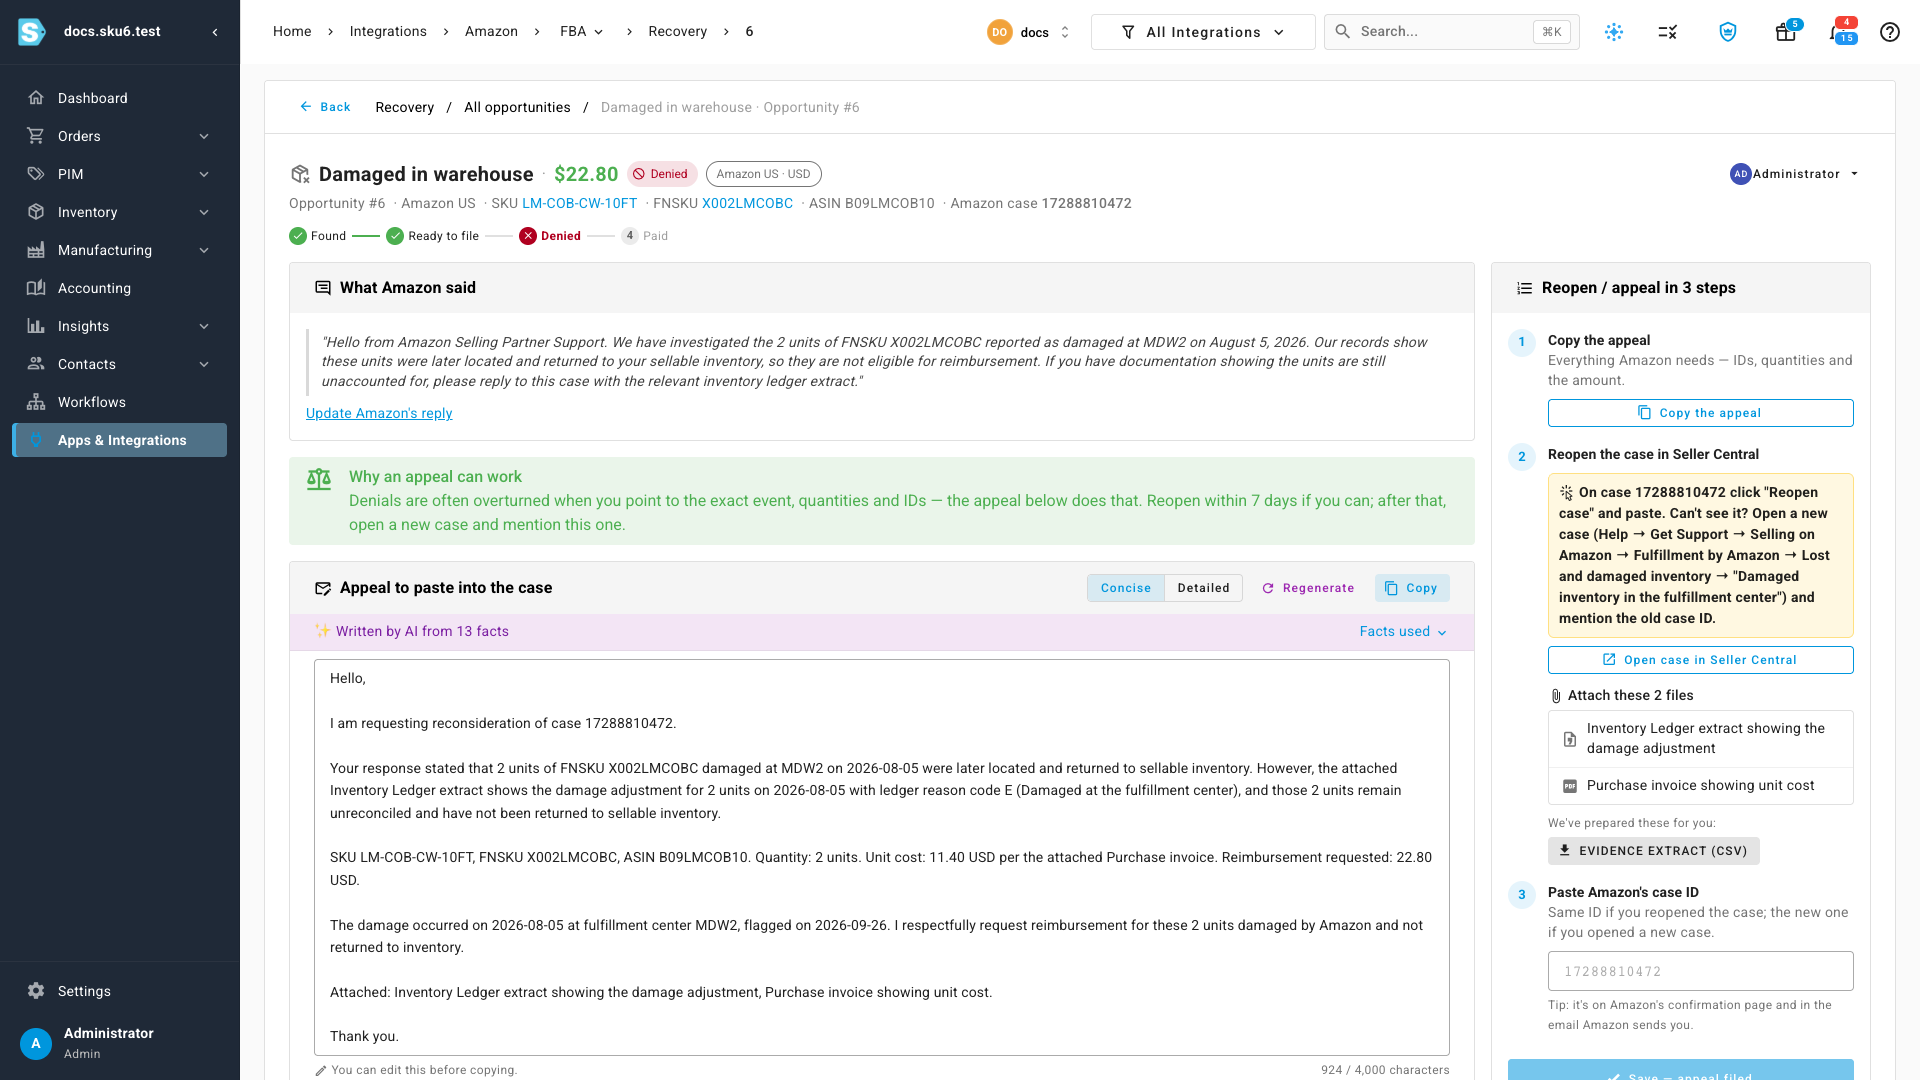
Denied: the case shows what Amazon said and an appeal written to answer it, under Appeal to paste into the case. Follow Reopen / appeal in 3 steps: copy the appeal, reopen the case in Seller Central (or open a new one that mentions the old case ID), and save the case ID.
-
Heads-up — nothing to file: some cases are warnings rather than claims. For example, when Amazon reimbursed you for a return that later arrived, it's likely to take that payment back. Click Got it — dismiss once you've noted it.
Check Amazon's payments
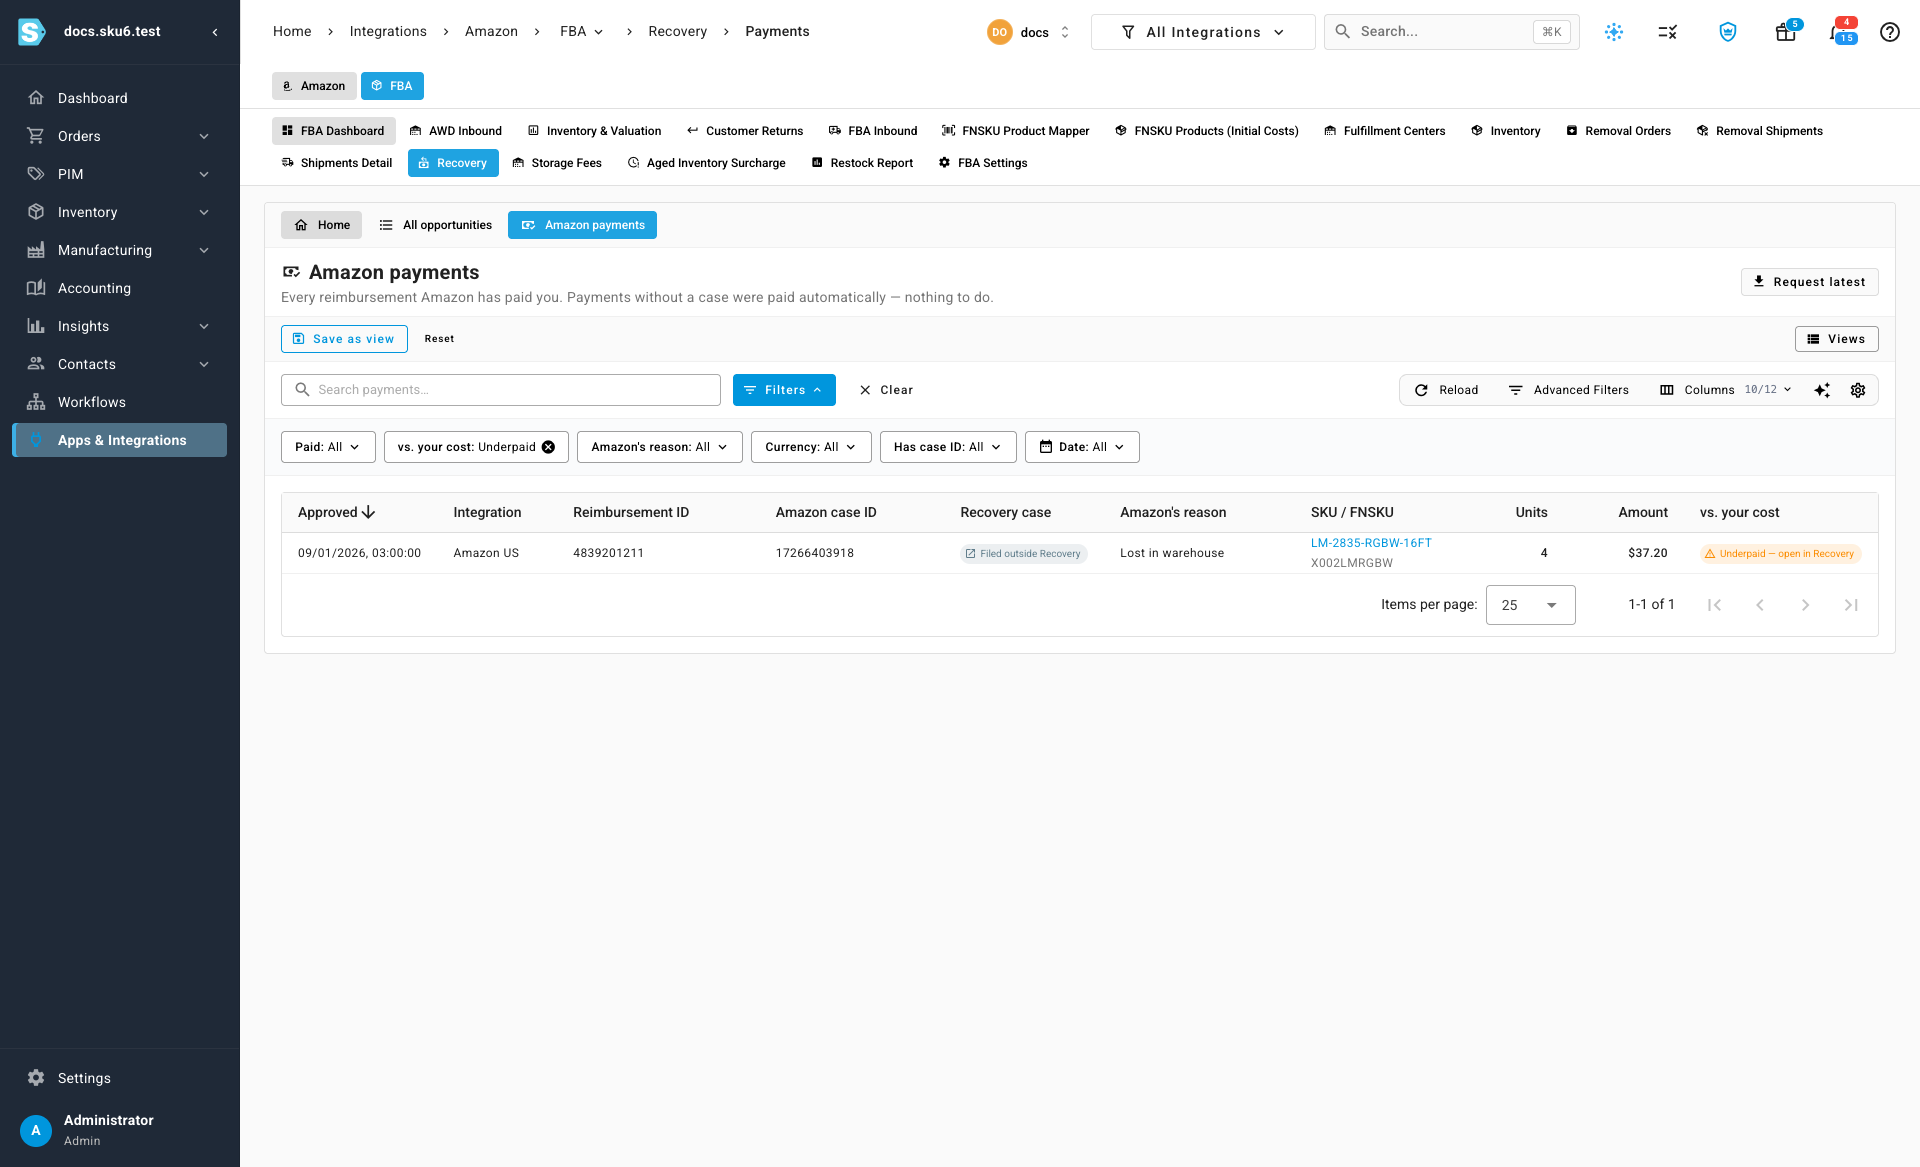
Click Amazon payments to see every reimbursement Amazon has paid you, newest first. The Recovery case column shows where each payment came from:
| Chip | Meaning |
|---|---|
| Case and a number | The payment matched a case you filed through Recovery. Click it to open the case. |
| Automatic | Amazon paid on its own, without a case. Nothing to do. |
| Filed outside Recovery | The payment carries an Amazon case ID, but the case was opened directly in Seller Central. |
| Taken back | Amazon reversed an earlier payment. |
To find payments below your cost, open the vs. your cost filter and choose Underpaid. Each flagged payment shows Underpaid — open in Recovery, which opens the case asking Amazon for the difference. Click Request latest to fetch Amazon's newest reimbursement report.
Tune Recovery settings
On the Recovery home, click Settings. Settings apply to one Amazon account at a time; if you have more than one, choose it under Amazon account first.
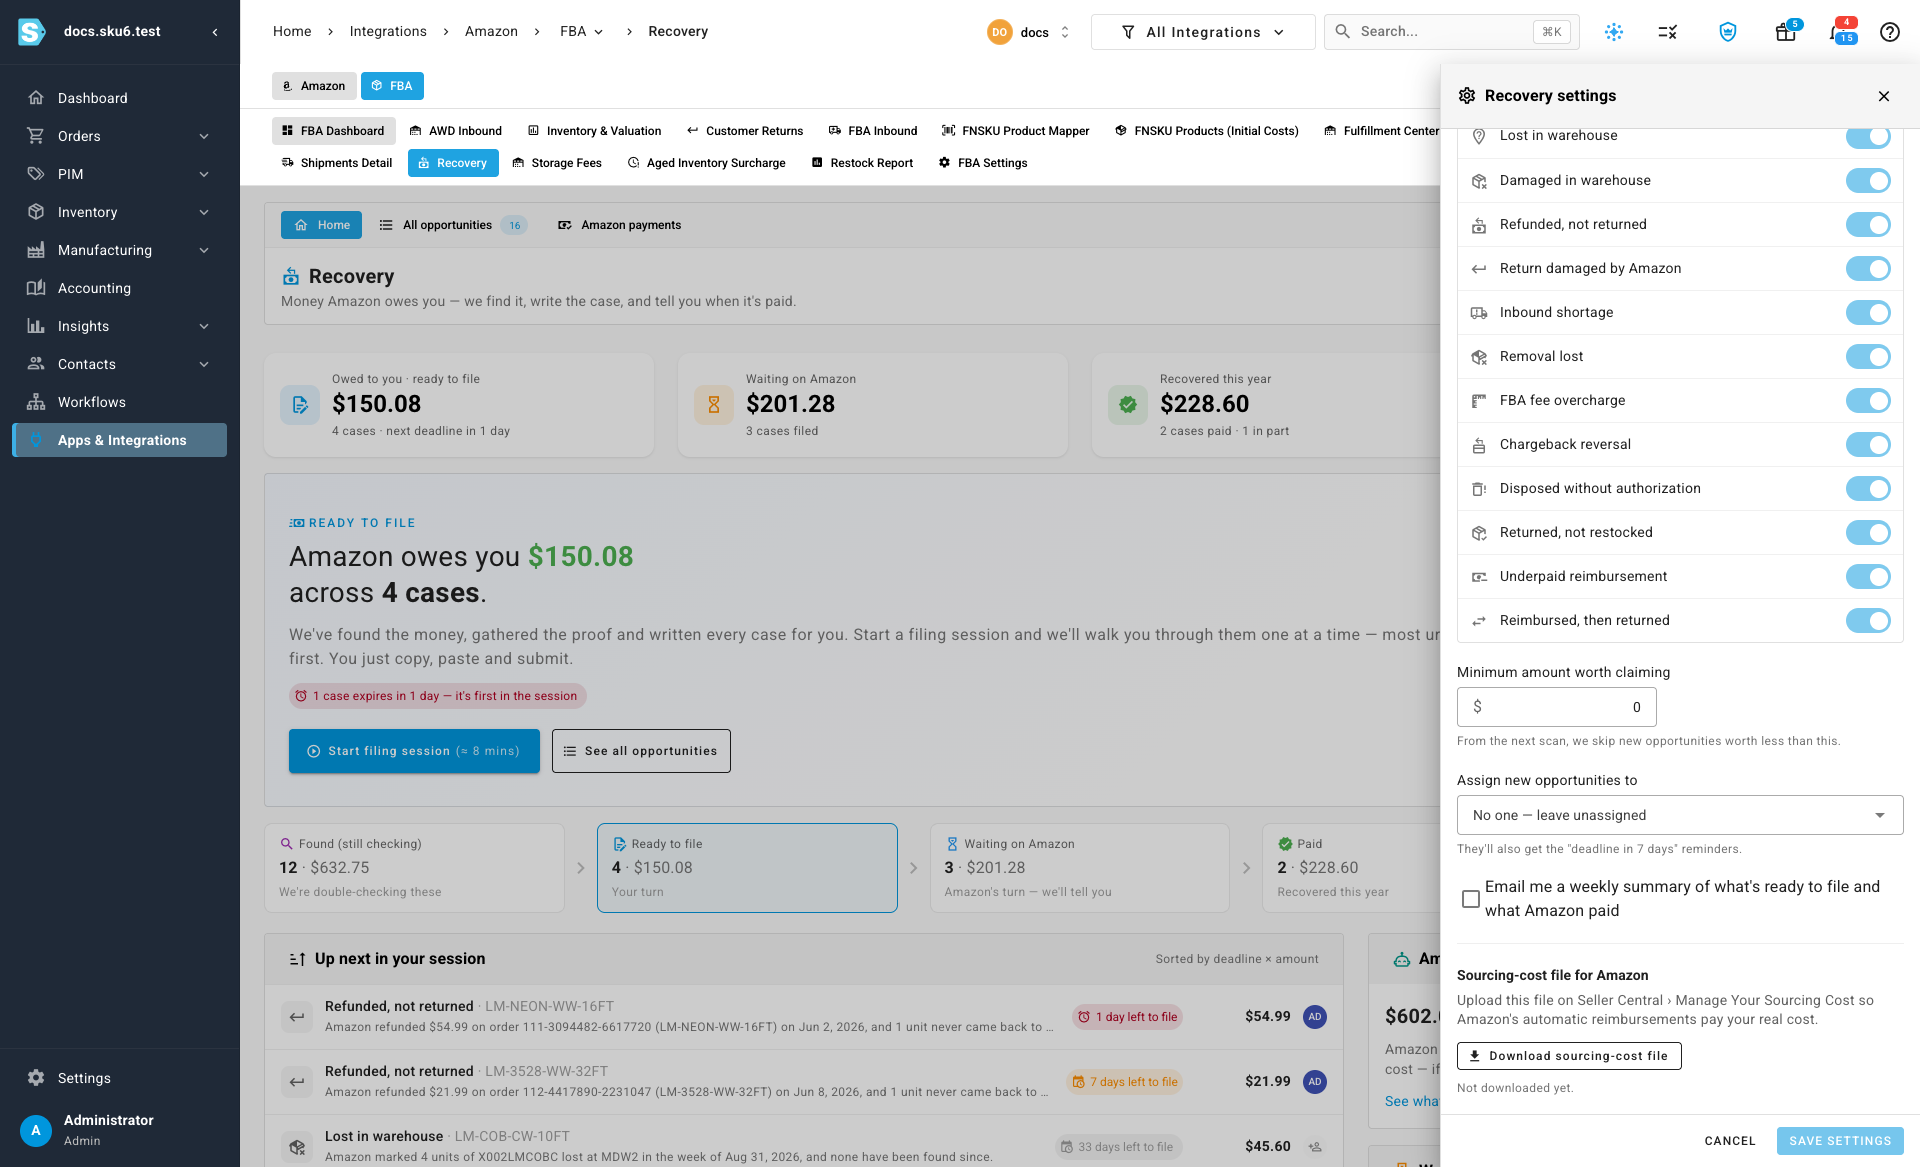
| Setting | What it does |
|---|---|
| AI case text | Shows whether case text is written by AI, and which provider. When it's off, click Connect a key. |
| What to look for | One switch per type of claim. Turn off anything that doesn't apply to how you use FBA. |
| Minimum amount worth claiming | New opportunities worth less than this are skipped. |
| Assign new opportunities to | The teammate who gets each new opportunity. They also get the reminder when a deadline is 7 days away. |
| Email me a weekly summary | A weekly email of what's ready to file and what Amazon paid. |
Click Save settings. Changes to what to look for and the minimum amount apply from the next scan; opportunities already in the list stay.
The types of claim you can switch on and off:
| Type | What Recovery looks for |
|---|---|
| Lost in warehouse | Units Amazon marked as lost in a fulfillment center and never found again. |
| Damaged in warehouse | Units Amazon damaged in a fulfillment center. |
| Refunded, not returned | Orders Amazon refunded where the item never came back. |
| Return damaged by Amazon | Returns that Amazon or its carrier damaged. |
| Inbound shortage | Shipments where Amazon received fewer units than you sent. |
| Removal lost | Removal orders where fewer units reached you than Amazon shipped. |
| FBA fee overcharge | Fulfillment fees charged at a bigger size or weight than your product. |
| Chargeback reversal | Chargebacks with no reversal posted afterward. |
| Disposed without authorization | Units Amazon disposed of without a disposal order from you. |
| Returned, not restocked | Sellable returns that never went back into stock. |
| Underpaid reimbursement | Reimbursements Amazon paid below your cost. |
| Reimbursed, then returned | A heads-up when Amazon paid for a return that later arrived. |
Download the sourcing-cost file
Amazon pays many losses automatically, valued at the sourcing cost you give it in Seller Central. To help those automatic payments match your real cost, download a sourcing-cost file and upload it on Seller Central → Manage Your Sourcing Cost.
- On the Recovery home, click Settings.
- Choose the Amazon account, if you have more than one.
- Under Sourcing-cost file for Amazon, click Download sourcing-cost file.
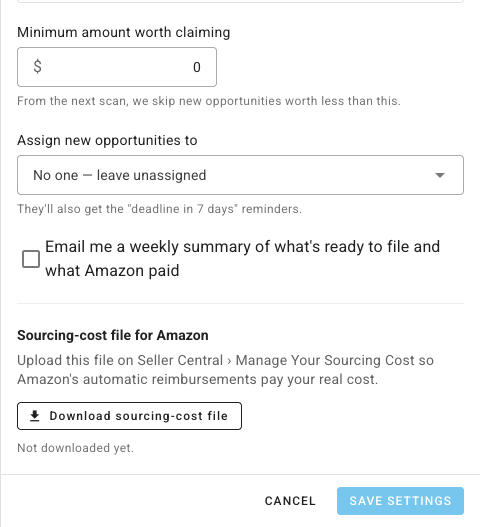
The file is a CSV, named with the date you downloaded it. It has one row per FBA seller SKU that's linked to a product in SKU.io:
| Column | Required | Format | Notes |
|---|---|---|---|
sku | Yes | Text | Your Amazon seller SKU, exactly as Amazon knows it. Each seller SKU appears once, even if you sell it in several marketplaces. |
cost | Yes | Number, 2 decimals, no currency symbol | Your cost per unit: the average cost of the units you have on hand, or your latest cost when you have none on hand. |
currency | Yes | Three-letter currency code, such as USD | The currency of the Amazon account's main marketplace. |
Some SKUs are left out:
- A seller SKU that SKU.io can't find a cost for. After the download, the settings drawer shows how many products are in the file and how many were skipped because they have no cost yet. Add a cost to those products and download the file again.
- A seller SKU that's linked to more than one product, because SKU.io can't tell which cost applies.
Amazon provides its own template on the Manage Your Sourcing Cost page. If its column headers
differ from sku, cost and currency, rename them before you upload. The settings drawer shows
when you last downloaded the file; download it again whenever your costs change.
Next steps
Video transcript
To see the money you're owed by Amazon, start from the sidebar, under Apps and Integrations. Under Quick Access, pick the sales channel whose claims you want to check. At the top of its page, click FBA. In the row of FBA tabs, click Recovery. It's one place for every claim, from finding it to getting paid. The Recovery home shows what you're owed, in plain numbers. Owed to you counts the cases that are ready to file. Waiting on Amazon is money you've already claimed. Recovered this year is what has been paid for your cases. Amazon paid automatically covers payments Amazon made on its own, with no case needed. Below, the strip follows each case from Found to Paid. To file the cases that are ready, click Start filing session. You work through each ready case, most urgent first. The header shows the amount and how many days are left to file. Why we think Amazon owes you explains the case in one sentence, with the math. Click Show the evidence to see the numbers behind the claim. Below the evidence, your case text is already drafted, in the Detailed version. Written by AI means it uses only the facts under Facts used. Switch to Concise for a shorter text, or click Regenerate for a fresh draft. Any edits you make are saved automatically. The text offers Amazon the evidence file SKU.io prepares. Check the box under the text if you'll attach that file, and the text says it's attached. Filing always takes the same three steps. First, click Copy the case text. Step two links straight to the right Seller Central form. The yellow box tells you exactly which options to choose. Paste the case text there. Then download the file under Attach this file, and attach it to your case. If Amazon asks for more, the box below lists what they may want. After you submit, Seller Central shows a case ID. Paste that ID into the box under Paste Amazon's case ID, in step three. A partial ID won't save, so copy all of the digits. When the ID is in, click Save and next case. The case moves to Waiting on Amazon, and the next case opens. Skip for now keeps a case in your queue for later. Not claimable dismisses a case, with a reason you choose. Click Exit session whenever you like, and your filed cases stay saved. All opportunities lists every case, most urgent first, with its details in a side pane. Use the stage chips and filters to narrow the list. Keyboard shortcuts move between cases and copy the case text. To share the work, tick each case you want a teammate to handle instead. Then click Assign, in the bar above the list. The dialog shows how many open cases each person already has. Choose a teammate, and the cases move to their list. Assignees get a reminder before a deadline passes. When Amazon pays, the payment is matched to your case automatically. Turn on the Paid stage, and the cases Amazon has paid join the list. Scroll down and select a case marked Paid in part. It shows what Amazon paid, and how much is still owed. A reply asking for the rest is already written. Reply on the case in Seller Central, then click I've sent the reply. The Amazon payments tab lists every reimbursement Amazon has paid. Automatic means Amazon paid without a case, so it needs no action. To find payments below your cost, open the cost filter and choose Underpaid. Each flagged payment links to a case asking for the difference. To tune what Recovery looks for, go back to the Home tab first. Then click Settings, at the top of the page. Turn off any category that doesn't apply to how you use FBA. Set a minimum amount worth claiming, and who gets new opportunities. You can also get a weekly summary by email. At the bottom, download a sourcing-cost file for Seller Central. It helps automatic reimbursements pay your real cost.